
Want to create a fabric collage quilt but aren’t sure which subject to choose? In today’s post—the second in our summer-long series of fabric collage how-to posts—amid my hints and tips for choosing a subject, I turn over the recommendations to my students from my October 2018 Portland, Maine, Quilt Retreat.
During that class I asked my students why they chose the subjects they did. Often they had a personal connection to the subject. Other times they chose for aesthetic reasons—colors, shapes, and so on. Linda Anderson wanted her piece to be lighthearted so she chose to make two purple hippos (above, in progress). Watch these recordings and see which explanation resonates with you. Is it the family dog, your favorite animal, or some other connection?
Sometimes these students also talk about the drawbacks of the choice they made, which is information that can be equally useful in your quest to choose a subject.
Here are the links to the Fabric Collage Summer Special posts in this series so far.
Susan Carlson Fabric Collage Throwback Thursday Summer Special—1 of 14: Choosing a Photo
Susan Carlson Fabric Collage Throwback Thursday Summer Special—5 of 14: Creating a Fabric Palette
Susan Carlson Fabric Collage Throwback Thursday Summer Special—6 of 14: Sequence
Susan Carlson Fabric Collage Throwback Thursday Summer Special—7 of 14: Sequence in Portraits
Susan Carlson Fabric Collage Throwback Thursday Summer Special—8 of 14: Using Sheers in Sequence
To dive a bit deeper, the information in this series has been gathered, reorganized and expanded upon in our online learning resource the Fabric Collage Master Class. For more information about the Master Class, click the button below.
Choosing Your Subject for Fabric Collage—Revisited
Tom here. Susan is away teaching and she left me in charge. We’ll find out whether that was a good idea or not!
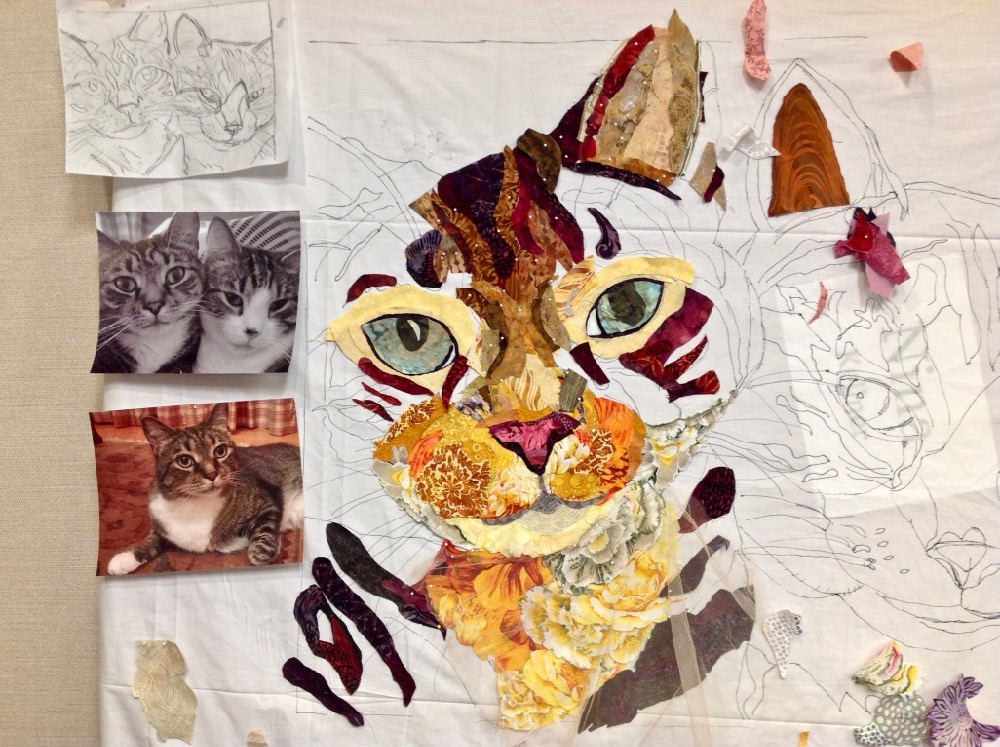
Until recently, I had watched Susan teach only in brief snatches here and there. For example, I spent some time in Susan’s October 2018 Portland, Maine Quilt Retreat recording students as they talked about how they chose their subjects. (Nina Kellner’s in-progress cat from that class is featured above. Be sure to check out the fabulous finished quilt, “Brothers, ” in this Finish Line post!)
However, during Susan’s Live Online Classes I’ve had a chance to watch her in action for days at a time, observing how she teaches and how she adapts her style to individual students.
Choosing an appropriate subject for their collage is one of the very first choices a student has to make. During the recent Live Online Classes Susan was able meet individually with each student before class and help guide them toward or away from particular subjects. Susan never outright vetoes a subject. However, she does point out the advantages or disadvantages of one subject over another. If a student insists on choosing a subject Susan thinks will be challenging, she often will ask them to choose an second, fallback subject—just in case. Then she encourages and instructs in exactly the same way as she usually does, with the same patience and eye for detail.
And she never says, “I told you so” if a student struggles, or even gives in and decides to move to Plan B.
Watching her guide these women, it brought to mind this post written more than two years ago. Susan has been giving lots of homework to her Live Online Class students, including making membership in the Fabric Collage Master Class a prerequisite. This post ought to be one of the first her students, or any fabric collage artist, should read.
Choosing Your Subject for Fabric Collage
(Original Post—published on November 10, 2018)
What makes a good subject for fabric collage?
Since virtually any image can be recreated using this process, that’s not really a helpful question to ask.
Instead, speaking as a teacher of fabric collage, the question ought to be: Based on my experience, what makes a good subject for fabric collage?
If you are a beginner the answer is going to be different than if you have a lot of experience. Some subjects are great for beginners, others not so much. But as a beginner, how are you to know?
Hopefully, I can help you out in this blog post. In a classroom situation, believe me, the effort to help select a good subject is in my own self interest, as choosing a difficult subject can lead to a challenging class for both the student and me!
I have talked about how to choose a photo for fabric collage in “From Photo to Fabric: Choose the Best Shot.” While it’s important to consider the photographic criteria mentioned in that post—value, contrast, focus, composition, and so on—it would also be helpful to set some (flexible) guidelines on how to choose your subject.
Throughout this post I have sprinkled videos of students from my October 2018 Portland, Maine Quilt Retreat. Thank you for sharing, ladies! Each talks about the subject that she chose, and whether it was a good choice (Spoiler alert: Most of them were happy with their choices). Their experience may help you choose a subject for your first (or next) fabric collage quilt.
Linda Anderson is a good example of someone who chose a subject that for her was low-stress and playful. I used a close-up of her hippo collage as the opening photo for this blog post.
Nothing Is Impossible, But…
You might have this photo you really want to do. It’s a family portrait. Or a full-body shot of a beloved Labrador retriever. Or a blurry photo of the family homestead in Nebraska. It’s not that it can’t be done, just maybe it shouldn’t be done as a first project. If you try something difficult to begin with, you could be setting yourself up for frustration, and you might not be satisfied with the end result. That might cause you to give up on fabric collage altogether, which is an outcome we want to prevent!
One thing I’ve noticed is that students are getting more ambitious with their subject matter than they used to be. Looking back at my previous “On the Road” and “Finish Line” blog posts and all the successful quilts done in my past classes, maybe I’ve given people a misleading sense of what to expect from a first class. In general, expectations run high and there’s work involved to make those expectations manageable for each individual.
What readers don’t see, and what I don’t usually talk about, are all the extra hours students put in, sometimes working until late at night after class. It may be a five day class, but the results show many more hours than the 6-hour class time. I also don’t emphasize the tears and the frustrated sighs that are not uncommon. People frequently go off and have drinks in the evening to de-stress. Yes, there are people who are able to jump into something more complicated, but the best results usually are achieved by those who keep it simple to start.
The point I want to make here is that while no subject would be impossible to do in fabric collage, there are some that are better choices based on your experience.
Kathi Allen said she was going to “throw caution to the wind” as far as her color choices went. Once I knew that, it helped me to direct her. I knew she was willing to take a more lighthearted approach rather than a serious approach.
Christy Beard has an affinity for birds. Some make good subjects, some according to Christy are more challenging.
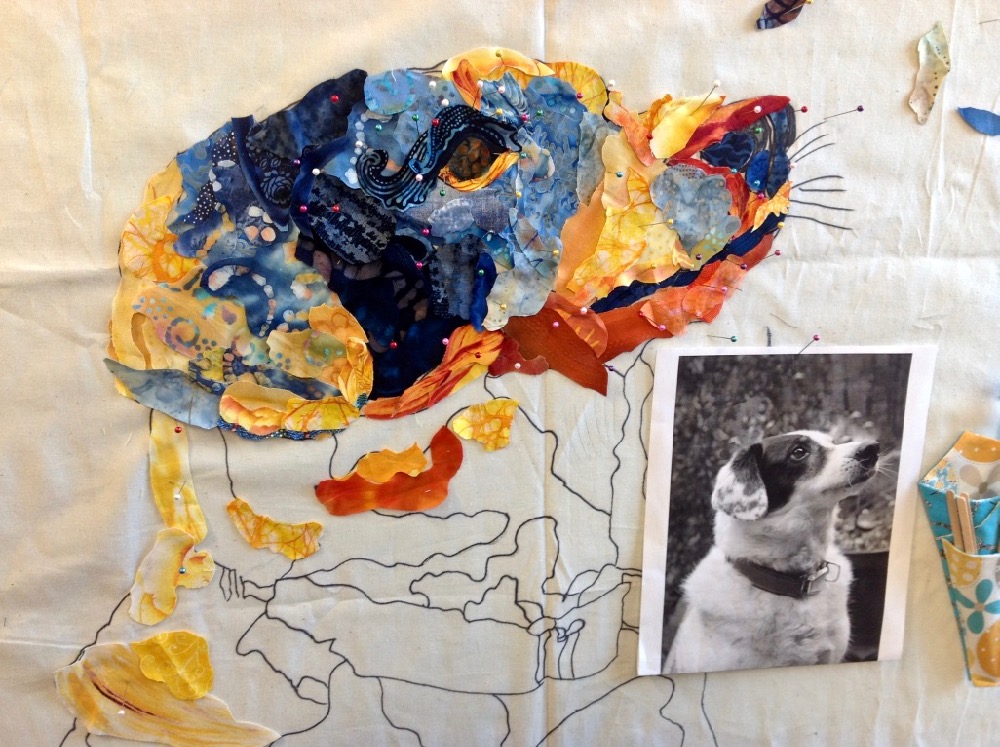
Pets are a popular subject in class. The personal nature of the images can work two ways. The connection to the subject can help to inspire a person to persevere, as in the case of Amanda Graham, or it can place pressure on the student to capture the personality of a beloved pet, as Nina Kellner describes.
Guidelines
“The [pirate] code is more what you’d call ‘guidelines’ than actual rules.” —Captain Barbosa, “Pirates of the Caribbean”
I hate to make hard and fast rules. It’s against everything I believe in as an artist. However, I think I need to overcome my hesitancy and at least provide some guidelines. I’ll start with the things to avoid, then suggest some good subjects based on experience level.
Avoid
There are always exceptions but here are some subjects that tend give my students fits and that you might want to avoid, at least to start:
Full length figures: Unless they are life-sized, it would make a face small in proportion, making it tough to create in fabric. And clothing with all its edges and folds can be a chore to recreate.
Multiple people: Creating a portrait is hard. Now multiply that by 2 or 3 or more. You get the picture.
Black dogs: Or white dogs. Or any monochromatic animal, really. Variation in color or lightness and darkness (value) gives form to shapes. Unless the lighting is just right, a black dog is just that—black—making it difficult to define its form.
Very thin subjects: Long necked birds, snakes, dragonflies, and so on. When your subject is very narrow, there’s not much space to play with fabric, and that’s really what fabric collage is all about. A way around that is a willingness to make the design BIG.
Landscapes or still lifes: Yes, they can be done and done well. But creating a stand of trees, a field of grasses, a rocky mountainside, or vase of flowers can be repetitive and potentially uninspiring to the creator.
Never say never. Julie Peterson’s tractor is an example of a still-life within a landscape, both of which I tend to guide people away from. Her piece is, as they say, the exception that proves the rule.
Good Subjects
Beginners: Choose a subject that you can have fun with, something that you are willing to create as a playful fabric interpretation rather than a realistic interpretation. Animals can be a good start, but make it a close-up. A close-up of a face of any sort can be easily enlarged to a workable size. A good rule of thumb is to make it life size, or larger, which may mean you should crop it tight in order to make it more manageable. If you want to make a life-size portrait of your husky for example, you could concentrate on the head and face rather than the whole four foot long body.
For a beginner (or anyone) who wishes to take a more lighthearted approach to fabric collage, I’ve made designs available on my website such as: fish, bugs, butterflies, a stylized sea turtle, and sun and moon face motifs (especially if you want to work toward a portrait). Any of these work well.
Intermediate: Full Bodies of animals, moving into realism, if desired. People faces based on good photos.
Advanced: Similar subjects to above but with further elements, including portraits with multiple people or with hands or more of the body. You might even be tempted to use a photo of your subject that might not be ideal, where you have to imagine highlights and shadows, or complete and fill in what can’t be seen in the photo.
Vickie Ostrow based her quilt on a pattern from my book, Serendipity Quilts. Using a pattern selected from the ones on my website is a great choice for a first fabric collage quilt.
Sometimes when students choose a subject that has personal meaning to them, it increases the pressure on them to succeed. Bonnie Dinsmore’s blue crab had personal meaning for her, but she took a low-pressure attitude that helped her to have fun.
Dawn Erikson went outside of her normal color range to create her dog Nellie. Sometimes it’s easier to use non-realistic colors, which helps students to avoid the expectation of making their image “realistic.”
Use a Small Section—Then Go Big
Ask yourself: What’s the focus? What’s important?
Then cut out unnecessary background and distracting elements. Just because it’s in the photo doesn’t mean you have to include it. If there are hands in the photo and this is your first fabric collage quilt, consider cropping them out. Simplify, simplify, simplify—not only will it make your work easier, it will focus your work on what’s really important to the image.
Other artists, such as photographers and painters do it all the time. In fact, some might say that simplifying and focusing our attention on a particular subject or idea is exactly the artist’s job.
For example when I made this quilt of my son and niece for my parents I cropped out the hands. They weren’t important to the image. In fact they distracted from the main part of the image, and it made my job SO much easier not to include them.


Why do extra work if it’s not important? Put your work into what really counts. Cropping is your friend.
Once you have your image simplified, now go big. A bigger image is easier to work on. It makes the shapes within the image larger, which promotes the use of more pieces of fabric, which will make the fabric collage more interesting. More is better, as I say.
How big should you go? Subject matter will define how big you need to go. For example a crane or heron needs to be quite large (maybe five feet tall) in order for the skinny head to be big enough to work on. Start with the smallest detail you want to capture and imagine recreating it in fabric. How big would it need to be? Consider an eye of a person’s face—life sized is not that big—bigger would definitely be easier. When you’ve figured out how big that element needs to be, then you can do the math (or use an proportion wheel) to figure out how much the overall image should be enlarged for its final size.
As I talk about Alice Magorian’s great blue heron, notice how big it is compared to all five-foot-four of me. It’s a good example of needing to go big in order for the details such as the head to be large enough to work on.
Start Simple, End Happy
So there you go, some guidelines for choosing the subject of your fabric collage quilt based on your experience level. Basically I can sum it up by encouraging you to start simple before moving on to more complex subject matter. I started out making simple fish, bugs, and butterflies. I made hundreds of them before I tackled the harder stuff.
In my Fabric Collage Online Master Class the exercise I start people off with is a spiral. This simple exercise teaches cutting and gluing in an easy and relatively quick way. Students who do the Master Class and later take a class in person with me often note that the spiral really helped them progress. I am of course gratified to hear that, as I plan to spend more time and effort updating the Master Class Manual. This update will be free to any who have bought or will buy the Master Class.
In your fabric collage journey, try to resist the urge to begin with something overly complex. Simpler images will make the creative process more fun, therefore more enticing to do more, and the more you do, the more you’ll learn and the better you’ll get.
Fabric Collage Master Class
For instructions on the entire fabric collage process, you can purchase the Susan Carlson Fabric Collage Online Master Class. Using video, photos, and text I take you from soup to nuts, beginning to end in creating your own fabric collage masterpiece.
Susan’s Fabric Collage Class Schedule
July 2026: 5-Day Live Online Fabric Collage Class via Zoom!
REGISTER HERE and attend from your own home
July 13-17, 2026
More about my 5-Day Online Fabric Collage Classes
From past online student, Sylvie Aguilar:
When the on-line classes started, I hesitated before signing up. Not being a very tech savvy person, it scared me. I also thought it would be a very long zoom day. After procrastinating for a couple weeks, thinking I didn’t know enough about collage, with my daughter’s encouragement I signed up. That was the best decision I made! What a fantastic class. I learned so much more than anticipated. Susan and her husband Tom, are a great team, and so generous with their time and knowledge. From day one, they made us feel at home. It was like we were all part of a collage artist family. It was so comforting to feel part of a community of fabric artists that understood you and got excited about the same things you did.
September 2026: Susan Carlson Fabric Collage in Bar Harbor, Maine 2026
A week-long class on the doorstep of the breathtaking Acadia National Park, Bar Harbor, Maine
September 14, 2026 – September 18, 2026
FOR MORE INFORMATION
April 2027: Strada Toscana—Serendipitous Fabric Collage with Susan Carlson
A week of fabric collage and cultural field trips in the Tuscany Region of Italy
April 18-23, 2027
FOR MORE INFORMATION
September 2027: Woodland Ridge Retreat—Fabric Images
Five days of fabric collage in this cozy retreat in Downsville, WI
September 21-25, 2027
FOR MORE INFORMATION
Susan Carlson Ongoing Open Studio Hours
Weekly Fabric Collage Coaching
1/2 hour time slots, $65 each
One afternoon a week, I’ll be available to help, encourage, and coach anyone who needs it—between the hours of 1pm-4pm Eastern Time (for instance, this would be between 10am-1pm Pacific Time).
Coaching could be to continue working on an in-progress collage, or to begin a new project—whatever is desired.
Sign-up can be for one day or multiple days—every week, every two weeks, once a month or once only. These sessions will be recorded and emailed to you, just as coaching sessions are, so they can be referred to as needed.
Sign up for time slots here
Please note that times are listed in Eastern Time!
Simply click on a slot and type in your name, Tom will bill you before your session.
Please contact Tom ([email protected]) so he can contact you with more instructions.
June 2026 Dates
Tuesday, June 2
Tuesday, June 9
Tuesday, June 23
Tuesday, June 30
If you are interested in this sort of coaching but Tuesday is not a day that would work for you, just drop us an email and we can figure something out ([email protected]).
From an Open Studio Hours participant who also recently took a class with me:
I can’t recommend enough this new format. I’ve met with Susan three times since our class (once a week) and each session has been inspiring, motivating, and very helpful in terms of defining my path forward (and also creating some accountability relative to that path…). Before each session, I think about what areas I would like to focus on and send off a photo with my questions. In this way, I get from Susan exactly the support I need, plus a video recording to remember it. Meanwhile, preparing for my session helps me make my project a priority so I see ongoing progress, which is gratifying.
Honestly, this was the format I was hoping for. I told Susan I wanted to write a testimonial about it because I was so happy she was offering it. So, if you’re like me and a periodic check-in keeps you learning, growing, and doing your best work, sign up for coaching. Maybe I’ll see you there (you get to listen in on other sessions during the open studio you attend). —LeahGrace Kayler
5 Comments