
Welcome to the third and final post that completes the series covering my May 2021 Live Online Class. Each post has covered one of the three Zoom breakout rooms we used during the class. If you missed the first two, use these links to visit the Zookeepers and the Horseflies.
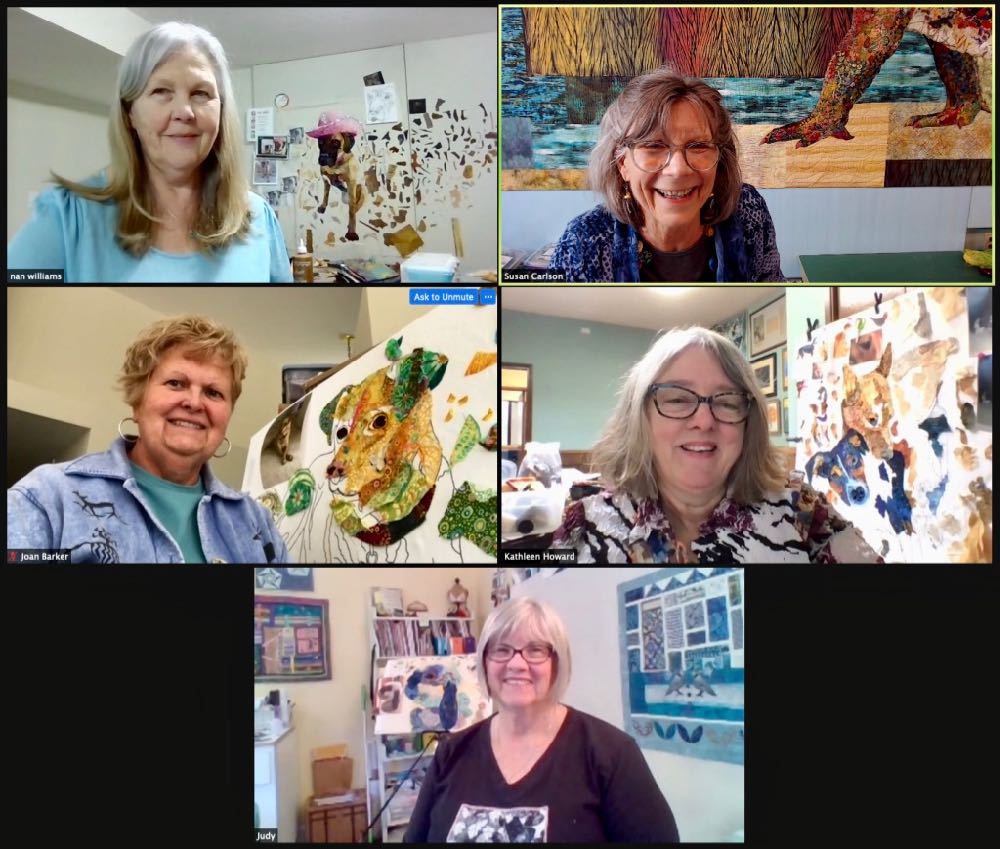
This week we finish up with Three Dogs and a Bunny—a group consisting of: Kathleen Howard, Joan Barker, Nan Williams, and Judy Bilardello (whose fluffy bunny appears above). A final thank you to these four, and all eleven, of my May students for letting us share your work and thoughts!
If online classes are an option for you, I am collecting expressions of interest for a class running in December, January, or February. Let me know by dropping an email to Tom ([email protected]) with the subject heading: “Expression of Interest: Live Online Class.” We’ll let you know in a separate email, when we’ve firmed up any dates and are getting ready to open general registration.
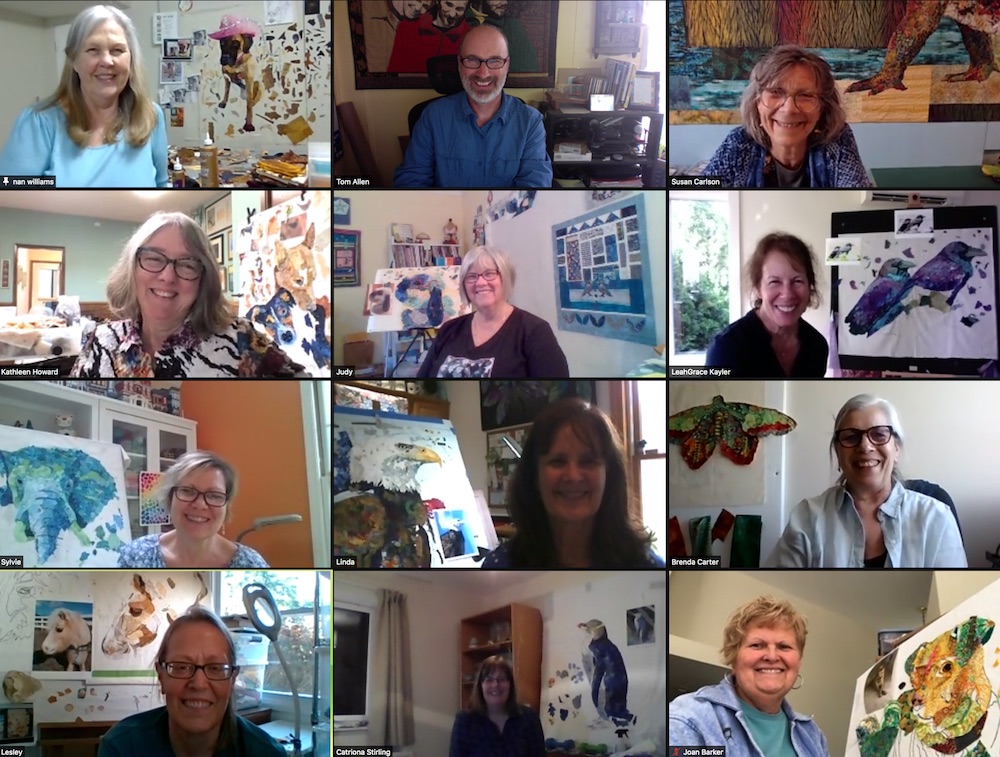
The photo above is all but one of my full class of students. After each morning’s meet up, the class was divided into Zoom breakout rooms. These smaller meetings within the larger meeting allowed my students to socialize while I was working with one of the other groups.
From Nan Williams in Canada:
I thought the breakout rooms were great. It helped you focus on your own work, rather than being distracted by Susan coaching each person in the class. Four people seemed to be a good compromise number, where it felt as if you were getting some of the social aspects of a class, but weren’t overwhelmed by endless chatter.
What? Quilters chatter? Of course we do, which is why the mute button on Zoom can sometimes come in handy. Tom and I did try to work in a few more social aspects like bringing the entire class back together at the end of class for a short slide show of each day’s accomplishments and a Wednesday night “dinner,” which with taking into account 5 time-zones among this class, dinnertime stretched from afternoon snack in California to (literally) a midnight snack in Scotland. And then at the end of the week wrap-up, Tom adjusted a big light or two onto my 20 foot crocodile quilt, and became the cameraman while I gave a little studio tour along the “working half” of my studio. After five days of my seeing where they worked, they seemed to like seeing where I worked. A nice way to end the week with a great group of lovely ladies.
Three Dogs and a Bunny
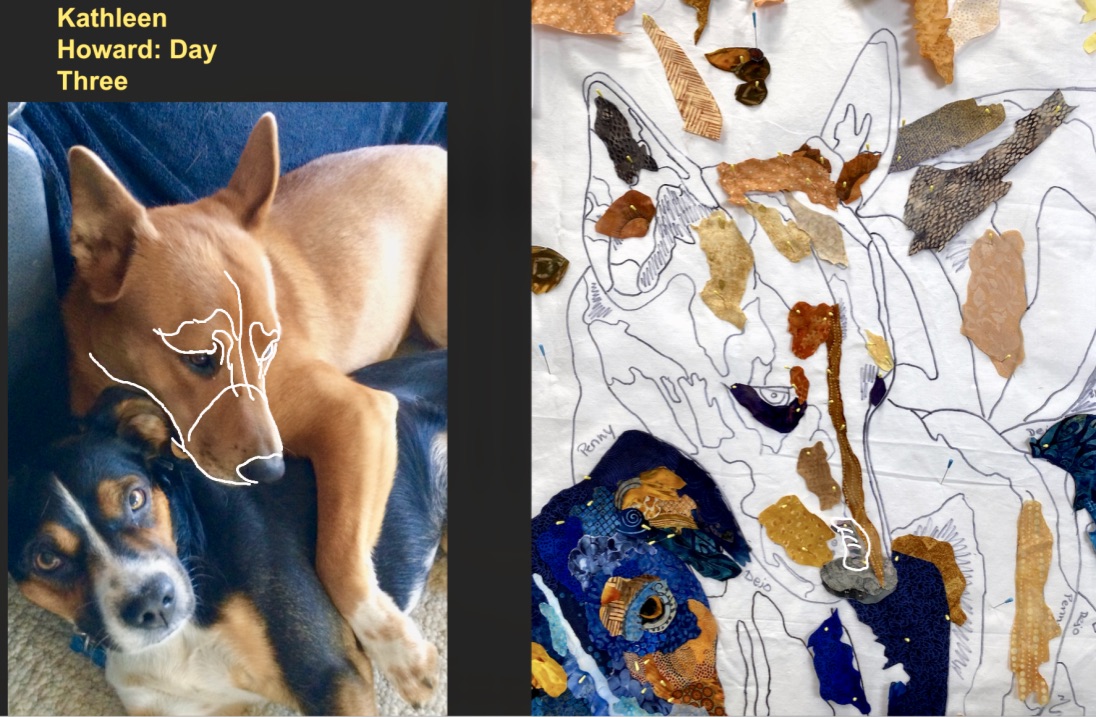
This group’s name was self-explanatory yet somehow it drew howls of laughter from the class as a whole. Maybe it brought to mind that forgotten Eighties movie, “Three Men and a Baby?” My guess is that it’s just so simple and obvious. However, it only took two days before we should have changed the name to “Four Dogs and a Bunny”—Kathleen Howard got started on the second of her pair of dogs—you can see them snuggling behind her in the photo below.
Kathleen Howard—When students choose subjects with multiple animals in them, I typically warn them that they most likely will only be able to make much progress on one. A week isn’t a long time to learn both fabric collage and also complete a pet portrait, let alone TWO pet portraits! But with focusing the first two days on only Dejo’s face (the blue fellow below), and the remainder of the class on Penny’s face (her golden girl), Kathleen was able to get her pups to the stage where I’m confident she will be able to finish both.
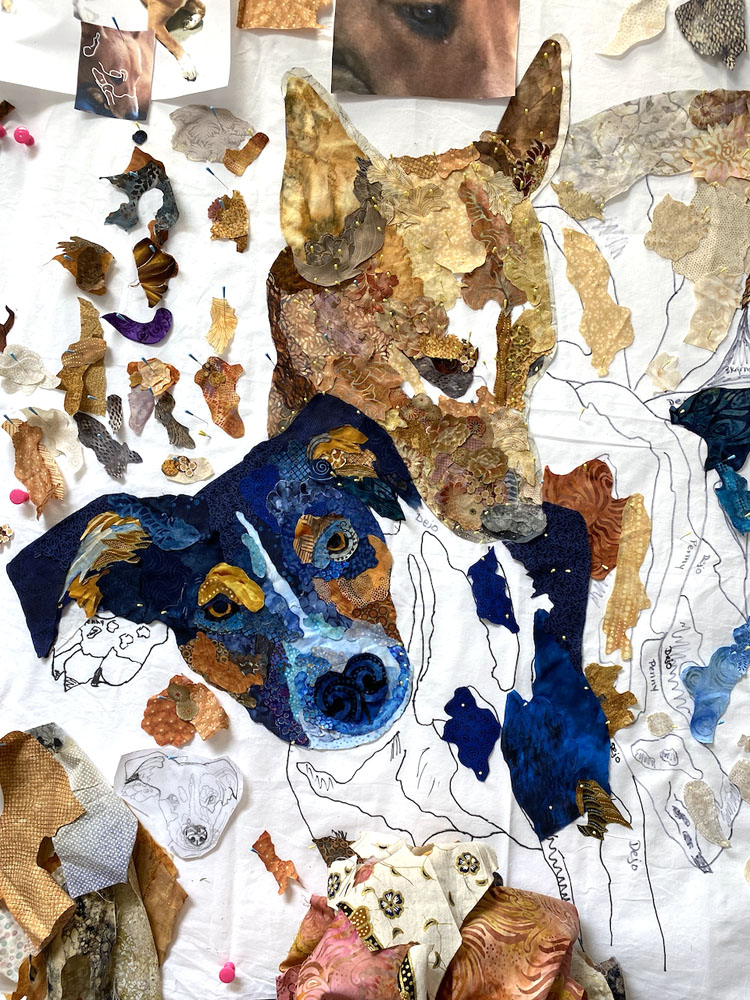


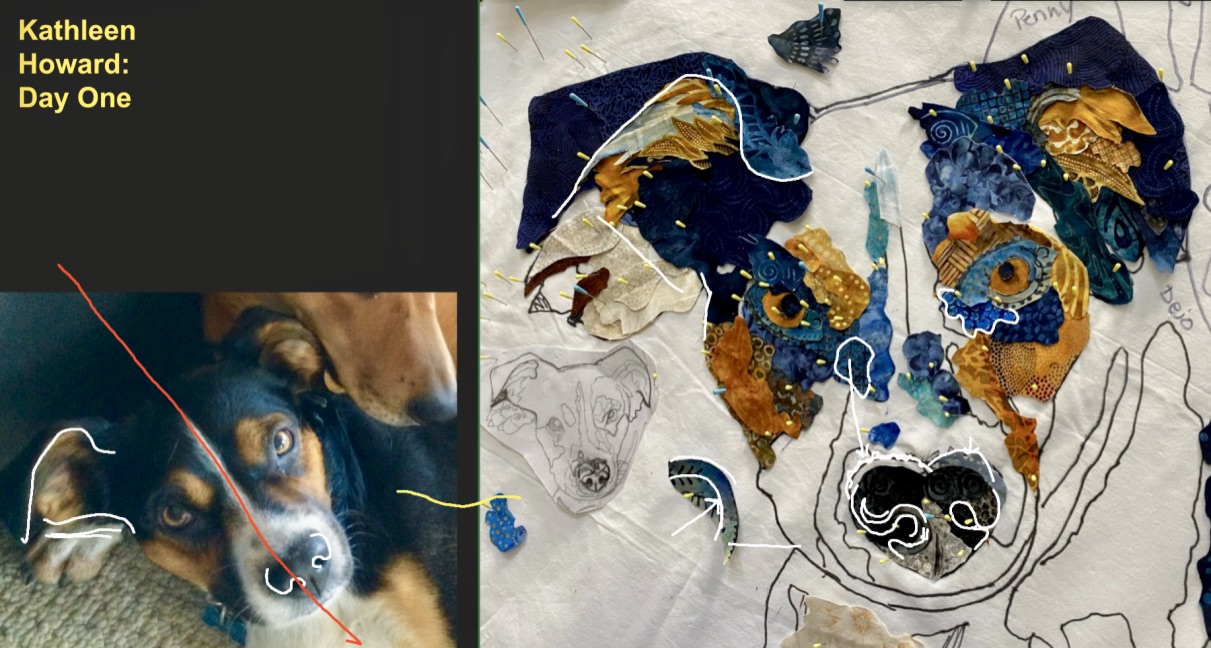
After our pre-class coaching session, Kathleen got a head start on both Penny and Dejo, and arrived at class with her first draft well on its way, see photo above right. I tell everyone to start with the nose, and even though she planned to begin with Dejo’s face, she was also inspired to collage Penny’s nose as well. So on Day One, we talked a little about adding highlights on Dejo’s nose to bring out it’s shape (screenshot below), which in the original photograph, looks remarkably like a heart. Kathleen said it was quite fitting, seeing as this Mexican street dog that her son rescued is such a happy, goofy, and lovable guy.
A reminder that all photos can be seen larger by clicking on them.
On Day Two, Kathleen returned with a brand new nose for Dejo—a fun curly-cued heart nose, below. She had been doing well with the more realistic black and grey version but ran into a wall or two adding details. So she cut her losses, thought outside the box, and went whimsical. I love it. Penny’s nose, however, stayed just as it was.


From Kathleen:
I cannot say I was ever frustrated. I got discouraged on Wednesday, but I kind of expected that because I was starting over with the second dog in my portrait. I knew that two dogs was an ambitious project. I didn’t like the colorway I had planned, and Susan acknowledged that I was “all over the place” [screenshot above] as a perfect description of how I was feeling. Her advice to pick a spot on Penny [start with the nose] and concentrate on that was wise and allowed me to push myself forward.
When I realized the colorway I had planned for Penny dog would not work, I was able to spend an hour raiding all my stash and project bags for fabric. If I had been somewhere else, I think I would have had to leave to find a fabric store. I also spent Wednesday night in my tiny greenhouse overdyeing some fabric I did have that could work with a different tint.
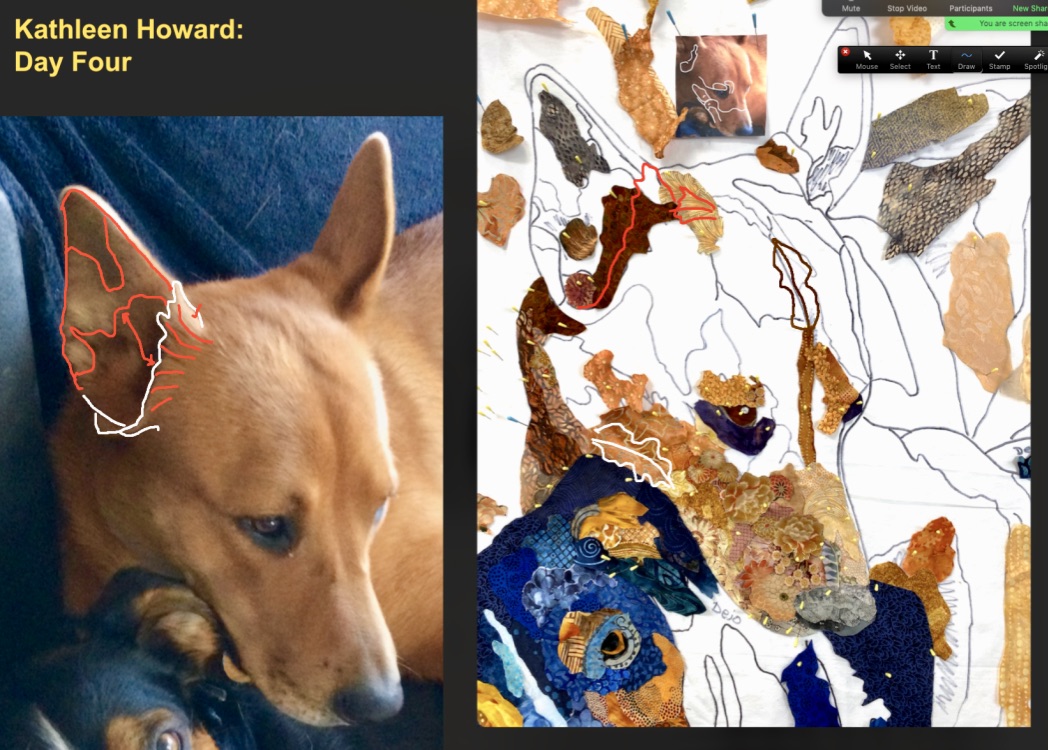
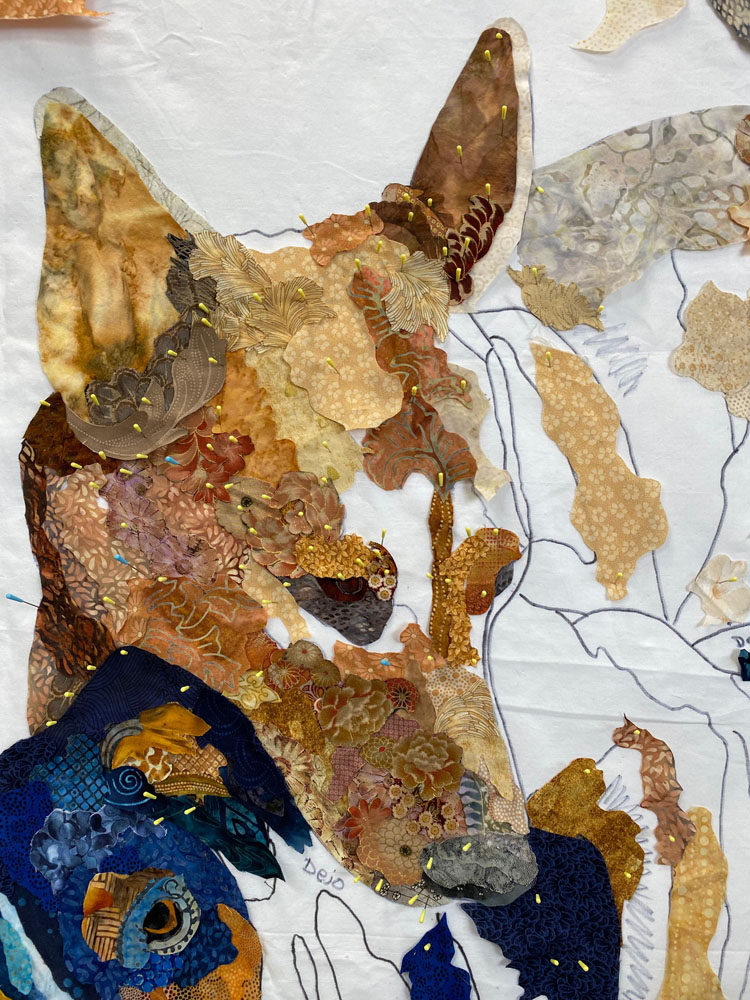
The progress Kathleen made between Days Three and Four was great by focusing on Penny’s nose and moving up her face. We took a look at Penny’s ear and made some annotations (above) to simplify all the lines and shapes she had drawn on her design. She saw what was there, no doubt, but too many lines can be confusing. Plus, places like ears are not the focus of a portrait, so judicious simplification in design and fabric choices in one area, can let other areas, like eyes, stand out—which is what soon happened with Penny’s ear, below.
Kathleen’s fabric palette for Penny is warm and rich and soothing. Along with the cuddling pose of these two, it gives Penny a mothering warmth, part of her personality, Kathleen says. Penny was another abandoned pup, but from California. It was an “instant bond when they met,” Kathleen told us, like they knew each other in a past life. Lucky, lucky dogs, I say.
From Kathleen:
So far, this is the best online class I have ever taken. This class makes smart use of the technology. I appreciated having key information presented in video format that could be accessed prior to the time with the teacher. Many online classes really do lack the personal interaction between student and teacher. I loved that this class emphasized personal interactions with the teacher, and each student was able to progress at their own pace and with a unique, personal project. This was great.
Joan Barker—I could tell right away that Joan is in love with her dog Bailey—he’s her golden boy.
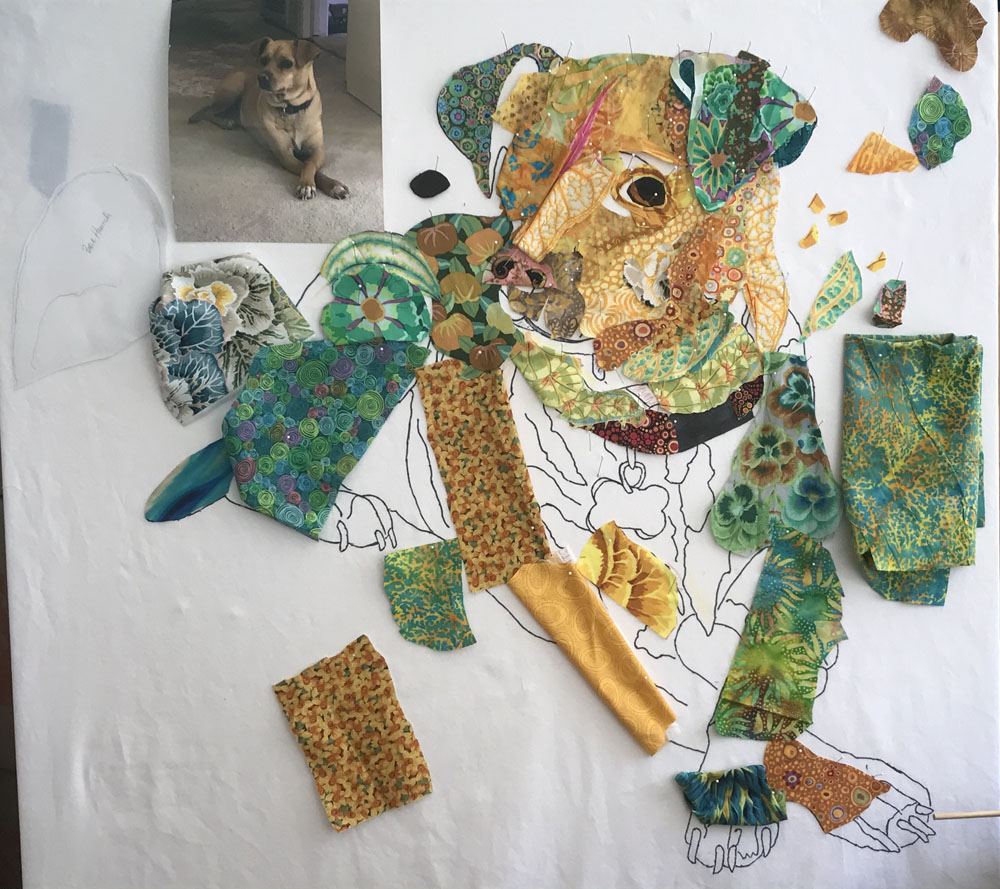
Color was the driving force behind Joan’s fabric decisions, and it was interesting to see how her fabric choices morphed over the course of the week. You can see the ochre yellows and golden browns in the photo, below right, which is where Joan began.


Not too far along in the process, Joan went on a fabric hunt and returned with a bit of a different palette. The two photos below illustrate the transition from the more “serious” browns into the brighter colors, bolder prints, and playfulness of many Kaffe Fasette fabrics. Check out the change in his ear in particular.


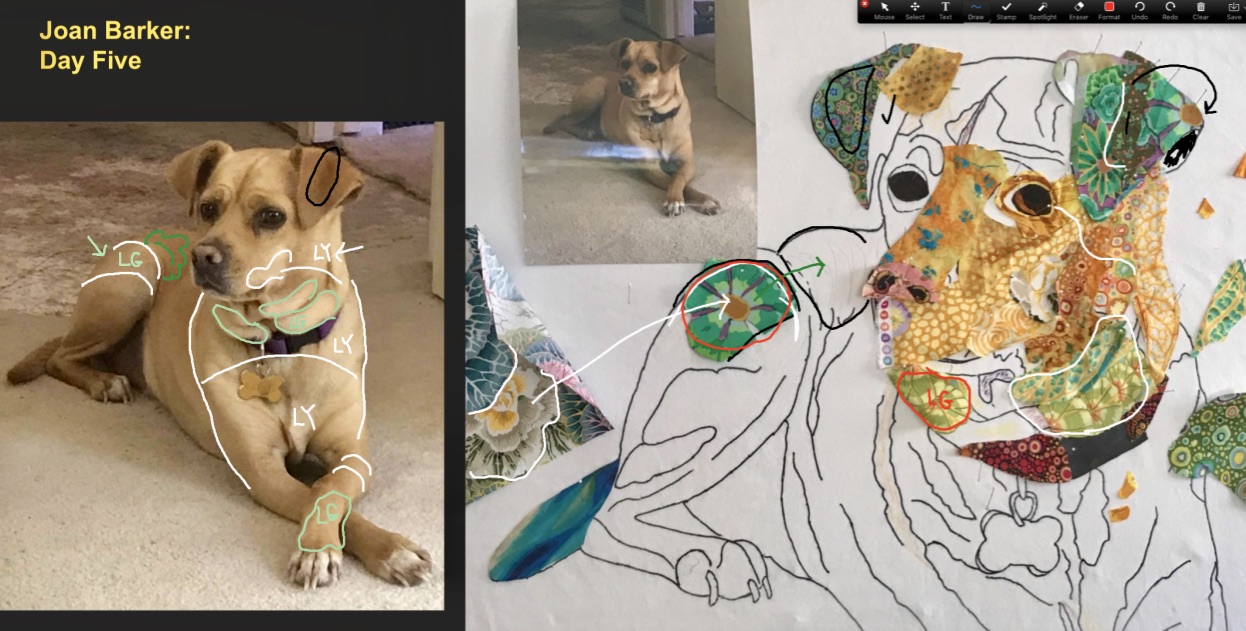
Joan definitely used the prints in her fabrics to her advantage. In the photo below, I particularly liked the way she worked the shadowed area in the center of his left ear, the leaf highlight down the bridge of his nose, and the soft rolls of fur under his neck, created with bands of overlapping flowers—I have that fabric! I look forward to seeing a finished version of Bailey sometime down the road—he already has a golden glow.
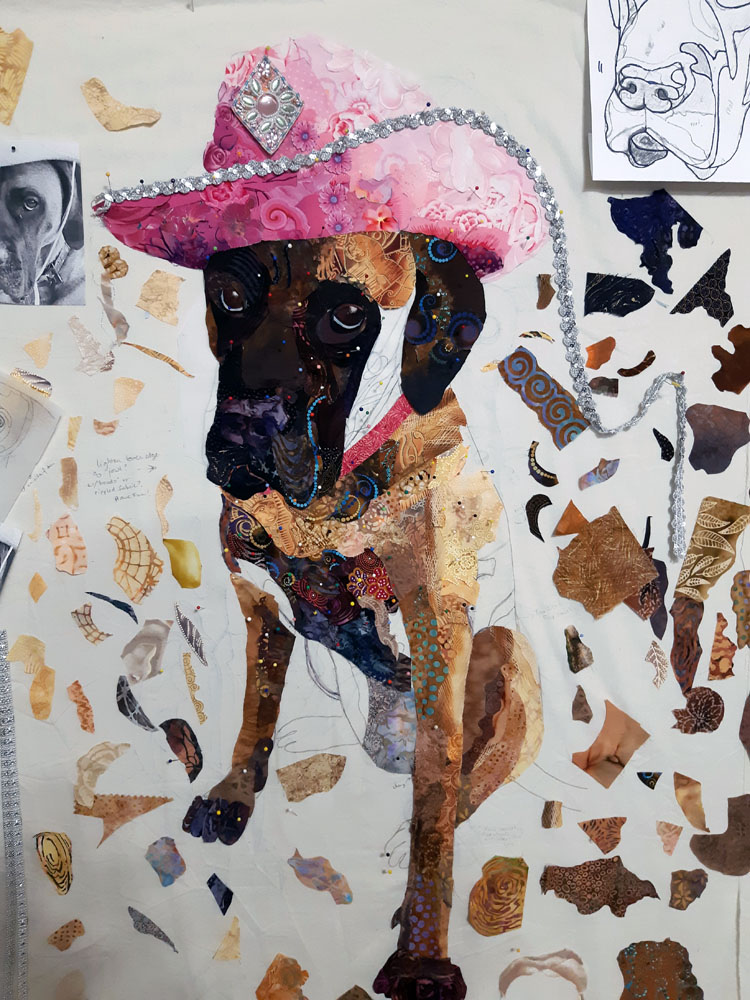
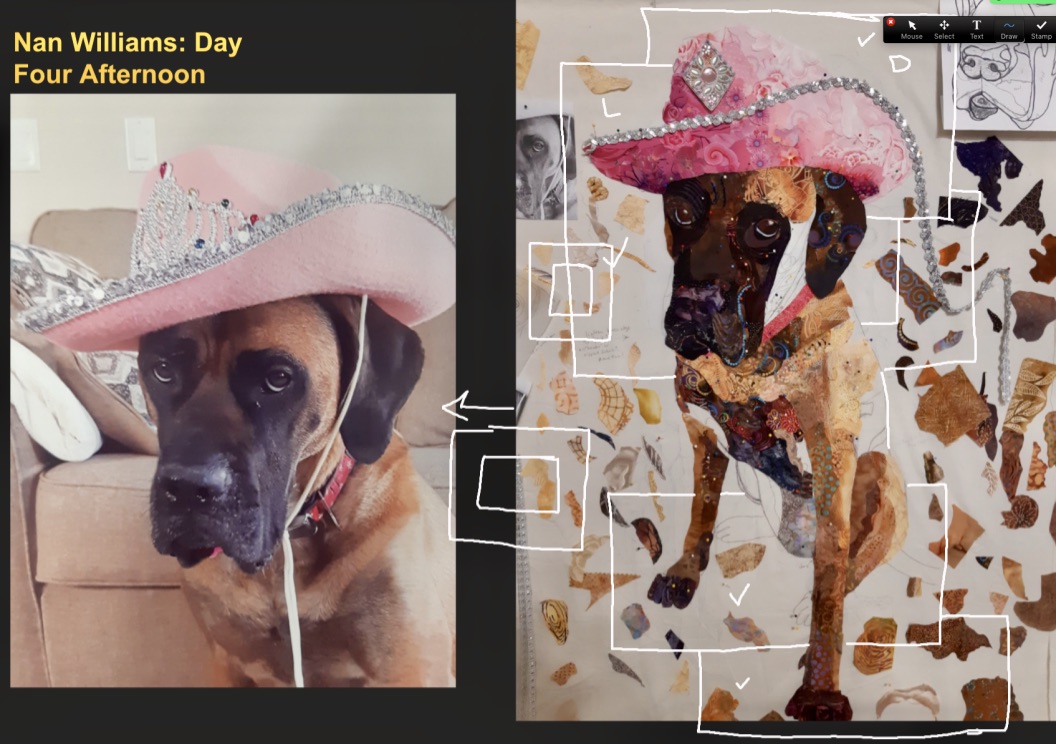
Nan Williams—Nan came to class with an in-progress collage she had started in a 2018 in-person class in Calgary, Alberta, Canada. She told me right away that her “Stampede Princess,” Bella, was no farther along now than when she was packed up three years ago, proving that it’s hard to know how to respond when someone asks, “so how long does it take to make something like this?” Sometimes things do have to sit for awhile until the Muse, or opportunity, returns.
Nan had three areas she wanted to address this time around: Bella’s belly, the side of her face, and background ideas. Fair enough.
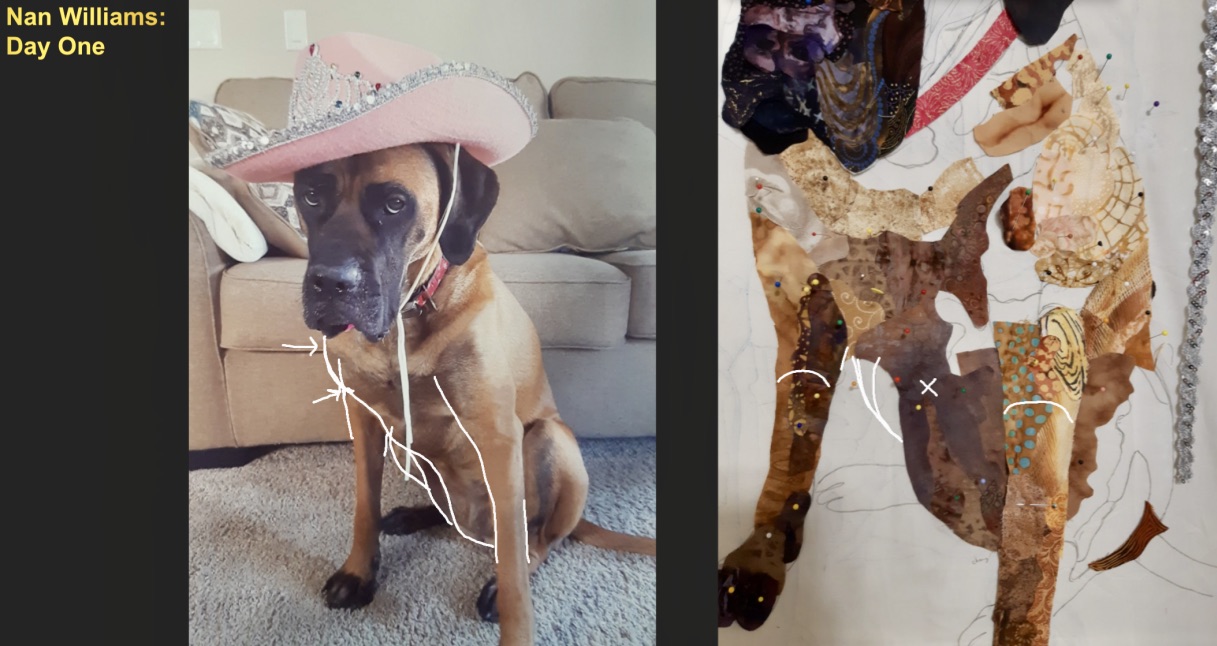
We started with Bella’s underside, trying to sort out the various curves and values from shoulders to floor. We determined that for starters, Bella’s upper chest needed to be broadened to the left and pieced so that her chest went over her right leg—see annotated screenshot above and compare photograph notes and beginning collage, with the changes made in photos below.
Nan took the belly area down to the foundation fabric, and there was the drawing of the nice broad chest overlapping Bella’s right leg, it had just gotten obscured in the flurry of creation years ago. In the process or re-creation, we also brought the line of Bella’s left leg up a little higher towards her shoulder, so that it definitely appears in front of her chest, which is in front of her right leg—which I refer to as sequence. When you look for how one part meets with another, it helps with your understanding of the image, which then helps with the collage. Many times if something just doesn’t look quite right, it’s that lines have gotten a little mixed up and you need to go back and look closely at the source image and drawing.
In the photos below, you can see what a difference that sorting out made. Also, Nan now had a great variegated brown fabric with spirals of multi-colored dots to add to her palette for Bella—much more interesting and fun than the solid-looking fabrics that were there before. Princess Bella had needed some color.


We only got as far as consulting and annotating the uncompleted side of Bella’s face (below), but Nan did such a nice job with the face already, I think she’ll be good to go. She’ll have these drawings to remind her of what we talked about. Again, it was mostly a matter of sorting out the lines in the drawing in comparison to the color values of the dog.


And third, the background. “Stampede Princess” refers to the annual Calgary Stampede. Since I’ve been to Calgary a few times and have friends there as well, I know that this is a horse and cowboy sort of event. So when Nan said she had “stampede fabrics” for the background, I was pretty sure she was talking rodeo novelty fabrics, and I was correct, below.
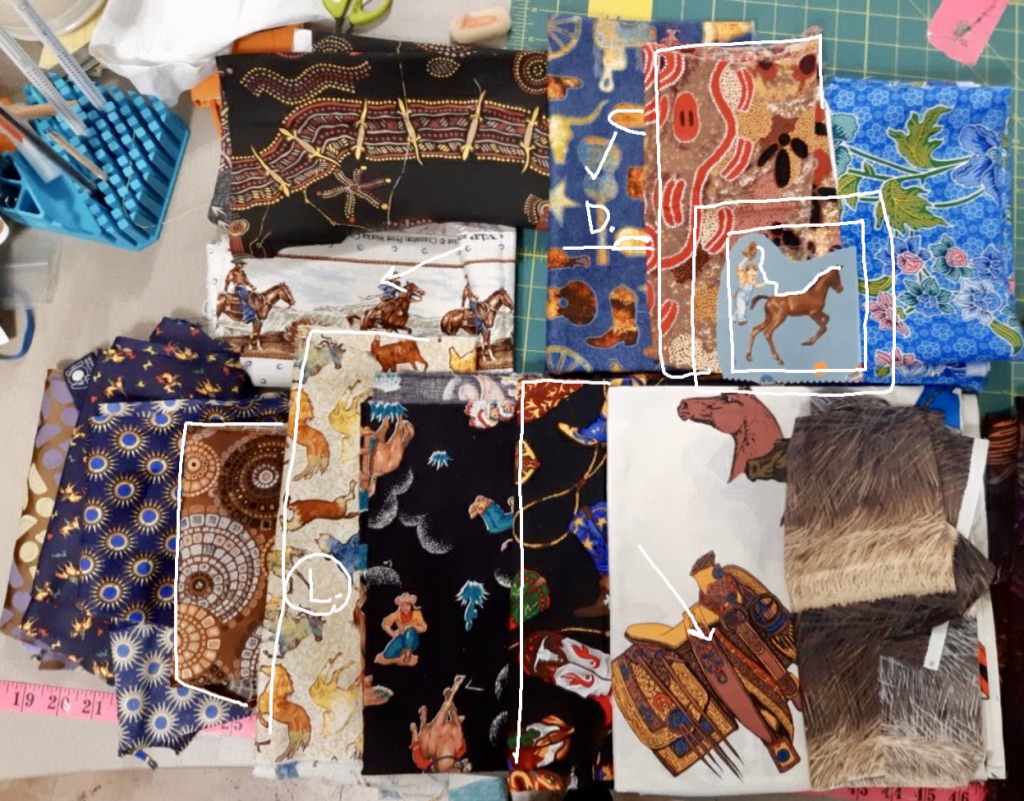
I immediately thought “straight-edged collage” background—a great way to display and even frame those sorts of picture fabrics—kinda like Bella was sitting in a montage of photos or postcards from the Stampede. I was able to visually describe what I meant in the annotated screenshot, below.
From Nan:
In some ways the online class was superior. Having the [pre-recorded] online demos was definitely superior to in-person demos. With 15-20 people in a classroom it is very difficult to see what is being demo’d. In-person, Susan spent a fair bit of time going through each person’s fabric to find the right piece which took time away from learning for yourself. I felt that I learned much more in the online class, but it was also my second class with Susan, so I didn’t have the overwhelmed aspect to deal with.
Judy Bilardello—And finally the Bunny from “Three Dogs and a Bunny.” I met Judy in the second-t0-last in-person class I taught pre-pandemic in November 2019, at Art Quilt Tahoe. You can see her mesmerizing collage of a blue mountain lion in the student slideshow in that AQT On the Road post. Soon enough, you’ll see it again in an upcoming Finish Line post. Judy also lists my book Serendipity Quilts, the Online Master Class, and Live in My Studio presentations, and now this live online class, in her list of fabric collage experiences. Turns out she’s a pleasure to work with no matter what the venue.
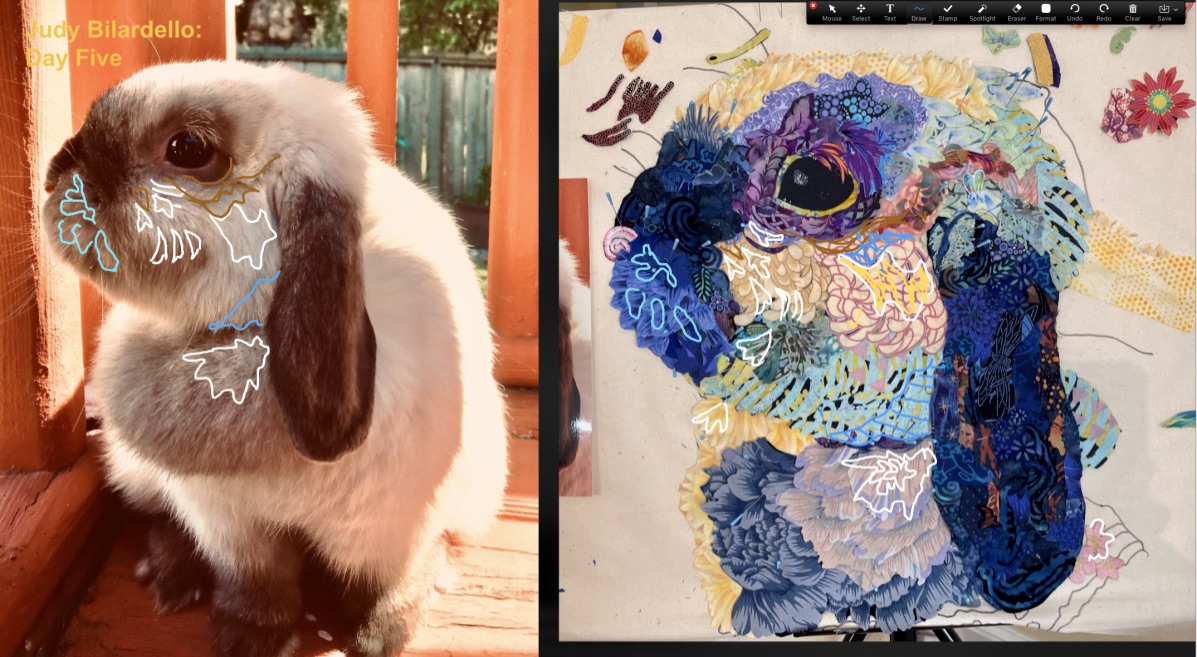
Judy’s bunny is named Ozzy, and his story is actually COVID related. He had been a shared pet between Judy’s grandchildren and another school related family. When the pandemic came along, Ozzy began living with Judy’s family full-time. Judy told us that Ozzy was the best thing to happen all year for her granddaughters who absolutely adore this fellow. So creating his portrait was a given for this online class.


From this angle, Ozzy doesn’t have much of a nose to start with, but the bridge of the nose counts as well, so from there, Judy move quickly and quite successfully to the eye. You can see below, how Judy translated his dark fur parts into blue and purples right off, but then had to audition a few different colors and lighter values to find the ones that worked for his lighter fur areas.


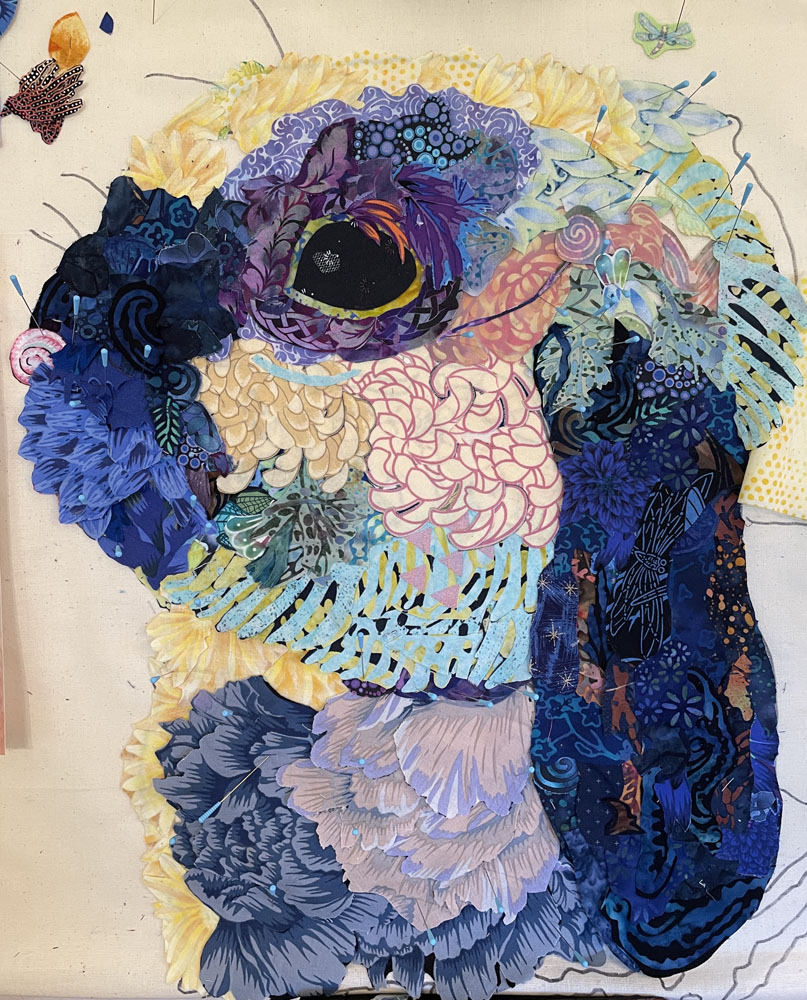
Judy did a great job creating the visual texture of a soft and fluffy bunny with the prints in her fabrics. There’s short and curved petal patterns for his cheeks, spiky tufts on his forehead, a larger leaf print that stands in for the longer hairs that curve around his head and under his chin, and much more. The ear itself is beautifully collaged with such a variety of darker blue prints that blend and flow together. And catch the simplicity of that perfect little pink spiral to represent his nose.
Below is a screenshot of one of our final consultations in class—talking about where to add third draft details, bits and pieces to bring out highlights and create more roundness to Ozzy’s face and body. Speaking of which, at the end, Judy was debating whether to continue the collage to include all of Ozzy’s body as seen in the photograph below. She emailed me recently that Ozzy was now done, though I haven’t seen how he was finished yet. It sound like we’ll have two of Judy’s quilts—mountain lion and bunny—for that future Finish Line blog post, so be sure to look for them.
From Judy:
The tech support and organization of this latest workshop raised the satisfaction factor immensely. Individual pre-class consultations, Master Class and daily topical videos made for thorough understanding of process and procedure. Additionally, personal consultations twice daily with annotations directly on my work and on my animal photograph focused my work time specifically. I was able to know what to do while working independently. Tom’s collecting of photos as we progressed made Susan’s advise and support current. She helped me notice what she sees. I’ll keep working on developing that skill forever!
That’s a wrap of my May 2021 Live Online Class. What a lovely group and what a lot they accomplished in a short time—and they left us feeling so good with their gracious comments. Thank you ladies, all eleven of you. The part I liked was being able to have more options as to how the information and instruction was delivered. Pre-recorded daily demonstrations, pre-class coaching sessions with each student, recordings and screenshots of the annotated feedback all combine to provide lasting and reviewable instruction.
It’s back to in-person classes for a while, starting next week! But like I’ve said, I plan to schedule at least one live online class between December and early next year, so let us know if you’re especially interested in further information as soon as we have it ready. Email Tom ([email protected]) with the subject heading: “Expression of Interest: Live Online Class.”
This “live online” class was wonderful to read about, and it seems Susan and Tom have really got a handle on how to do this! Of course, that’s not surprising. After traveling to one of her classes in Maine, getting to stay home with all my fabric is enticing. The detailed help she gave to each student is helpful as I think about my next fabric collage (another cat piece).