I had 11 fresh and familiar faces in my May 2021 Fabric Collage Live Online Class. After three sessions this spring, I have to say that I am really enjoying this teaching format. From the comments I receive from students, I think they are too. They like having access to their complete stash of fabrics. They like being able to take care of their homes and families and pets while doing something for themselves. They like having a visual record of my annotated feedback in the form of screenshots and videos.
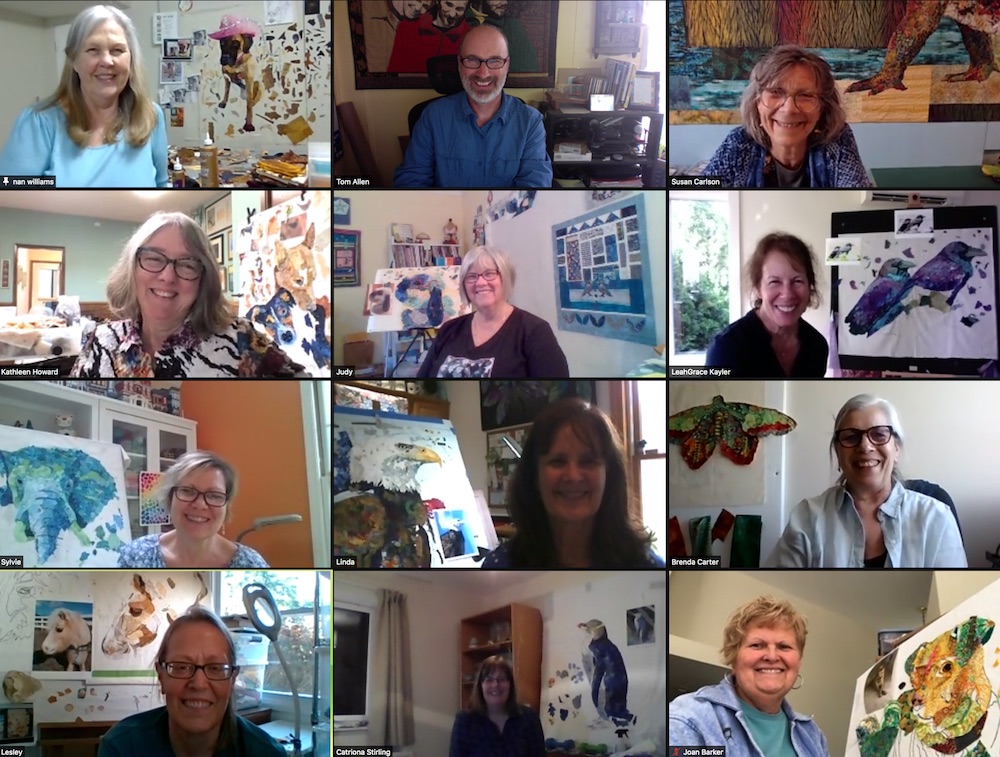
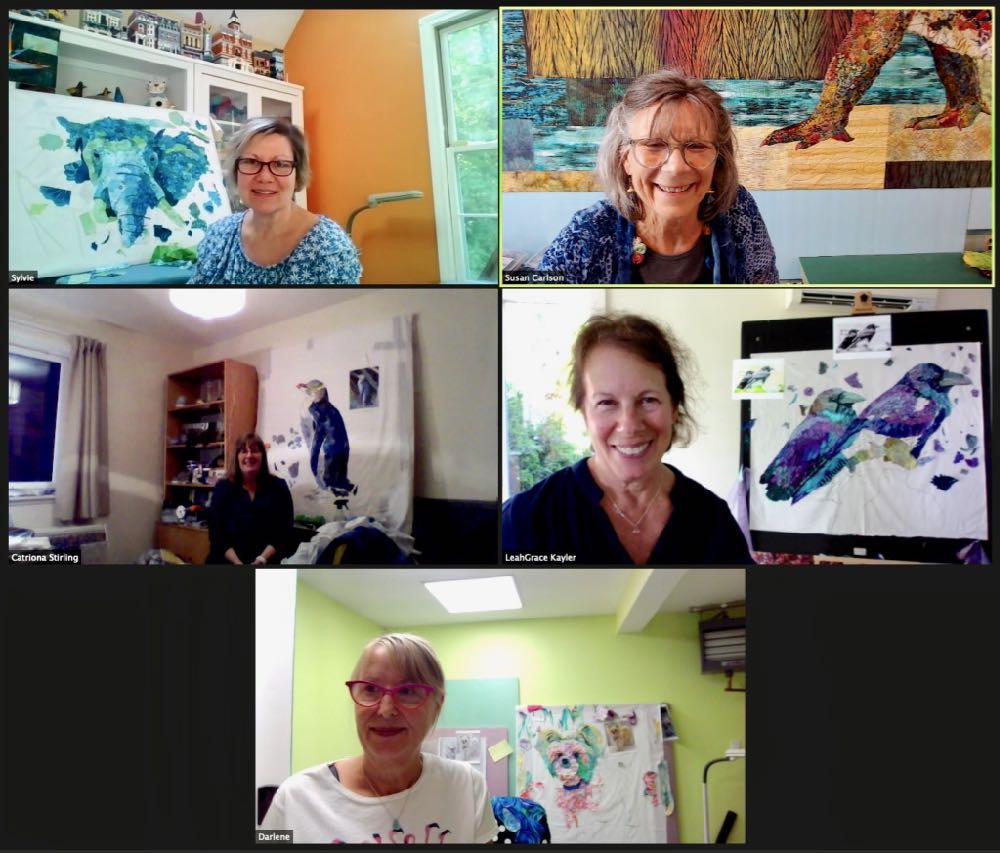
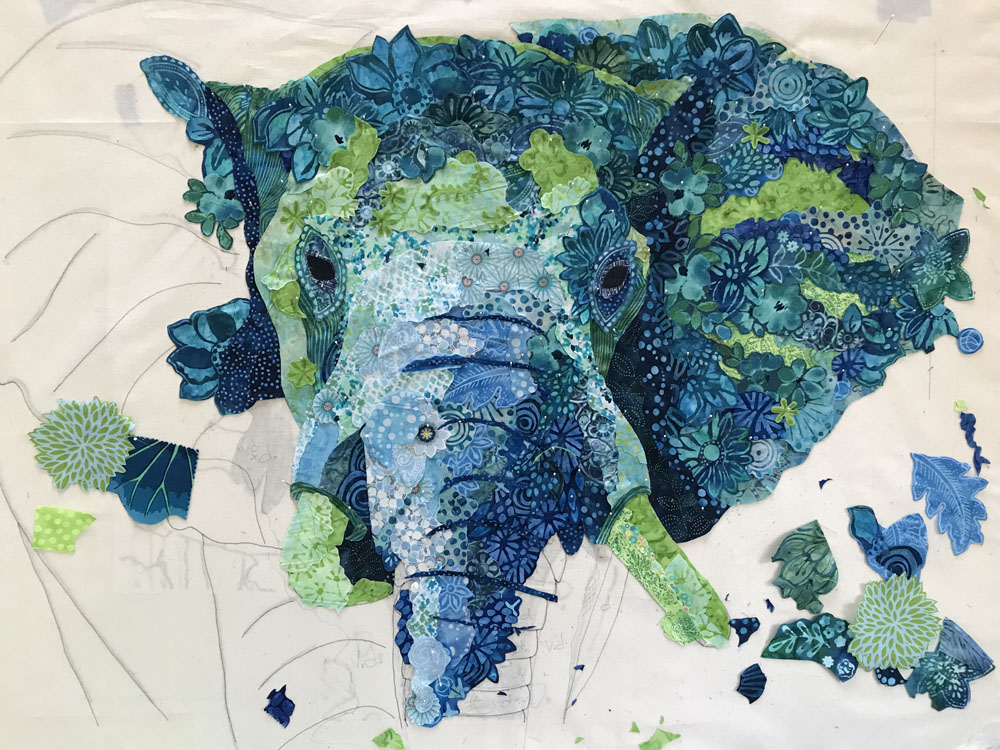
As Tom and I sat down to write this post and the photos and thoughts started flowing, we made the decision to divide the class information into three parts, based on the three breakout rooms we had divided the students into. Today’s post will be focused on the four “Zookeepers” (Sylvie Aguilar’s blue elephantine beauty is pictured above).
If it isn’t clear how a Live Online Class works, please visit the link to my March 2021 Fabric Collage Live Online Class. That post explains the process in detail. You may also like to check out April’s Online Class post.
Next month I get back to in-person teaching, then summer busy-ness descends, then more in-person teaching this fall. I’ve yet to decide when to fit in another Live Online 5-Day Class, but they’ll definitely get worked into my schedule in the future.
If online classes are an option for you, I am collecting expressions of interest for a class running in December, January or February. Let me know by dropping an email to Tom (tom@tomallenbooks.com) with the subject heading: “Expression of Interest: Live Online Class.” We’ll let you know in a separate email, when we’ve firmed up any dates and are getting ready to open general registration.
Now let’s get to today’s main attraction: the first of three groups of fabric collage quilts from last week’s May Online Class! Thank you to my students for letting me share your work.
Zookeepers
In posts recounting my previous online classes, I’ve said how I try to group students into Zoom breakout rooms by subject matter if possible. That doesn’t always work, of course, as is evident by the wide range of creatures in this group—who named themselves the “Zookeepers.”
From Darlene Determan:
Putting us into small groups was brilliant. I was in the Zookeepers, an amazing group of three other women. Having them there provided company and support while I worked. We didn’t talk much, but I could hear them talking softly to themselves, and that helped when I was struggling to stay working, which is a real challenge when I am working alone.
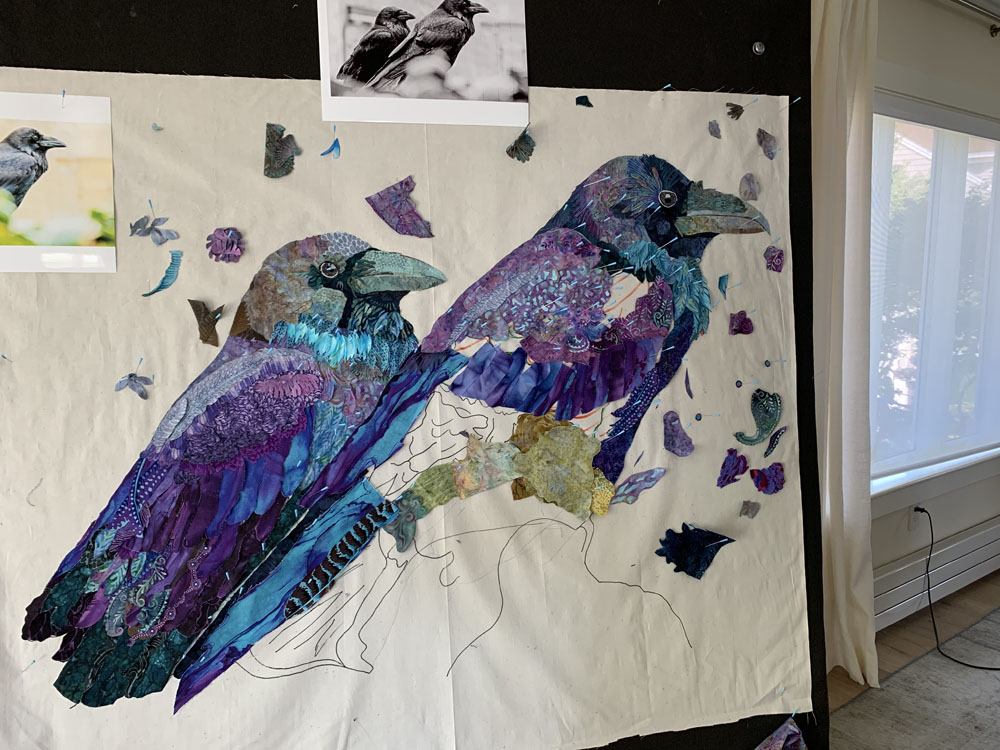
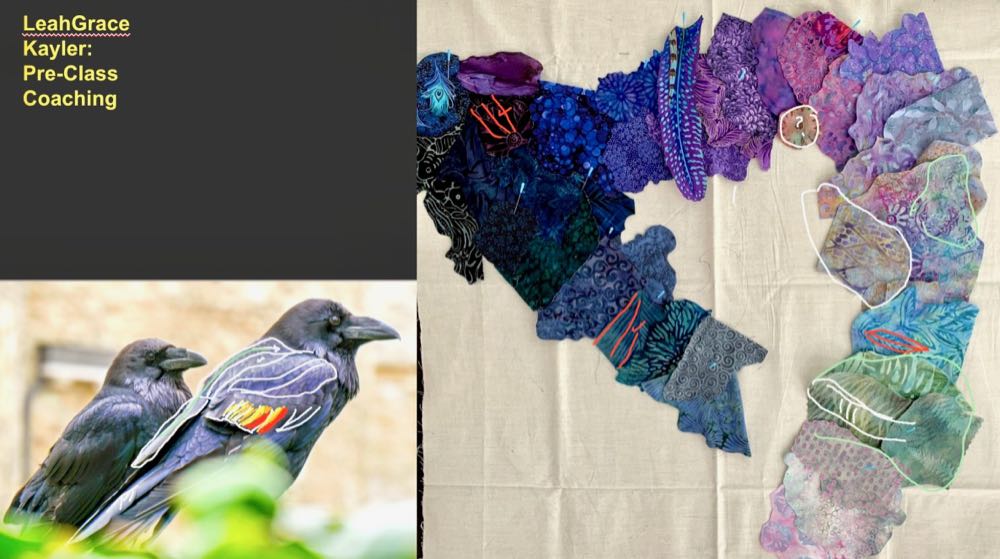
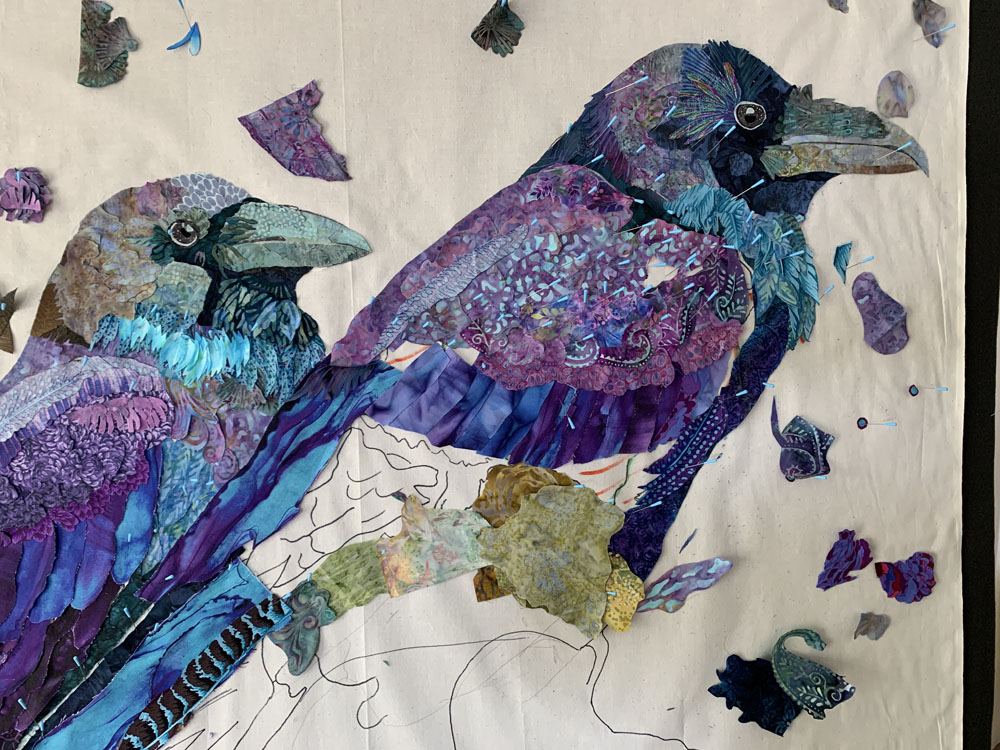
LeahGrace Kayler—LeahGrace is a returning live online class student. You will see her black cat “Archie” in the March 2021 Live Online Class post. Once again LeahGrace chose a mainly black subject: a pair of ravens. The natural iridescent sheen of raven feathers reflects colors of purple, blue and green, so LeahGrace had no trouble working non-black colors into her duo.
LeahGrace went large with this piece as you can see in the photograph above. It’s about four feet side to side. It may seem intimidating to work on a such a large canvas, but you’ll have to take my word that it’s actually easier to work on than a smaller piece. The larger the design, the (relatively) larger the fabric pieces—to cut, trim, pin and glue—and the more space to play with fabric colors, designs, and values. LeahGrace’s initial fabric palette is pictured in our coaching screen-shot below.
As always, please click on any photos to see them larger.
From LeahGrace:
I’ve always intuitively worked more with fabric collage than quilting, but when I saw Susan’s work, I felt I’d found my home base. I loved the class in March and was so delighted to repeat in May. I wish I could have done all three! I’ve learned so much from each of the two classes. From my first piece to my second, my awareness of blending and values and flow has been steadily increasing.
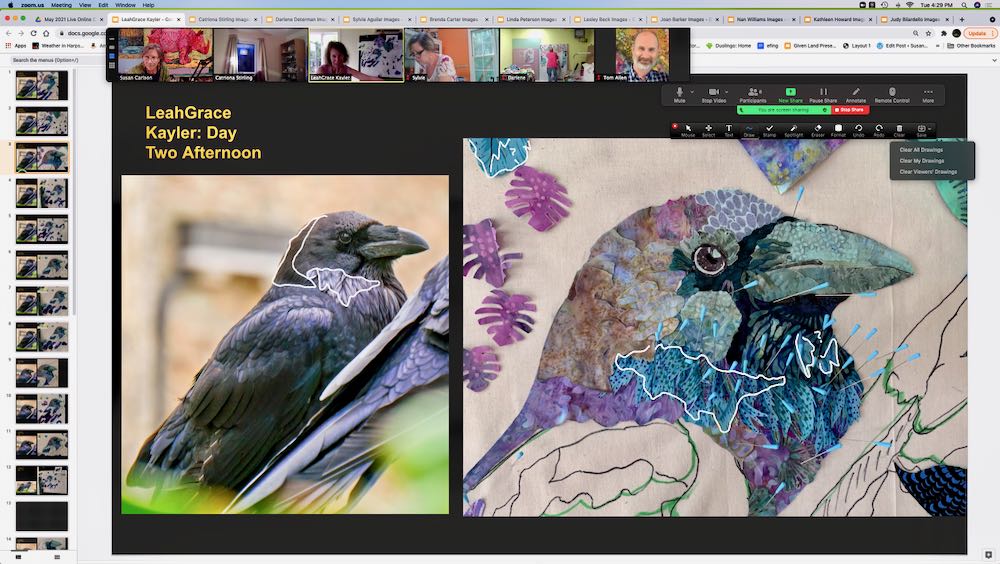
Throughout the class, both students and I are taking screen shots after I’ve marked up their photos a bit during our classroom consultations. The photo below shows a full screen shot, complete with the running photo album (on left) of images sent by LeahGrace for us to talk about when next we meet. While I’m talking to her, others in her breakout room can listen in to my comments and suggestions—those folks are seen in windows at the top. My annotation tools are listed in the black bars near the upper right of the photo, where I can change colors, line widths, switch to an eraser, or undo or redo my marks. Fun! And at the very top, is a band of folders, one for each student containing their own running collection of class photos.
From the beginning, LeahGrace had a “his” and “hers” collection of fabrics and color variations picked out. There ended up being some “sharing” between the two birds, but it was a great place to start when making those initial fabric selections. The annotations on the photo above marked areas of value that LeahGrace was questioning. The photos below are her mid-week switch from mostly done with first draft on first bird, to getting started on the second bird—seemed like that beak and eye came together in no time!
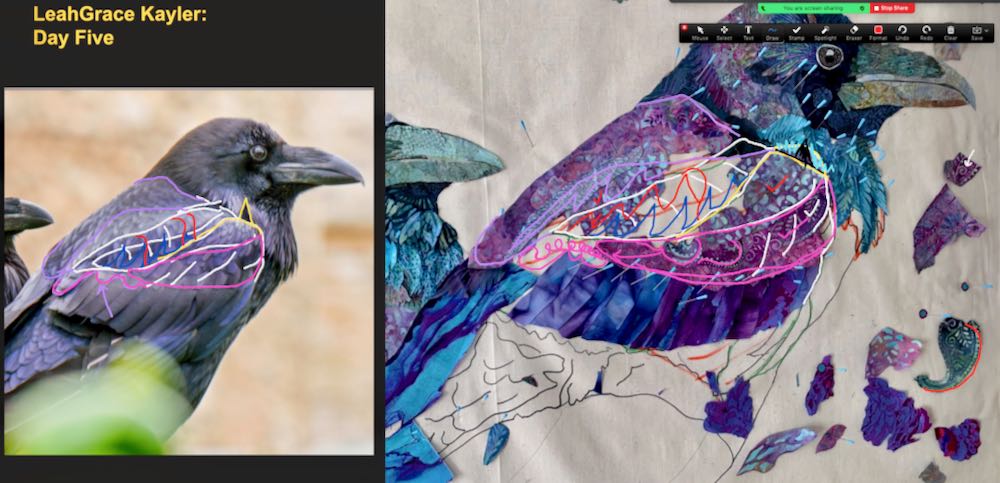
Sometimes I get just a little carried away by the power I can wield with my annotation markers. Those times when I finish (or just take a breath), it kinda amuses me when I see the mess of lines I’ve created on someone’s photo, like below. LeahGrace is so kind and assures me she totally understands what I was getting at, and I believe her, since next time around she’s made a few more strides forward toward bringing her subjects to life.
Some creative introspection from LeahGrace:
I think of the first morning of class. There’s a blank canvas of muslin with just an outline on it. Then there’s me. It’s intimidating. But somehow, a third thing emerges that is wonderful and beautiful and would not have existed without the canvas and the artist.
Darlene Determan—Darlene has attended many of my in-person classes. During the pandemic cancellations of 2020, she began taking advantage of my online Fabric Collage Coaching. This I think convinced her that an online class would be a pretty good substitute for in-person instruction.
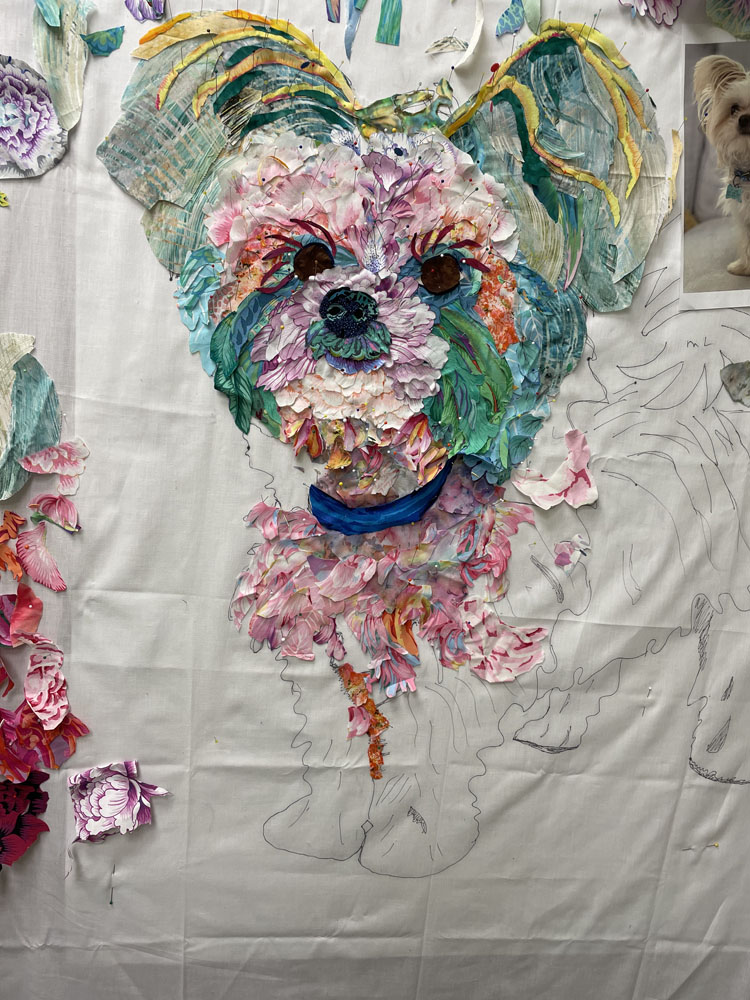
“Sophie” (above) is only the latest of her beloved pets to be captured in fabric. Her dearly-departed Yorkie, Claire, appeared in at least two quilts, that can be viewed here, along with a dozen more of her completed collage quilts! Seeing Darlene’s work, it’s more than obvious she prefers to work in non-natural colors, and she really likes her Kaffe Fassett fabrics.
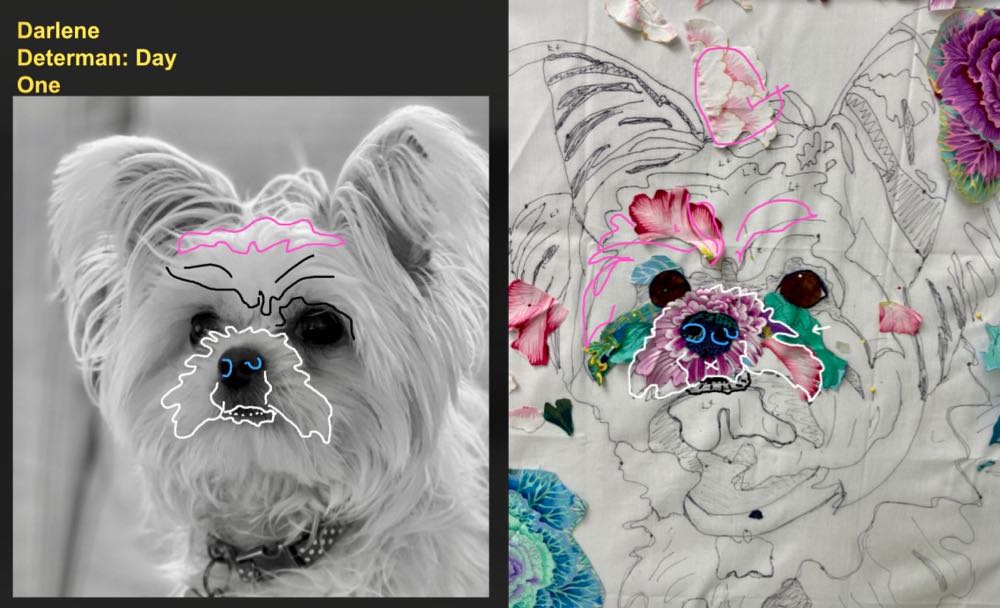
Darlene told me she wasn’t sure if she knew Sophie’s personality well enough yet to choose fabrics for her portrait, but she did know they wouldn’t be white fabrics. I replied that she loved Sophie, she loved her Kaffe fabrics, and maybe that was a good enough connection to get started. (I’m confident there will be at least one or two more Sophie portraits down the road, with time to collect more fabrics.)
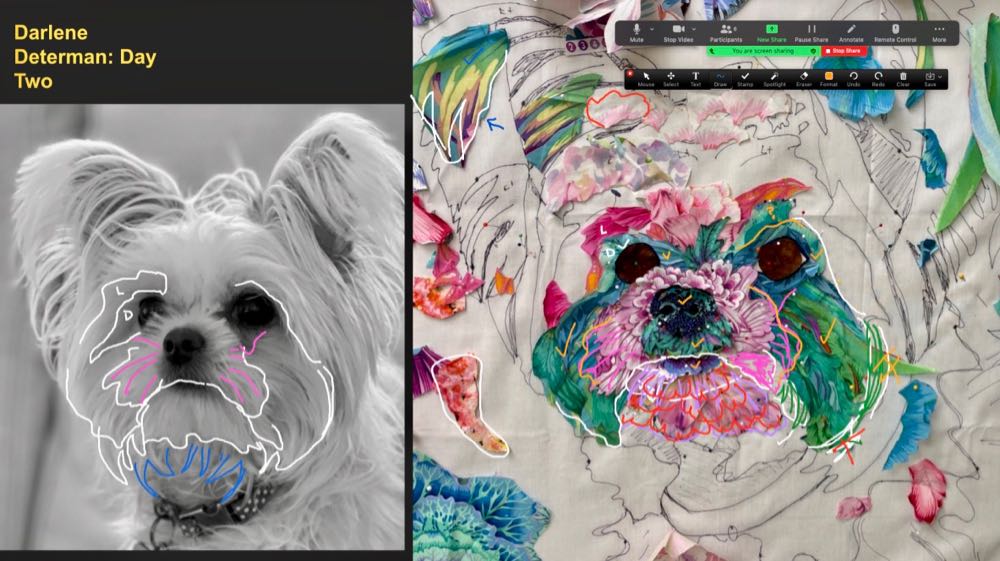
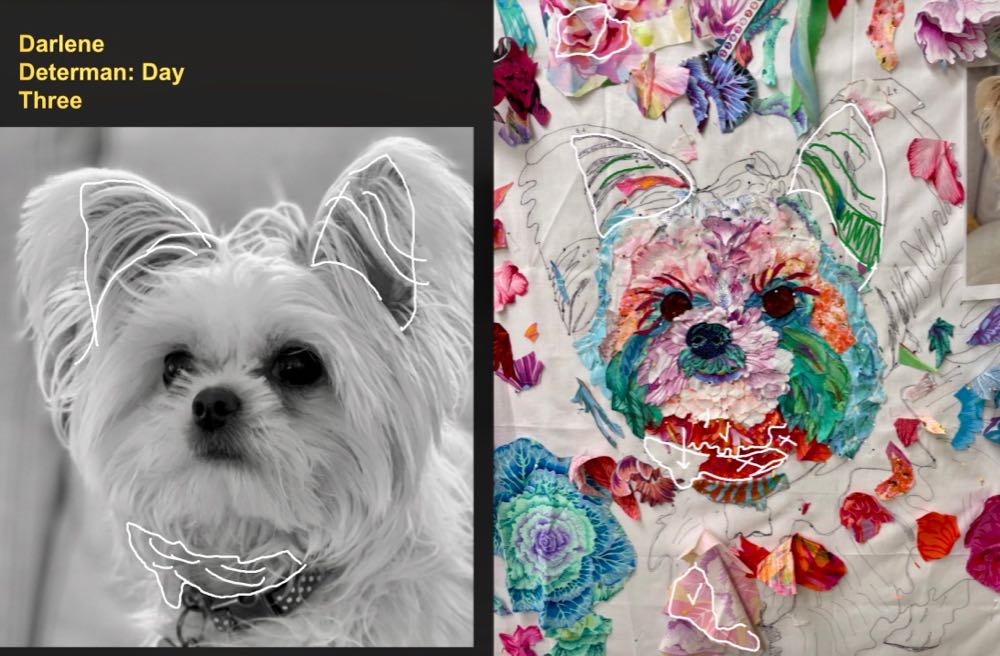
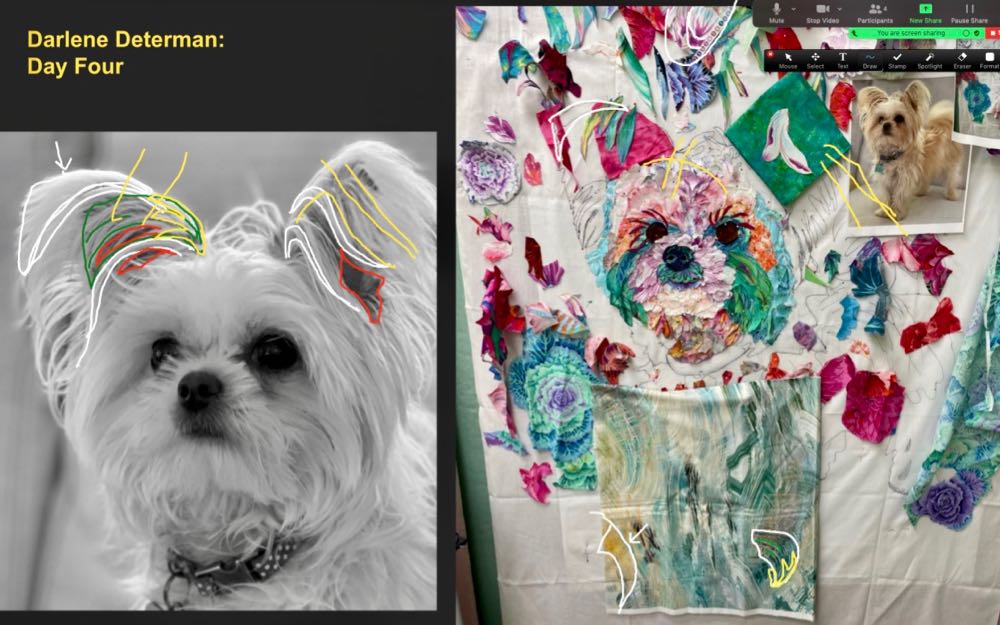
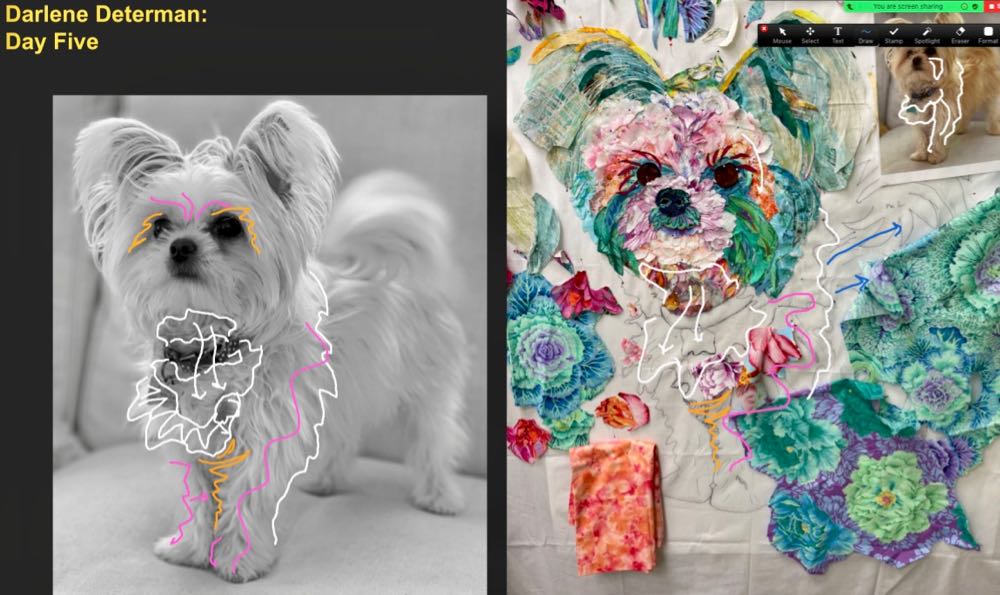
When I went through the screen shots for this post, I realized I had good representations from each of the five days of class, to illustrate Darlene’s progress through the week. “Start with the nose,” I say, and work your way out and backward on the subject.
From Darlene:
Given how much I have loved Susan’s in-person events in the past, I was frankly surprised at how wonderful this on-line workshop turned out to be. I liked being in my own home and having access to all my fabric. The critique sessions had an advantage in that I could record them and go back and listen to each point without forgetting what Susan said when we talked. I love love love that Susan draws on my latest photographs of my piece as we are talking about a certain area and that she notes suggested changes to make. I can print those images to help me make my changes.
By Day Three, Darlene had worked her way out to the ears. Looking close, you could see that Sophie’s actual ears ended with the darker shadows behind all the flowing fluff—see photo annotations above. We talked about the sort of fabric, color and print, she should look for, and then I wished her luck and had to move on to the next student. But lo and behold, by the next morning, Darlene had found a definite possibility in the green brushstroke sort of print hanging under Sophie’s face, below right.
That green fabric worked great (see below), and the first draft of Sophie’s head was done. Getting direction to move ahead on her own was Darlene’s priority for Day Five, when she moved into the rest of Sophie’s body. I do believe Darlene already knows where she’ll direct some attention on Draft Two—rethink the color and value of Sophie’s Charlie Chaplin moustache.
From Darlene:
Having a record of a critique has made the critique more helpful. An on-line workshop with Susan is a wonderful way to improve my fabric collage work. In person or online, Susan gives 150% of herself to her students. Highly recommended—and special thanks to Tom for his behind-the-scenes tech help!
Sylvie Aguilar—Sylvie has created a few small collages on her own, but was ready to go BIG with very little encouragement needed. Again, bigger means more room to play with our fabrics, but here, it also gave this subject the space needed to feel immense and weighty.
In our pre-class coaching session, we discussed cropping of the design, above left. Sylvie had in mind a closely cropped horizontal image and I thought that a great idea—I like to say, “cropping is your friend.” In this case, it gets the head as big as possible, yet says everything you need to say about an elephant.
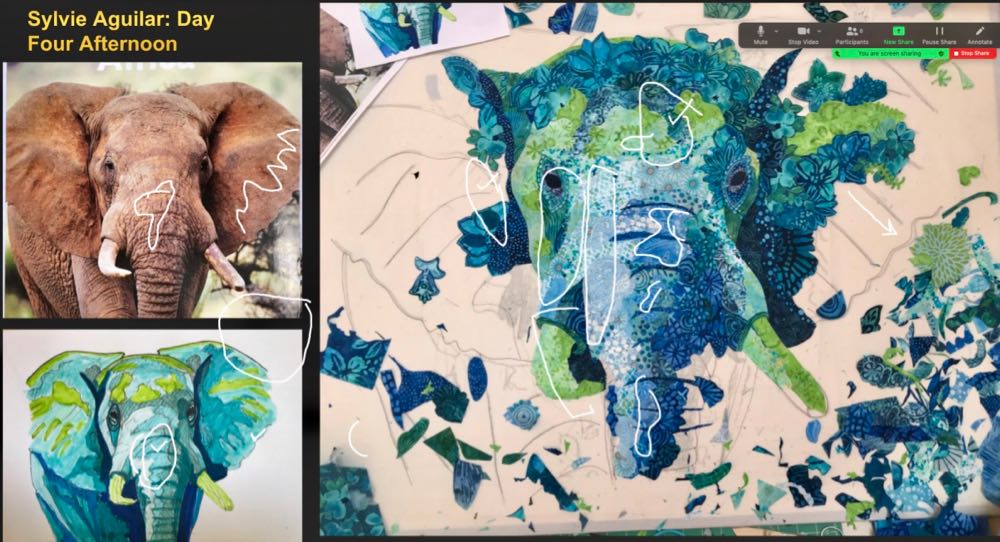
In the photo above right, Day One of class, I think Sylvie would agree with me that she had hit the messy scary stage. I had also advised Sylvie to start with the nose—the values in the horizontal movement and sections on the nose, but neither of us were satisfied with where it was going. However, before the day ended, I had a thought to leave her with—to focus on the vertical light-to-dark value changes along the length of the trunk instead, see annotated photo below left.
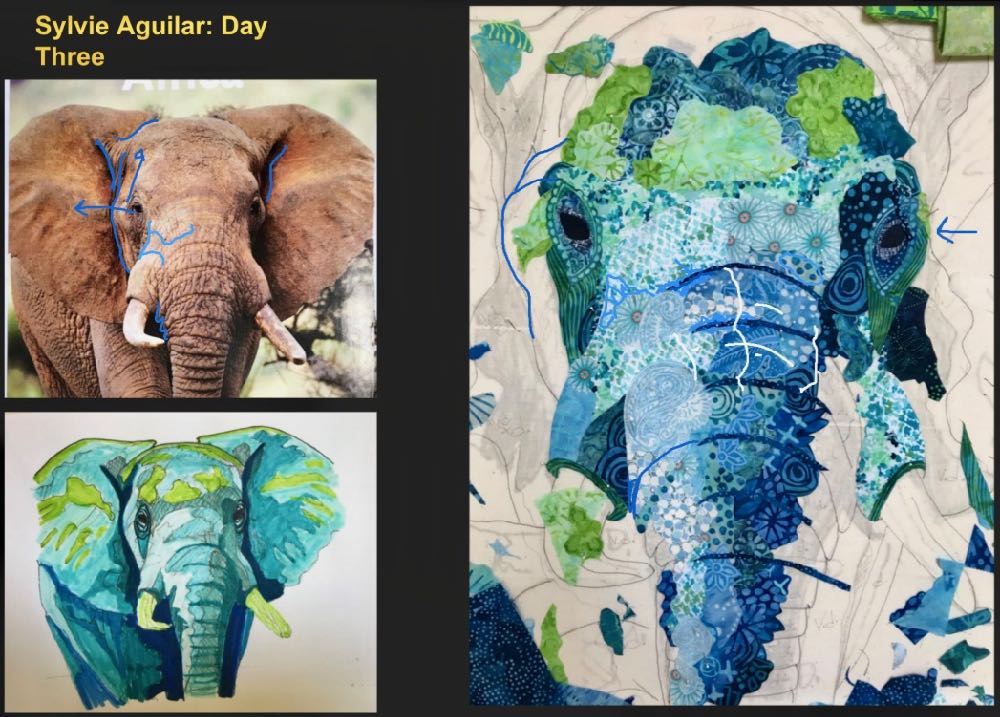
The next day, Sylvie returned with a great new start, see photo above right. Sometimes knowing what doesn’t work is as worthwhile as knowing what does. Sylvie had figured out that the vertical shading did work for her by applying her drawing skills to create a marker drawing (lower left below) to use as visual guide throughout the process. Brilliant. She translated the photo of an elephant into her own colorful rendition to better “see” it in her chosen palette of fabrics. And as you can see in the Day Three image below, Sylvie was on a roll.
From Sylvie:
One of my favorite moments of the class was being able to get a glimpse of what goes on in Susan’s head. Hearing her talk about her process from beginning to end was very interesting to me. Learning how to see details like a true artist, was eye opening. This class has thought me so many valuable lessons and tips, helping me grow as a fiber artist. Susan and Tom are a great team and work very well together. They are both genuine caring patient generous people. I’m also very happy to learn that I am not the only one repurposing those salad containers as storage for scraps! If it’s good enough for Susan, it’s good enough for me.
It is a very demanding class but so very worth it. We all went through ups and downs, at times feeling exhausted, trying to do as much as we could before the next one-on-one meeting with Susan. The way the class is set up makes it easy to manage as the breakout rooms give you a bit of flexibility. If you need to tune out for a bit to recharge, you can. After 5 days of hard work, the end result is spectacular. No project is complete but we all have the skills to finish them on our own.
By Day Five, Sylvie had found “new” fabric in another pass through her stash (below left), she was already honing her skills to focus on the colors and prints that would work for her elephant. And as we finished for the week, she had a first draft all the way through one of the luscious ears, to share with her fellow classmates in the final end-of-class slideshow.
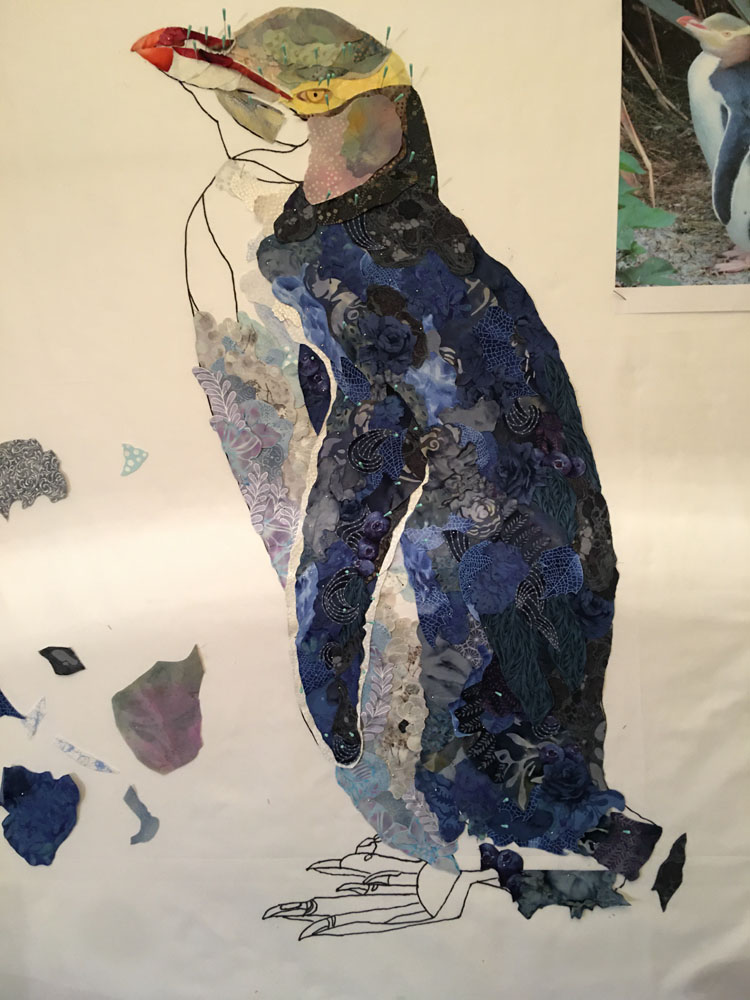
Catriona Stirling—As our first live online class participant from across the pond—Scotland to be exact—Catriona’s sleep pattern took a hit. Class began for her at 3:00 p.m. and ended sometime after 11:00! But Catriona knew what she signed up for and soldiered on, though sometimes disappearing for, “a wee bit of a nap.” She made great progress before class began each day and has quite a charming yellow-eyed penguin to show for it.
This was our second live online class penguin, the first being done by Sandy Low in the March edition of the class—though Sandy’s penguin was from Antarctica and Catriona’s was one she met on a trip to New Zealand. Both ladies dealt with the challenge of creating shape and form in a bi-colored, high-contrast subject very well, making quite nice fabric choices to create their not-so-black-and-white subjects.
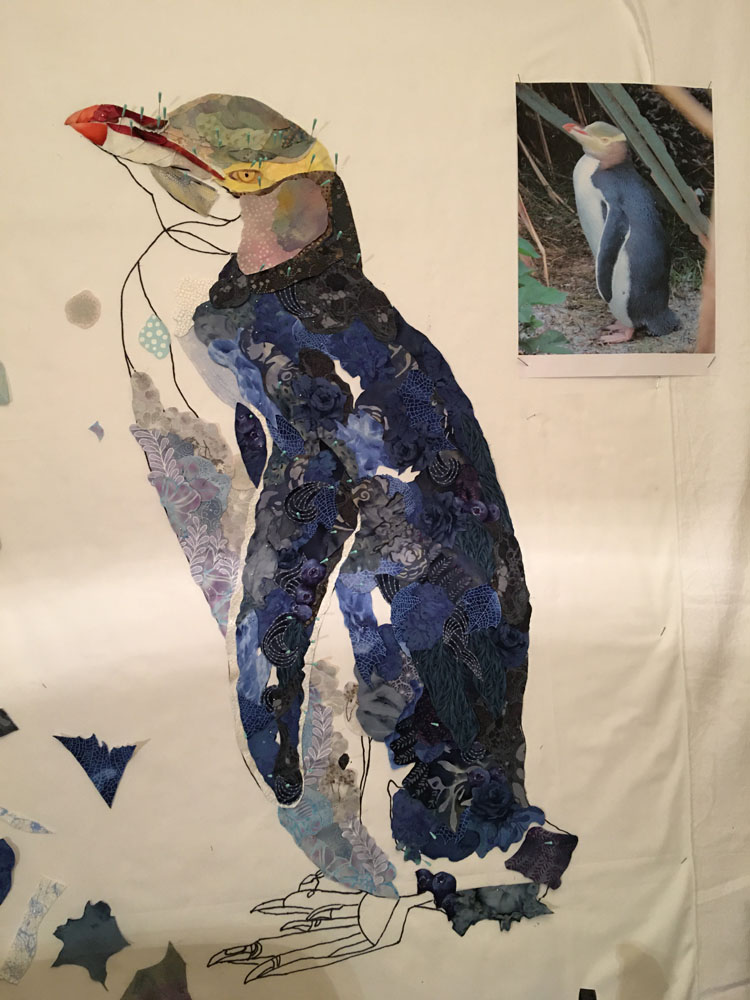
This yellow-eyed penguin has a bit of color on her face. Again, Catriona started with the nose, or in this case beak, and dealt with all that detail at the beginning of the week. Upon close inspection, you may see an apple mixed into those reds. Bit-by-bit, Catriona caught the softness and realism of this bird’s head. She had already selected a range of dark blue fabrics for the black of the feathers—certainly showing up as variations of steel blue in her original photograph.
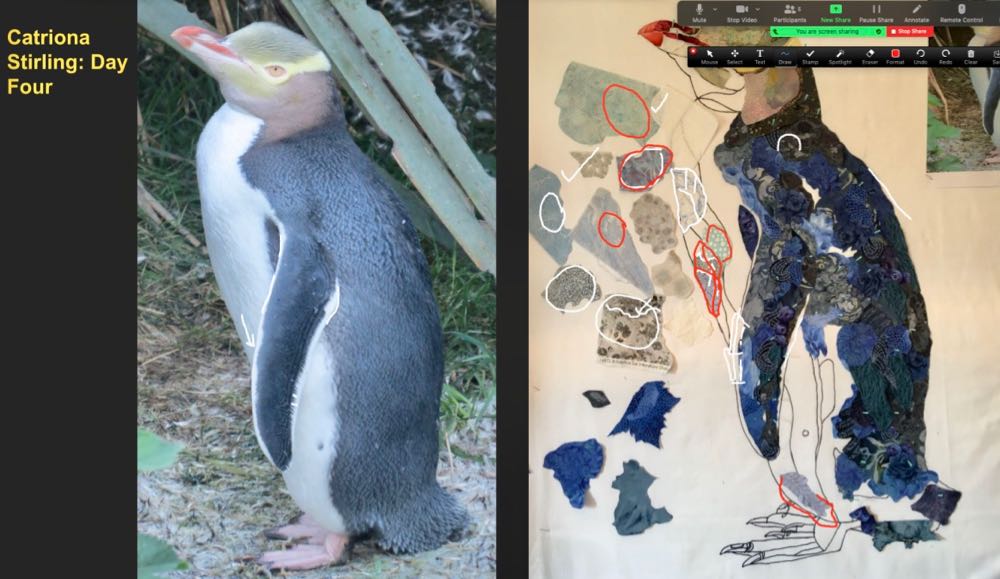
The whites of this penguin became soft blues, violets, and tan colors—see our annotated “discussion ” of her fabric palette above. I noticed that over the course of the week, Catriona developed her cutting skills to cut better along the prints in her fabrics. It really makes a difference in how well the variety of both light and dark feather fabrics blend and merge together—see photos both above and below. When asked what was her favorite moment of class she replied, “the moment the blending method really clicked for me and I could see the shadows/shading start to appear on my penguin.” I agree.
From Catriona:
I have been a fan of Susan’s work for many years but, living in Scotland, it was difficult to try to get a place on an in-person class. When the online option was offered I realized that this was my best opportunity to finally learn the technique and I would definitely recommend it. While it wasn’t possible to have Susan pick up her scissors and cut a piece of fabric for you or literally show how simply moving something to a different place would make a difference, the online tools, and the great support provided by Tom to make all the up to date photos available, worked really well.
One of the positives from attending my first collage class online was that I didn’t need to try to pack and transport the rather large selection of fabrics I’d selected from my stash as options for my project. There might not have been room for many changes of clothing in my baggage allowance with the weight of all the fabric! Now I’ve taken a class I would be more confident to identify the most appropriate options and prepare a palette to work from.
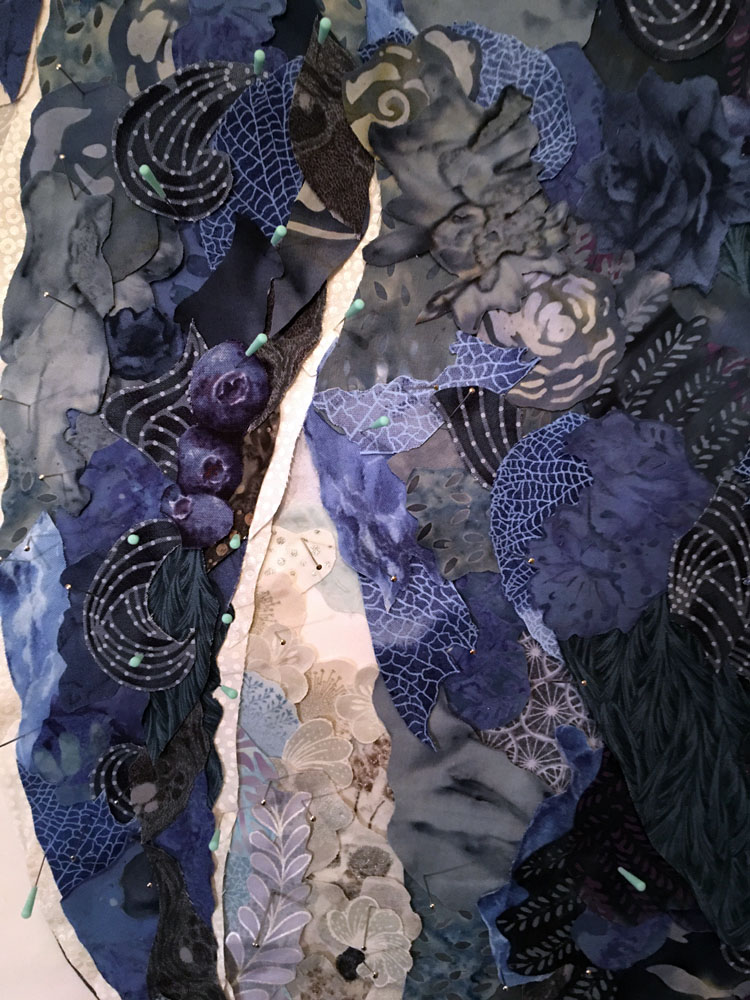
Just don’t leave behind the blueberries and bicycle wheel fabrics, Catriona! I love that you worked them in so seamlessly.
Be sure to grab a cuppa and tune in to next week’s blog post when I go in-depth with the classwork of the second of three breakout groups from May’s online class. They call themselves the “Horseflies”—Linda Peterson, Brenda Carter, and Lesley Beck—and they’ll get you buzzing with fresh creativity!












Hi Susan
I’m always overwhelmed at how beautiful these quilts are. You are such a fabulous teacher guiding each student so their work is so outstanding. I loved taking your class at Tahoe a while back. I don’t know if you ever got the finished picture of Sherlock and/or my gecko. Please let me know. I have looked through all the posts of finished quilts and didn’t spot them.
Thanks again for being such an inspiration to so many of us!
We sure did, Sheilah. He’s in this blog post along with several others: https://susancarlson.com/2019/06/22/the-finish-line-student-quilts-based-on-my-designs/
Susan I have been following you, bought patterns, collected all my bits and pieces of of all my fabric projects. My question to you is the foam you use to start your prodjects. Is that styro foam or soft foam?
Hi Dixie—thanks for all that interest! The pinning surface I use is styrofoam wall insulation boards you buy at home construction stores. It comes in 4×8 foot sheets of different thicknesses—I’ve used both 1 and 2 inch thick boards. Both work well and will lean against a wall, but of course the 2 inch thickness is sturdier. Very easy to cut down with a utility knife, though a serrated bread knife would probably work as well!