
A painter’s main tool, beside her brushes, is her palette. For each painting, an artist chooses from her countless tubes of paint just the ones she wants for this particular image. She squeezes out a dab of this and a dab of that until she has the entire range of colors and values she wants to use.
I want you to look at your fabric as your palette. Now don’t misunderstand: You may have stacks and stacks of fabric, but that is not your palette. Think of those as your tubes of paint. You have to narrow those choices down. And most importantly, just as you can’t use the paint when it’s still in the tube, you can’t use your fabric when it’s in a huge chunk of a yard or more.
What to do?


When creating the turtle quilt from my Fabric Collage: Sea Turtle eWorkshop, my palette was always close by and was arranged by value, light to dark (see photo at beginning of post). Because my palette was nearby and organized, it was easy to zero in on just the right choice of fabric.
Well, what I’ve been telling my fabric collage students more and more, is to make a fabric palette before they begin their collage. I have them select a range of fabrics. The colors don’t matter as much as the values do. Your subject can be any color you want, but in order to give your subject form you need to have a complete range of values. From the lightest highlight to the darkest shadow, you need a fabric that fills those niches.
Once they’ve selected their fabrics, I have them cut out hand-sized chunks of the fabric, following the prints in the fabric as a guide, NOT cutting directly across and through the print design. Once the pieces are cut out, they’re arranged according to value, from light to dark.
This, then, is the fabric collage palette.
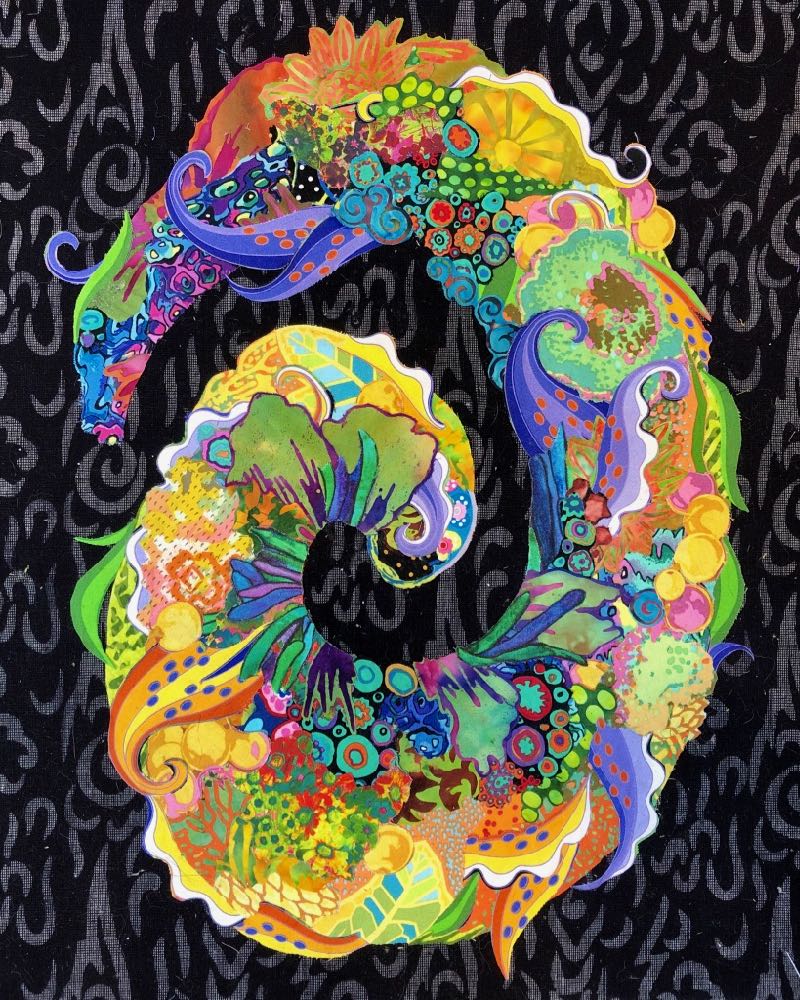


It’s important when creating your palette to avoid cutting your fabrics into similar sized shapes. Create a palette with a variety of shapes by letting the design or print in the fabric dictate where you cut. In this example from my 2020 Thursday Night in My Studio Live! presentations, “Is It Drafty in Here? Working in Drafts”, take a look at the variety of shapes included in the palette for my colorful spiral. Organic or irregular cut pieces of fabrics blend together better than those that are cut in a repeated shape. Note how the fabrics in my palette blend together when placed next to each other.
I’ve always kept a palette of fabrics nearby as I worked on a collage, though not always in an organized sort of way. The idea of encouraging my students to pre-cut their palette and organize to values, grew out of a situation in which I was teaching a class but there was a 24-hour delay in having a few students’ patterns enlarged. To occupy their time in a productive way, I had them look at their fabrics and create their palettes. Even though they had to wait until the second day to start placing their cut fabric shapes, they actually made as much or more progress on their collages by the end of that day than many other students in the class.
The usefulness of teaching this way of working was immediately obvious to me.
However.
It’s not easy to convince students that all this cutting into of their perfectly fine un-cut fabrics is a worthwhile effort, when they don’t even know if these fabrics will, in the end, even work in their collages. I understand that it’s a leap-of-faith investment of time to create a palette before starting to collage. And many of my students are simply so excited to get started that they skip ahead of this step. I just know that from what I’ve seen from their experiences with fabric collage, I’m going to emphasize it more and more in the class curriculum.
I’ve always considered fabric collage to be painting with fabric. I have developed the technique to be as immediate as possible, like painting: I avoid the making of templates; I use glue from a bottle rather than fusible adhesive; and I prep my fabrics by creating a palette. These methods all help me concentrate on collaging the image with my pre-cut shapes, rather than interrupting the process by searching through stacks of fabric again and again.
Pre-cutting a palette of fabrics for your fabric collage allows you to audition, place, and easily trim each piece. Try one fabric, reject it, choose another, trim it down, pin in place. Move on to the next open area.
Arranging your palette by value helps you zero in on the fabric you’re looking for. Are you working on a highlight such as the tip of the nose or cheek? You know where your lightest valued fabrics are already. Working on a shadow on the side of your dog’s head? Here are the darkest values of fabrics.


For my Facial Features eWorkshop, I demonstrate the portrait exercise above. Notice how I’ve arranged my palette around the design from light to dark. Not only that, but the light fabrics and dark fabrics are placed near the side where they’ll be used, the lights on the left, the darks on the right. The cut shapes don’t get used in their entirety, I end up using sections of each—parts of them here and there. As I do so, the hand-sized pieces get reduced in size, as do the open areas I need to fill.
When you initially create your fabric collage palette, that doesn’t mean you can’t and won’t add to it. A palette of 12 – 15 cuts of fabric is a good number to start with, it gets you going with as little fuss as possible. But you may find as you progress, that you need another fabric color, print, or value to fill a particular niche. That’s fine. It’s expected, even. You’re learning what you need as you move ahead.
I hope creating a palette helps you begin and keep going on your fabric collage journey. I believe it is one of the simplest ways to give yourself a head start on your next project.
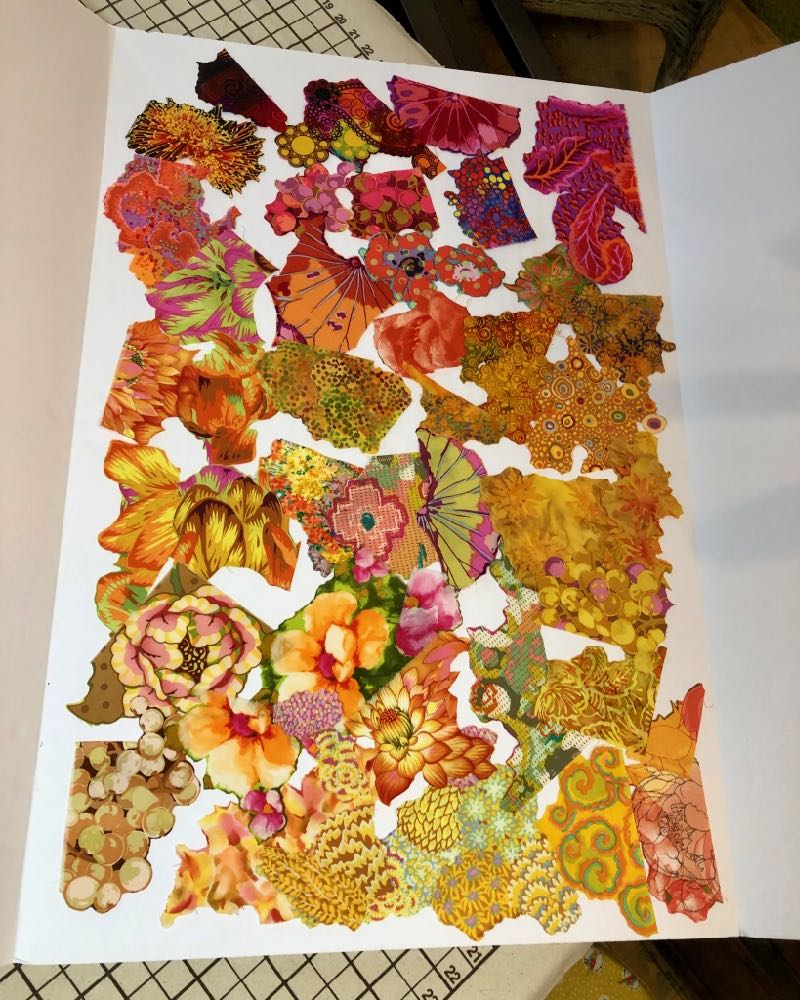
For a Sun Portrait project based on my sun portrait pattern, I cut the fabric palette above. Admittedly I got a little carried away with my initial selection (but I’m really looking forward to working with them). I have placed my palette onto the center section of a tri-fold presentation/display foam board. Below are photos showing how the sides of the board are hinged so that it can be closed up and will protect my fabrics when they’re not in use. I thought this was a particularly clever idea. I mentioned it to Tom noting that my palette would now be safe from my curious studio cat, Djinni: “In case she decides to nap on them, knock them around or, you know, puke on them.” No sooner had I closed the shutters on my palette than Djinni hopped onto the table and hacked up her breakfast onto the folded up board, proving my hypothesis that yes indeed, a foldable palette surface could save my fabric shapes from the cat.


This is a brilliant idea & makes me feel more comfortable choosing fabrics & placing them. Thanks!
Thank you, Susan. I love your blogs. I understand that taking the time to precut the fabrics helps to blend the pieces together better. I have a tendency to rush in with a big piece and then end up with a rather sharp line, which looks awful. Thanks for teaching us your wonderful and hard-won techniques. I hope to be able to take a class with you one day. Keeping my fingers crossed that this Pandemic will pass and your classes will be back on soon.
I have fabrics set aside that I hope will be great for collage projects. I think I will start storing them in cut shapes instead of folded piles. Can cut while watching movies with the family and feel very productive. Then create pallets later.
Although I was in Susan’s Portland class in 2017 and have made several fabric collages, her Thursday Night Studio Live presentations have been extremely helpful as reminders and refreshers for her teaching. And I need to highlight or bold or ALL CAPS the “cut fabric into palm-size pieces” instruction! Keep saying that to yourself; do it; sort this way; you will find this simple step a brilliant tool. Those folded piles aren’t as precious as we first thought.
Thanks Susan. I really love this idea of identifying one’s palette and making the sizes manageable to work with.
This is a terrific hint. I am always stopping to hunt for fabric and the big pieces do not lend themselves to “trials”. Thank you for sharing!
Wow thank you for telling me about the foldable palette because I do have the foldable board already so now I have a great use for it.
Years ago I bought an area rug and brought it home to show my husband. I laid it down and as my husband was explaining why it would not work where I wanted to put it (“what were you thinking?”) our Himalayan cat walked up to it and threw up on it. I made sure I cleaned it well before returning it….Cats have a way of letting you know.
This is my first encounter with fabric collage, but I see a lot of similarities to creating paper or digital collages. Prepping your collage elements before starting the actual collage can save a lot of time and effort, since you don’t have to dig for something to use. Same thing as when I make a digital collage– I make sure to have my major image elements and color palette ready to go. Really cool! Thank you for sharing!
Best tip ever! Usually I’m so unorganized that I can’t find anything. I know that this will make it so much easier next time! Can you please explain how to make a hinged board?
Hi Joyce! Mine was a purchased “tri-fold foam presentation board”—easy peasy and when I did a search online, can be found at Staples, Walmart, Micheal’s, etc. What also came up was a YouTube video from Threads Sewing to create a folding design board. The panel sizes would need to be adjusted to fold as the tri-fold does, but a good idea (and also pretty easy) as the board could be covered with flannel or something so the fabric palette wouldn’t slide around so much on the smooth surface.
Thanks for the reminder in this post. I, too, use the tri-fold board for my art quilt projects. Sometimes my projects take a road trip. The project board keeps things together.
Thank You Susan for sharing your knowledge here. Your work is beautiful and I always enjoy reading your blog.