
In science if you get a result once it could be a fluke, but if you can replicate that result, then you can say you have discovered something.
That’s kind of how I was thinking about my first Live Online Fabric Collage Class. Sure, it went great, but can I do it again? Maybe I just got lucky having good students. Maybe the class chemistry just made it effective. I didn’t know.
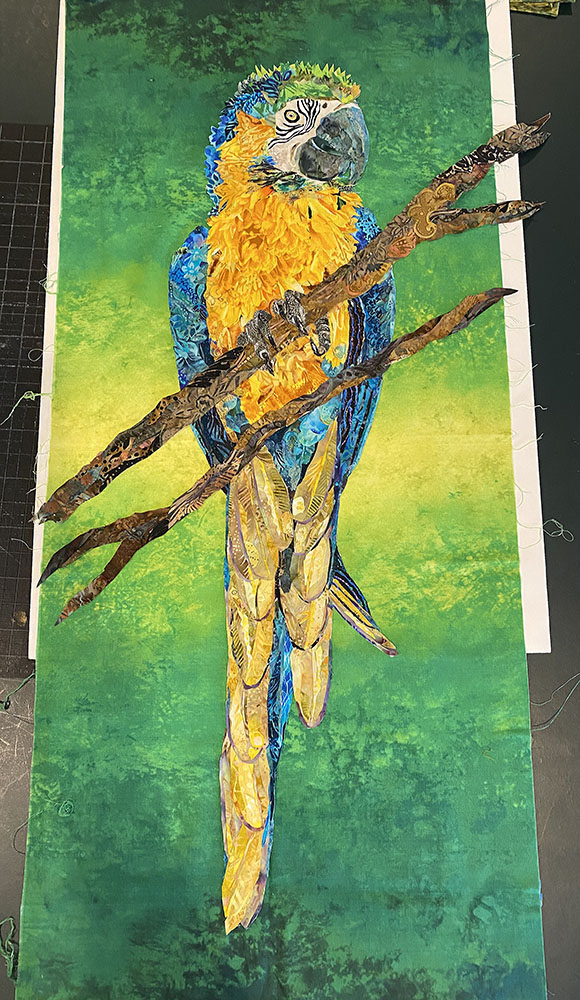
Well, after completing my second Live Online Fabric Collage Class, I’m feeling confident that the first wasn’t a fluke. The results of this fabric collage experiment can be and were replicated, as you will see in this post. The example of Mr Macaw by Jean McCreary is pictured above.
Class Description
I’ll give you a brief overview of the way the class works, but if you’d like a more in-depth description, please see the post for the March 2020 Live Online Fabric Collage Class, where I went into great detail of how we manage to pull this off. (I say “we” because it takes both Tom and I working together to make it happen.)
Students start preparing before class by choosing an image, tracing a pattern, and picking fabric. A week prior to class, I schedule a one-on-one coaching session with each student. I give them feedback on their image, their pattern, and their fabric selection. In this way, they’re ready to start on day one. Actually, in both classes so far, several people have actually started collaging before Day One of class.
For each day of class, there’s a pre-recorded presentation of the daily topic—techniques they’ll need to take them through the fabric collage process—that can be viewed whenever is best for each student. Then as class begins, we go live where they can ask questions or request that I give a further demonstration. I’ve started selecting a quilt of mine that particularly addresses the day’s topic (adding details, using sheers, etc.) and giving a close-up video “tour” of the quilt. After our morning meeting, I go from student to student giving feedback.
How do I do that? This is where Tom comes in. Students take photos of their quilts (at whatever stage they’re at) and email them to Tom. Tom compiles the photos into a document the we can both edit and see even though we’re working on separate computers (we use Google Slides, if you’re wondering). I then use Zoom’s annotation software to draw on their images. I circle things, color in areas, use arrows, number areas, and so on. Once the image is discussed and marked up, most students take a screenshot to refer to later. Students also have the option of recording our feedback sessions to their home computer.
Breakout Rooms
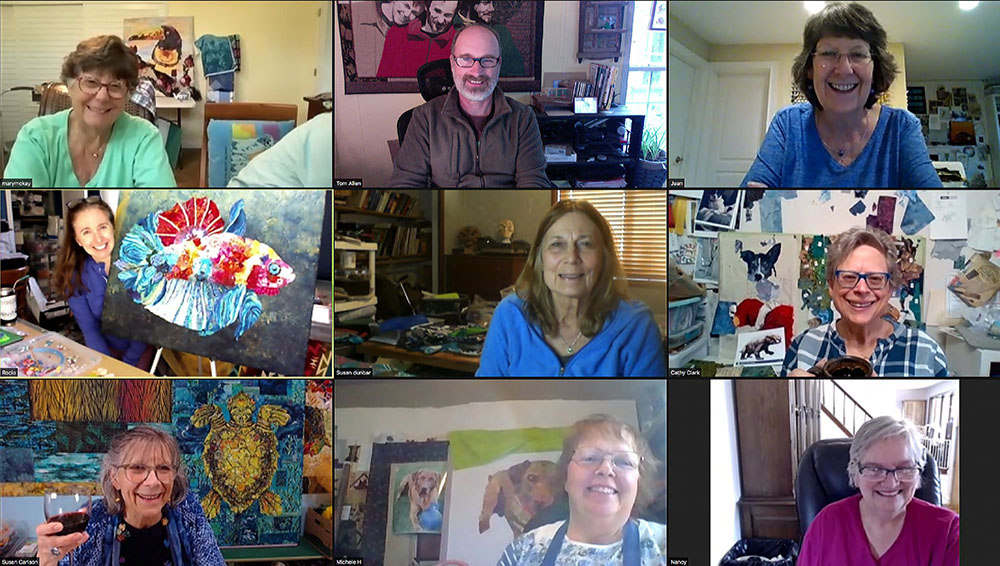
I organize my students into groups using breakout rooms. Breakout rooms in Zoom are essentially smaller meetings within the larger meeting. In this class, it was easy to organize because there were only 7 students and four of them had dogs as their subjects. So I took three of the students with dogs (one dog person wanted to be with a friend in the other room) to form a breakout room that they named the “Dog House.” The other students—two birds, a fish, and a dog—were grouped together in a breakout room entitled the “Pet Shop.”
Grouping students as I have either by fabric collage experience (as in the March class) or by subject matter allows me to tailor my feedback so that all the students in that breakout room are able to benefit by overhearing my comments and suggestions for their roommates. Much of what I had to say to one student in the “Dog House” could apply to the others, for example.
Breakout rooms also allow students to socialize with each other while I am working with the other group, giving them the opportunity to develop a camaraderie which makes pleasant memories and perhaps lifelong friends for attendees. I know there’s students from both classes, who didn’t know each other before, already making plans to attend a future online class together.
In the “Dog House”

Three students were in the Dog House. No, they hadn’t gotten on my bad side. They had all chosen dogs as their subjects.
Cathy Clark—Cathy set an ambitious goal for herself. She wanted to start with a portrait of her neighbor’s dog Diamond. Once she had made enough progress and felt confident leaving it to finish on her own, she chose to start on a second piece—a collage of a prehistoric animal called Placerias hesternus.
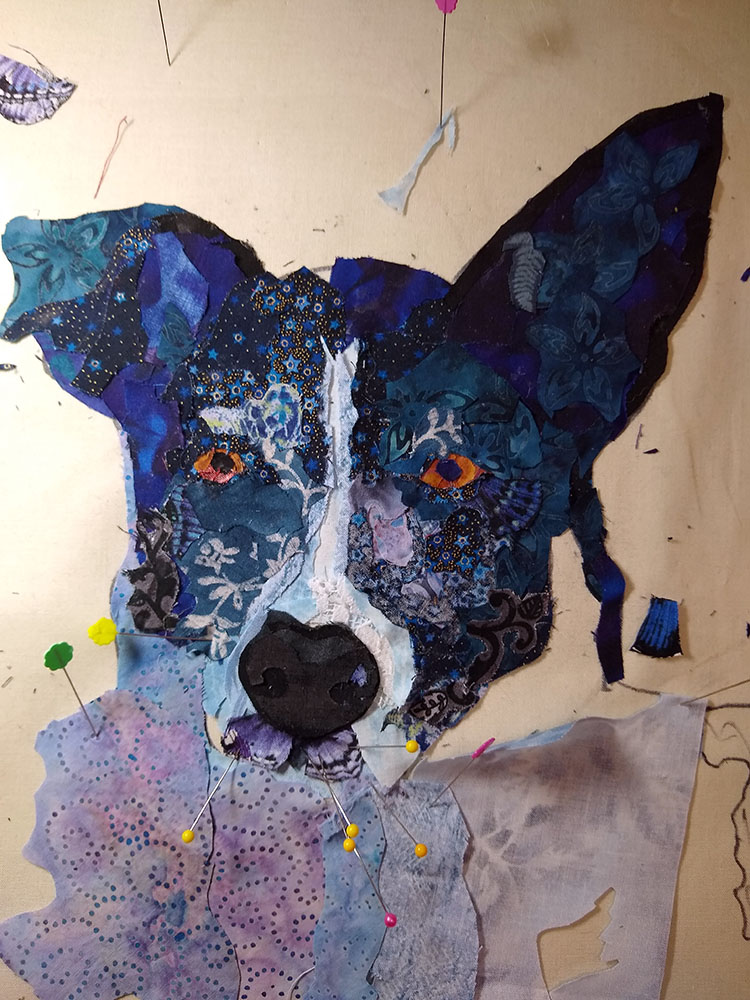
Diamond is named for the diamond-shaped marking on the crown of her head (yet to be added to in the photo above). Cathy faced two challenges with this piece. First, Diamond is a largely black and white dog, two colors in which it’s difficult to find variation in value. But even before our first meeting, Cathy had chosen dark blue and purple colors in a variety of values to represent Diamond’s dark parts, and light blues and violets to stand in for Diamond’s light areas. She used those fabrics perfectly—especially using the prints of those fabrics to give contours and details to Diamond’s face.


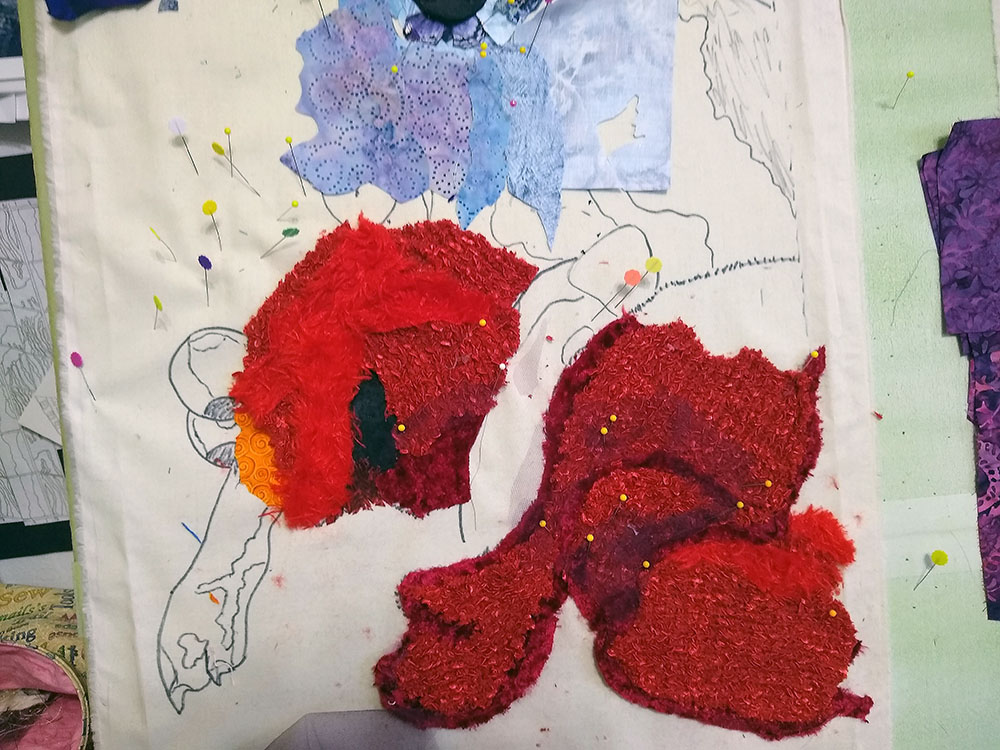
The second challenge was Elmo. Elmo, as you can see in photo above, is Diamond’s favorite pal as she advances into her old age, so Cathy ended up combining two different photos of Diamond for her composition. At first look at Cathy’s fabric selection, we both agreed there were no Elmo appropriate fabrics, seeing as Elmo has a very distinctive coloration. So right away, Cathy went on an Elmo fabric hunt—to Goodwill. A red sweater laced with satin strips and a real-life previously loved Elmo doll (now re-purposed as fabric) became two of the three fuzzy color values she used. A fourth darker value was added with a layer or two of black tulle.
Cathy’s second collage is based on the recreation of Placerias hesternus, a name which I told Cathy would be hard for me to remember in those last couple days of class, so we nicknamed her Hester. Cathy will be the artist in residence at the Painted Desert/Petrified Forest National Park in Arizona where this beast once roamed. Cathy based her design on a reimagined drawing of Placerias hesternus, used by permission, and is creating Hester for display during her residence at the park this September.


From Cathy:
I was concerned that I wouldn’t get the help I needed for this new technology and my inexperience in making a usable pattern. Everything worked out so well! I wouldn’t hesitate taking another live online class with Susan. Susan and Tom have such an easygoing competence in what they do.
Nancy Hayes—Nancy’s choice of pooch was her golden retriever Ami. What a lovely sunny disposition she captures in this piece. Nancy got all the way to auditioning background fabrics by the end of the class week. Ami has passed over that Rainbow Bridge, so that was one idea Nancy had in her mind, which you see below, though not exactly what Nancy was picturing. However, the fabric does give her an idea of how those rainbow-like colors may work, before she further pursues the idea.
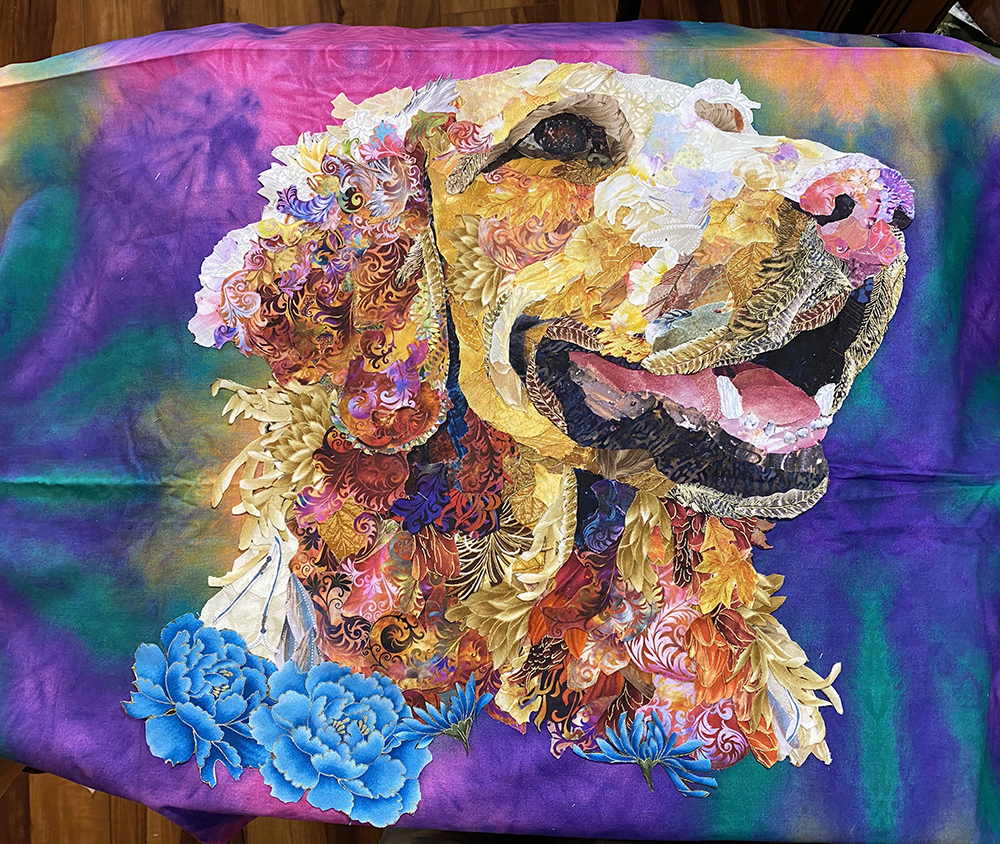
Nancy was one of the folks who began her classwork the weekend before the class began. In all the material the students have to review, I do say to “start with the nose,” and that’s exactly where Nancy started, with Ami’s cute-as-a-button pink nose (with purple shading), photo below right. The progress you see beyond the nose and into Ami’s muzzle is where Nancy was at the end of Day One.


It wasn’t long before Ami had her beautiful eye in place, her furry ear of flippy fabric prints, and her lovely smiling mouth, below. I heard numerous “wow’s” from the other students as we had our end-of-day slide show for all to see on Day Two… or was it Day Three?


The days do tend to blur together, and Nancy was working at a great pace creating this portrait in memory of her sweet Ami. By the beginning of Day Five, Nancy was ready to talk backgrounds. Since all the sunlit highlights were being “lost” on the white foundation fabric, I suggested Nancy tuck neutral green fabric behind the collage, below right, so we could see and assess those highlights better. It’s a stop-gap treatment to help separate what is the subject and what is the foundation—helpful on any light colored images, and making final edit much clearer. From there, Nancy tried her rainbow fabric, and I happen to know she’s still on that background hunt. Good luck, Nancy!


From Nancy:
Susan is a gracious, experienced teacher who knows how to give advice without being critical. I appreciate her obvious patience as well. I would absolutely take another class just with Susan in person or online. I feel I really learned some new techniques and had a great time doing so!
Michele Holmes—Michele’s muse was her dog Hugo, and right away, she told me she wanted to expand her color palette, so during her pre-class coaching session I circled some of the areas where I saw colors beyond his very brown-ness. Separating out the areas this way helped her see the colors she could expand into, such as the purple in his ears or the orange under his muzzle. Check out the blog post I wrote using Michele’s quilt as an example for seeing color in your subject: “Unlearning Looking and Learning Seeing in Fabric Collage.”
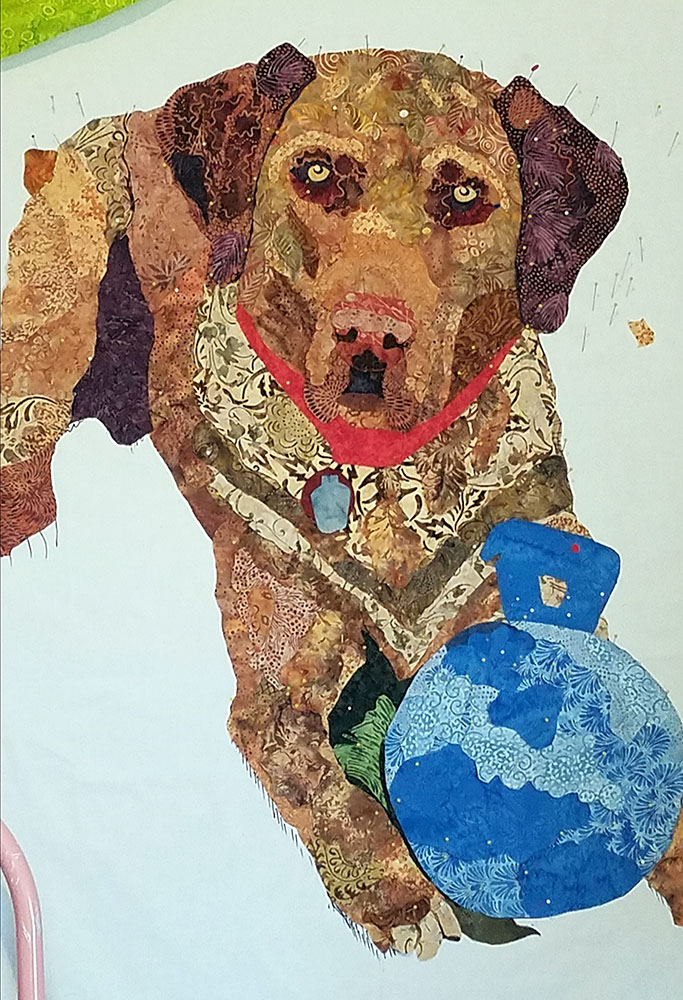


Michele’s Hugo demonstrates another way to “begin with the nose”—with the bridge of the nose. This is a good way to start playing with your fabric palette. The bridge of the nose will almost always catch a highlight where you’d use lighter values of fabrics. The cheeks slope down through medium values and then into shadows under the jaw. When you look closely at Hugo, he has quite an angular face, so Michele was able to work with the value range in her fabrics to define that facial structure.


On Day Two, I gave the “nose demo.” I had asked Michele to hold off on Hugo’s nose itself until after the demo, and then Hugo’s temporary nose in the upper left photo, morphed into his more colorful one you see in the upper right photo.
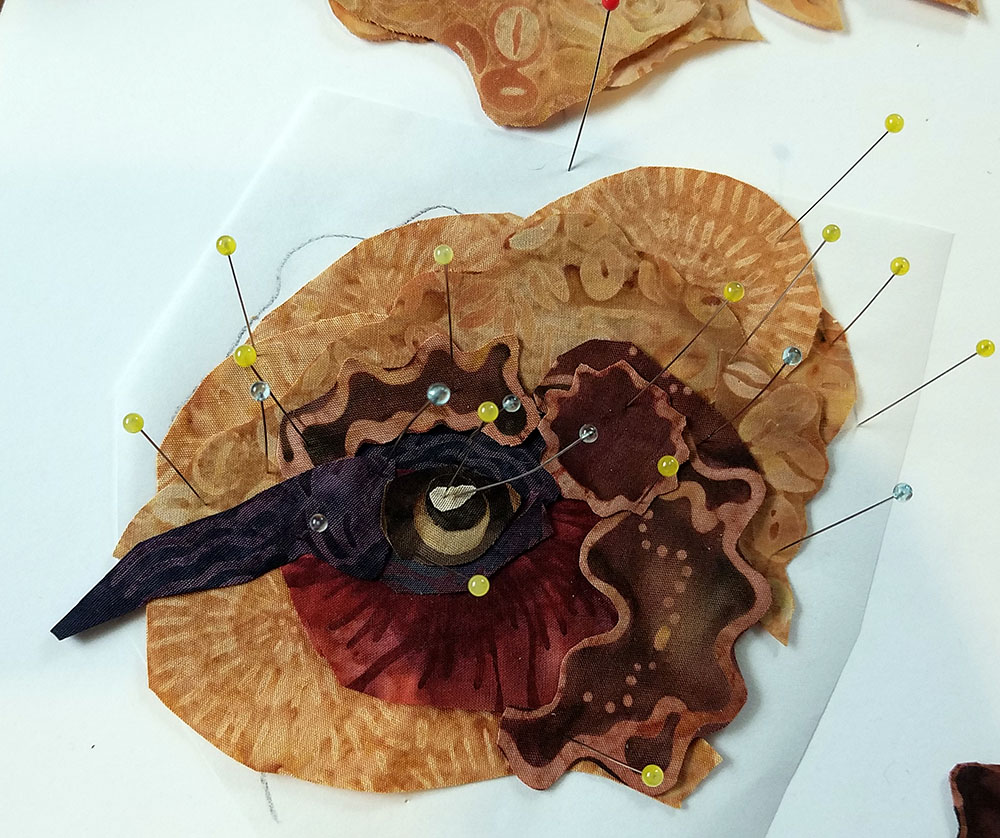
I think it was between Day Two and Three that Michelle took on his eyes—a detail of one is above. I love how she used the outlined shapes in one of her fabrics to portray the dark “patches” seen in the depths of his eye sockets, and the curved lines on a dark red for the dark shape under his eyes. A great use of the designs she found in her fabrics. The eyes were in place as class began for the day and they made Hugo come alive and gave him a deep soulfulness. And then Michelle took off finishing the rest of his first draft—all the way down to his toes.


From Michele:
The online class allowed me to participate in the comfort of my home. If I needed additional fabric, supplies or tulle, I could look for it. How do ladies travel to class with fabric, do they share? I now realize how perfect those flower fabrics I passed in the store are important to fabric collage. I am on a mission. Your online class was a success because the two of you spent hours preparing and preplanning.
The breakout rooms worked great, my greatest enjoyment was listening to Susan explain to each of us “In the Dog House” group, helpful ideas, techniques, and drawings, which we could take pictures and refer back to them after class was over. I would be the shy person who would stay to myself and feel I would be imposing on a person’s privacy, should I want to listen during the personal enrichment time.
In the “Pet Shop”
A dog, a fish, and two birds filled out the the Pet Shop breakout room.
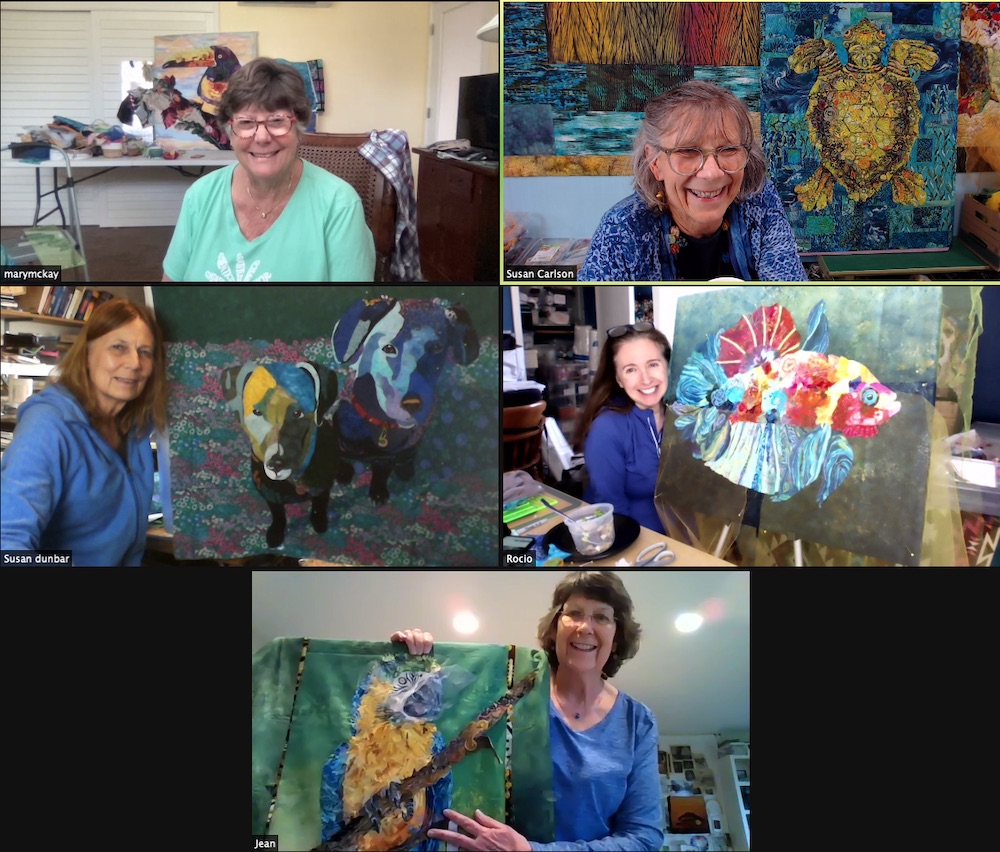
Susan Dunbar—Susan was attending the class with her daughter-in-law Rocio, so even though she had her dogs as subjects, Moncho and Kelso, I placed her in this group so she and Rocio could visit online while working.
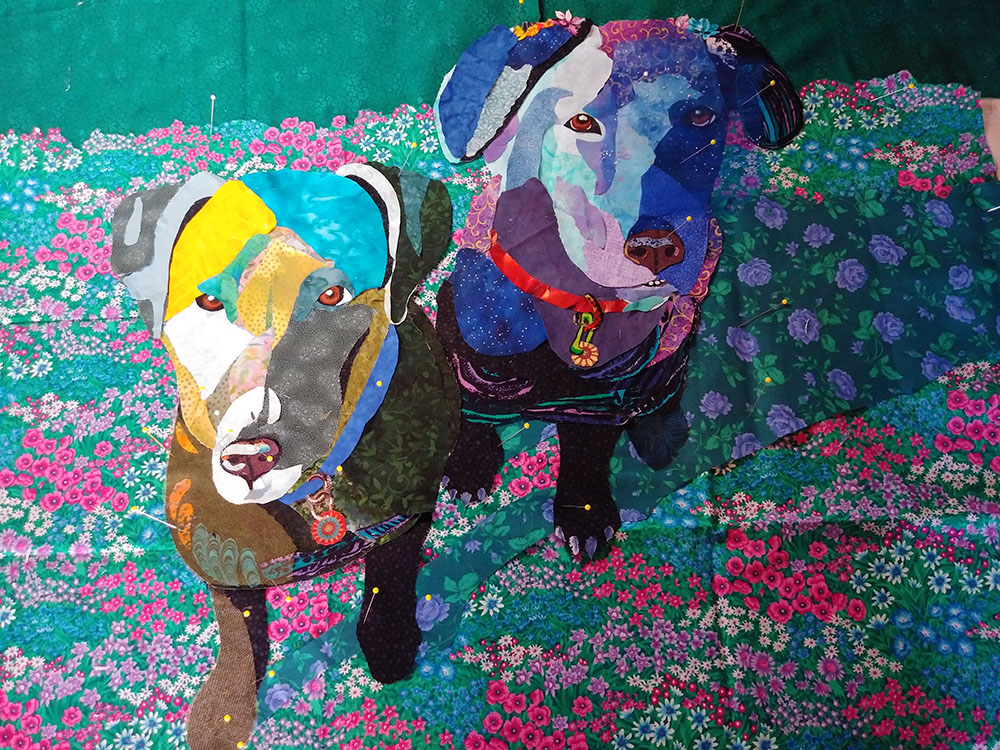
Not just one, but TWO black dogs! Black animals are tough. Susan’s original photo below was taken in bright sunshine, which made deep shadows, obscuring the details on the dog’s chests and right sides of their faces. In order to help Susan see the shape of the dogs in those undefined areas, Tom took her photo and brightened it. That photographic value adjustment blew out the highlighted areas, but brought out details in the shadows, helping Susan to define the structure of the dogs, seen in her drawing below, and also in the later draft above.


Susan is a painter, and I could see that in how she blocked in the color values of Moncho’s face and then body in the photos below.


Each dog had his own color palette of fabrics to bring out their individual personalities—and Kelso on the left, does look more thoughtful, and Moncho more playful—or maybe it’s Moncho’s toothy underbite that gives him a bit of goofiness. But it’s their eyes that are captivating, and their noses that are lovable in their slight heart-shapes.
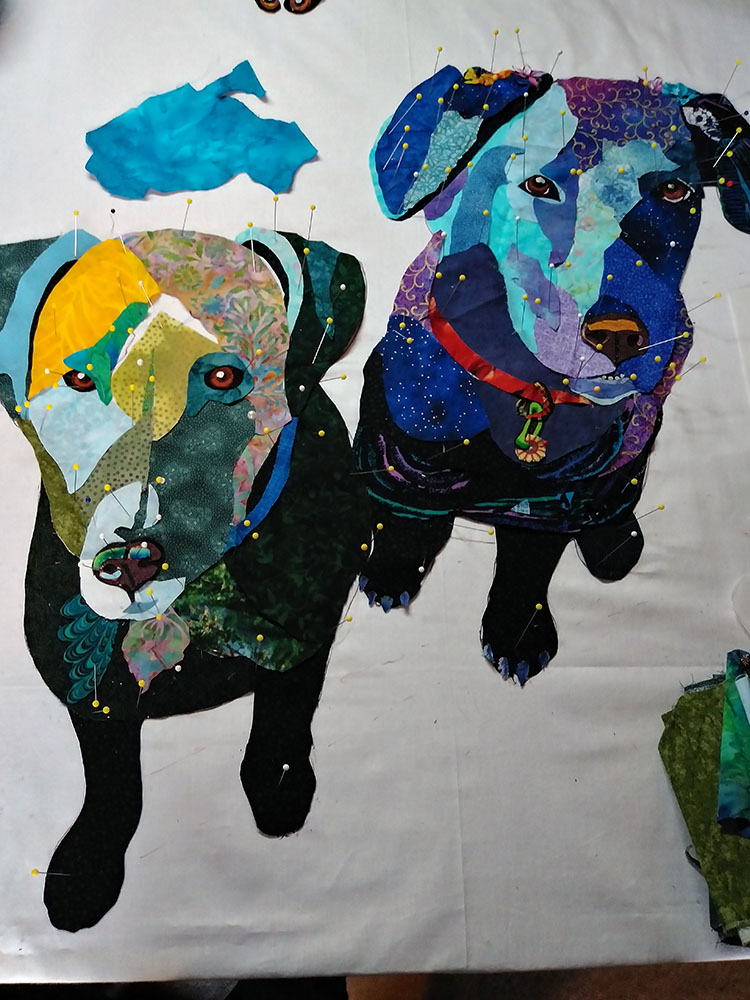
By the end of class, Susan had both dogs to the point where she could cut them from the foundation fabric, and then took photos of them arranged on various background options. It was fun to then flip through those photos with her to get impressions of what we each thought worked best.
From Susan:
The Live Online Class was clearly explained and so organized from the Class Overview to Pre-Class Coaching to pre-recorded instruction, to live one-on-one, and daily class schedules with specific instructions on how to create and finish our fabric collages that everything was well covered and I can’t think of anything that needs improvement!
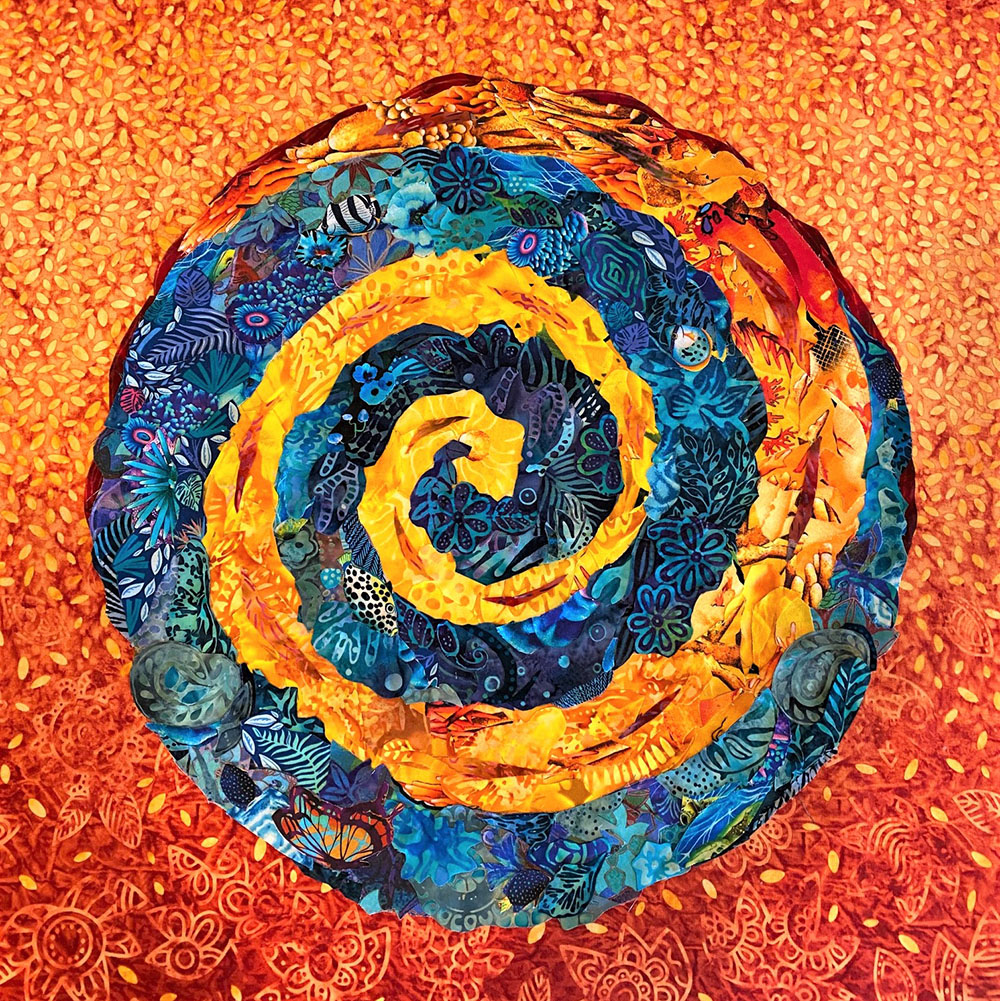
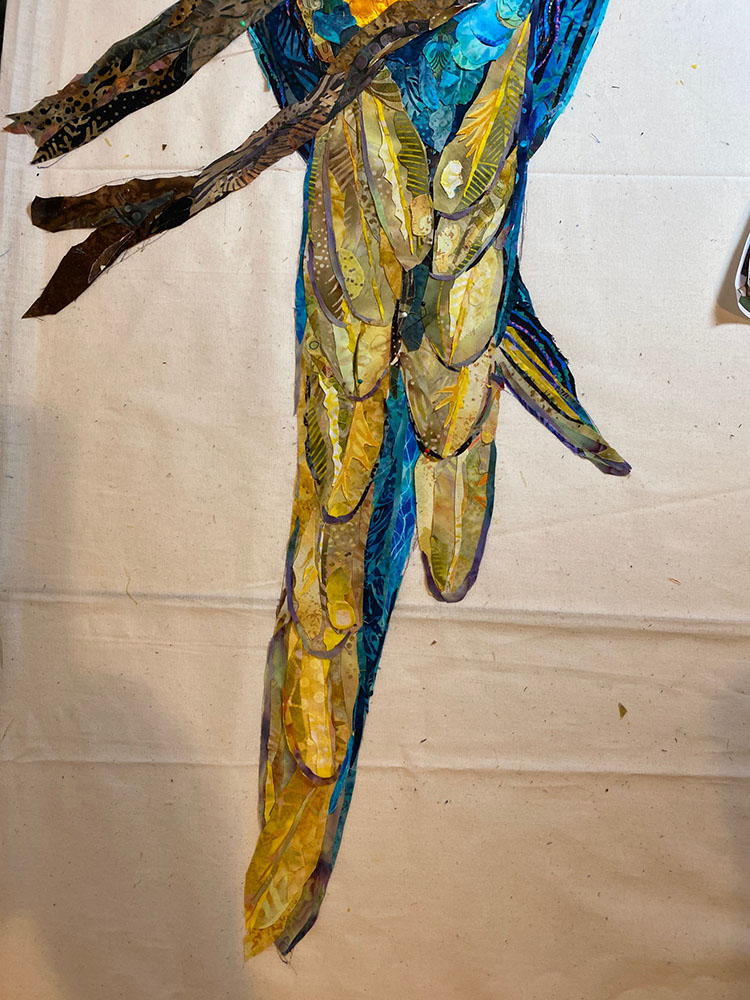
Jean McCreary—The brilliant macaw that Jean chose as her subject was one she photographed while on a trip to Kenya. Jean had no need to imagine this bird in any colors other than its own bright oranges and blues. Before class began, she had already selected her palette and completed a spiral exercise, familiarizing herself with the colors and fabrics and how they played against each other.


In our pre-class session though, we did talk about how there was a teal color in the grays of the bill, and how a graphic black and white print could possibly be rearranged to mimic the pattern on his face. Well, that was inspiring enough for Jean to work over the weekend to arrive on the first day of class with the first draft of Mr Macaw’s head (above) completed!
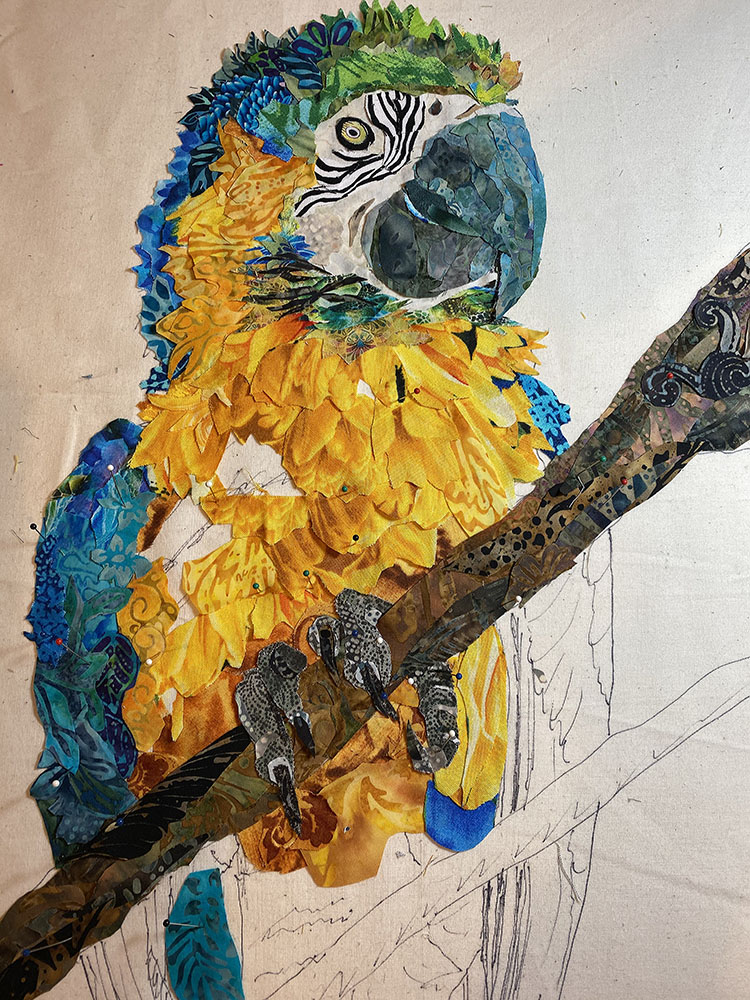
The rest of the week was working down the length of the bird—feather by feather. Jean had some great bird-foot fabric with spotted linear textures, and the claws materialized seemingly effortlessly (at least from my end). In order to set them out and show them off better from the feathers behind them, Jean increased the contrast by lightening up the feathers, You can see the difference in the photos above and below.


I don’t think Jean gave herself many breaks over the week, and she hit a wall with the tail feathers. It didn’t seem that she liked those particular fabrics. But to me, they looked spot-on, so I encouraged her to keep plugging away on them. Which she did, and they look fabulous.
A single piece of luscious gradated green fabric—what you see below is the entire piece Jean had—looked beautiful behind the macaw. But we both thought a little more interest in the background might be nice, so I did what I usually do when students are questioning the background, I asked about the story of the bird.
Jean was in Kenya, walking and paying more attention to looking for snakes on the ground when she saw droppings, looked up and saw the bird in a tree. A great memory for her. She brought out African fabrics she had purchased on that trip from a woman at a market stall, to show me and play with. Then somewhere around day four of class, Jean did some further research and discovered, somewhat to her disappointment, that macaws are not native to Africa—South America yes, Africa no. Her bird must have been brought there. Personally, I thought this made this an even better story of a displaced macaw in Kenya. So with some gentle encouragement from both myself and Tom, Jean kept reworking her background fabric possibilities into a nice balance of greens and (later) borders of the African fabrics, that told her bird’s story.
From Jean:
I lost patience and was frustrated with myself and was mired in doing draft after draft that didn’t seem right. Susan gently and calmly guided me back to the vision, showing what stood out among each of the drafts and suggesting what to retain and what to rework. By the end of the day I was energized and back on track! This was the most intense, individualized and successful learning experience for collage quilters I have ever taken, bar none.
Mary McKay—This was Mary’s second Live Online Class with me, having just attended my March 2021 Live Online Class. Mary wanted to work on two quilts, both of which were pretty far along in the process. Her goal for the week was to finish the piecing of both of them so that she could move on the quilting. Mary has also taken several fabric collage coaching sessions with me over the past year.
Mary’s first quilt will be familiar to those who saw the post about the Live Online Class in March, where she began this project of an aracari, a toucan relative.
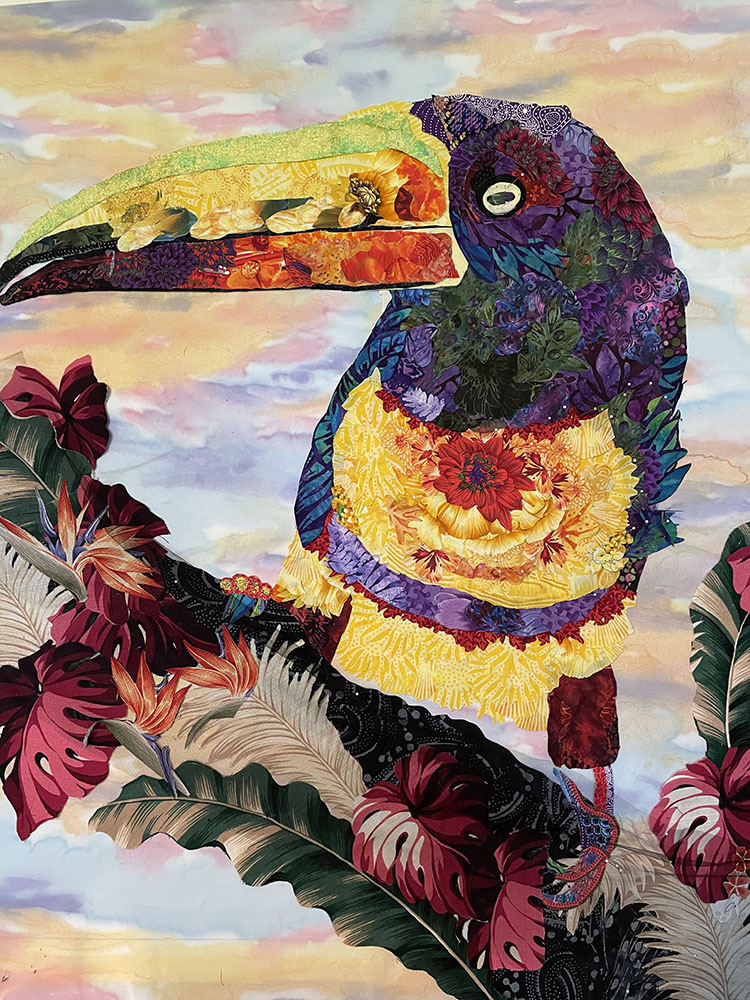
Mary didn’t have far to go to complete this bird, definitely third and final draft material. But it’s the attention to those details that can make such a difference. The photo below left, is where Mary was at the start of this class, the above photo is finished.
The unusual beak of this bird is much better defined with extra contrast, his chest feathers have much more interest now, as do his claws, and the branch and foliage have been tamed to a lushly collaged perch for this handsome fellow. A beautiful piece of handpainted fabric from Skydyes completes the vision. And with just a little push here and there, Mary played with glittered sheer fabrics to add a little sheen on his beak, and there’s a touch of sequins as his feathers curve over his forehead. Good on ya, Mary.


The other project Mary brought to finish in class is a collage of her grandson, Jason. I have worked with her from the beginning of this piece through several Fabric Collage Coaching sessions, starting with her photo and drawing.
Jason’s portrait is oh so close to being finished. With just a little more tweaking for the nose to come, his lips and chin I believe can now be crossed off the third draft list. Mary has since reworked the water to show more of Jason. I do hope to see both of Mary’s collages sometime soon in a Finish Line blog post.


From Mary:
This was my second online class with Susan and it just keeps getting better!
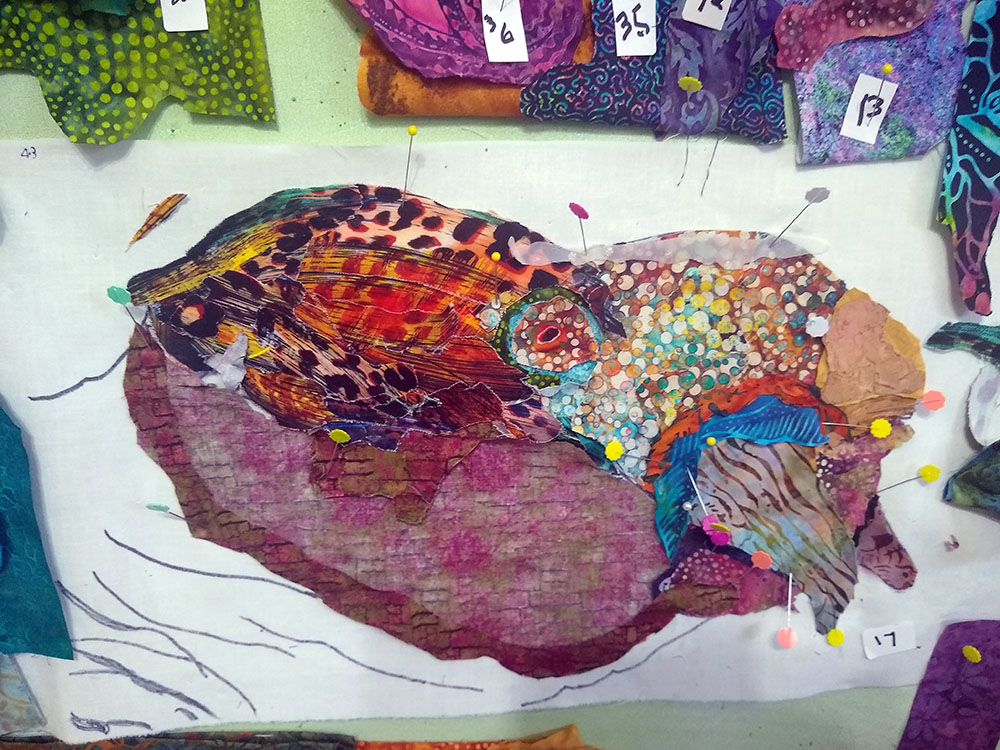
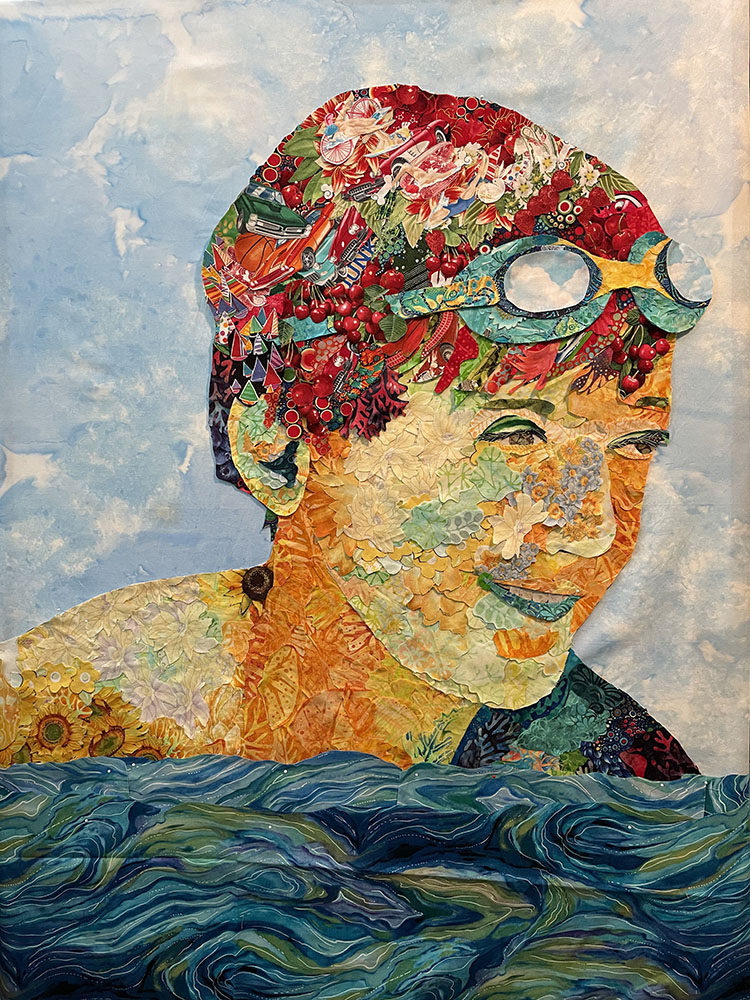
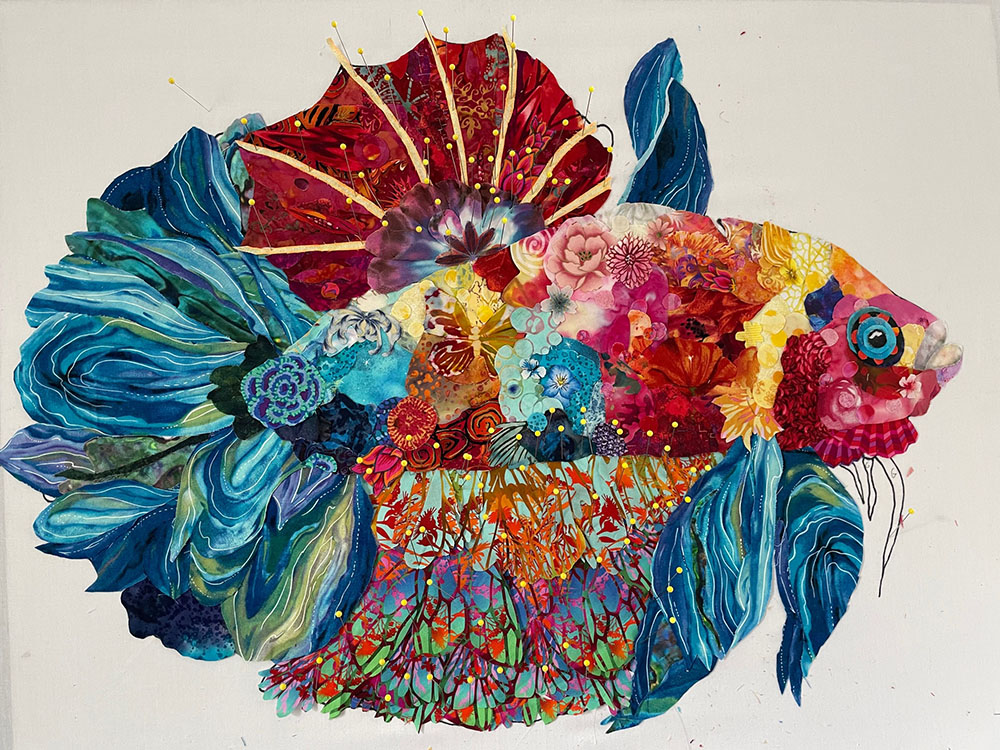
Rocio—We’ll finish up this online class post with a lovely fish portrait. Rocio intended to use my “Carpe Carpem” pattern for her fish, but after seeing her “inspiration” betta fish photos, I encouraged her to create her own design. She combined her favorite fish parts of the three photos and created her own unique Rocio-fish.
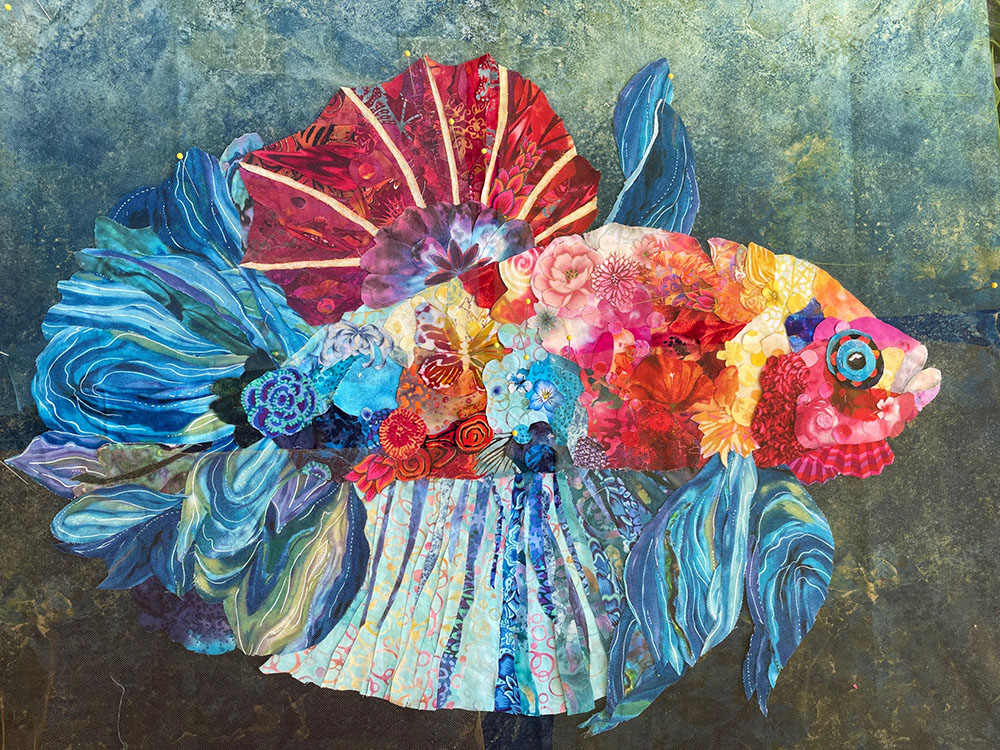


Rocio created a fantastic design by selecting parts of those three different fish she had chosen for color inspiration. She had her fabric palette ready to go and the beautiful fish body of variegating colors came together pretty quickly. Sure, there was some editing, but you can’t edit what isn’t there, and Rocio added many details of spots and other small details to help smooth color transitions. She was another student who did a lot of the work outside of class time, so it was always fun for me to see what was new and what had changed by the start of each day.


Sometimes all you need is one perfect fabric to cut apart and rearrange, and that was the case for the fish tail fabric. Cut and done. The same fabric was reflected on the front fins as well. The top and bottom fins were a whole different story and were fully collaged and totally impressive. Each red section of the top fin is separately collaged and has so much interest worked into each of them.
And the bottom fin? If I remember correctly, it completely changed four times. Rocio took a lot of photos along the way, which allowed her to see this large fish on a smaller scale through her camera. That change in perspective, in addition to changing the photos to black and white, brought out areas that were perhaps lacking in value or confusing in pattern, and Rocio acted on what she saw. The final version of the fish on its background, shows a lower fin with nicely undulating straight cuts of fabrics and a gradation of values that contrast very nicely to the curves in the tail and front fin fabric. I wonder though, will this really be the final version? Only time, and a future Finish Line post, will tell.
From Rocio:
First class with Susan… but definitely not my last 🙂 I loved the small class size and the camaraderie that was fostered by the format. Susan was always full of energy and good humor, patient and encouraging, and Tom was a fantastic tech maven as well as additional commentator.
Because of my family’s health circumstances, it’d be next to impossible for me to absent myself from home for a week. Also it’s very difficult to get into any of Susan’s in-person classes, they get solidly booked so far in advance. It’s got to be hard to be so popular 🙂
Wow Tou have a great success all of the collages came out wonderful
Wow, Wow, Wow, Wow, Wow, Wow, Wow to all you absolutely talented ladies. Fantastic work, colors exceptional. What a pleasure to be viewing this blog. Thank you for sharing … brilliant work, cheers to you all!
I had such a fabulous experience! I hands down would do another class with Susan online or in person! Tom and Susan are a great team and very encouraging!
These were awesome!!!