
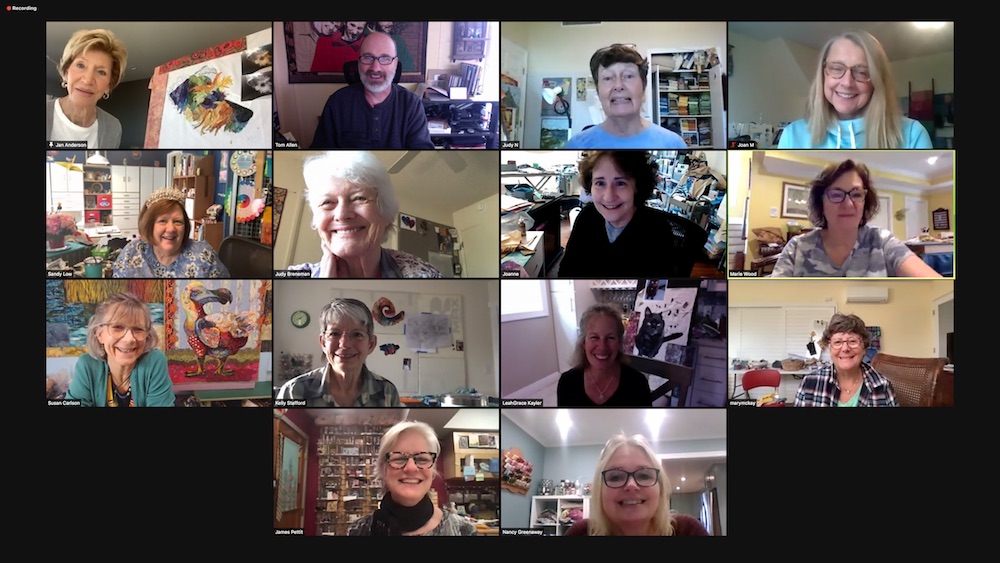
I expect that I will look back fondly on the week ending just seven days ago for a very long time. My first ever live online fabric collage class was as successful as I dreamed it could be. Almost exactly a year prior to the class the pandemic was officially declared, now here I was sitting in my studio, teaching fabric collage to twelve students from all over the country (and Canada!).
Above are just four examples of work done by those students—clockwise from upper left by; LeahGrace Kayler, Mary McKay, Joan Malone, and Jan Anderson. Below is the full “classroom”—you’ll meet everyone and their subjects later in the post.
My husband Tom, and I didn’t go into this class unprepared. It took a lot of planning and practice. Months of Thursday Night in My Studio Live! presentations had familiarized us with the Zoom conference software. Dozens of student fabric collage coaching sessions had given me practice with the annotation tools that allow me to draw on the screen in a way that both my student and I can see.
Even so I wasn’t without doubt. When we first started considering a live online class, I wondered how we could possibly recreate the experience of an in-person class. However, three ideas or features gave me the confidence that we could do it.
First, we made membership in the Fabric Collage Master Class a prerequisite. This online learning resource became the “textbook” for the class, giving my students a reference they could study beforehand and return to for a refresher anytime they needed.
Second, I met with each student the week prior to class in a 45-minute coaching session. I got to meet them, learn a bit about them and their fabric collage goals, give them feedback on their subjects and the drawn patterns they had made. I could also guide their preliminary fabric selection. This way both I and they would be confident they would be ready on day one of class.
The third idea was to pre-record my daily morning presentations. In an in-person class, I typically take the first hour of the day to demonstrate a particular technique that students will need to understand the process and to answer questions. By pre-recording these morning demos, which expanded on the information already found in the Fabric Collage Master Class, I could instead tailor my morning presentations to what the students in this particular class really needed, and have plenty of time for questions. See the Dog Nose Demo Time Lapse below for a sped up example of a live demo I did for my students.
Giving Feedback via Zoom Annotation
The interaction between student and teacher is at the heart of any class. I like to give my students as much of my attention as possible. By far, I spend most of the time going from student to student giving feedback on their works in progress. In an in-person class, the method of giving feedback is obvious: I walk up to them, engage by asking a few questions, tell them what I see, and then we talk about how to achieve their vision. I can paw through their fabrics, take a picture with my iPad so we can look at it from a different perspective, even pick up their scissors and cut.
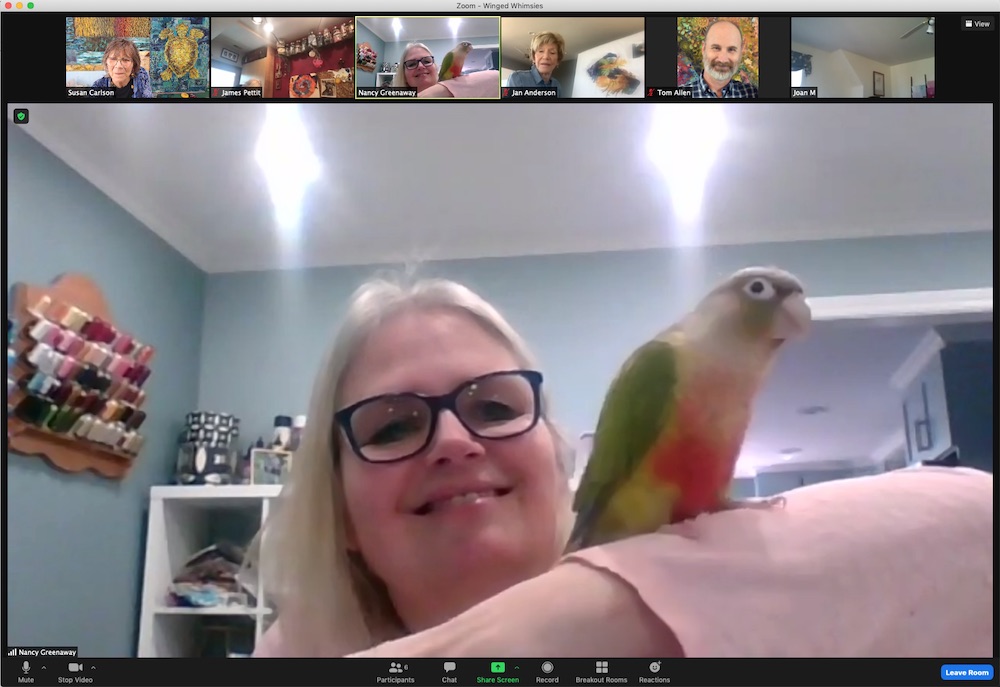
While I can’t reproduce the physical interaction with the student and their quilt online, I think I’ve found ways to adapt so that giving feedback is at least as effective. In order to view their work, students send me (or rather Tom—who’s also at class start to finish) pictures of their collage in progress. Tom then compiles the photos in an online slide program that he and I both have access to on separate computers. Tom follows along as I talk to students in a particular breakout room (see below). When I get to the last person in one room, he jumps ahead to the next and asks those students to send him their most recent photos. That way, I’ll constantly have the most updated images to work with for each student.
Using Zoom annotation tools, I draw right on the images of their quilts. Instead of (in-person) pointing with my finger, I can circle or outline or draw arrows. Then when I’m sure a student understands, they can take a screenshot (or photo with a cellphone) so they have a record of what we discussed to refer to later. Students also have the option of recording their feedback session.
In the slide show below are examples of annotations made on a photo from each student at some point during the week.
The Breakout Rooms
Zoom has a feature called breakout rooms. These are mini-meetings within the overall meeting that allows you to group people into smaller combinations. We created three breakout rooms with four students per room. They were assigned using a few criteria: those with the most experience or who had had a number of coaching sessions with me were assigned to the “Long Haulers” room. The other two rooms were grouped by subject matter (as you will see): “Winged Whimsies” and “CatBirds.” (The students in the latter two rooms came up with the names for their groups, I may have been responsible for the “Long-Haulers,” a nod to the COVID-inspired coaching sessions begun last year, and the fact that these ladies have stuck with me.)
Organizing the breakout rooms this way allowed me to give feedback to students in groups of four. Because they were mostly grouped by subject matter, what I was saying to one student, another student might find applicable to their collage. Listening in on (and watching the annotation I was doing of) another’s collage was a cross-educational benefit.
Of course, the other benefit was that when I was not in a particular room, the group could socialize freely without interrupting the person receiving feedback.
Breakout Room 1: The Long Haulers
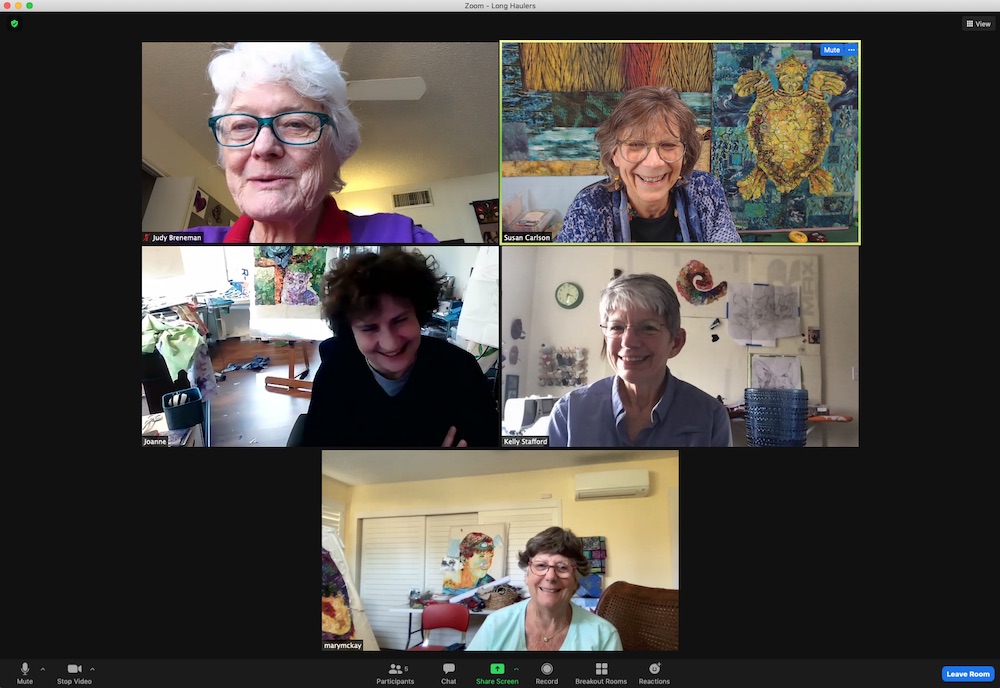
This group was one made up of students I have been working with for multiple coaching sessions and/or had taken in-person classes with me. Their experience meant that I could expect they had a certain level of expertise and understanding of the collage process. Also, I was familiar with their learning styles.
You can click on any of the photos to see them larger on your screen.
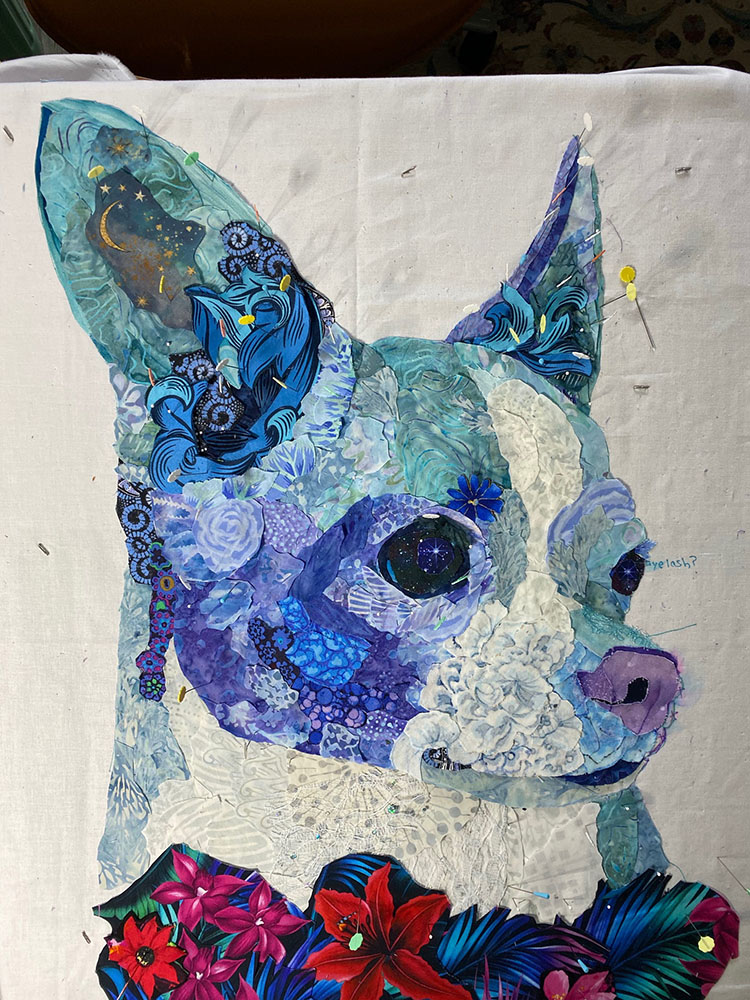
Kelly Stafford—I had previously consulted with Kelly on her portrait of a horse and later, a couple cats. In this class she was working on a commemorative portrait of cute little Roscoe the chihuahua, recently passed away, and having belonged to a friend of her daughter’s. One of Kelly’s goals was to create this portrait in unrealistic colors, and we found that working with the idea of warm (aqua) blues versus cool (purple) blues was the way to give the most interest and dimension. And let’s hear some oohs and ahhs for Roscoe’s lovely lavender nose.


From Kelly:
Thank you! You did so much. I liked the pre-class videos (appreciated the new tips), mix of teaching approaches, and accessibility. I felt like it was a coaching session on steroids. I would highly recommend this class to any and all. Hope you keep offering online content.
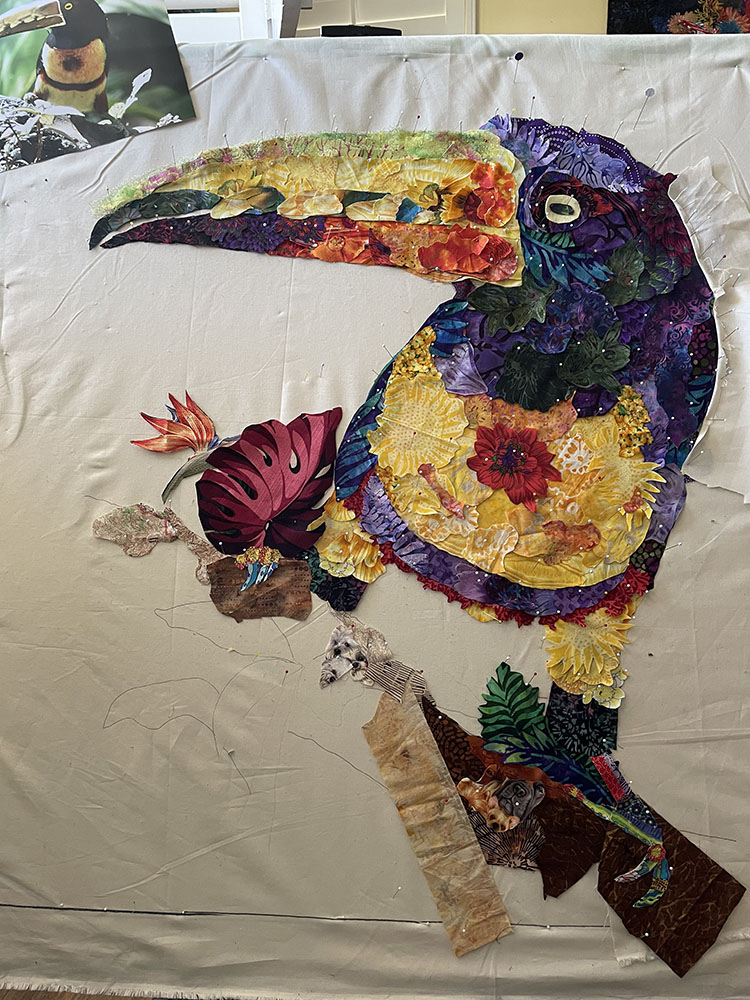
Mary McKay—I first met Mary in a class through MISA—the Madeline Island School of the Arts—at Tanque Verde Ranch in Tucson, Arizona—her finished quilt can be seen here. This is now Mary’s fourth(?) collage, and I’ve been coaching her most recently on a portrait of her grandson (still in progress). Mary chose this Costa Rican aracari (a relative of the toucan) that she photographed. She wanted to reflect its bold colors in her own fabric choices—note the use of the dark-valued purples, greens, and reds to translate the black feathers of the bird.


Having taken an in-person class with me before, Mary had this to say when asked to compare the two experiences:
The stress level was so much less and in my mind it compensates for the difference in relationship building. Sleeping in my own bed, eating whatever Frank heated up from the freezer, being able to walk in the yard made it possible to “walk away” from the class more easily than being away from home. Being able to take screen shots [of Susan’s annotations] is a huge aid—and more helpful in a way than in-person classes because you can go back and refer to them.
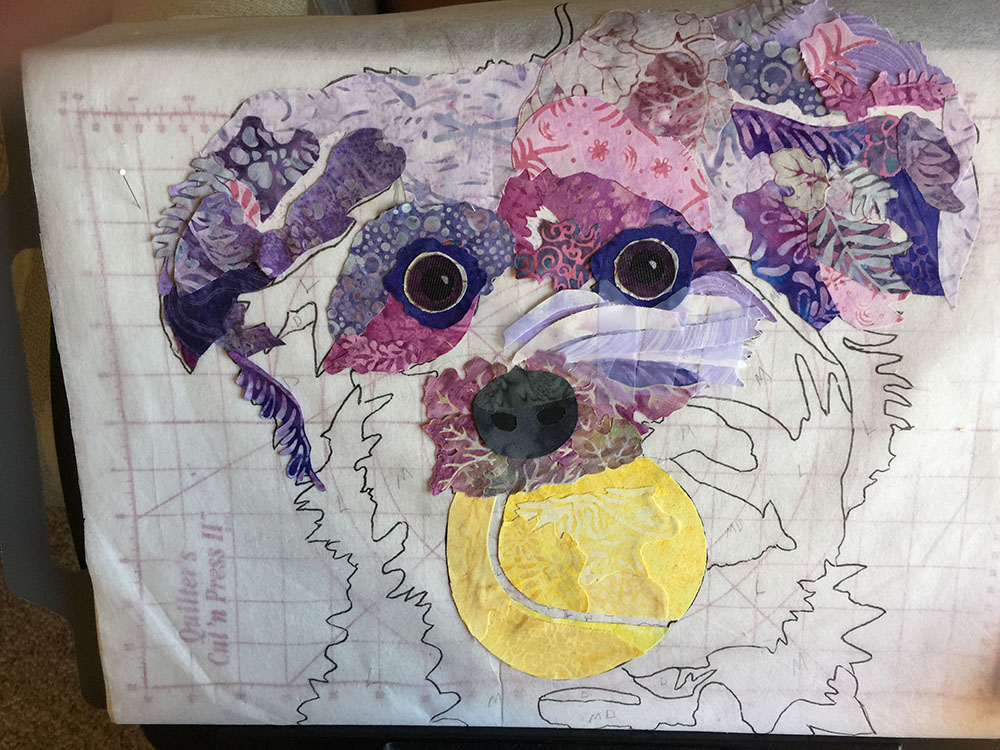
Judy Breneman—Judy has been a Patreon supporter for some time and has taken advantage of the video feedback I give contributors at the $10 and $20 per month levels. During these live monthly Zoom meetings, I share the work of three or four of my supporters’ collages and give feedback if they request it. Judy has been sharing and learning through that forum. This week’s image of a sweet little pup is a break from her ongoing collage series of wild desert animals from her yard in Arizona. Judy’s goal was to work with unrealistic colors for “Zoey” and knew that the long strands of fluffy fur would be her particular challenge. Judy also seemed to be avoiding the tennis ball, so we were sure to get started on that before the week was up.


Judy definitely saw the upside of learning from her studio:
We have all our stuff in our own sewing space. Huge savings from travel, lodging and meals. I liked the movement from full group learning experiences to small group work time.
Joanne Schwartz—I have Zoom coached Joanne off and on throughout the past year on a few different quilt collages. She graciously allowed us to feature her and a portrait of her friend’s dog “Catch,” in an October 2020 blog post focusing on Zoom coaching. Before last year, Joanne had taken a couple Maine classes with me in 2018, here and an advanced class here.


We have worked on several quilts together and her style and methods have changed with time and experience. In this online class, I teased Joanne as she began a third new collage of Winston and Meggie, her obviously beloved British Shorthair cats. After Day One, Joanne decided that going back to and finishing quilt number one (beginning photos from 2018 above) was the way to best use our week together.
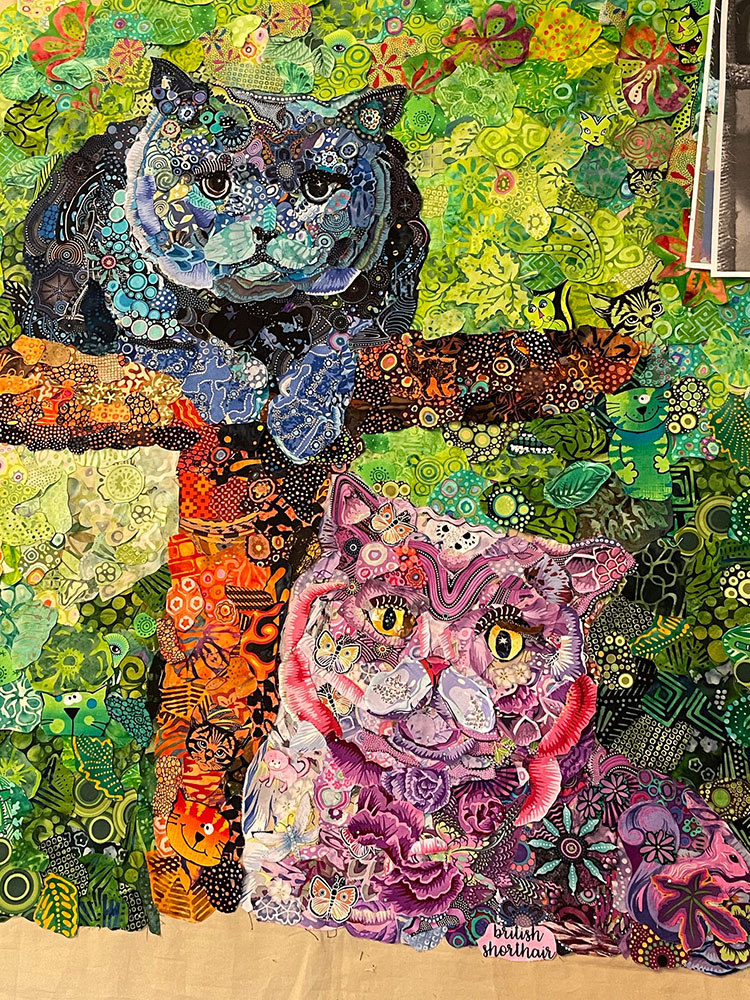
So Joanne skipped from the first draft to the third and final draft of the collage process—taking a fine-toothed comb to the image and listing every little thing we saw that could use some extra attention. Noses, eyes, ears, chins, cheeks. Put them on the list and then check them off one by one. You can see some of those changes below in the before (left) and after (right) pictures. I look forward to hearing when Winston and Meggie are quilted and proudly displayed in Joanne’s home. They’re a couple beauties already.


Breakout Room 2: The CatBirds (a.k.a. The BirdCats)
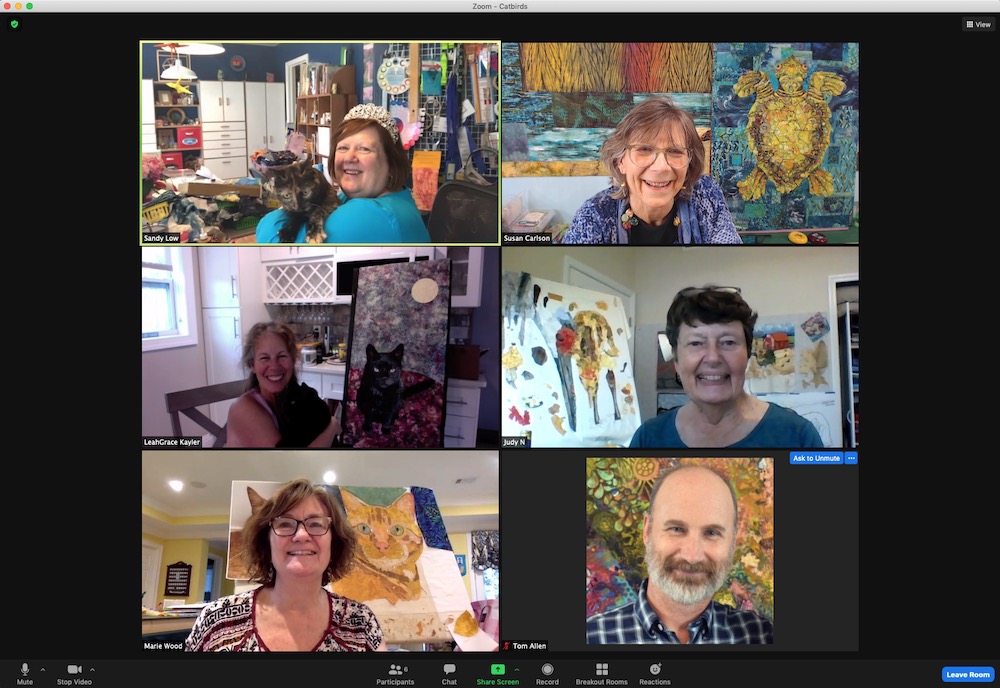
Surprisingly, this group was named such because the students were all making either cats or birds. Imagine that!
Other than LeahGrace Kayler who had taken one coaching session with me, I had taught none of these students before. Grouping people with like abilities and subject matter was helpful not only for me but because they could assist each other by sharing ideas and providing support—which was definitely a recurring theme in the post-class comments we received.
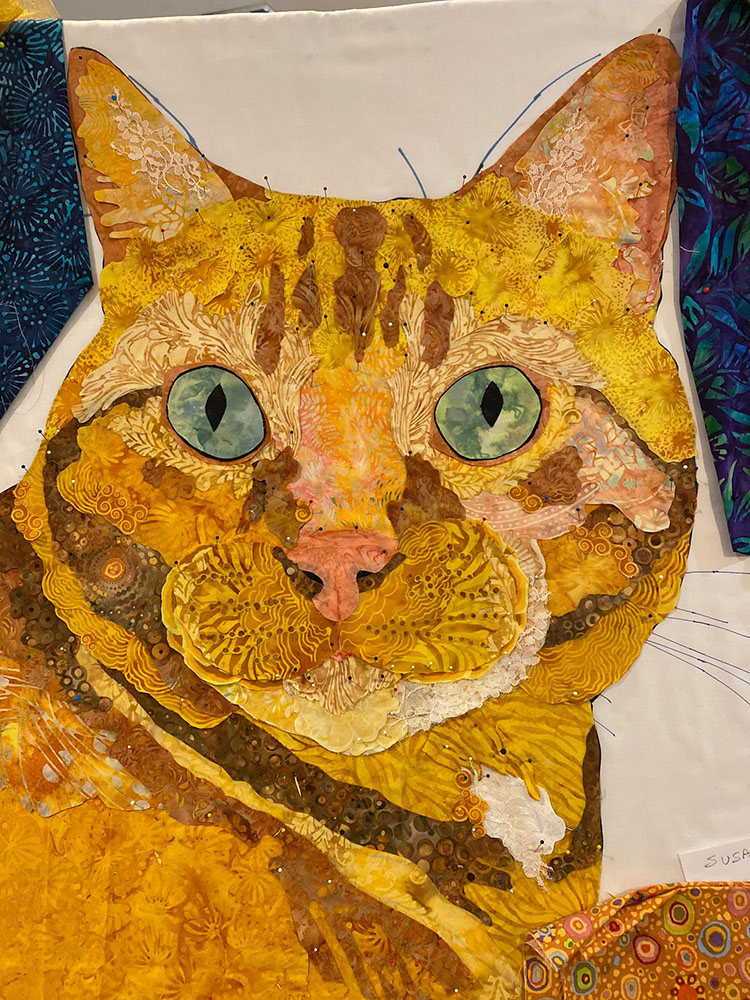
LeahGrace Kayler—LeahGrace made awesome progress in the portrait of her cat Archie—I do believe it’s one of the best black cat collages I’ve seen yet. Black, and other solid colored animals can be tough, but she seemed to breeze through it. Why are they tough? Because in photos, it’s often so hard to see the differences in value, lights and darks, that create form. To give LeahGrace credit, the photo of her cat Archie was as good as one could hope for. It had enough contrast so that with careful observation, she could separate out the cat anatomy and give Archie his “Cattitude.”
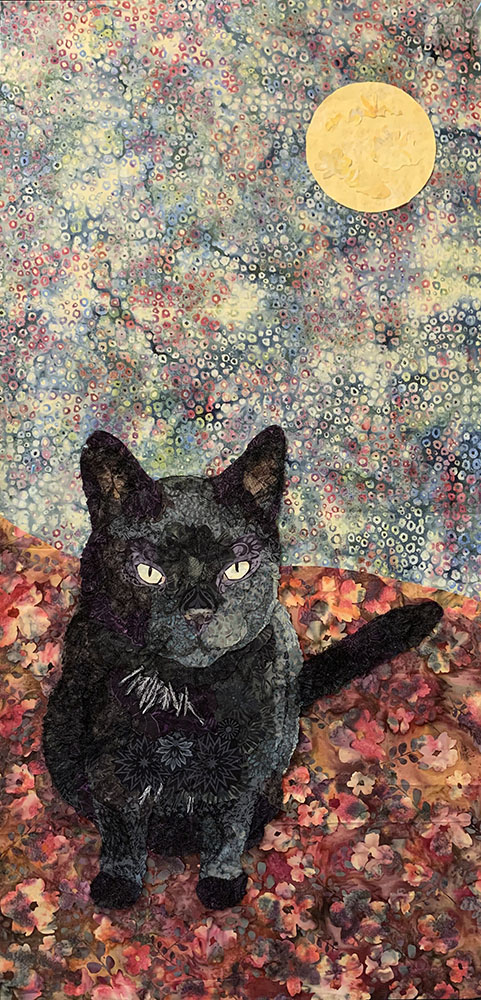


By the end of the week, Archie seemed satisfied with his larger than life image (below), though Baayla the labradoodle felt left out. I think LeahGrace has a new single-colored pet subject to tackle in the future.


I’d like to include everything nice LeahGrace had to say about the class in our post-class survey, because she was very thoughtful and kind. Instead I’ll pick out the comment that includes Tom, because this class was not something I could have done alone. It took both of us, working all day every day to make it work.
From LeahGrace:
I thought you and Tom put together a program that was as carefully crafted as your collages. Small things, like Tom’s endless patience in receiving many photos at once, yet having them ready for your 1:1 coaching sessions right away, meant we didn’t skip a beat. Tom’s constant helping presence and occasional insights about someone’s work were a nice complement to your wonderful teaching sessions as well as your exquisite attention to each of us in coaching sessions. How could you possibly have focused on all the background “stuff”? I thought you offered us the right mix of answering each person’s questions in the 1:1 sessions without making us feel rushed, but also holding us accountable, alongside you, to the reality that there were 11 other eager students in the class.
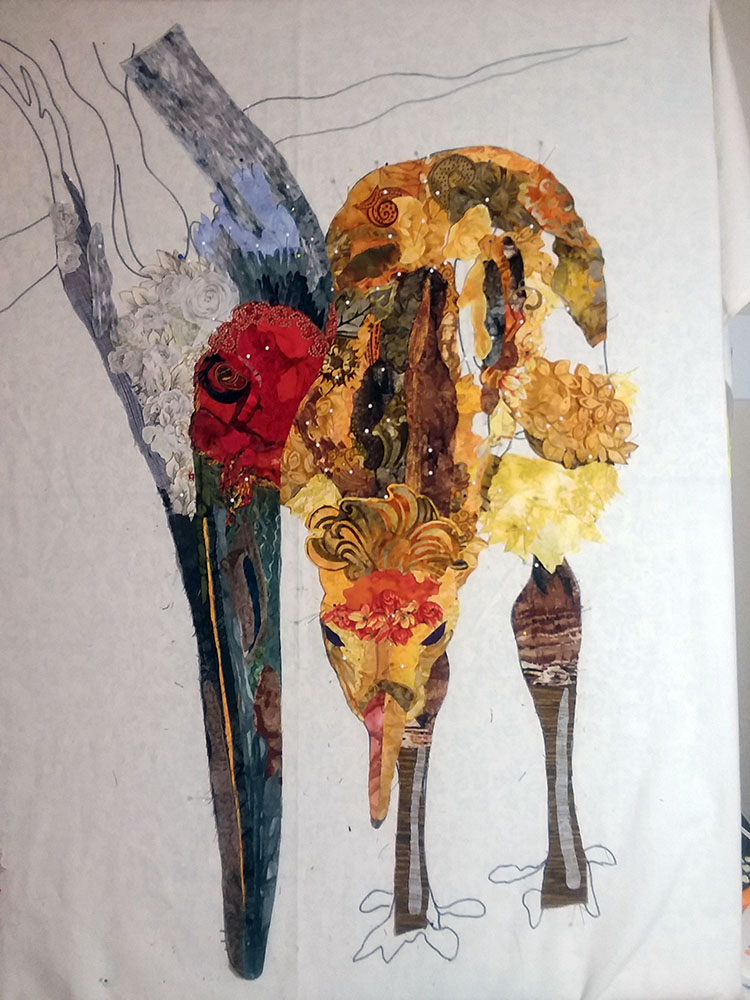
Judy Nichols—Judy’s selection of a sandhill crane and chick was a brave one. Feathers, fluff, long necks and legs are another toughie. Judy’s already done a great job, but lucked out with the composition based on a photo from a friend of hers. The image was cropped to the information she needed to tell us about this mama and baby.
Because all we see of the adult crane is her head, Judy could work quite large, giving her the space to add a lot of detail to both the mama’s face (which is looking gorgeous) and the chick. For scale, refer back to the breakout room screen shot above, behind Judy. Just imagine how large the image would have been if she included the rest of the adult bird. I often tell students that cropping is their friend.


From Judy:
Grouping us together by the subject matter of our pieces was a great idea. Being able to listen to each others’ coaching sessions brought reinforcement of techniques/ideas to my work as well as ways of seeing/handling things that weren’t in my current work, but will undoubtedly appear later. It was like having multiple coaching segments to draw from. Our CatBird team bonded really well and offered ideas, suggestions, and experience to each other.
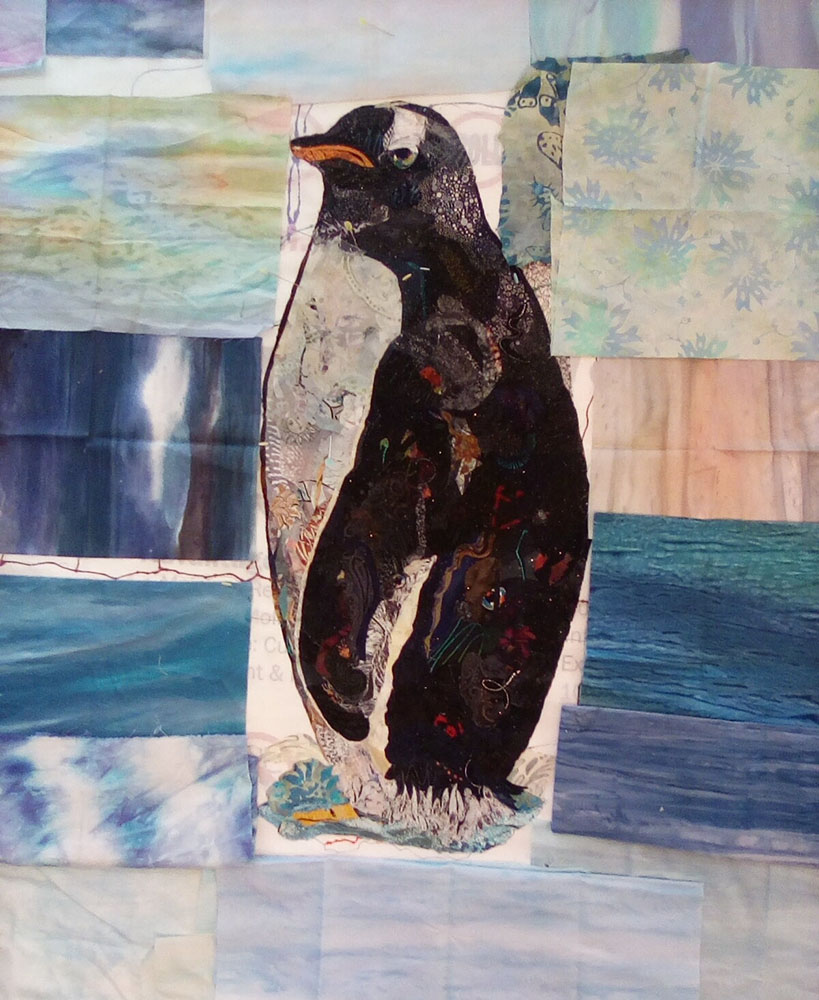
Sandy Low—I was so happy when I saw Sandy sprinkle her black and white penguin with some surprising and interesting flecks of color and pattern. Straight black and white fabric are flat in appearance and don’t work to create form in an image. I saw Sandy was prepared with a variety of values and shades when we went over her fabric selection in pre-class coaching, but when I saw that front flipper come to life, I knew this fellow was going to have some presence.
“Bubbles,” is a particular gentoo penguin in a zoo that Sandy’s daughter works at. Sandy’s nephew studies glaciers in Antarctica and tells how gentoo penguins are loosing their habitat to climate change. We had time in class to talk about the background behind Bubbles and how it could tell his “story.” Sandy already had an action plan for a puddle in the ice at his feet, an open expanse of water, and a receding glacier beyond. I can see from the blocked in fabrics she’s placed behind him that she’s on the right track.


Sandy was so cheerful throughout the class—even as she was trying to keep her dog Penny, from eating the fabric scraps she was generating. She said she really enjoyed the breakout room, allowing her to get to know her fellow classmates in a smaller setting. I’m sure her roommates felt the same.
From Sandy:
When I took Drawing 101, in college, the teacher said that he couldn’t teach us to draw but he could teach us to see. Susan Carlson taught us to see AND the techniques of collage quilting. Her knowledge and patience created a positive learning experience.
Marie Wood—The final CatBird was Marie. Her daughter’s cat, Ziggy, is a proud and brightly colored boy, even in real life. Marie did her tiger in pretty much realistic colors, and big—you’re not going to miss this guy. Again, you can see him in the group photo above, peering over Marie’s shoulder. His size meant that Marie had plenty of space to play with her wide variety of golden ginger patterned fabrics, which in turn helped to define his contours and gave him visual texture.
After the morning presentation on Day Four of class—using sheer fabrics for details—Marie appropriately added bits of lace to Ziggy’s ears, jowls, and chest to help soften and add interest to some of his lightest parts.


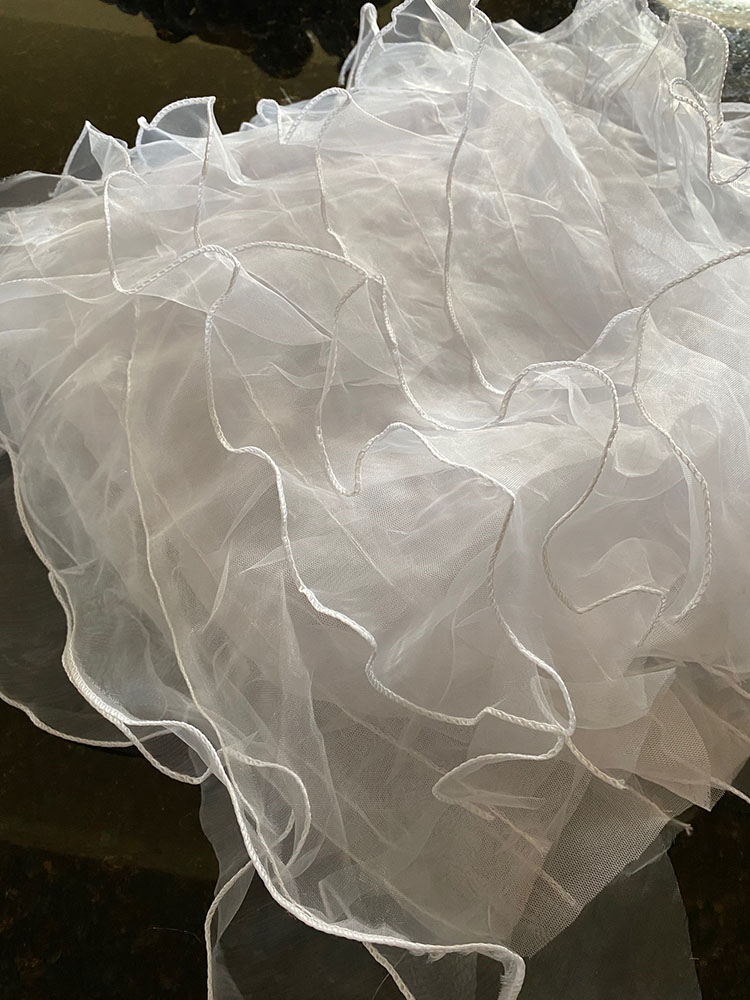
There was some discussion during class about how to make whiskers. Stitching them in during the quilting phase is always an option. But another way is to find a sheer fabric—netting, tulle, or the like—with a linear pattern and color to match the color of the cat’s (or dog’s) whiskers, and fussy-cut the lines out of it. A day or two after class, I received an email from Marie with the image below, saying “Look what I found at JoAnn’s for Ziggy’s whiskers!” Well done.
Breakout Room 3: Winged Whimsies
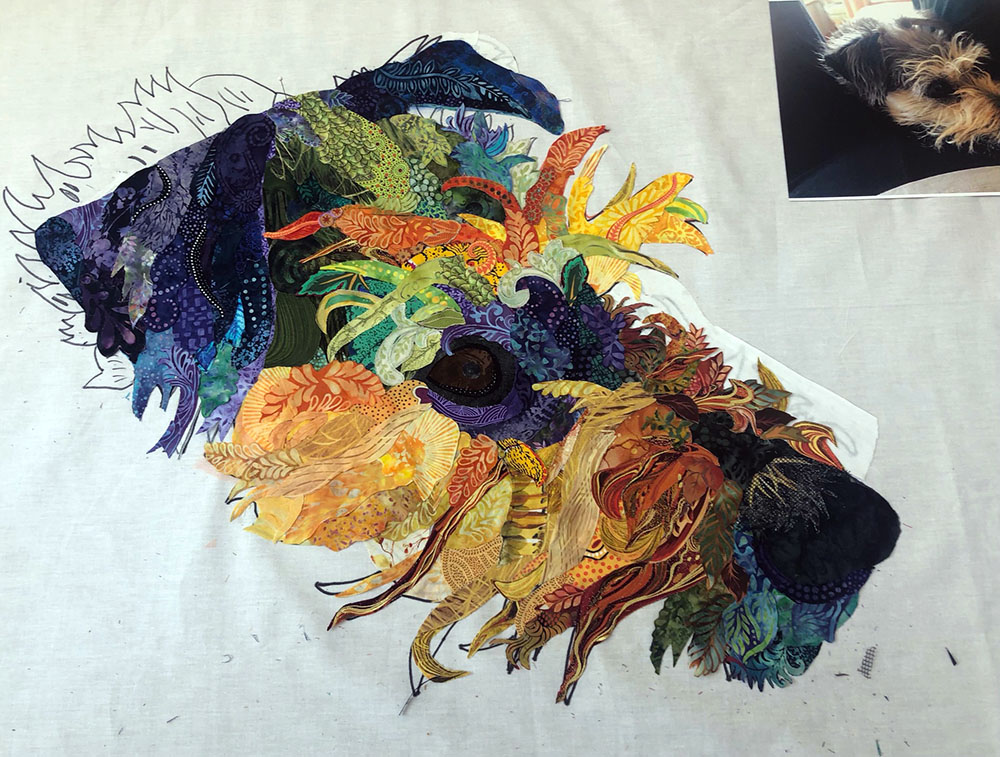
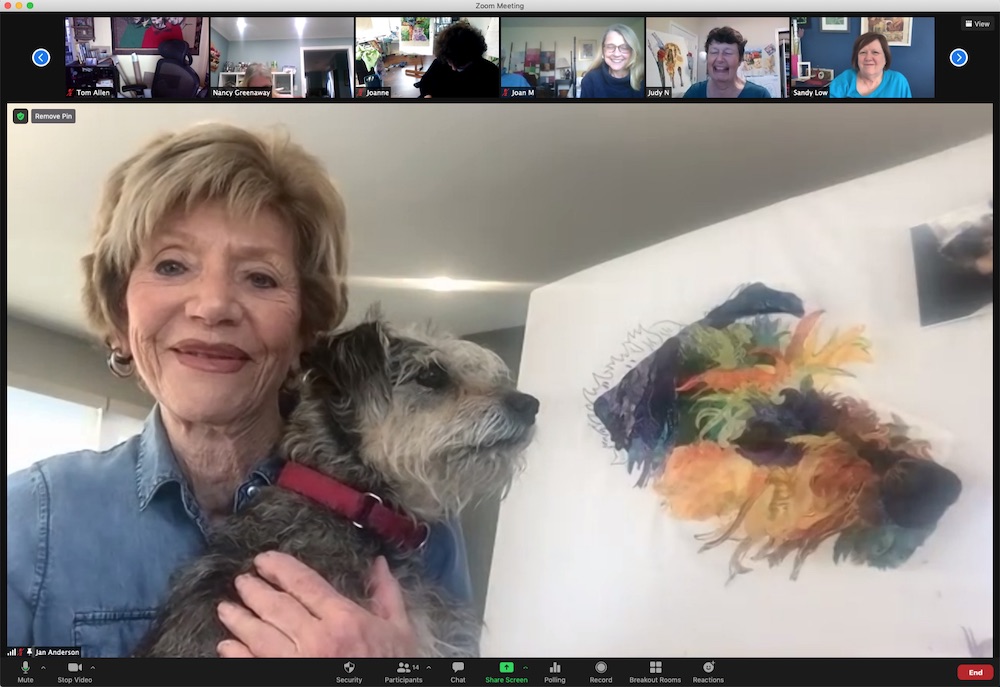
This group was named for the two butterflies (winged) and for the unicorn (whimsy) being created in it. Jan Anderson’s portrait of her dog actually fits as well, since her goal had been to use unrealistic colors and I seem to remember the word “whimsical” mentioned.
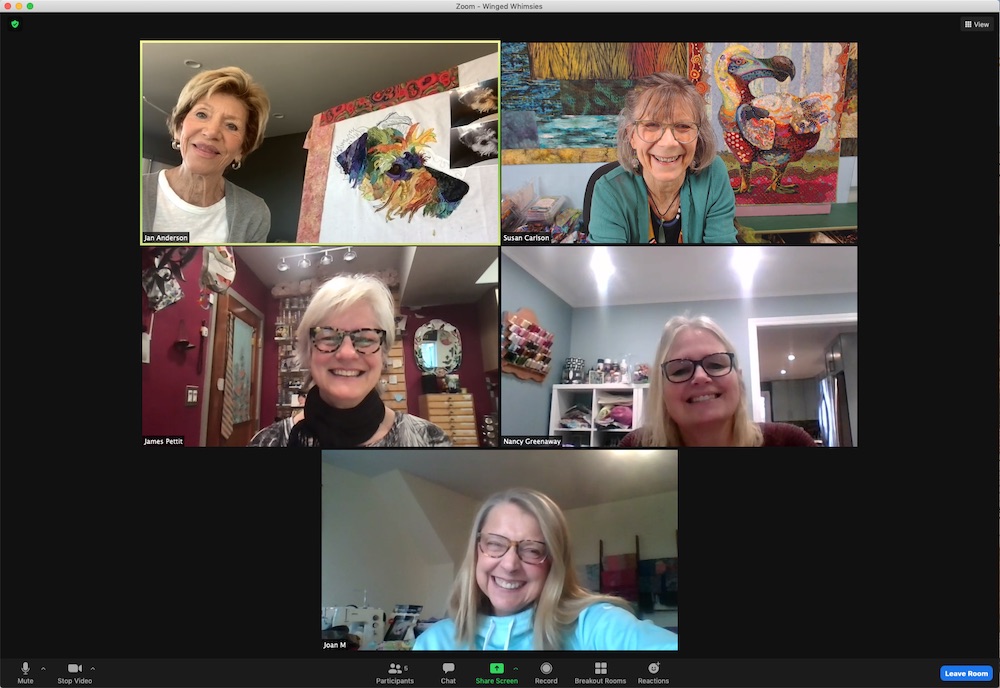
Jan Anderson—Pets are a popular subject in my fabric collage classes. The close connection people feel with their pets often inspires a focus and attention to detail leading to great results. This certainly was the case with Jan Anderson. Her fondness for her rescued schnauzer mix “Maggie” is evident. What a wonderful touch she had with Maggie’s “fluff.” Early on in the process, we discussed how to approach Maggie’s colors. Once Jan decided that Maggie’s grey fur would be cool colors (blues, purples) and her light fur would be warm colors (oranges, yellows), she was on a roll and Maggie came to life.


Jan said she like working from home, giving her more flexibility in her day:
I really liked the system of sending photos of our progress and her spending time with each of us, analyzing our work and suggesting improvements. I also liked the fact that I could work many more hours of the day. That would not have been possible attending an in-person class. I loved the freedom of working and doing other necessary things as needed throughout the day.
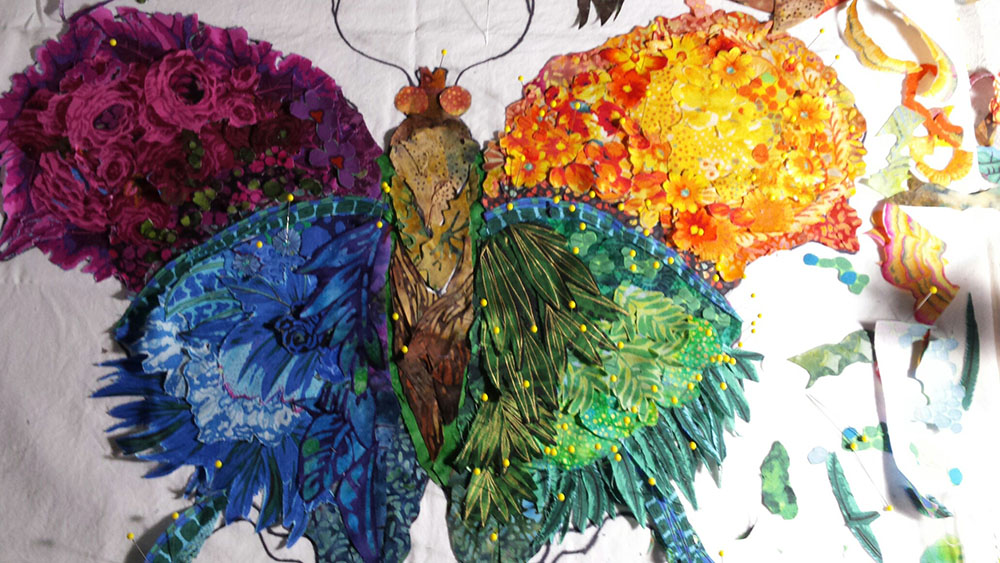
Ros Pettit—Ros changed direction with her butterfly after day one. She had a large initial fabric selection that included fabrics in yellows and oranges, some of which had been her mother’s. Ros also wanted to work with values, so a blending of those fabrics from dark to light values seemed like a good start.


However, images of wing marking variations found in some blue morpho butterflies that Ros sent to me prior to class, should have been a hint that Ros really wanted to work with the luscious blues and aqua fabrics she also had picked out. Luckily that only took a day to figure out and she made big strides on day two and continued to make progress the rest of class, on a totally different butterfly. The way Ros put together her blue fabrics made me think of slices of polished gemstone. Intriguing and beautiful.
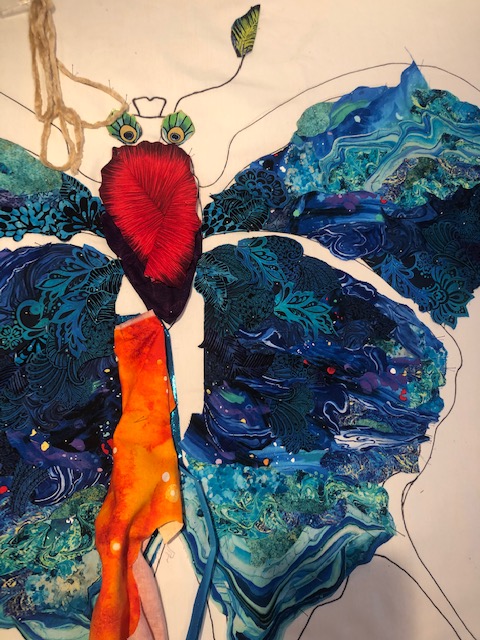
Ros’s husband would sometimes pop in to her studio and make suggestions or play with her fabrics, prompting Ros to playfully suggest he should have taken the class! I wonder if the googly eyes were his contribution.


Joan Malone—Joan took an approach to her butterfly inspired on Day One by that blue morpho article of non symmetrical wings that Ros shared with her as well. But Joan added the thought of “well, why not every color then?” At the beginning of class, Joan said her goal was to better understand working with values. She chose deeply colored and heavily patterned fabrics to make the dark to light transitions—and the result is eye-catching and oh so visually rich.


By Day Four, Joan happy enough with her progress that she switched temporarily to an in-progress sea turtle to get some feedback for shading on his head and neck.


I really appreciate Joan’s comments regarding the class:
Between prior consulting work and completing coursework in professional coaching I’ve had lots of online experience, both leading and attending sessions. I think you’ve done a phenomenal job of anticipating challenges and working to address all skill levels and learning styles. As a true hands on adult learner, I found this experience excellent.
Nancy Greenaway—The final whimsey of the Winged Whimseys is Nancy’s unicorn—based on a photo of a horse—who developed a playful and colorful personality. Nancy’s early comments to me were that this piece was to be about joy, and yellow represents joy to her. Her color choices and subtle adjustments to things like the eye and the mouth, plus that flowing mane with fussy-cut curls of printed shiny sheer fabric, helped to lend a magical and playful air to this collage she is making for her granddaughter.
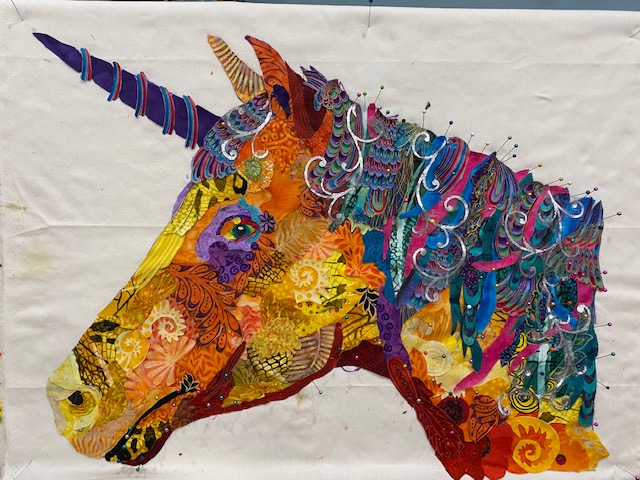


Nancy’s progress on this piece didn’t proceed in a straight line from beginning to end. She had a moment of struggle due to one of my comments, which I didn’t realize until after class. But overcoming that struggle seems to have been an important and memorable experience for her:
On Day 2 or 3 in the afternoon, Susan suggested that my unicorn was looking serious, whereas I wanted it to be joyful. I was fairly deflated for a half hour or hour. I talked with my group as to whether they felt their colours looked the same when Susan shared the screen as they did in person, and they all said their colours were brighter in real life. That made me feel a little better, but still, I looked at the work that I had done, took Susan’s comments to heart as she intended them, constructively, before I was too far along, and I made conscious choices that brightened things up, and even took off two or three pieces of fabric. I felt much better at the end of the afternoon, re-energized, because my Unicorn was definitely taking a more joyful turn. While it was deflating at first, I needed to hear it. That was the entire reason for being in the class with personal consultation. Left to myself, I would have continued on as I was, then maybe gotten to a point when I didn’t like how it had come together, and have it sit unfinished in a closet till the end of time. It was frustrating, but ultimately fantastic!
A couple days after class ended, Nancy sent this to Tom and I:
I wanted to share my daughter’s comment about my Unicorn project: “She is like the Mona Lisa of fabric unicorns. I’m so impressed that you made this and I know you!” Granted she loves me, but she is not one for insincere compliments. Thank you for this. This warms my heart more than you could know. I didn’t know I had this in me, but it could only come out with your help.
Overcoming
It should go without saying that not just Nancy but almost everyone in class had moments of struggle. Fabric collage isn’t necessarily as easy as it may sound, which might not be obvious from the wonderful results these students achieved. Each of these ladies has something that they excel at, whether it’s their job, a craft, or a sport, they all have an ability that they have taken years to hone and perfect. When my students get discouraged, I sometimes remind them of that fact.
Ros Pettit was for decades a professional opera singer. When she was struggling to overcome the original path she had started down on her butterfly, I asked her, “Okay, Ros, how long would it take you to train me to sing an aria at the professional level?”
She said, “With daily training, a couple hours a day—I could have you ready in two or three years.”
Fabric collage takes the same sort of commitment and practice that it takes to excel at any art form. If my students aren’t meeting their expectations, I tell them to go easy on themselves. I’ve been practicing fabric collage for 30 years. That said, I’m here to give them a jump-start in the process and I take pride in helping to guide my students to a satisfying result at whatever stage they’re at right now.
Awesome work ladies! Thank you Susan for sharing this.
Well done to all. What a thoughtful, meaningful experience. Seeing the work and feedback was fun for me.
Susan, your demos are always a great learning experience.
Thank you for sharing.
Epic! It was an epic week. I made steady progress and am continuing to work. Thank you, Susan and Tom, for your incredible patience.
Wow! what fun to re-live the fabulous experiences we had in this class and to re-visit the friends that I made. I’ll certainly take another class if possible!
Susan and Tom,
Congratulations on seeing your dream of online collage classes come to fruition! I applaud your determination and hard work. What a wonderful collaboration between the two of you! I’m delighted for you and look forward to taking a class very soon!
What a wonderful inclusion effort. So many of us don’t or can’t travel as much as we used to, yet we can learn and experience in such a customized experience. I hope you continue offering online classes, even after the pandemic is in the past. I’ve been taking classes via zoom this year and have found them to be a great experience . . . I’m in the comfort of my own home, and have my stash handy for little ah-ha moments. Take care my friends and keep up the forward motion.
They are all very impressive! I was drawn to the cat quilts, since I have 3 cats. Would love to know how the woman created the all black cat. How many fabrics in one color does one need for any of these wonderful quilts? They are all the best I could imagine.
Susan and Tom, thanks for these full descriptions of the interaction with the students in the online format. The students must have had very successful experiences from the looks of the pictures. I especially was glad to see how LeahGrace handled her black cat, making me think more seriously about tackling Tarbaby. Getting a good photograph is such a challenge, as you said! I hope this format is working for you so you don’t have to be out-of-town and away from Tom and other family so much. Congratulations for mastering this new way!
I was wondering how this was going to work. I so want to make a fabric collage, but I’m not ready. I’ve done zoom meeting with breakout rooms – those are very handy. You and Tom thought of everything! And it shows as I read the step by step description of the class and the enthusiasm shown and voiced by your students. Congratulations to you both!
Susan and Tom, I am signed up for the April virtual collage class, and reading this post really helped me think about how to get ready for the class. Thanks so much for all the hard work you have put into making the virtual class work so well! The students for the most recent class did really inspiring projects!
If you’ve read this post and are considering taking an online class with Susan, sign up and enjoy, you deserve it! I had been working individually, using the masterclass, blog posts and attending some Thursday nights in Susan’s studio sessions. Taking the class helped me significantly advance my confidence with collage and my skill in executing my vision. Susan is a gifted teacher and she and Tom have created an excellent online learning experience.