You don't need a lot of specialized tools or materials for fabric collage. The basics are very simple: some fabric, some glue, a pair of scissors, and you can start. But like a lot of tasks, having the right tools or materials for the job can make it much simpler and more enjoyable.

I first came up with my Fabric Collage Toolkit more than two years ago. Since then I have added some items—ones that I overlooked, ones that occurred to me later, and some that were suggested by others. So it has grown and it's about time the whole thing got a new coat of paint.

In the original version I provided a brief description of why I used the tool or material listed. It occurred to me that it might help if I provided even more context by including videos and photos of the item in use. Showing how I use the proportion wheel, for example, might help users decide whether it is a tool worth having on hand. People are always asking me about my "pelican-bladed" appliqué scissors, so I included a video about how I use them.

I also reorganized the listing, breaking the items into sections that further clarify what they're used for and whether they are integral to the fabric collage process or something of an extra. The four sections are: The Basics, Making a Pattern, Sundries, and Inspiration. The Basics are the tools you need to get started. Making a Pattern covers the supplies I use when creating a design to work with. Sundries are those little things that you don't absolutely need but are handy or fun to have. And Inspiration is a list of books, not on fabric collage, but on the artistic process or getting and staying inspired.

I've described why I use the particular version or brand of item I do. Personal preference, experience, and even luck play a part in my choices. There are all sorts of similar makes and models out there and you may have or find another that works better for you. No worries—if it works, it works.


You can use the links provided for the items below by clicking on the images. We are part of the the Amazon.com Associate Program and receive a small portion of whatever sales are generated by using these links, at no extra cost to you.

So what this means is, while I have listed the exact item I would buy, and have found the best price I could on Amazon.com, you may be able to find the item elsewhere or less expensive. And that's okay.

Of course, I'd certainly appreciate it if you did buy items through my links—it's one way to help fund the time we put into these posts. That said, enjoy the virtual shopping trip. Who knows, you may already have some of these things, but didn't know you could put them to use in fabric collage!

We'll continue to add items to the Fabric Collage Toolkit as appropriate. For the most up-to-date listing, visit the permanent Fabric Collage Toolkit page.


THE BASICS

Scissors

I love these "pelican" bladed applique scissors from Gingher. I discovered them decades ago and haven't needed to try other brands, I know they are out there, but you're on your own for recommendations. These strange looking scissors are the first place I turn to for cutting around the printed designs in fabrics. I find them very maneuverable and they allow me to cut very fine and clean. For a demonstration of me using these applique scissors in three different ways for fabric collage, see my blog post "Running with Pelicans: Scissors for Fabric Collage."

Note: Unfortunately, last I checked, Gingher did not make a left-handed version of this model. At least one user has recommended Quilters Select Wave Appliqué Scissors, available here.

Here's a short video about how I use these scissors.

Glue

For over 25 years now, I have used the Original Aleene's Tacky Glue for my fabric collage quilts. It's non-toxic and dries clear and flexible—not stiff as some other white glues are meant to do. I also feel is has the right "tacky" consistency for fabric collage—not too runny, not too thick—just right. It does not remain tacky, thoroughly dries, doesn't gum up the quilting needle (just a few FAQ's). The Original formula is not their Archival version. I looked it up one time, and the Original formula is less acidic than the fabric itself—so I have no issues with longevity of my artwork as far as this glue goes. And as I said, it's been 25 years, and counting with no adverse affects on those early works. For more on glue read my blog post "Why Glue?"

"Sharpie" Marker

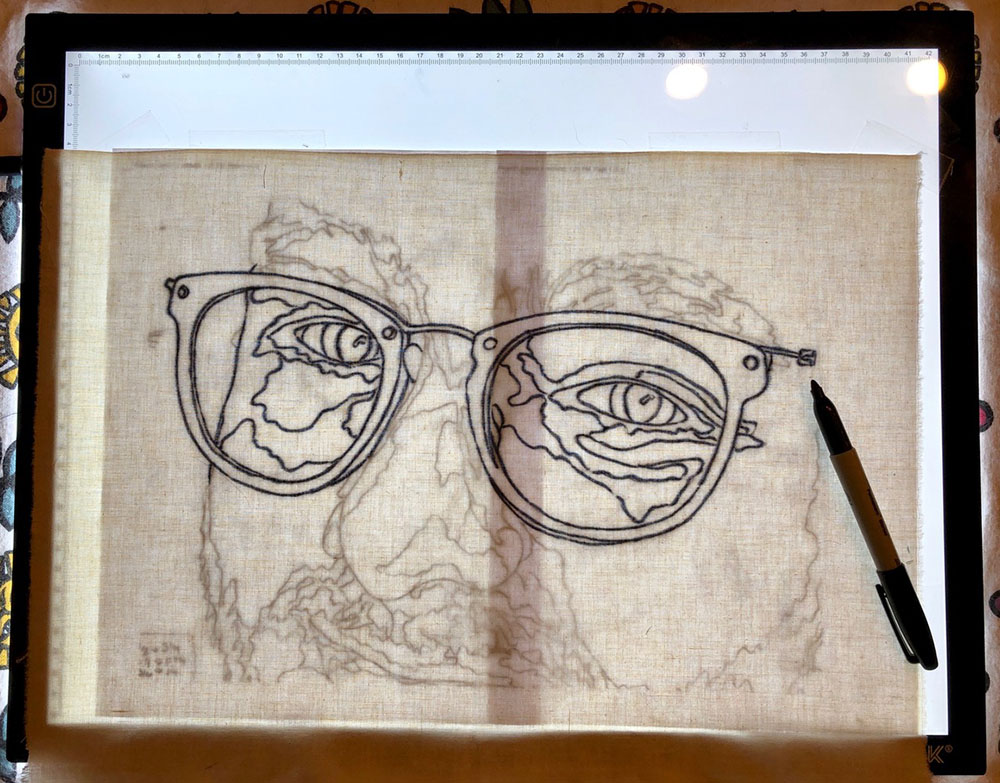
Eventually in the design process there is a time and place for a nice permanent marker, and that's when you're ready to transfer your pattern onto your foundation fabric. I suggest a permanent marker to prevent unfortunate bleed-through incidents when water may be used to loosen errant glue or to smooth a piece of fabric. I also suggest the "regular" sized Sharpie marker to create a nice definitive line as a guide to work from. You get an idea how I use a Sharpie in conjunction with the lightbox in the photo below for transferring my enlarged line-drawing to the foundation fabric.

Pins

I have used regular round-headed quilting pins for holding my bits of fabric in place on my design board forever. They work great. Recently, however, a follower recommended these Magic Pins. She said she has a bit of arthritis. The special shape and grip of the heads of these pins, she said, made them easier and less painful to use. Luckily I don't have arthritis, but I tried them out (and will keep using them), and saw how they could be helpful for those with hand pain.


MAKING A PATTERN

Lightbox

There are different options for tracing your image onto tracing paper—a glass tabletop with a lamp underneath or maybe a nice bright window—but nothing beats the convenience of a light box. I myself have a home-made light box from the last couple decades of the previous century—it does what I need it to do but it's a bit elephantine in both size and weight. I looked into the portable LED light boxes now available—it's a new world out there folks (they're more like a sheet of lit acrylic than a "box"), with many seemingly feather-weight choices available.

I picked these two in particular to try because an electrical adapter is included in the package (a convenience, others have a USB plug only) and they had good reviews for the bit of plug extension that comes off the light box itself (apparently it's a connection that can wear out easily on other models—I'll take their word for it). I gave them a try and they work for me. The 9 x 13 inch size fits the size of the tracing paper I use. Some of you may find the larger size (13 x 17 inches) more convenient for what you do and how you work.

See the larger size in use in the video below with the Proportion Wheel.

Proportion Wheel

A proportion wheel is a tool to figure percentages in either enlarging or reducing something. In my case, I use it figure out what percentage is needed to enlarge my original traced image to create the final desired size of my pattern. My proportion wheel is another hold-over from my college years (along with the Burnishing Tool) and I take pleasure in still using it. You can also figure out enlargement percentages using a math formula, but you'll have to look that one up yourself. Or, I'm told, there's an app for that. Or you can just tell your copy center person what final size you need and let them figure it out. So, this tool is not necessary for most people, but students ask when they see me using it, so here it is. Besides, it is kind of fun to use.

The video below gives a demo of the Proportion Wheel. It also shows the Lightbox listed above.

Tracing Paper (Vellum)

Not all tracing paper is created equal. From way back in my college days, I've used tracing vellum for sketching and designing. It has a nicely textured yet smooth surface that takes a nice sharp pencil line, and erases easily too for those minor (or major) adjustments. I use vellum when I make tracings from photos which I then enlarge to my final image size. Read about creating your own traced design in this blog post "Making a Pattern for Fabric Collage."

Mechanical Pencil

A nice sharp point on a plain ol' pencil gives the best line when tracing your image onto tracing paper—a mechanical pencil means you don't have to keep sharpening it. After using different brands of mechanical pencils through the years, I've settled on this maker as my favorite. You wouldn't think there'd be a difference, but somehow there is.

I always use a pencil line as opposed to an ultra-fine marker line for my drawings. First of all, a pencil gives a thinner line than a marker does, creating a better and more accurate tracing, essential if you're dealing with details such as facial features on person or creature. Second, you can erase a pencil line to adjust your drawing, I never assume I'll get a line right on the first pass. And third, when the drawing is eventually enlarged, the thinner pencil line is more "readable" than an enlarged marker line is.

Eraser

Eventually, I wear out the erasers on the end of my pencils before the lead runs out. If you're the same, here's an eraser I particularly like—it does a nice and neat job.


SUNDRIES

Tweezers

I don't use these myself—I prefer to use my fingers—but some students use this tool or one like it to get into tight places with tiny pieces of fabric. This tool was first recommended by student Kaye Burns, who appears in the video below. Read about how she uses the tweezers and other tips from advanced students here.

Purple Thang

I use my fingers to apply glue—mostly 'cause I always know where they are. However, for those who prefer to keep their fingers clean—or may have trouble getting the glue to the right spot—my students have found Purple Thangs effective. Aside from their amusing name, this tool is meant to be a stiletto and a 1/4 inch measuring tool, but it also works great as a glue applicator. Of course, you can also use coffee stirrers, toothpicks, and so on. Joanne Hannon Shaw demonstrates the use of the Purple Thang in the video.

Burnishing Tool (AKA Safety Pin Closer-Upper)

In my college days, a burnishing tool was a necessity in graphic design classes. Years later, in desperation to save wear and tear on my fingernails, I realized I could re-purpose it to close the safety pins I use to baste my quilts prior to quilting. I hook the curved point under the tips of the safety pins to pull them up into the socket. I demonstrate how I use this tool below, and again in my blog post "Free-Motion Quilting on Fabric Collage Quilts."

Netting, Sheers, Tulle

These are the types of fabrics that I use for adding fun, shiny, sparkly bits to my fabric collage images. I will often use darker sheers to emphasize shadows, while the lighter colored, sparkly ones I use for highlights. Sometimes I use a thin tulle over the entire collage to achieve a certain look or to make the piece easier to quilt. Almost always I pick up my variety of sheer fabrics at stores such as Jo-Ann Fabrics, either locally or as I travel around. But for quantity or convenience, I've found some online, such as the ones you see here. But beware, shopping for sheers online is a maze of sites and clicks you could get lost in. For information on how I use these specialty fabrics, visit my blog posts: "To Tulle or Not to Tulle" and "Using Sheer, Netting, and other Semi-Transparent Fabrics."


INSPIRATION

Books

I draw inspiration from this book by Anne Lamott, though written for writers, it is a good source fortification for any type of creativity. Lamott's generosity and good humor will help you start or keep going on a project. To read about how I use this book in class, see my blog post "Bird by Bird: How I Use a Book on Writing to Teach Fabric Collage."

When I'm working in my studio, I often choose to listen to audio books. I have a few favorites that deal with creativity and how to get yourself motivated and inspired. I find that every time I listen to one of these books I get something a little different out of them. I'm going to list a few in case you're interested in checking them out for yourself. These are all available in other formats as well:

Creative Strength Training: Prompts, Exercises and Personal Stories for Encouraging Artistic Genius by Jane Dunnewold

Big Magic by Elizabeth Gilbert

The War of Art by Steven Pressfield

The Creative Habit by Twyla Tharp

2 Comments

  • Just a couple of tools I’ve found to be super important and learned about in your classes are:
    (1) Kwik Klip tool which was given to be by a master quilter when I was fussing about using safety pins. It is similar to burnishing tool but has a couple of ridges to hold down the safety pin and a nice rounded tip.

    (2) Micro eyelash applicator brush (teeny tiny q-tip) for those of us who don’t like to touch glue with our fingers or need to get a spot that’s hard to reach

  • Great list to have all in one place, thanks! But I do have 2 suggestions. Please consider making the font size of the letters a little larger, and please use black instead of light grey for the lettering. Harder to see light grey words on a white background, not enough contrast for easy viewing. Thanks!

Leave a Reply

Your email address will not be published. Required fields are marked *