
It isn’t always clear to those who haven’t seen my work in person how much netting, tulle and other semi-transparent fabric I use in my quilts. For simplicity’s sake I’m going to call them all sheers (even though sheer is a type of fabric itself).
I use these fabrics near the end—or final draft—of my piecing to add a final layer of detail. They’re one of the last things I consider, obviously, because they’re transparent and need to be placed on top of other fabric—such as the collaged image.
Sheers serve several purposes. I use them to create highlights and shadows. They can be used to smooth the transition between fabrics. And they add visual interest, some glitz, when needed. In other words, they change, without completely overpowering, the look of the fabric underneath. The effect can be subtle or it can be striking.
Netting, lace, organza, chiffon, tulle (also called bridal illusion)—I use it all. I have literally dozens of them in different colors, prints, weights. They tend to be polyester, which is usually quite inexpensive, making them doubly hard to resist.
And—surprise, surprise—I prefer to use sheers that have a print in them. Plain netting is okay, but why use it when there are so many with delicious prints to choose from that can help define form or add interest. I am especially fond of flocked netting or netting studded with glitter.
Many people who saw “Crocodylus Smylus” in Houston at the International Quilt Festival remarked that they hadn’t known how much “bling” I had used in creating her. It’s hard to see except in person as many photographs don’t pick it up. Most of it was added using glitter-studded netting.
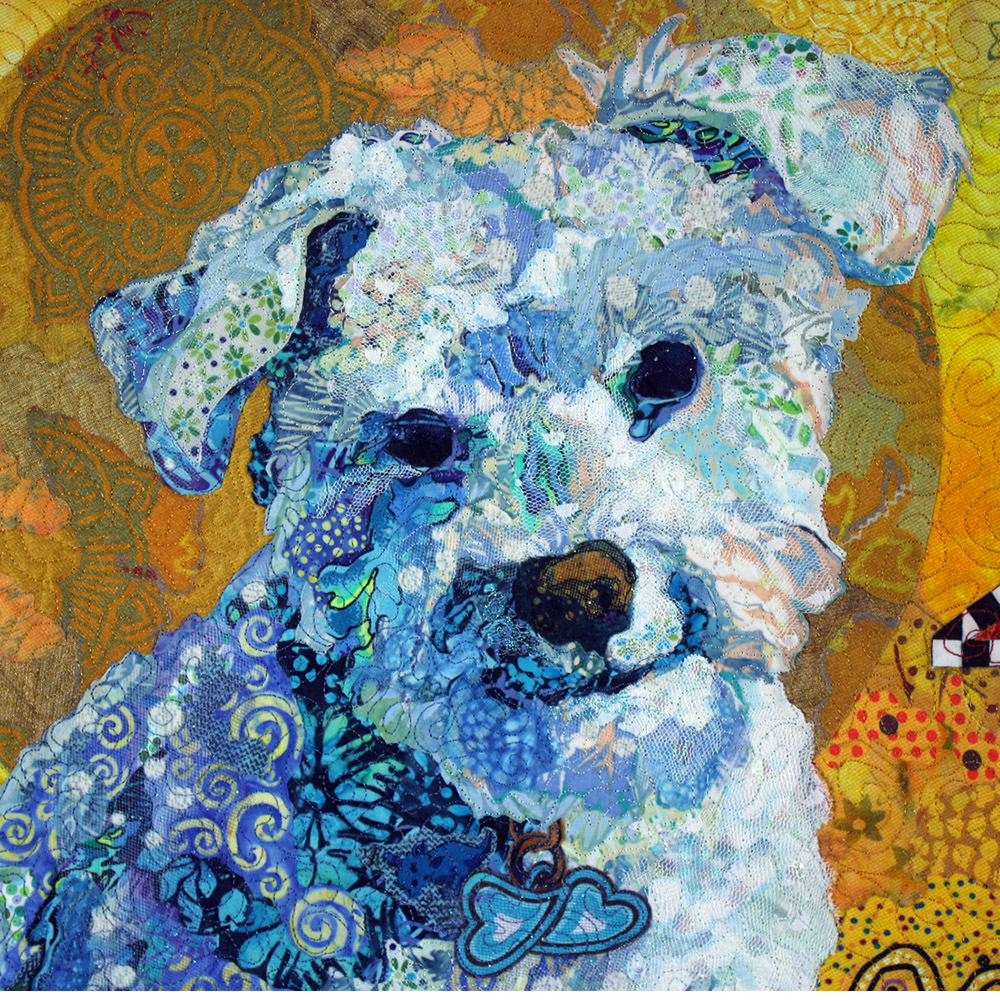
I don’t use sheers in all my pieces. I’m thinking especially of “Dixie Dingo Dreaming,” the portrait of my dog Pippin, in which I used no sheers at all. I had a couple reasons for abstaining. First, I had made it my goal to use only Aboriginal-themed (cotton print) fabrics—to fit with the “dingo” Australian theme. Second, I used no glitzy materials because Pippin wasn’t a glitzy sort of dog. She was a more of a roll-in-dead-fish sort of dog.

On the other hand, “Golden Temple of the Good Girls” has a fair amount of sparkle. They’re all girls, they are our princesses, so adding sparkle seemed like a natural thing to do.
An Example
As I said earlier, I basically use sheers in four ways. I’ve already demonstrated in the above video how I used glitz in Stevie the crocodile, so I’ll use another quilt, “Polka Dodo,” to show examples of the other three ways sheers can be used—though glitz was definitely a big part of his look.
To add glitz- To add highlights
- To add shadows
- To soften or blend fabrics
First the quilt:

There’s a lot of dimensionality to “Polka Dodo.” At least there’s a lot of dimensionality to the finished piece. Take a look at the quilt before any sheers were applied.

Now look at his head after I used sheers to add highlights with some white spotted netting. By the way, I set myself the challenge of using only polka dotted fabrics—including the sheers—in “Polka Dodo.”
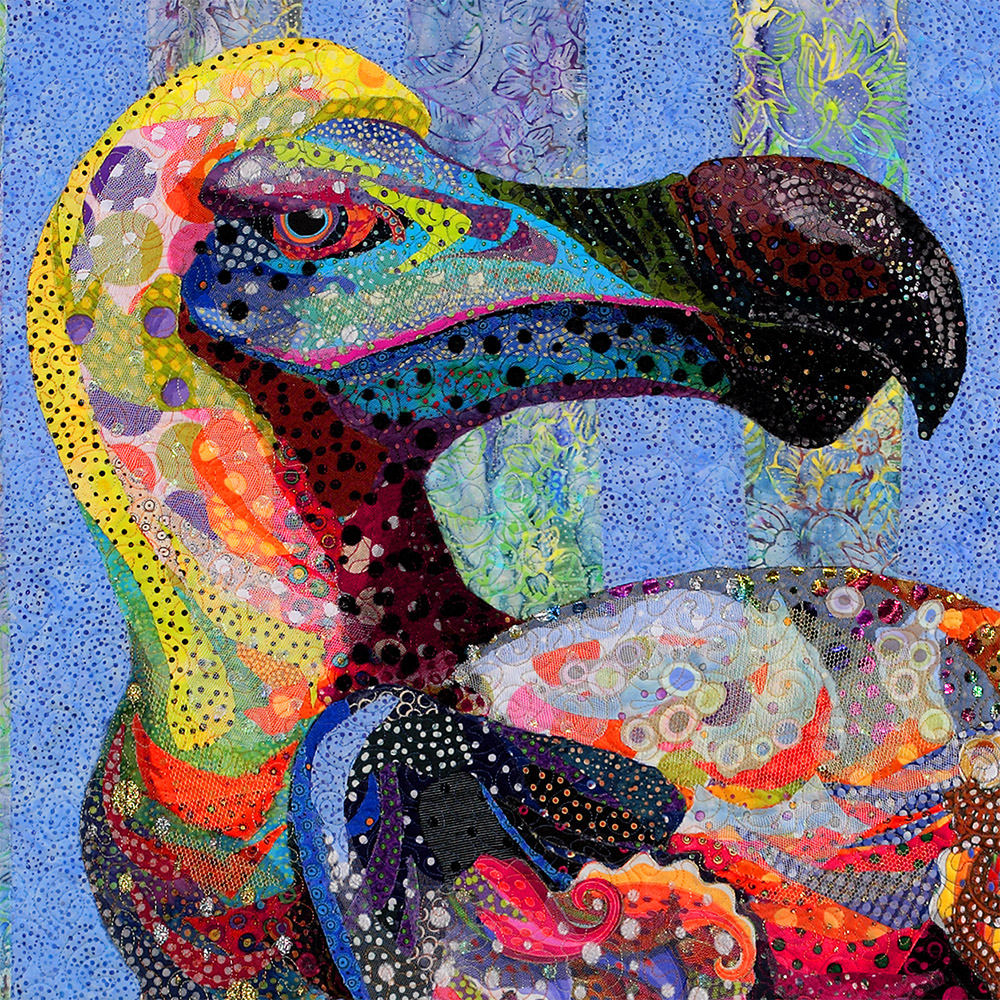
Look at the light sheers on the neck, head and cheek. The use of light sheers helps to bring that part of the image forward. I also used it on his back, as if the light were shining from above. Notice that much of the sheer is not simple netting, but is iridescent or metallic polka dots. The same is true of the shadow on the lower jaw and neck. Those black polka dots are actually black flocked netting.
Let’s move on to using sheers for shadows in other parts of the quilt.
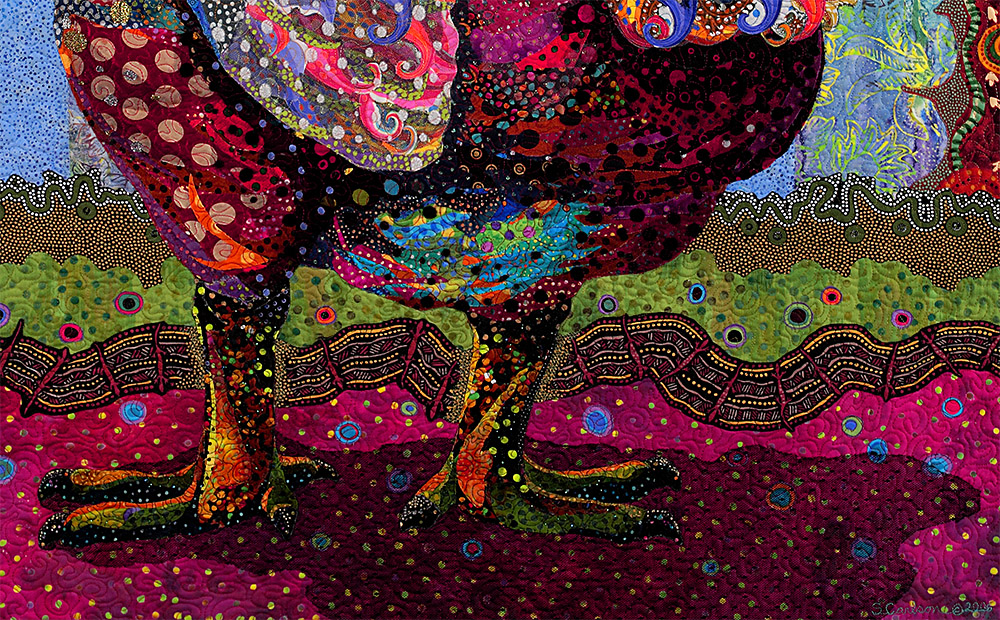
The shadow under his feet is a successful and simple use of sheer fabric. A medium weight netting embedded with tiny polka dots overlays the area defining Dodo’s shadow, shading the underlaying fabric, just like a shadow would in real-life. It’s difficult to see but there is also a dark sheer under his floofy tail and around his wing. In both cases, creating a shadow helped to define those body parts and bring them visually forward.
Finally, and perhaps least obvious is the use of sheers to blend. Look at the white polka-dotted sheer on top of the wing.
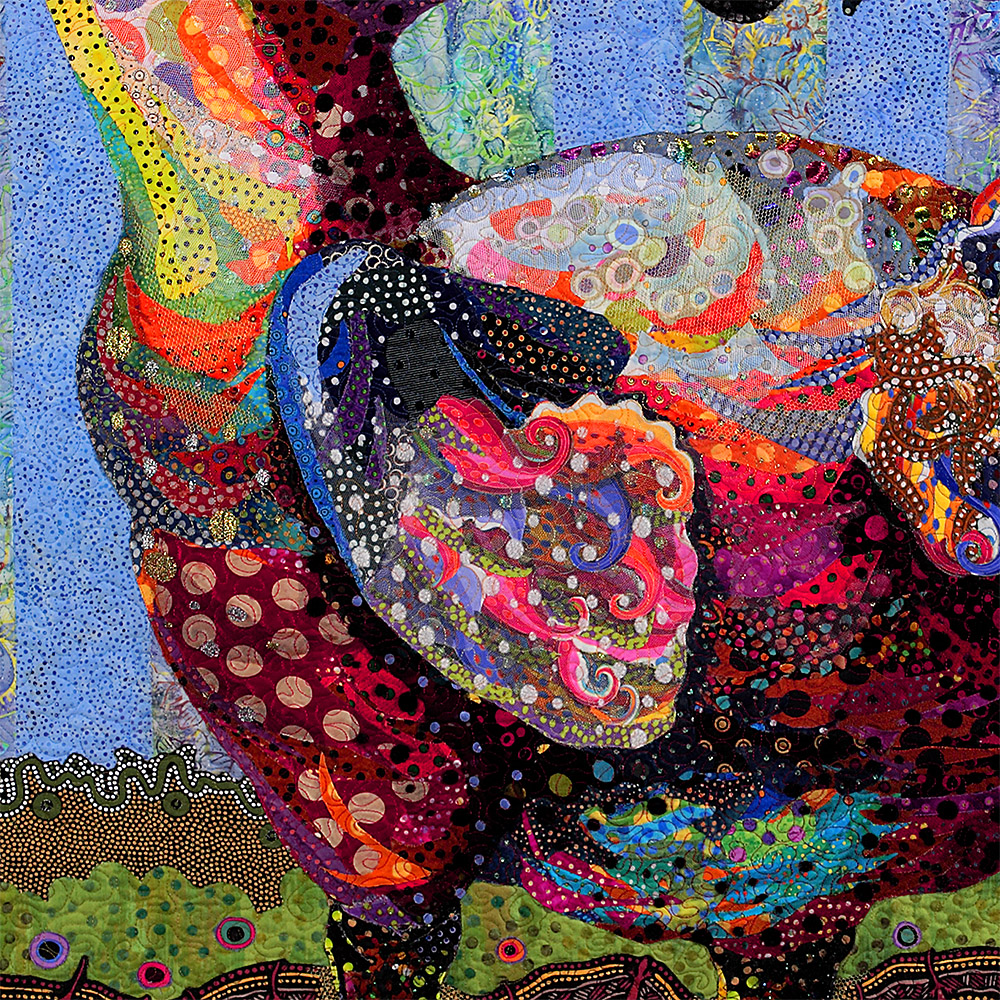
To my mind, the wing was too complicated before. Interesting as it was, all those individual pieces of fabric competed for attention with one another. I needed to unify them somehow so the viewer saw “wing” before they saw “curly blue and pink feathers.” The white spotted sheer overlaying the wing helps to lower the contrast between the feathers. It blends them together to accentuate the stubby wing shape. (It also lightened the overall color of the wing, bringing it forward and helping to separate it visually from the body.)
How To
In class, when we get to the stage of adding sheers, my students don’t know how to proceed. How is it done? Do you really just keep on using glue?
Yes.
It takes a little finesse but glue gets the job done. Cut the sheer just as you would cut any fabric for fabric collage, to the exact shape you want it. Rather than applying the glue to the sheer, put a few dabs (not a glop or line) of glue on the fabric you want to adhere the sheer to. Then smear the glue with your finger until you can no longer see it. At that point, the glue is still tacky enough to stick the sheer to it. When applying sheers, I tell my students to use a consciously lighter touch with the glue.
Then, of course, your quilting will hold the sheers—and all your fabrics—in place.
No Discrimination
I hope this post drives home the fact that any fabric can be used for fabric collage. Some may be more useful than others, but your imagination shouldn’t be limited by believing that you can only use cottons or only use opaque fabrics. There are no rules, which can be unsettling at first. Keep at it. You’ll get used to it.
Susan, this was terrific. I remember getting close to “her” in your studio and seeing all the ways you used the tulle–something I have never looked at twice. The presentation was crisp and understandable. Thank you .Now you’ve made me want to get back to my pelican, Herb, and work on him some more.
I’ve come to think Oh great! when you appear in my inbox! Then I settle down with a cup of tea to look. You are so generous in your explanations and so clear. I love your videos too! Thank you.
What great information and you are able to communicate so well. Many ideas are swirling around in my head thanks to you!
Thank you so much for sharing your work. I saw one of your pieces at Houston a few years ago, and was amazed at the different fabrics you can only see close up. Looks like I’ll be adding to my stash. thank you
Susan,
LOVED this! Your explanations for use of the sheers is so helpful, and the embedded videos showing just where and how you used each piece are great! Thank you so much for sharing these techniques. Question for you: Once you get several of these video bits done, is there any consideration that you will compile them on a DVD? Reason I ask is that Vikki Pignatelli did this, it is a series of 2 DVDs with segments for different techniques. I find that I go back to that often when I am working and it is so helpful to have the video to work along with when I get stuck. The video from last week on fabric and this one are just so very very helpful, and seeing it in real time is like being in class. Really love these!
Thank you so much for the information and inspiration. Your posts are the absolute best. You give clear, great information along with awesome photos and videos. I love seeing you in my inbox!! I will finally be able to take a class from you this year and your posts have been so instrumental in preparing for it and helping me feel like I might be able to to this. Thank you, thank you.
Oh my gosh, I agree with another noter who mentioned how excited she is when she sees you in her inbox ~ I am too! I love sitting down with a cup of something hot to drink and spending some time listening and learning. You are so generous with what you share with us and I appreciate that very much. Thank you!
Hoping soon to have your book appear in my mailbox ~ I have been printing out images I like in black and white and breaking them down into areas of value. Also photographing fabrics, editing to b&w and beginning to see values instead of colors and prints.
You are so inspiring!
Good morning, Susan!
Finding your mini vids VERY helpful while I’m constructing my spiral quilt! Yesterday I was purchasing tulle to audition with my colors and I was overwhelmed with choices and material textures, so I just kept to solid tulle only.
I have a question about a tulle variety I once used … In the past I made some simple tu-tus for friends & I to run in during a charity race and had picked some sparkly, glitter tulle. After I was finished with their construction, I had a fine layer of glitter throughout the entire house, & 3 years later I can still find it around. (Truly, glitter is the herpes of the crafting world!) do you have any tricks to perhaps fix the glitter to the tulle, or maybe just avoid the stuff entirely?
Again, thank you for the videos, & looking forward to learning from you in November at Lake Tahoe! (We got 5+ feet of snow in last couple of days … We’re going snowshoeing today!)
This post is great! I have used sheer fabrics in my art pieces before, but mostly to hold it all together so that I could quilt it. You bring on a whole ‘nother dimension! Thanks, Susan! Maybe when I’m retired I’ll be able to take a class with you. Hope so!
I just saw you on Quilting Arts this morning. How amazing ! your art work is Susan. This is going to be such fun.
Susan,
Thank you for showing us where you placed the sparkles. I read somewhere that “Smylus” had sparkle on her. Hmmm I was thinking where and how. It all makes sense to me now.
I have gobs of this type of fabric after sewing costumes and clothes over the years. Now I have another use for them. Thank you for sharing…I’ll bring some to class even though I may not get that far.
Oh great! Here I was planning to put my stash on a diet and maybe get rid of a few fabrics and then you deliver another excellent video that tells me I’d better hold off. You obviously have a really large stash. How to you organize it, remember what you have, and then find it when you need it?
I echo others in expressing my appreciation for these videos and like the idea of DVDs of your segments being made available.
That was great, thank you Susan! Now I want to go shopping (again)!
Using sheers is also one of the things that I like to do. I don’t use glue to hold them in place, I add them during my stitching phase. I pull and manipulate the sheers as I accent my work with thread. Susan, I just love your use of fabrics.
Absolutely loved this! Your written instructions on how to use sheer fabrics to provide highlights, shadow, or texture were awesome by themselves–the video explanations were a definite bonus and really helped cement the versatility of these fabrics.
I’ve made a couple of fabric collages using your process–the early pieces I simply layered on tulle across the piece thinking it would really help as I quilted (which it did), but I wasn’t always completely thrilled with how it changed the colors of the fabrics underneath. More recently I went ‘sans sheer’ to keep the colors vibrant and found the quilting was not as challenging as I feared. Now I’m excited to try bits and pieces of strategically placed sheers to bring highlights, shadows, and textures to the work.
Thank you for your generosity as you continue to share your process. You and your work are AMAZING!
Wow! Never would have guessed the ways to add texture and value with sheers! I am going to do my first fabric collage this year as one of my goals and will keep all this mind! I love how you explain things, clear and precise. You make things come alive with little tidbits of this and that. I can’t wait to get started.
I love how you share your processes and appreciate your creativity and art! Thanks for your continuous sharing of your knowledge!
Your work is truly amazing!
Thank you so very much for this particular email. I did notice the bling in your quilts while in Houston. It was exciting to see something in person that I hadn’t seen in the photos. I have been so drawn to sheers for years and have many collected in drawers I just had no idea how to use them yet. I never knew what to do with the edges. How simple to have the freedom to just cut and place in spots instead of covering the whole quilt. Thank you so much for sharing this information. I look forward to your emails every Saturday morning.
Susan–I was up in the storage area this week looking for solids for a project and came across my big tub of sheers. And then this post. Serendipity!!!! I love how just one layer of sheer changes the surface of a quilt. It’s magic. Am loving your series of posts………
Wow. Just. Wow. I am learning so much. Thank you!
Thanks for this I put, Susan. Any comments on batting or thread? This is a great series
Stay warm!
This is fabulous – I had never thought of using sheers with a texture – I just have plain tule (in various colours) – but of course textured tules/sheers makes so much more sense and fun.
These segments are wonderful – hope that you are going to devote a section to glue……the rights, wrongs and in betweens.
Cannot wait for your class – it will be fabulous – you are a born teacher.
Janey, I have written a blog post about glue: “Why Glue?” You can search my site for it.
Hi Susan, So interesting, helpful and very well presented!! Thank you!!
Thank you for you generosity Susan. Amazing work.
I love the idea of upcycling sheer clothing. Thanks for sharing so much of your process! It is fascinating!
Hi Susan!
I have been following your blog for quite a few months now and have been very excited to learn these techniques you are happy to share with other creative souls ;0) I am looking forward to receiving much more of these skills and would love to have a full online course to subscribe to as I live in Australia so traveling to your workshops are a little expensive for me. I recently won the viewers choice at my local art show which I give thanks to you as it was my first piece in fabric applique! I have been fumbling around with my art and sewing until I discovered your amazing art pieces and then I knew how to merge my love of art and fabric together. Thank you for being that inspiration……
Thank you so very much for sharing your talent, time and technical skills. Your class is on my wish list and I’ll be there if I can get someone to stay and care for my disabled husband. Until the I have your book and blog!! Thanks again
Wow, this was so timely for me. I am working on a friends llama, Sarge, and I was struggling with under his chin, now I have an idea of how to create that contour. I just love coming to my I Pad every Thursday morning and Saturday morning. I learn so much even when it is a repeat, reviewing always bring new insights.
Looking forward to this afternoon’s Thursday in your studio.
Brilliant!! I have your books and I am studying your blog posts before I begin my spiral. Thank you so much for sharing your amazing breadth of knowledge.