
As I’m revving up for my fall fabric collage teaching schedule, I’m starting to think about what my students will be choosing for their subjects. Animals, people, rusty trucks?
And, one of the most pressing questions: Will there be hair involved?
It could be the hair for a portrait of a person or the luxurious mane of an African lion. In any case, there’s sure to be at least one or two quilts that will need to recreate long, flowing locks.
This is a case of choosing a topic for a blogpost based on deciding what would be helpful for students to be familiar with before they come to class. Hair is one of those topics, having eluded us for almost four years of posts.
Hair in fabric collage can be tricky. It took me years to learn how deal with it in a more satisfying way. A couple earlier attempts are in the portraits above and below. The self-portrait below is my third ever fabric collage from 1991—a detail from “Self Portrait with Shadow“—and I’ve learned a lot since then. The entire collage is treated very simply (in comparison to how I work now), but that’s what playing with fabric is all about. I was just starting to glimpse the benefits of working with printed fabrics, bravely using the large leaf print in the shadowed underside of my hair.

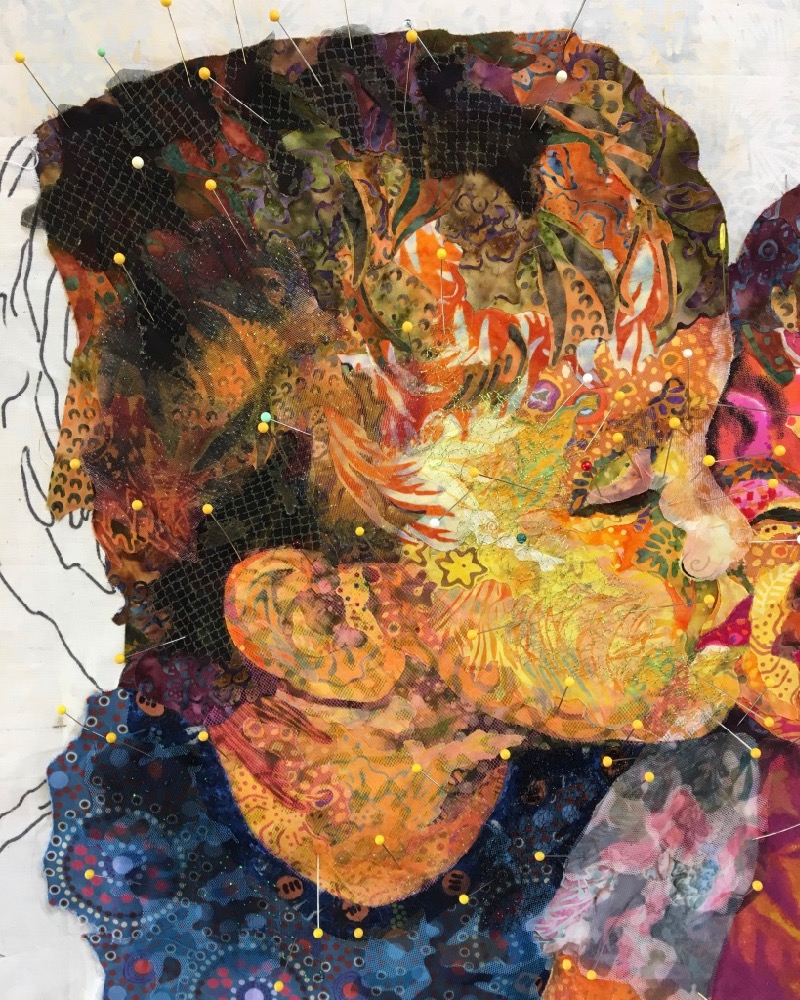
Skipping back to the first photo, is a detail of my quilt “Twilight” from 1994. I see this quilt as an “aha moment,” and really took off using an uncountable amount of fabric pieces, cut to follow the designs and contours I saw in the printed fabrics. Layer upon layer, and I could bring out a richness of highlights and shadows that I hadn’t achieved before.
But in both these early quilts, I used my art background and a particular painting class where the instructor talked about painting trees. Look at a tree: you don’t see individual leaves but groupings of leaves based on value. Some are in sunlight some in shadow. In the same way hair does that. A section of hair comes forward or backward—catching light, or casting shadow.
In general, when you study the hair in a photo—animal or person—you don’t see the individual hairs for the most part. There may be strands or locks here or there, but if you squint your eyes, the whole head of hair breaks into into clumps of lights and darks (like tree leaves). There will be an area where the hair curves around the head that will catch the light and form a highlight, for example. Values define these waves of hair.
Hair is constructed in the same way any other collaged shape is constructed—with a variety of lighter valued fabrics, darker valued fabrics, and whatever is needed in between. First comes the basic squint-your-eyes areas of light and dark, then comes the locks and the strands as fine-tuning details.
So yes, hair can be a challenge. Let my experience give you a leg up. I’ve chosen three of my fabric collage people portraits as examples—all a bit different—but with the hair treated in similar ways.
It’s in the Fabric
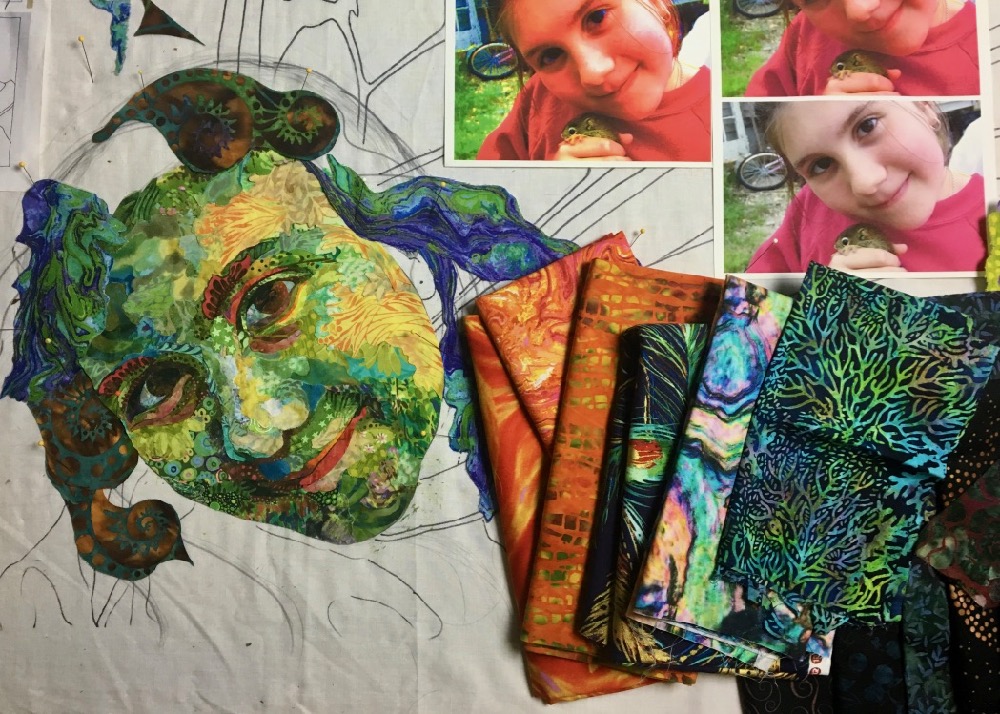
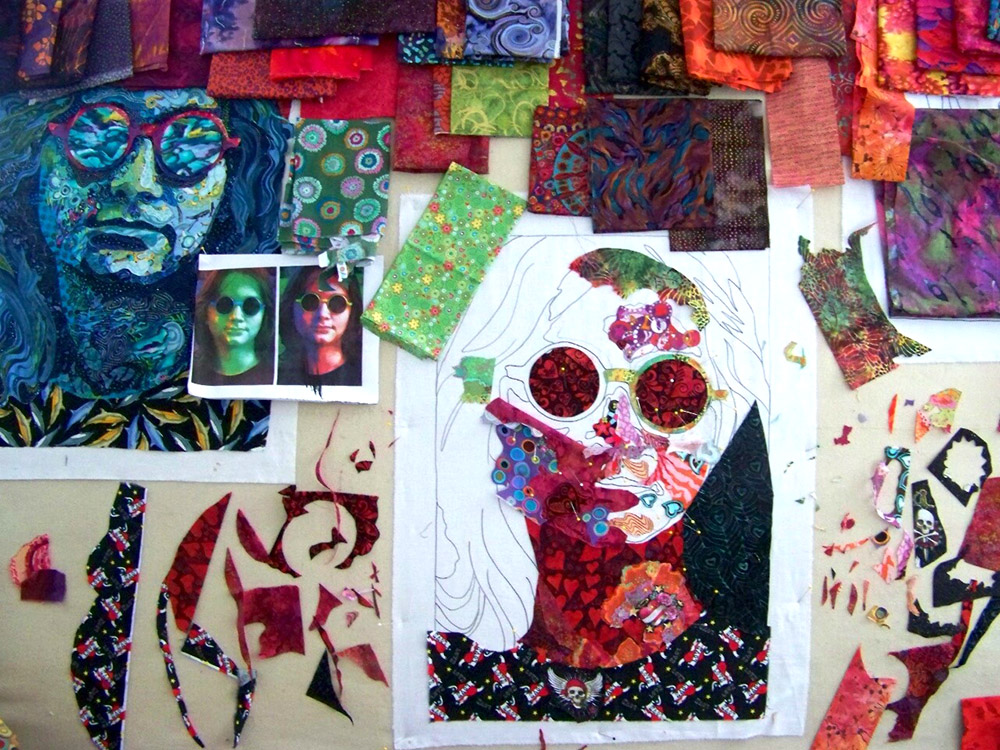
Here’s my latest quilt “Monarch Maia” ready for hair. The photo I had to work from didn’t give me a lot to go on since it’s cropped so tight. But I had the now adult Maia pose for a new photo so I could sketch in the rest of her head and some hair.
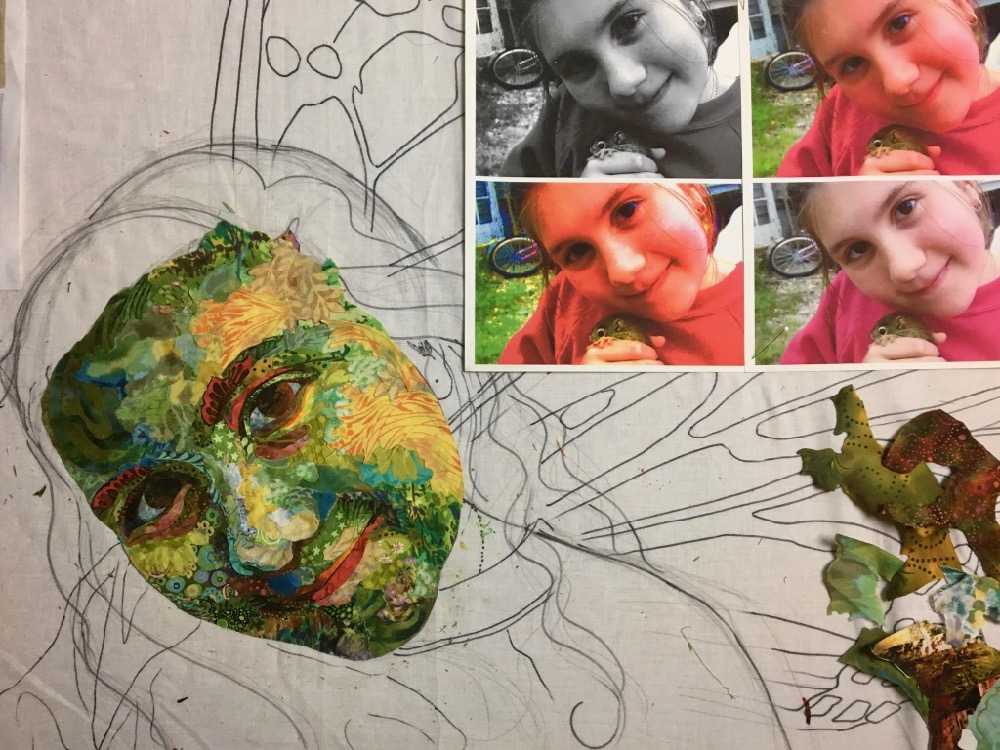
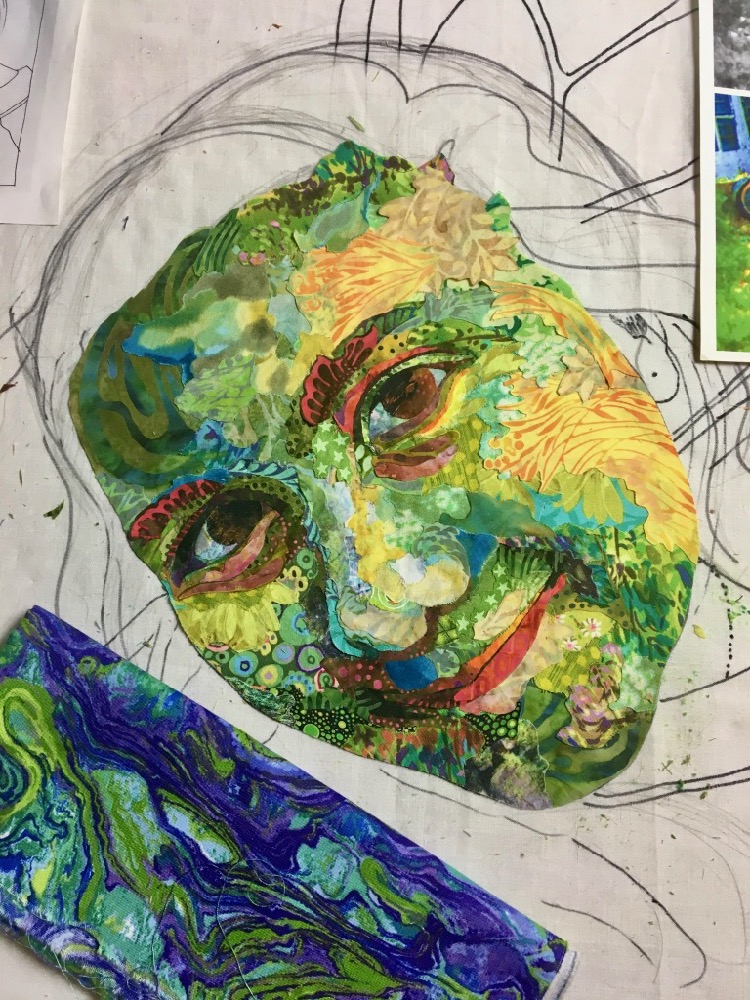
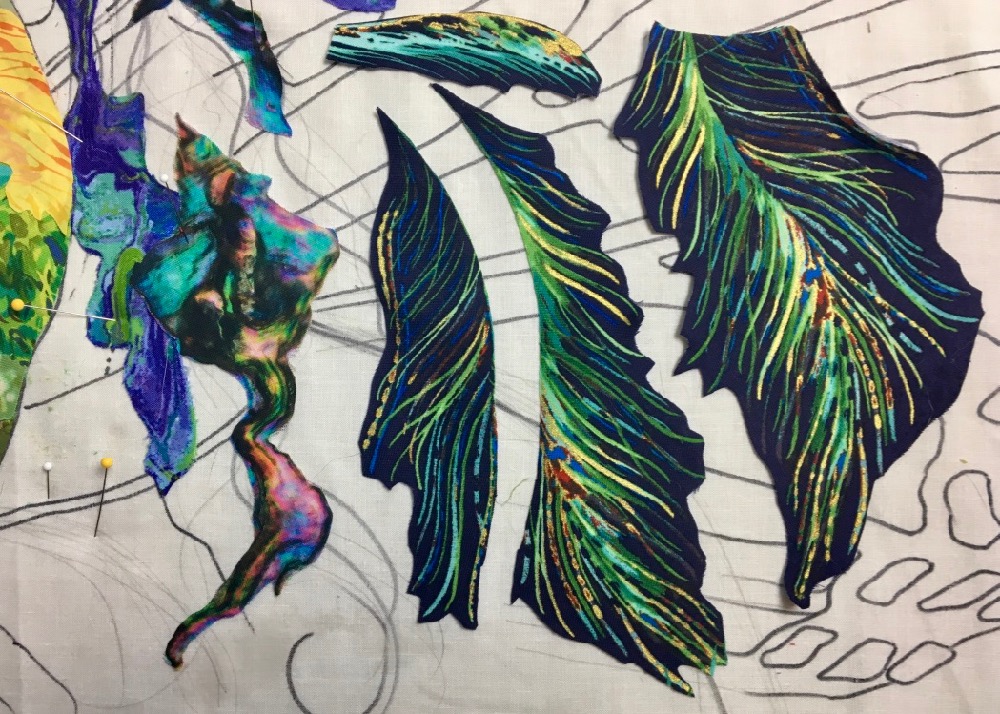
But even with the head sketched in, I didn’t have a whole lot of detail in there. Instead I determined to let the fabric do the talking. The fabric above, with it’s marbled strands, and coloring to work with her face, seemed like a good start. I cut a few elongated hand-sized shapes, using the marbleized edges as a guide, and got started in the photo below.
Then I pulled some darker values and a few browns to match her chestnut hair. I wound up using a couple of these fabrics, but most didn’t have the long flowing curves I needed to indicate hair.
I’ve already made a cut on the brown fabric below. You can see how that could take care of a whole curl of hair.
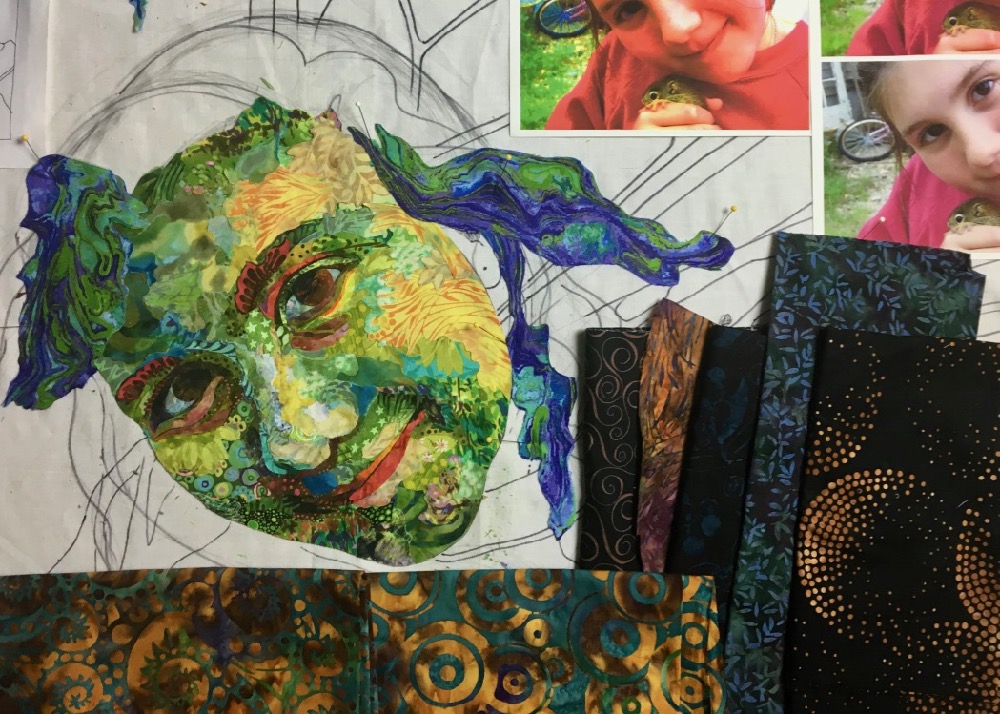
After some more stash searching, some dark blue and purple prints stepped up to create the darker shadowed areas of her “brown” hair.
To add to the mix, I pulled some bright and wild fabrics for highlights, below. These had some nice movement to them with long flowing curves. You really want to focus on the print. That’s important, because in fabric collage you aren’t trying to recreate every individual strand of hair (remember the lesson on tree leaves?). It’s not about cutting hundreds of hairs, or leaves, it’s about your interpretation of what you’re looking at.
Even if you were successful dealing with all those strands, you’d run the risk of the head of hair looking too detailed and drawing too much attention to itself. The hair’s purpose is to frame the face and enhance the features, not to distract the viewer’s attention. It’s not the time or place for the small cut details, yet.
Rather, search for hair in your fabrics. It’s in there. Hidden in the colors and especially the prints. Cut out your fabric in some random chunks (elongated if it matches the hair you’re looking at) using the print as a cutting guide. Then look at your drawing or your original image, squint your eyes if you have to, find the areas of color, value, and visual texture where those fabrics, or parts of them, will look good.
Orange highlights for a brunette? In addition to, “why not,” I had good reason for looking for orange hair fabric. In this quilt I’ve given Maia monarch butterfly wings. The orange fabric will be used to reflect the color coming from those wings.

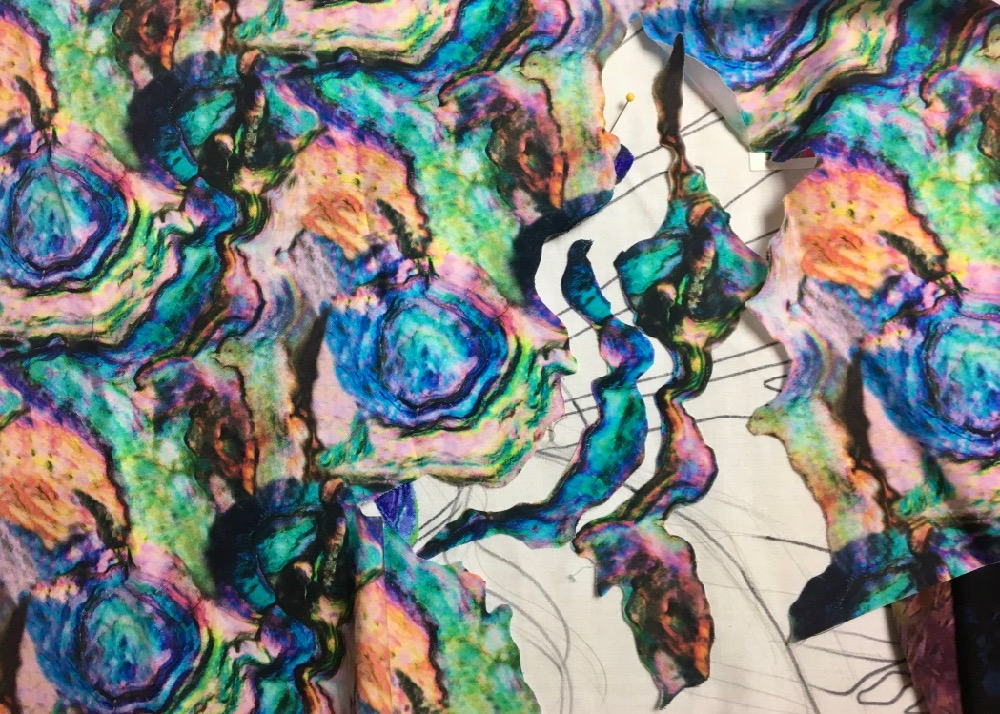
Look at the stringy clumps of shapes I was able to cut from these fabric patterns—the batik stripes and even the printed abalone shell design. Not working in realistic colors opens up a variety of fabrics to select from. I never planned to make her realistically colored anyway (I mean, after all, I’m adding butterfly wings). Even if I had been shooting for straight realism, dark hair can have colorful highlights when you look closely at it.
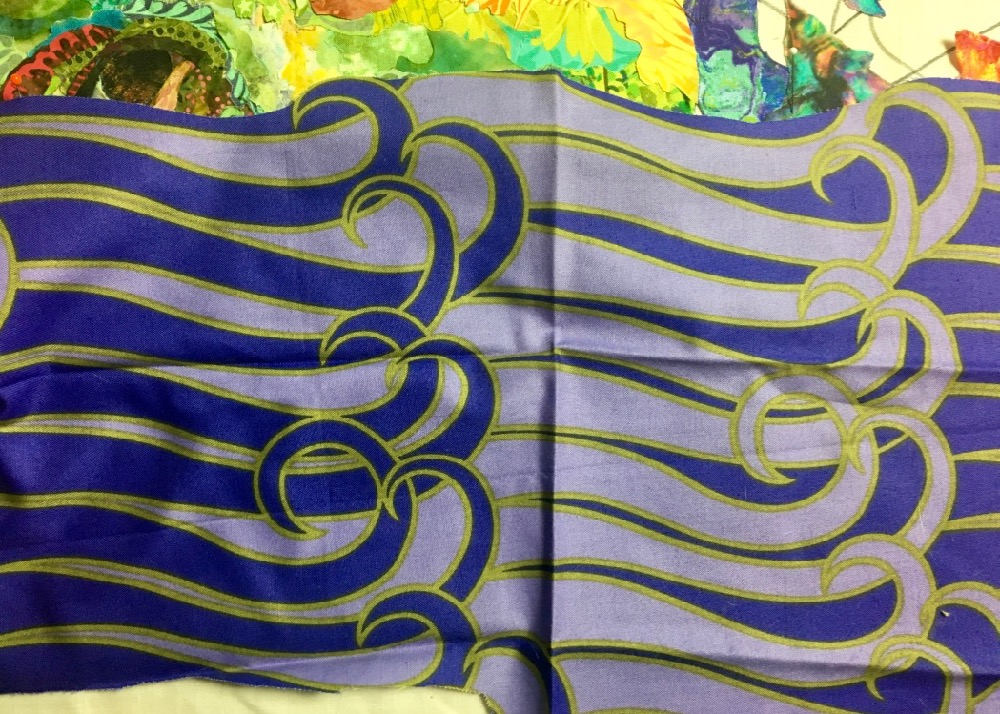
At first glance the Jane Sassaman fabric below, may be overlooked because the pattern is so regular and graphic. But if I cut out a few of those individual curls and use them judicially here and there, they’ll work nicely and add to the fanciful nature of the portrait.
What about peacock feathers?
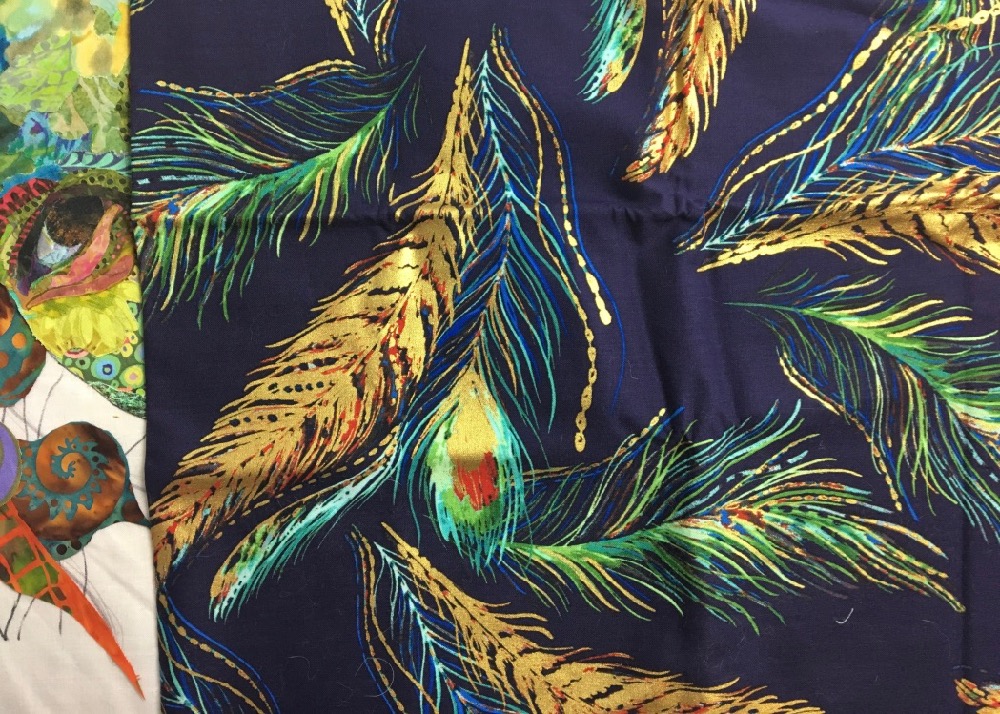
When cut out, they also work for a gently curving lock of hair here and there.
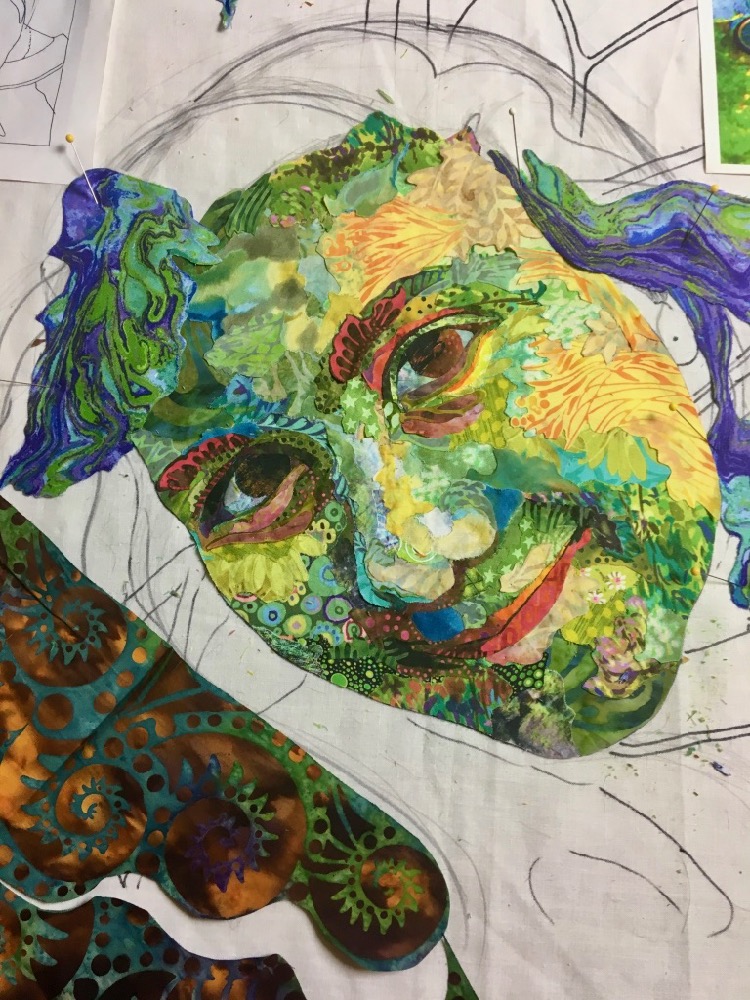
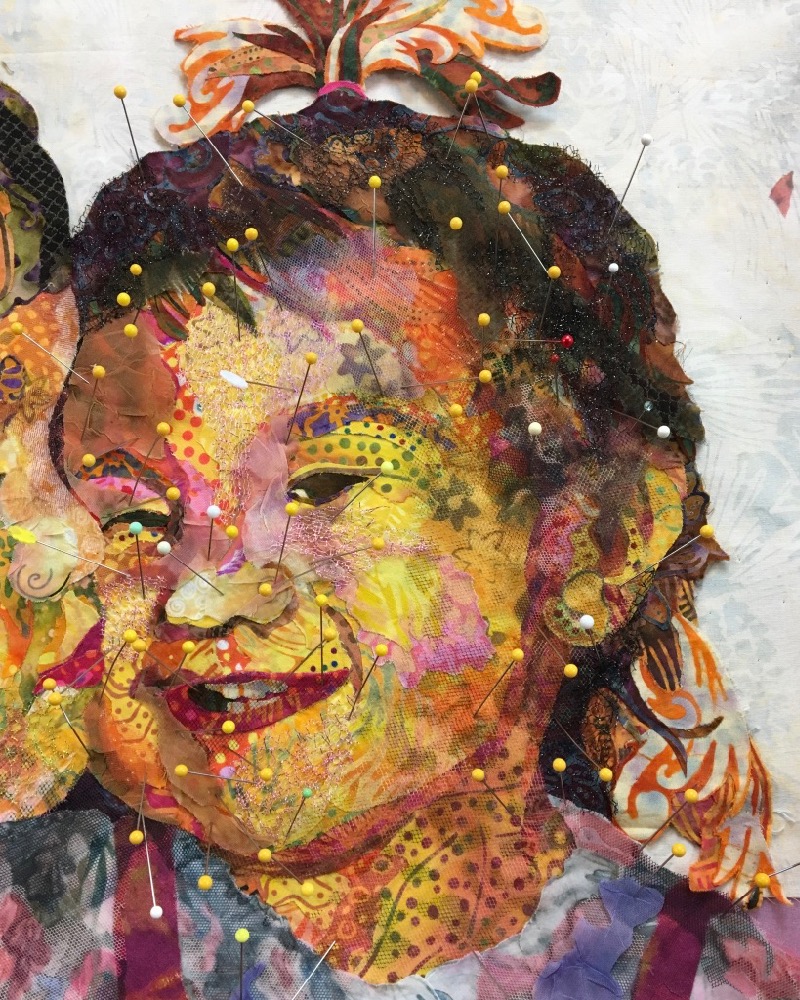
When doing hair I work in a sequence slightly different from the facial features, such as eyes, nose, and mouth. For the eyes and mouth, I start with the smallest details first and build around it. For the nose, with the highlight on the bridge. In contrast, the movement of the hair is what I work on first, filling in the highlights and shadows, fine details later. Below is the first draft of her hair.
Can you see where I’ve used the individual fabrics I showed in the photos above?

Here’s a second draft. I’ve added more detail, highlights with a couple different leafy vine sort of prints, and more purple spirals from yet another fabric.
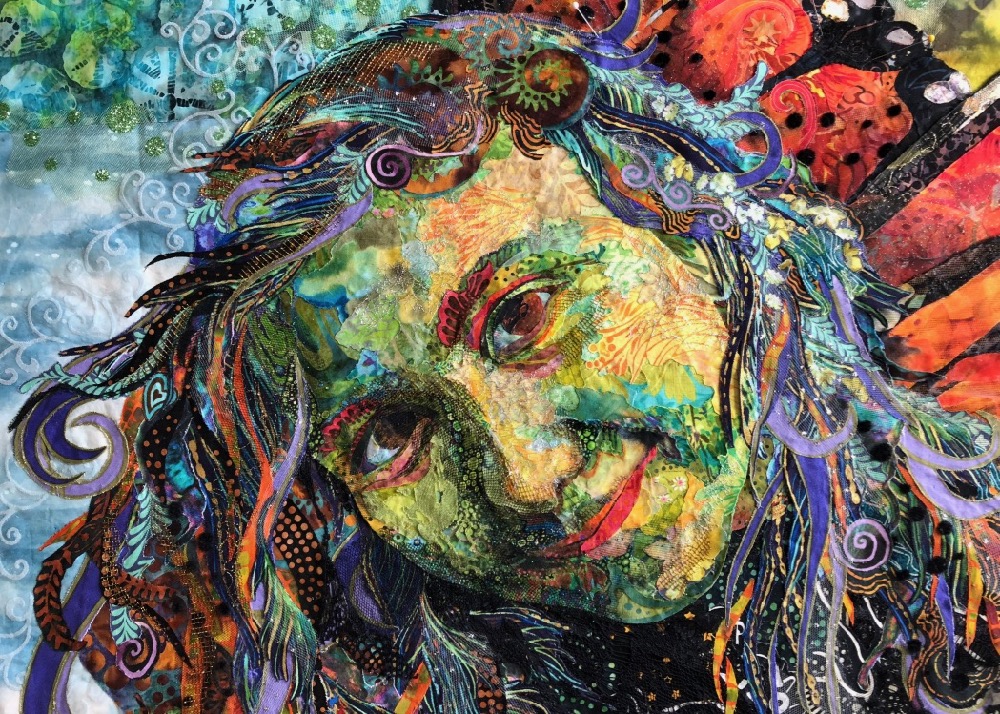
The (almost) final draft is below, where I’ve added layer after layer to build up depth and detail. The final layers tend to be the highlights, the strands of white you see here and there, but there’s dark accents thrown in for contrast as well. All this adds to the illusion of volume and form of the hair. Rather than looking pasted to the head, you want it to look as though it flows from and around the head, over the forehead, and around the cheeks.
You can go on and on in this layering collage process. Sometimes it’s hard to know when enough is enough. If you sit for more than ten minutes, obsessed with trying to find just the right spot for the little bit of fabric pinched between your glue covered fingers, you might be done.

Different Kinds of Hair
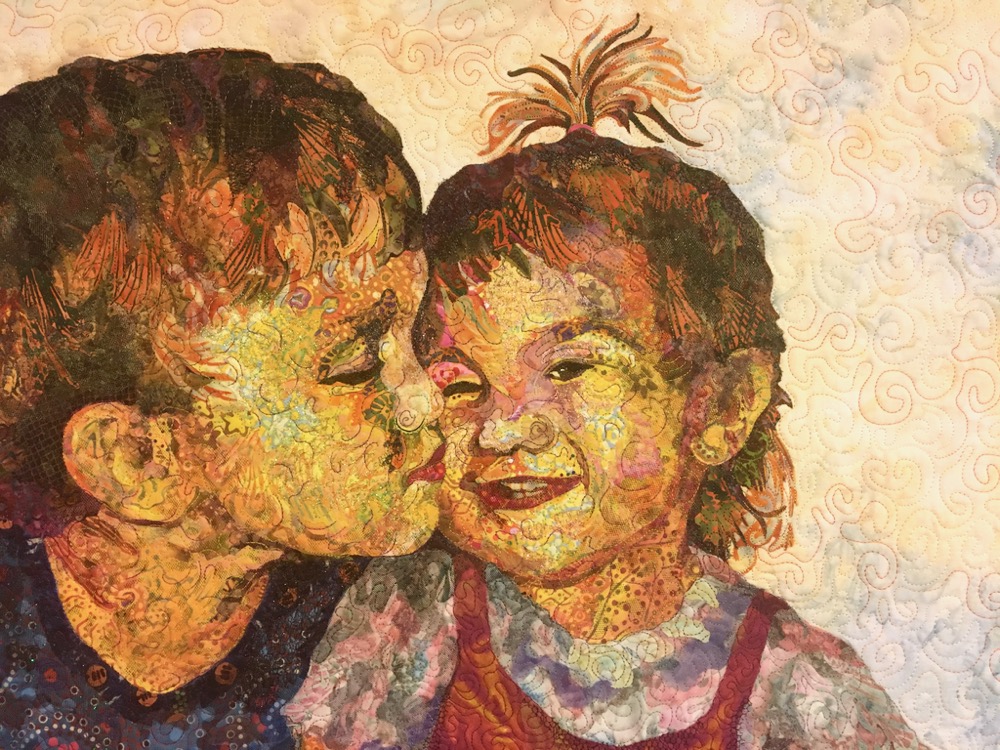
Of course you’re not always dealing with long flowing locks. In my portrait, “Kissin’ Cousins,” of my son Sam and an much younger Maia, I had a very different challenge. Their hair in this portrait is fairly thin and smooth, lying close to their heads (with the exception of that topknot of Maia’s, of course).
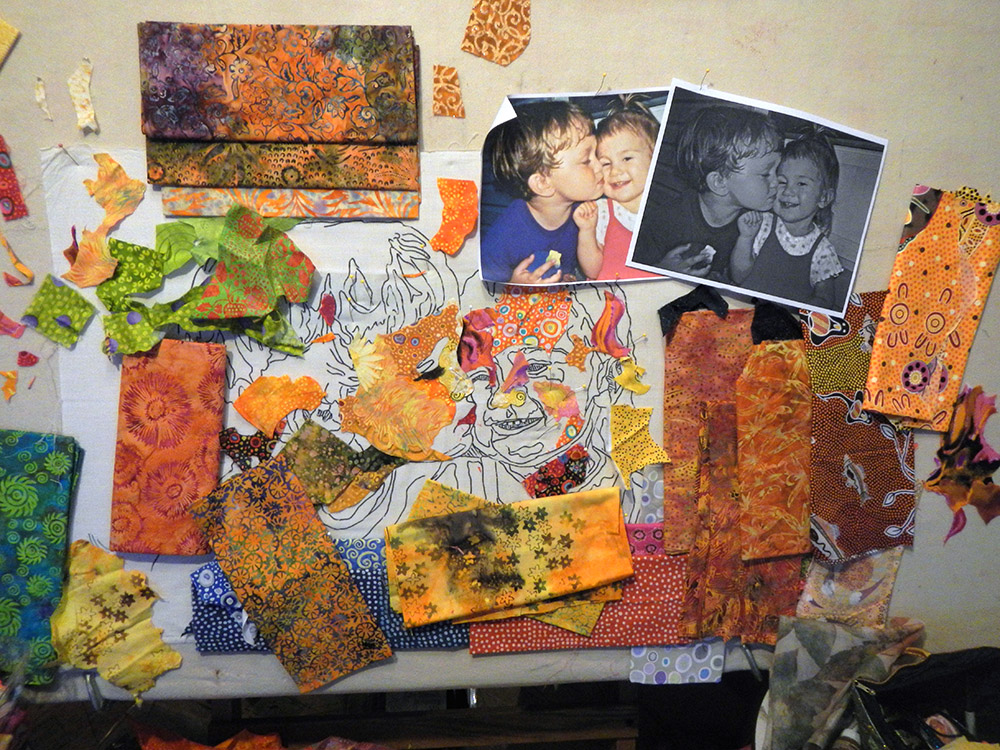
In these portraits, the fabric selection was much simpler with three primary fabrics used for both kids, seeing as their hair color was almost identical. Those fabrics are pictured in the upper left of the above photo. You can pick them out in the first draft below. I was able to put the multi-colored batiks to good use by picking and choosing the light and dark colors for the light and dark values in their hair. The dark values are mostly concentrated away from their faces, where it the hair is thickest. The hair around their faces in contrast is lighter and wispier.
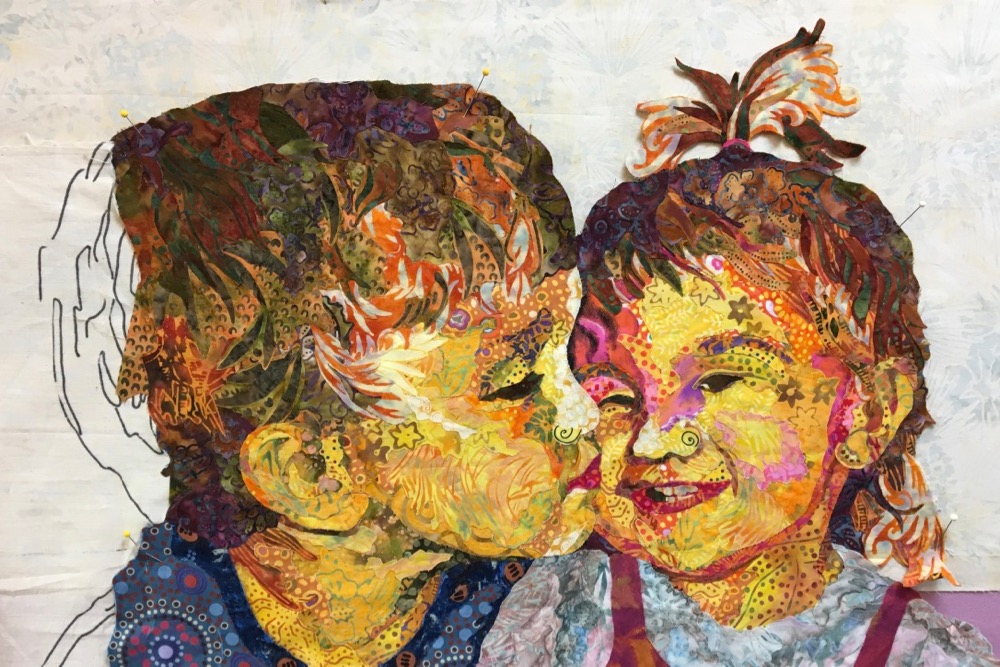
I was liking how it was looking above, but some darks were still needed for contrast. I used the dark areas of a printed chiffon to break up the medium tones Sam’s hair and give his little head a little more form (marked with the pins below).
To give Maia’s hair a softer look, I used a slightly lighter colored chiffon for softer shadows—plus a little glittered black tulle for subtle but fun highlights.
Maia’s topknot and the “escaping” hair at her neck, needed to look as wispy as possible. The wispiness of an orange print batik gave a good base, since the background of the batik print was so very similar to what the background of this portrait was going to be. But it never looked complete until…
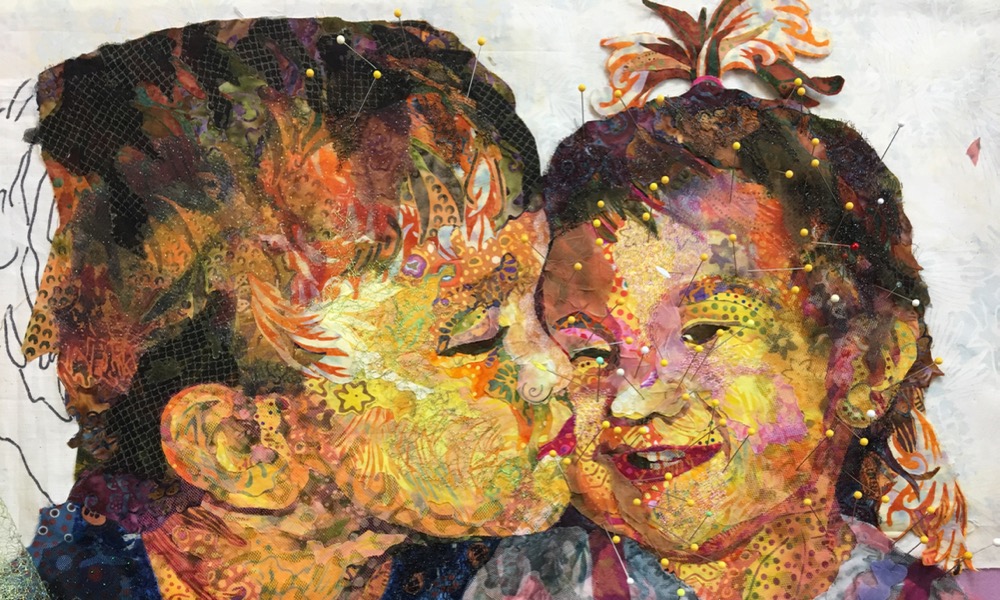
I added more strands to it, below. This is the stage where those fine-cut details come into play—the fine-tuning of the third draft. Another batik print added hair-like linear highlights to both kids’ heads of hair. You can see that addition detail below as well, and on final quilt following.

Four Times the Hair
In my quilt “Peace, Love, Tie-Dye, Save the Whales,” I re-created the same portrait four times, a different color way each time.
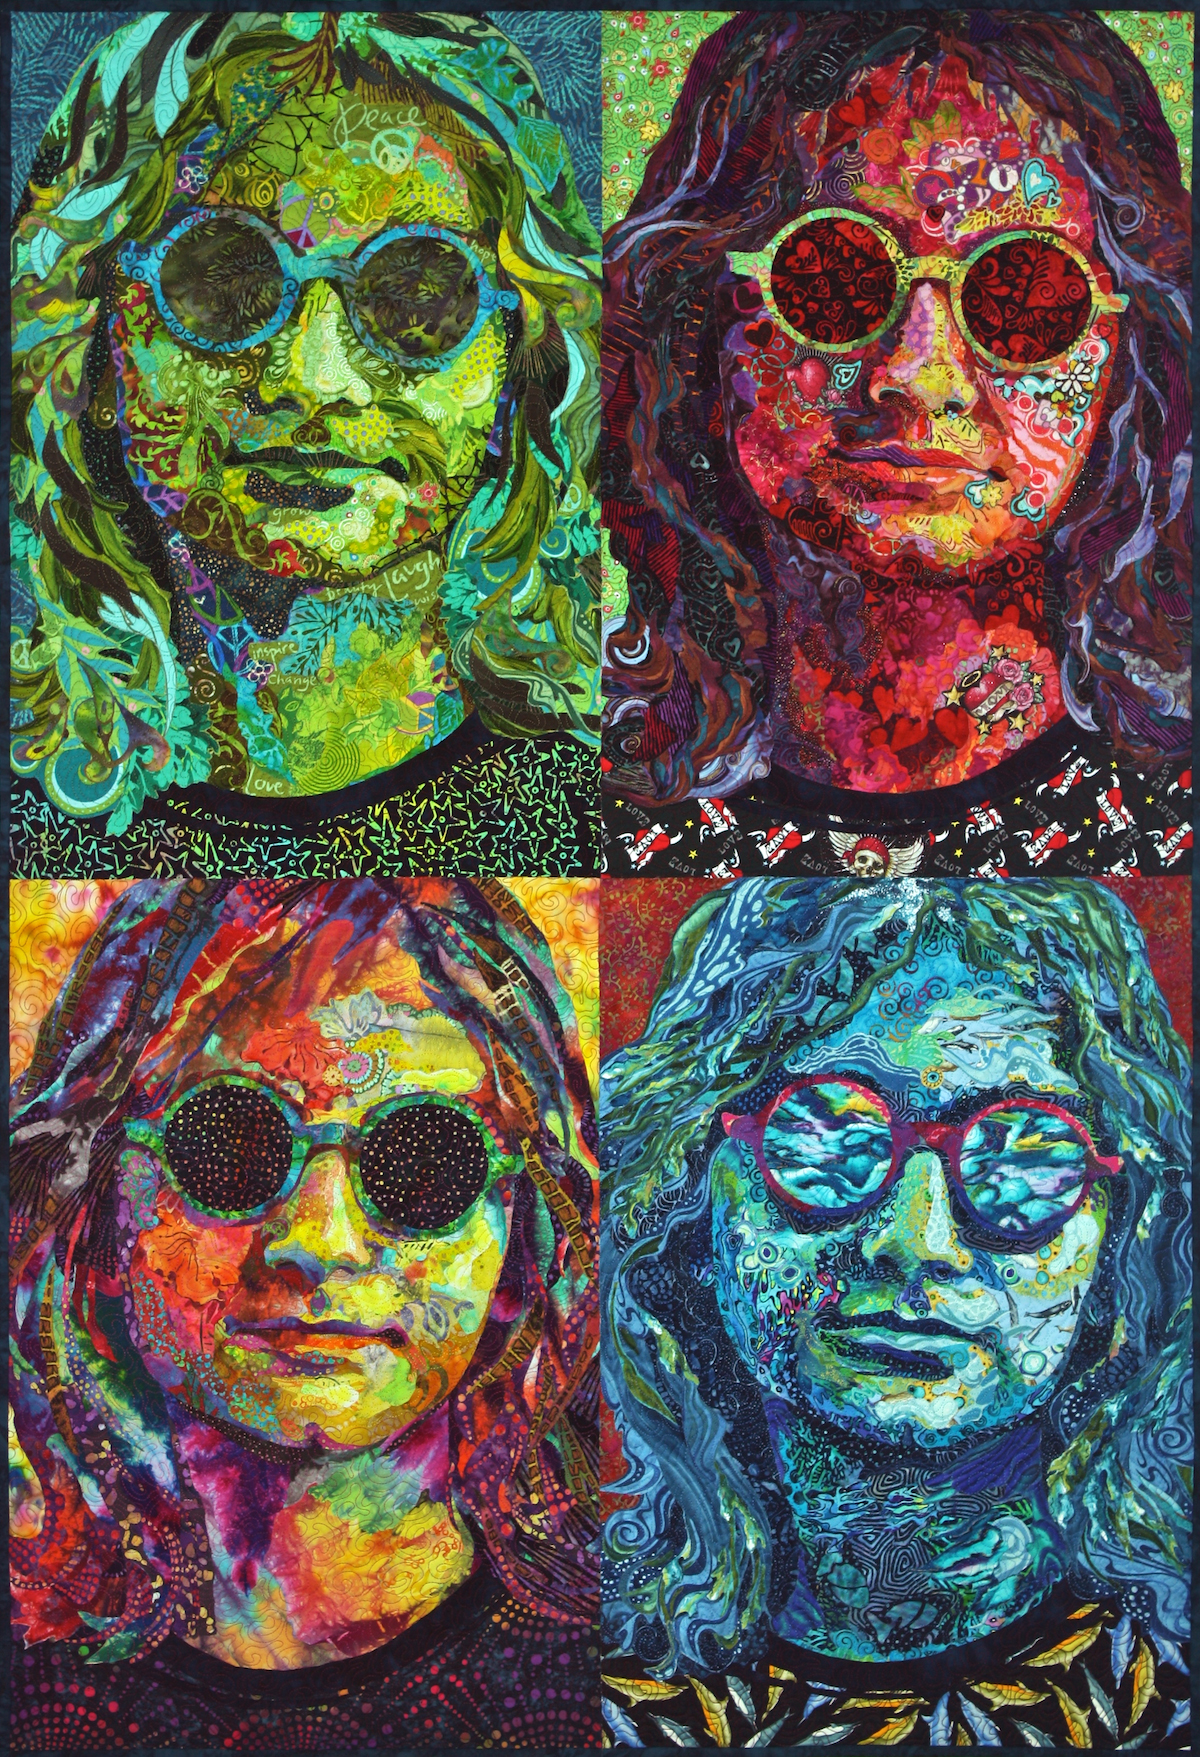
In the drawn design, shown partially obscured below, I broke the hair up loosely into sections of light and dark. I used that design as a guideline to help me place the hair’s highlights and shadows in relatively the same area in each portrait. There’s a fair amount of variation, due to the different prints on the different fabrics chosen for each version.
You can see some of the wavy fabrics that got used for hair directly above the in-progress portrait of “Love” (below).
In the early stages of each portrait below, you can see how the creation of the hair begins and progresses, always employing fabrics that have a “flow” to them to mimic the beautiful locks of hair that Sam had as a young teenager. By choosing fabrics with that sort of printed contours and movement—and a full range of values within each color range—I can let the fabric do some of the work for me, adding a a uniqueness and serendipitous quality to each of the four portraits.


Hair is challenging but can also be a lot of fun. It’s a good place to let go and play with your fabric—to go with the flow. Keep your eyes open for fabrics with patterns and designs that remind you of the curves, curls, locks, flow, highlights and shadows that hair can have. Start a little collection, and when the right subject comes along (and remember it could be a hairy animal as well as the hair of a person) you’ll be ready to try a new hairstyle, and be your own stylist.
You continue to have great posts. This was so helpful even though I have seen these quilts several times I looked at them in a whole new way as I heard this post! Thanks!
I agree with Darlene. Each time I read one of your posts and analyze the photos of your work, I think I have a full understanding until you point out the next thing. Thank you for your detailed and thorough explanations. I love reading them.
Ditto the prior two comments. I am really studying how you cut fabrics for different uses, These are just so incredibly helpful. Thank you.
Thank you for sharing these great posts, Susan.
I am in complete agreement with the two above noters.
A broken arm or this would be longer. Love the beauty of your techniques Susan.
Although I have seeen some of these pics before, the first one was really helpful. I have been afraid to start on my picture, not sure of the values and patterns and the head isn’t really very large to do eyes. This helps somewhat.
Something to look at again for Bob the longhair cat, I used lots of short bits, might need some extensions. Love this post, really very helpful.
This post was so wonderfully timed for me – I’m about to start my first collage hair. I just love how Maia’s hair turned out. I’m curious about the tiny thin white curls that you added near the end. Were they a print that you were able to cut out so accurately? Or did you cut them freehand? They’re so tiny and delicate – hard to imagine handling them without destroying them! Maybe it’s an acquired skill. 🙂
The white curls were cut from some netting that had that pattern in it.
Aha. Thank you.