
Birds are a popular subject for my fabric collage students. And why not? They are bright and bold and beautiful. They present a unique challenge, however. What do birds have that other animals don’t? Feathers, of course.
In previous blog posts I’ve discussed how to create hair (“What’s On Top?: Fabric Collage Hair”) and fur (“Creating Fur in Fabric Collage”).
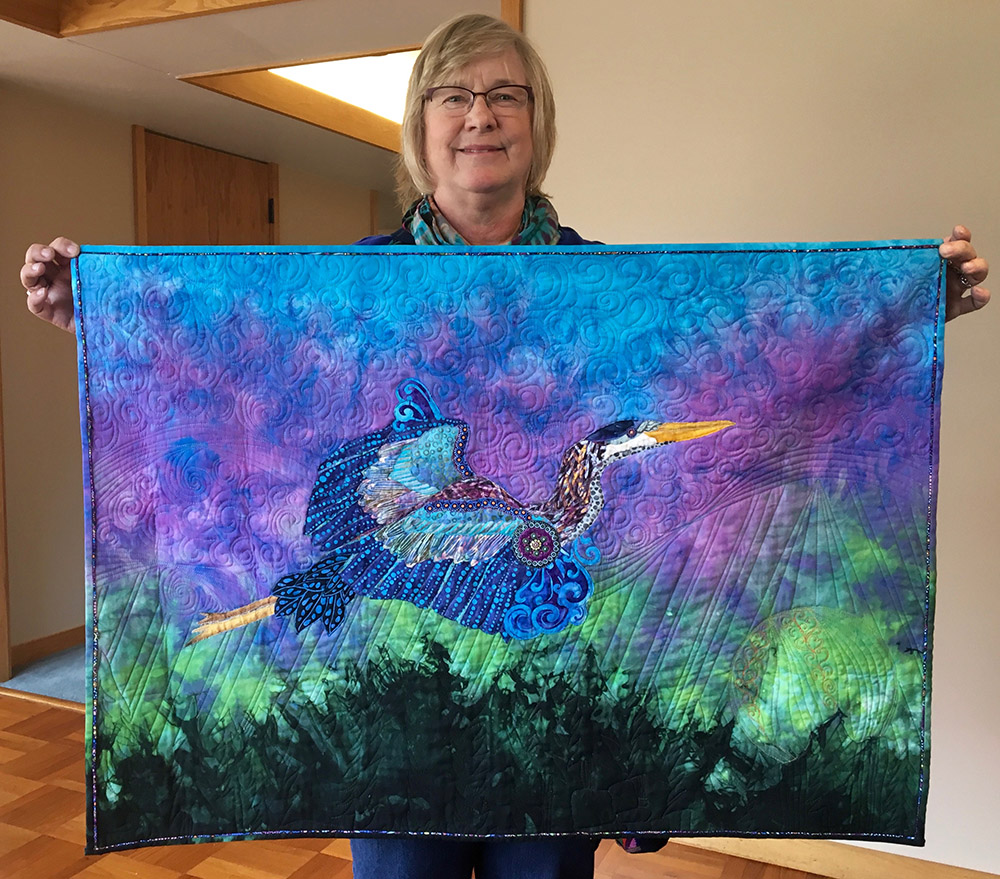
In this post I’ll show you some examples of how I and some others, such as Marilyn Davidson whose heron appears above, have dealt with creating feathers in fabric.
In a way birds are like flowers. They have feathers the way that flowers have petals. And the first impulse when starting to portray either is to create each individual feather or petal. For some people that might be a workable strategy, but many I find will be intimidated by the monotony of such painstaking work.
Instead, where possible, I encourage my students to think in terms of groups of feathers or areas of feathers. Just as when creating any other shape, look for the lights and darks (the values), then use the prints in your fabrics to help you give the impression of feathers without creating each and every one.
The first bird I made as a fabric collage was “Polka Dodo”—he was also one of the first “interesting animals” I put on a list of subjects for future quilts. Pink rhino—check. Coelacanth—check. Twenty-foot saltwater croc—check.

“Polka Dodo” is a good example of separating out the light and dark values seen on the bird form into shapes that I could then interpret with fabric. However, I chose to use exclusively polka dotted fabrics, a challenge I set for myself (’cause I liked the way the words “polka” and “dodo” sounded together) that made the job both easier and harder. Easier because using only polka dot fabrics simplified the question, “What fabrics should I use?” Harder because polka dots don’t exactly give any sort of impression of “feathers.”
This is a bird I created in 2006 and I love him for who he is, but now that the polka dot theme is out of my system, I’ve since let the print designs in my fabrics do some of the work for me. Choosing fabrics with designs reminiscent of feathers—linear, elongated curves, spirals, flower petals, and feather prints themselves (among others)—can all combine to create the impression of feathers without cutting every… single… feather.
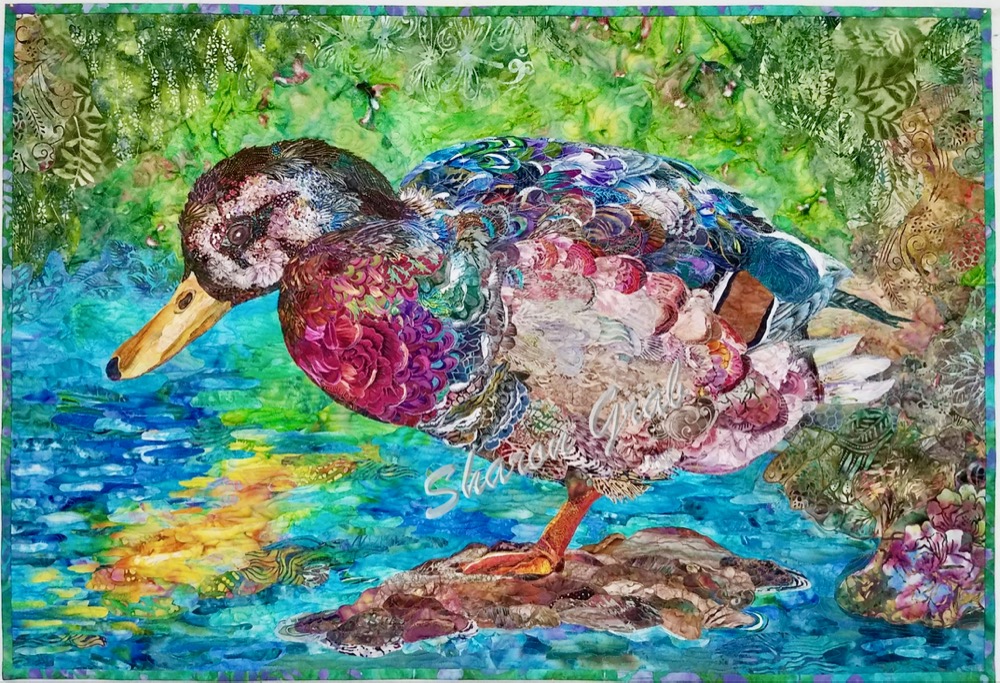
A quilt that uses the patterns in fabrics to “imply” feathers is Sharon Grab’s duck, below. You can see in-progress and detail photos of “Boulder Balance” in the Finish Line link above (as with all the following quilt examples as well). This is an excellent example of how using a variety of fabric prints, cut and arranged with attention to the direction the feathers are laying, create a very believable bird. Notice how three or four well chosen flowers on the breast convey the feathers for that entire area.
Bird feathers come in different sizes and shapes, and call for different attributes to look for in the fabric prints. In this portrait of our budgie Kiiora, below, from “Golden Temple of the Good Girls,” I don’t even try to indicate the the tiny feathers on her face.
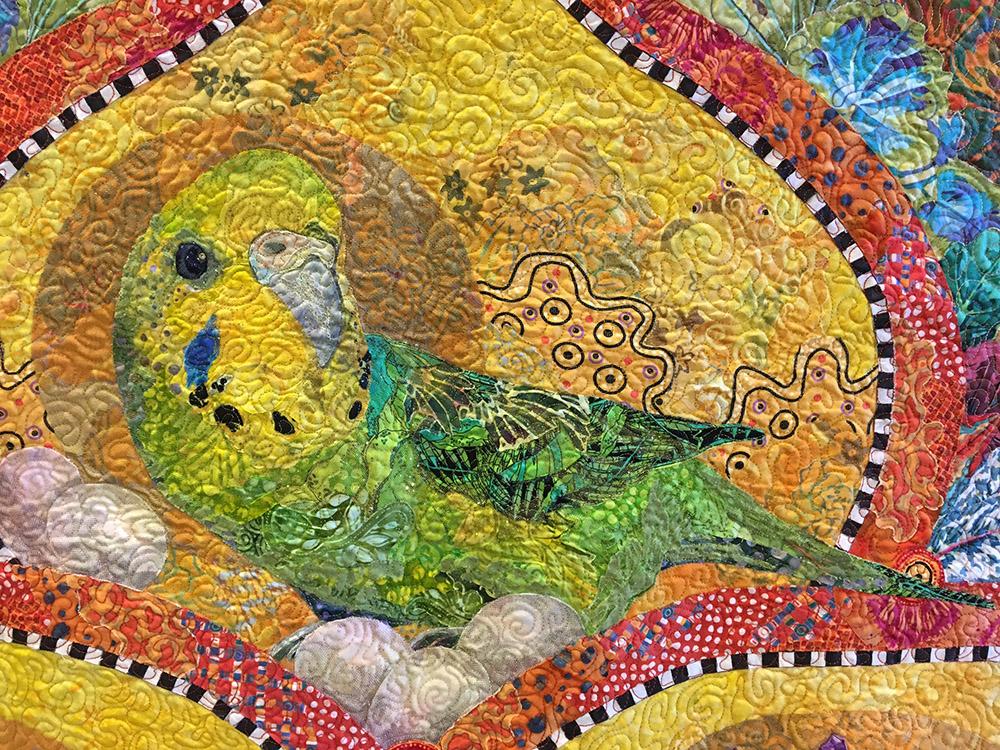
But as the feathers get more pronounced and larger, especially on her wings, I have used ever larger prints in the fabrics to create the visual texture of feathers, as well as suggesting the movement of the feathers and contours of her little body. A variety of leaf patterns and other nature inspired designs worked well to convey the idea of feathers. A very subtle print, a low-contrast batik, “sketches in” the feathers on her neck (just below her blue feathered beauty mark).
In Brenda Betz-Stolz’s quilt (above) her heron is the model of economy. I love her fabric choices for different feathered areas of the wings, very effectively letting the fabric do some of the work. She did cut the pinions out one by one (those elongated wing feathers), but the lines of printed dots on the pinion fabric infers even more feathers. The same with the neck. The brush-stroke designed fabric on the top of the neck works to create the illusion of a mass of feathers in a smooth curve from head to body.
Kenzie Preston’s blue-footed booby, below, also makes exceptional use of the patterns in the fabrics to help her give the impression of feathers without creating each one. I especially like how she used and arranged the fabrics on the head. You can see how she used “feathery” prints throughout the bird, found in both high and low contrast prints, in a variety of values. Then just for kicks, she includes two completely-real-looking white feathers on the tail end, which help sell the illusion of feathers all over. Very clever.

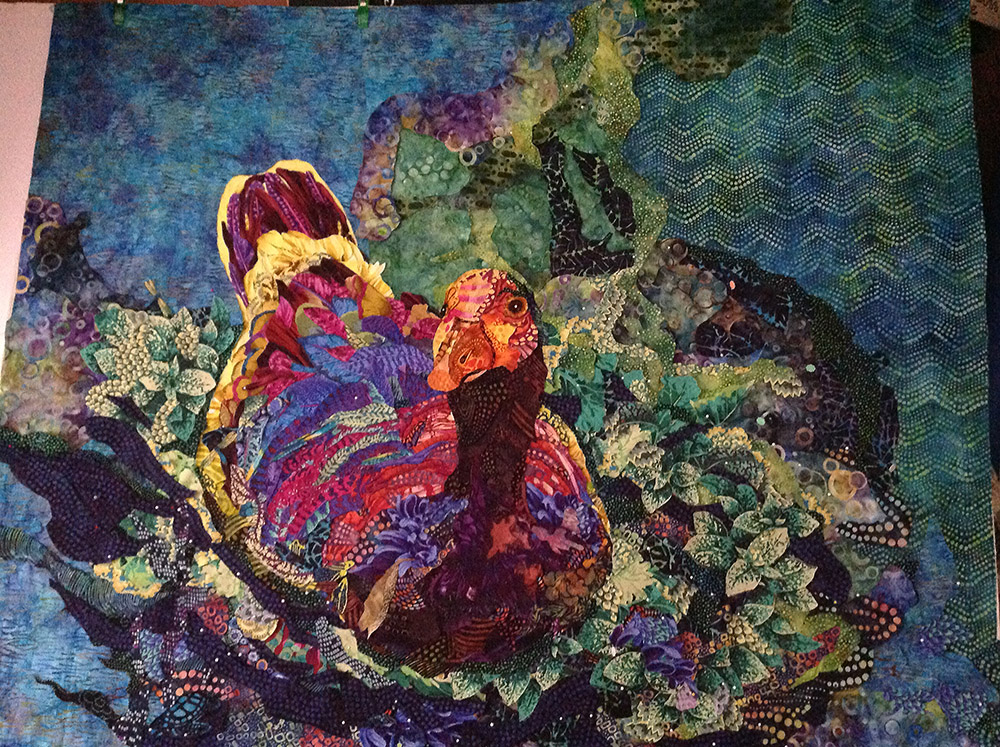
In “Kaloli Moondance,” my portrayal of a Marabou stork, below, there are a variety of sizes and types of feathers to contend with. There were tiny, hairy feathers on her head and chest; smooth, white feathers on her belly; and large pinions on her wings. Each needed a different treatment.
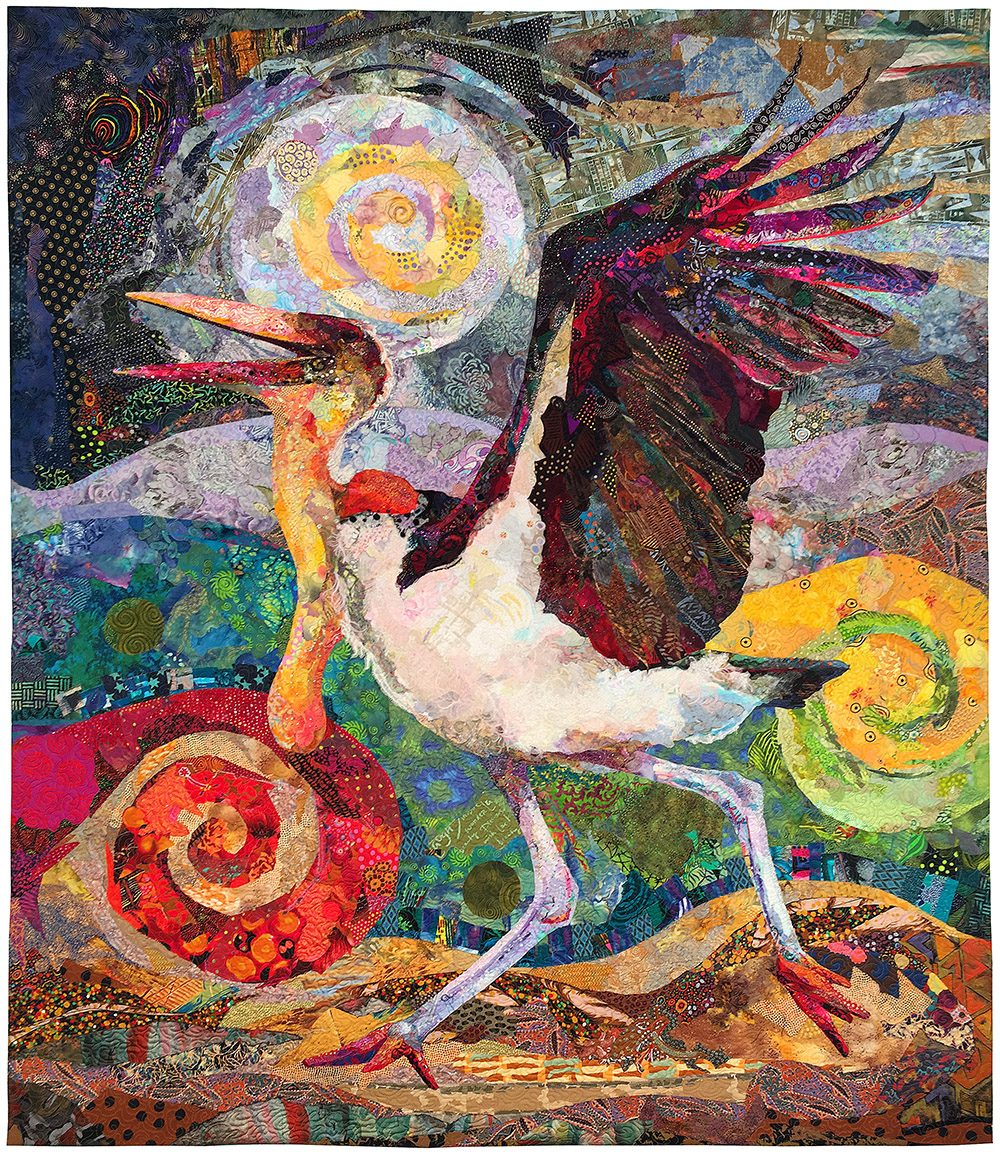
For the tiny, hairy feathers I cut small shapes from a decorative netting, carefully aligning them to run in the direction I needed. I placed these toward the end of the process since they were so fussy and easily damaged.
In the belly you’ll see I didn’t stick to strictly white fabrics for this white bird—assigning various pastel colors to different areas of value on the body in order to create form—pinks, yellows, blues, and light mossy greens. I tried to simulate the fluffiness I saw in these short feathers by choosing fabric prints that curled or spiraled.
The pinions in the wings were one place where, yes, I did have to create each individually. Especially the ones toward the tip needed to be a specific shape because they are so important to creating a realistically-shaped wing overall. As they move closer to the body you’ll notice that the feathers become more abstract and even start running together. There’s a directional movement and a lot of straight lines, though no real individual feathers, in that mass of dark values.
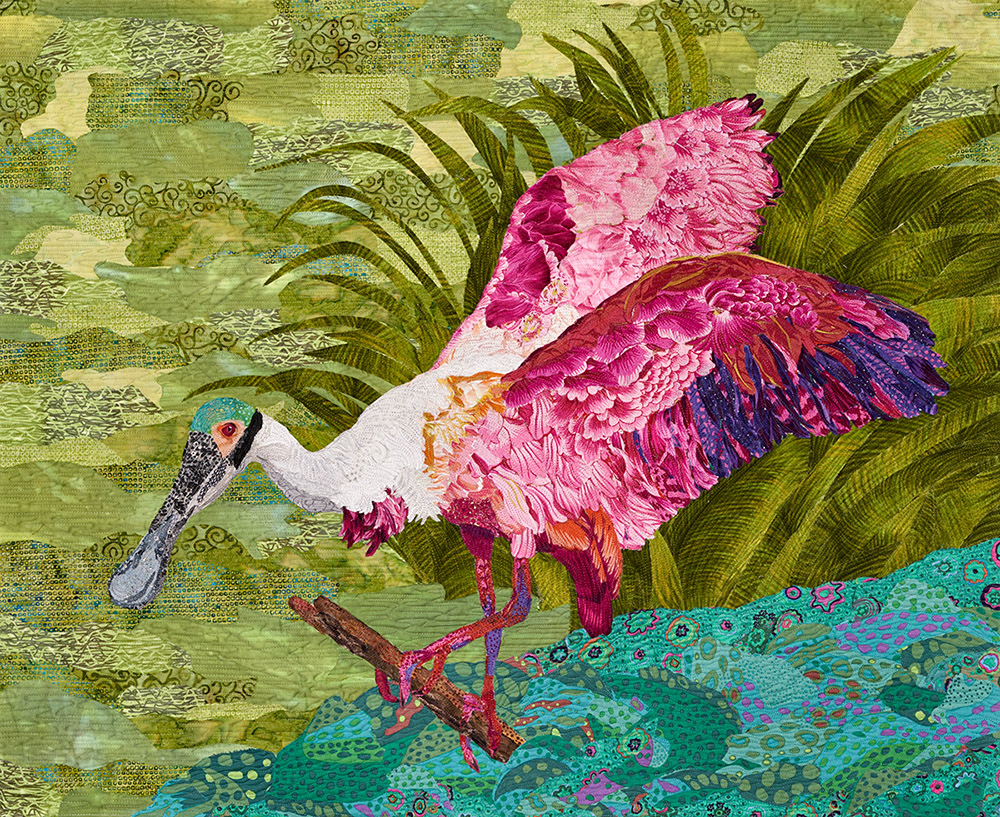
Similarly, Marylin Davidson in her spoonbill, above, also uses a combination of fabrics and cutting styles for portraying the feathers. The pinions nearest the edge and tip of the lower wing are individually created because of their distinctiveness to a real wing. However, as we move up the wing toward the body, the feathers get smaller and fluffier, thus she lets the fabrics, in this case some flowers, work for her, being able to portray larger areas of feathers with just a few pieces of fabric.
Notice also how Marilyn uses the prints in the fabric to indicate the directional movement of the feathers. The larger pinions run vertically, while the smaller fluffier feathers under the wing tend to run horizontally. The fabrics she has chosen are printed with patterns that lead your eye in those directions.
Joanne Hannon-Shaw uses the fabric prints in her goose, below, in a similar manner. While the fabric shapes themselves are cut in horizontal arcs, the prints on those fabrics run vertically, The arcs give that nice wide contour to the back while the prints give the illusion of feathers running from the front to the back of the goose.
These quilt examples ought to give you some strategies to employ when creating feathers to dress your fabric collage bird. As is often the case, fabric selection is probably the most important skill to develop for making those pinions and downy wisps. When you can choose a fabric that does some of the work for you, it makes the process run a little smoother and will be more enjoyable. Whether you are making feathers or fur, hair or skin, learning to see how the printed patterns, colors, and values in your fabric is the key.
And now for something (not completely) different…
COMING SOON
Susan Carlson Sea Turtle Online Workshop
Learn fabric collage with this fun and colorful (and fabric print laden) sea turtle project. We are making good progress (with the occasional minor setback as you’ll see below) and plan to have the Sea Turtle Online Workshop, ahem, online in March 2020.
If you are a member of the Fabric Collage Online Master Class you’ll receive a discount on the purchase of this online workshop.
Already we have over two and half hours of video shot and edited, taking you step-by-step through the process of making a sea turtle fabric collage quilt. Shooting video usually goes quite smoothly. But it helps to remember to set your camera to “video” and not “time lapse.” We reached the end of the section in the video below before realizing that there was no way the video was going to align with the audio that we had recorded on another camera. Oh well, live, learn, and repeat. Enjoy the “practice” video below as a taste of what’s to come.
I love your work!!!!!!!!!!!!!!!!!!!!
I love all of your examples of feathers but wish I knew how Marilyn Davidson created the long curlicue feathers on the crane. Couched yarn? Beautiful and I am trying to do a feather project that would benefit from that kind of ? Texture?
Actually this question ties in nicely with the blog about creating hair (see the link in this post). I believe Marilyn and I used the same sheer fabric. She used it here in her heron, I used it in the hair of Monarch Maia. Anyway, it’s a netting with curlicues and we have cut them out and laid them down with a touch of glue to hold them. Maybe Marilyn will chime in if she sees this comment.
Ah so the netting has a curlicue pattern? I wonder if it is still available. I have been making individual feathers with sheers and I like the idea of the glue. Thanks for the response.
I don’t know about Marilyn, but I found mine last June at Kalispell, Montana’s JoAnn Fabrics.
Thanks. I think I will check the local JoAnn’s before I head for Montana. I love the pieces shown here and all of them.
I’m looking forward to the sea turtle online workshop!