
After three and a half years, my quilt “Polka Dodo” is back home. He was part of a traveling exhibit by Studio Art Quilt Associates (SAQA) called Wild Fabrications. The show, made up of animal quilts from 38 artists, traveled throughout the country, making fourteen stops at quilt festivals and museums. Some of the Wild Fabrications’ exhibits included: Houston Quilt Market and Festival, Texas Quilt Museum, and the Chicago International Quilt Festival. According to SAQA, the show hosted more that 150,000 visitors during its tour.


I believe Dodo served as a fine ambassador for fabric collage. Though the poor fellow won’t get much of a rest, I’m afraid. He’ll accompany me, tucked into my carry-on, for my next two teaching jaunts to Melbourne, Australia, and Pacific Grove (Asilomar), California, both of which classes are focused on creating animals.
In the original blog post below, the how-to photos show a way of working that I wouldn’t use now. Specifically, I wouldn’t block in (fill) large areas of the design with big pieces of fabric. When I analyze some of my older pieces—Dodo is now 13 years old—it strikes me how the way I work has evolved, which is normal, of course. I still really like how the quilt turned out, I wouldn’t go back and change him. I’m especially pleased with how he developed a personality, which is one of the reasons I prefer sentient beings as subjects.
In the way I categorize fabrics, polka-dot prints would fall closer to a “solid” fabric in that polka dots are often very-regularly-spaced, high-contrast patterns, neither of which lend themselves for a soft transition from one piece of fabric to another. Therefore, they don’t “blend” in the same way that irregular patterns and mixed colors do.
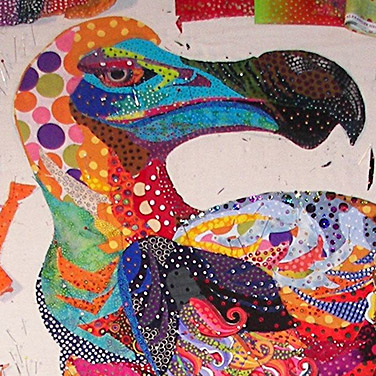
You can see that the fabric shapes in Polka Dodo have hard lines with distinct edges separating one fabric shape from another. However, that’s the limitation I gave myself when I decided to chose fabrics specifically for the polka dot theme. But limitations can also be helpful—in narrowing down our seemingly unlimited fabric choices—and also fun to work with. This fellow makes me smile and am glad to have him home again.
In the video above, you can see he really benefits from the use of netting and tulle, which I use to blend between contrasting colors and patterns. The decorative sheers also help make him fancy, accentuating his haughty, full-of-himself personality. I’ve always thought he’s something of a dandy. If he could, he’d use a walking cane to strut his stuff.
Original Post
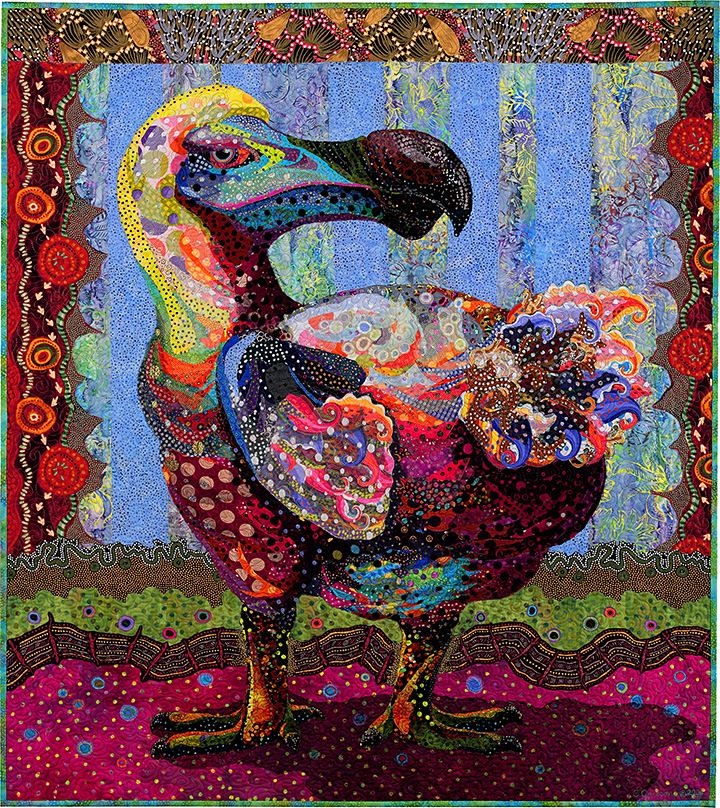
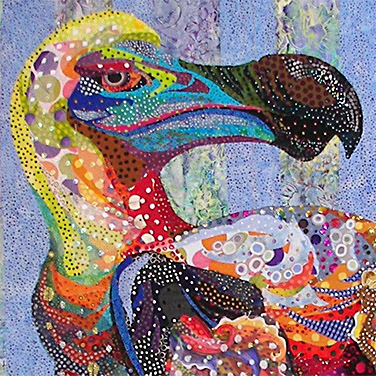
“Polka Dodo” is a bird with an attitude, even though he’s extinct. At some point in their creation, my quilts take on a life and personality of their own—like children. This guy developed a haughtiness that defies you to ridicule him, who proudly struts his polka-dotted stuff on his own private stage.
“Tickled Pink” Leads to the Dodo
“Tickled Pink”, my hot-pink rhino completed in 2005, opened up a whole world of new subject matter for me. Before that, I had been immersed in fish, bugs and butterflies, and portraits. After that, large, interesting animals became fair game for getting the fabric-collage treatment. Shortly after completing “Tickled Pink,” I made the following list on my day planner.

There, right after the rhino, was the Doh-Doh Bird (I must have been thinking “Play-Doh”?—our son was elementary school age at that time).
I have to admit I had avoided birds before then. I considered them similar to flowers, which I also avoid making. I didn’t think I could stand the tedium of doing all those feathers (or petals).
Yet, I should have remembered from my painting and drawing classes that you don’t have to paint or draw every strand of hair on a head or every leaf in a landscape. Once I considered the dodo to accompany “Tickled Pink,” I realized I could treat the feathers as areas or clumps of color and value—lights and darks. Then, every so often, I could put in a detail, say a piece of fabric that has a design on it that looks feather-like somehow. If I was successful, the viewer’s eyes would fill in the rest.
The Dodo Becomes “Polka Dodo”
My search for pictures of dodo birds turned up a variety of renditions. The birds were discovered and went extinct quite quickly in the 17th century. There were no photos, no scientific taxidermy, just a few random skeletons, and drawings and paintings that were artistic impressions. My research in 2006 was shortly before the internet really became the resource we now rely on, so I was limited to old encyclopedias and other copyright free collections of drawings.
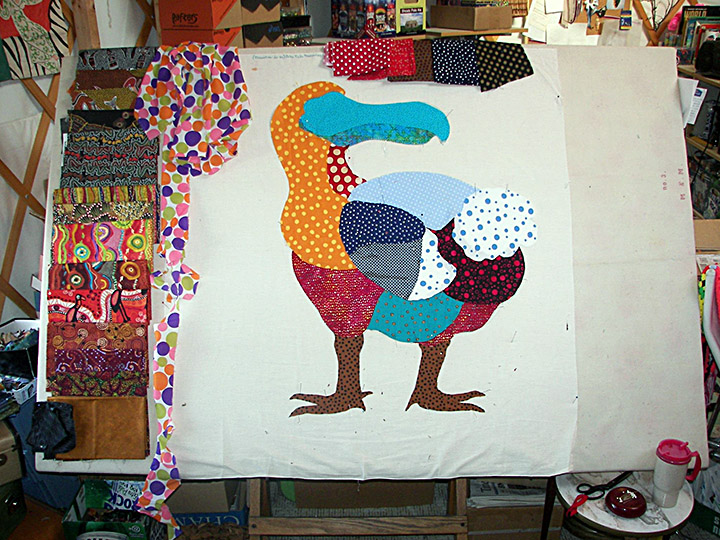
Since there was no definitive version of what dodos looked like, however, I felt pretty liberated in what I could do. I used the head from one and the poofy tail from another, and the insignificant wing from another—parts that I found interesting—and put them together into my own bird, which I sketched freehand on foundation muslin.
As I was looking at my fabrics and trying to decide what color theme I was going to use, I happened to pull out a few polka dot fabrics that had been stored together. I was thinking of polka dots and dodo and the two came together for the name: “Polka Dodo.” The name actually came first and made the rule that all the fabrics I used had to be made up of polka dots: cottons, rayons, silk, or even glitzy sheer fabrics all had to be polka dotted and only polka dots. I later decided that the background fabrics could be made up of other designs, as long as it also included polka dots.
There was only one exception to this polka dot rule. I used a large floral Jane Sassaman fabric on the bird’s tail and wing because the petals were the perfect length and curve to portray the fluffiness there. But still, the petals did have polka dots on them.
When I was finished, as I was folding up the mess of fabric flung on the floor, I counted more than one hundred different polka dotted fabrics. Of course I often used more than one piece from each and there were also little scraps of fabrics of different designs that I used up as well. So well over 100 different fabrics went into him.
Do as I Say, Not as I Do
Reviewing the in-progress photos of this piece in the time-lapse movie above reminds me how differently I work today. The dodo was a sort of hybrid of how I work now and how I worked earlier in my career, when I was doing fish, bugs and butterflies, and portraits.
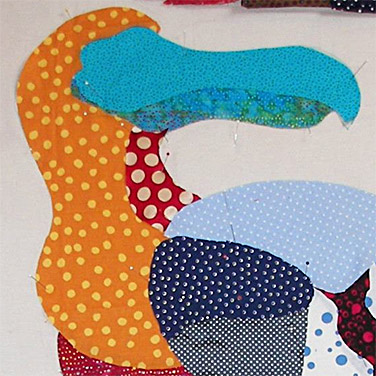
For the dodo, I put down blocks of fabrics, filling in sections of the bird with those background colors, similar to blocking in a painting. Why I decided to work that way, I’m not sure. After all, five years earlier I had completely thrown out that way of working when I did “Samuelsaurus Rex.” In that piece I used small scraps of fabric to fill in large sections of the quilt. Instead, the dodo was blocked in with larger pieces, making it look as though I could have used a pattern or template, but I didn’t. I cut the shapes free-hand to the lines I had drawn.
I don’t work this way anymore. I don’t teach people to work this way either. Why?
In my experience, once an area is blocked in, beginners are tempted to stop right there. They have problems adding more detail. They struggle to use the values and designs in fabrics to create form, which is the whole point of my kind of fabric collage.
The blocked in area becomes a block.
A mental block they have to struggle to overcome. In my teaching experience, this usually happens either in the beginning or near the end of a four- or five-day class. In the beginning, it’s because quilters are used to working with templates and the familiarity is reassuring. Near the end, it’s because they haven’t finished their piece and they feel pressed for time. I see students starting to use larger and larger pieces of fabric to fill in the design they’ve drawn—even if that’s not the way they had been (successfully) working the previous days. Almost inevitably, that is when they begin to struggle. When I catch it, I suggest (gently) that they remove the too large piece of fabric and instead fill in the area with smaller pieces.
With “Polka Dodo” I believe I overcame that potential problem from blocking in the areas because of my years of experience with fabric collage. I knew that this was just the starting point and that much if not all of the underlying fabric would get covered up. An example of this is the orange polka-dot fabric on his neck. Look at the following sequence and pay attention to how the orange is almost completely covered up by the end. (For that matter, choose any other fabric and watch how it progresses.)

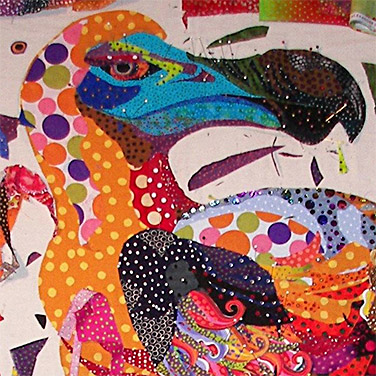
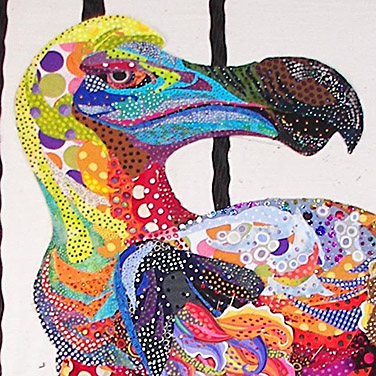
A beginner probably would have found it difficult to overcome that orange polka-dotted fabric. It was so strong and striking, they would have been tempted to leave it or most of it showing. They might have thought it was good enough.
Obviously, I too thought it would be a good place to start. BUT, I knew it was a first draft. I knew because of my many years of playing with fabric collage. My students don’t have that benefit. So when they start laying in those big pieces they get stuck and don’t understand why.
Here’s how I see it: When a large shape is cut and set in place, our brain says it’s done. When more pieces of fabric are added on top of that one, they look isolated, like little islands on a lake. If you instead resist using that big piece, it forces you to think harder about which smaller piece of fabric will look good against another smaller piece of fabric, and so on. Fabric collage in this way is not a quick process, but it works.
It took me a few years of teaching to consistently observe how students struggled with those little islands and why. Now I know how to help them avoid having to overcome such a challenge. I tell them: if you start with smaller pieces, slowly filling in the larger spaces with many pieces of fabric, it’s easier to blend colors and values to give shape and form to your subjects. Trust me. And most of the time they do.
When I first started I had so many scrapes of dot fabric left over from a little girls quilt her mother wanted, I used the dots in trying to make a chicken. The dots were so overpowering no matter what I tried to do to cover the dots it was a failure to me. The way you did the Polka Dodo by camouflaging most of the dots I which I would had been part of this blog before. Thank you for sharing
Hi, Susan,
This is such a helpful post. Seeing the progression of your work in Polka Dodo, along with your explanation, clarifies so many questions I have had.
Thanks so much!
Linda
Hi Susan!
Love your video! I have taken classes from you in Canmore Alberta and loved them and learned a lot!
My question is, how do you attach the tulle/netting so it is firmly attached to the quilt?
Thank you so much!
Susan, I finished my elephant quilt from 2018 Empty Spools. I would like to send you a photo of it. What is the best way to do that? Thanks.