
I hope you admire the pieces in this collection of Fabric Collage Finish Line quilts. This is an especially varied bunch—not so much in subject as in style. The impressionistic portrait by Sharon Oldfield (above), contrasts with Rosell Crockett’s abstracted face (“Girl Done in Pink”), which is on the opposite end of the “realism” spectrum from Pat Beaudoin’s four-footed friend later in the post—and more. All are fantastic.
If you are interested in learning more about fabric collage, each of these quilts has something to offer you. I try to point out from each an interesting choice, technique, or problem overcome, and many of these ladies documented their steps to even further share their thought and collage process with you. So, yes, admire and ooh and aah over these quilts, but take a closer look and see what you can learn. Thank you to those who submitted yet another set of fabulous finished quilts!
If you too have a finished fabric collage quilt you’d like to submit, please use the link below. And a thanks to you too.
Submit Quilt for "Finish Line"
A reminder that we have brought back the Pandemic Collage Coping Free Pattern. Get your free pattern by visiting the Patterns page—susancarlson.com/patterns/—and using this Coupon Code:
goawaypandemicfreepattern
Be sure to click Apply Coupon before proceeding to checkout. Those who used the previous coupon code for a free pattern can use this one for a new free pattern. And if another pattern or two catches your eye, you’re welcome to add it to your Shopping Cart. 😉 One free pattern per customer.
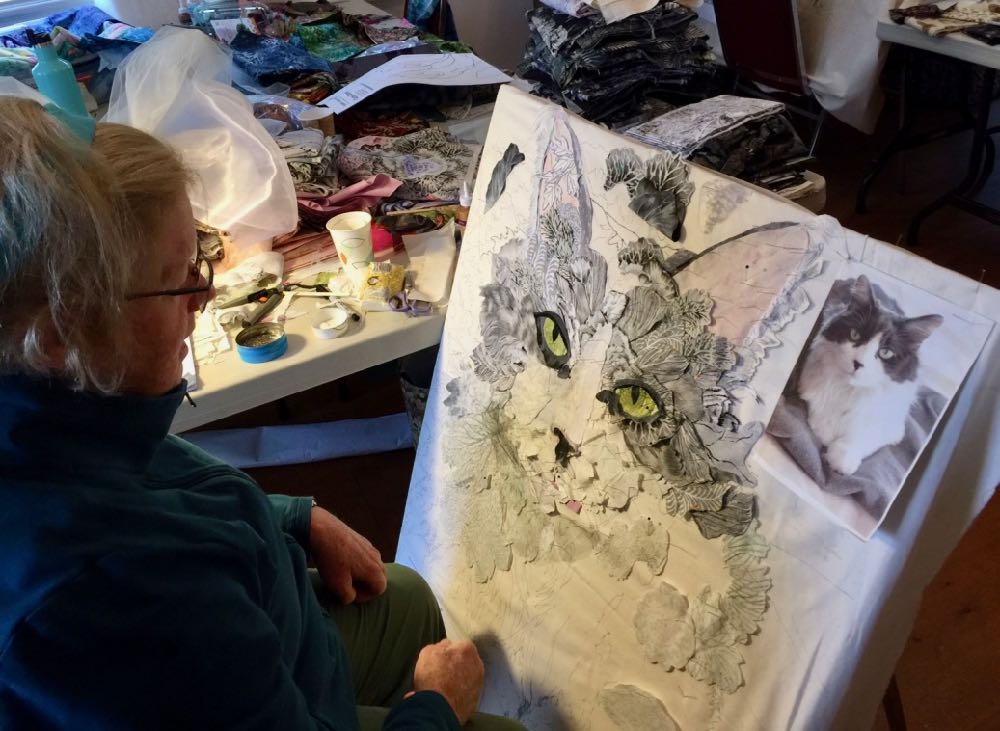
Sharon Oldfield
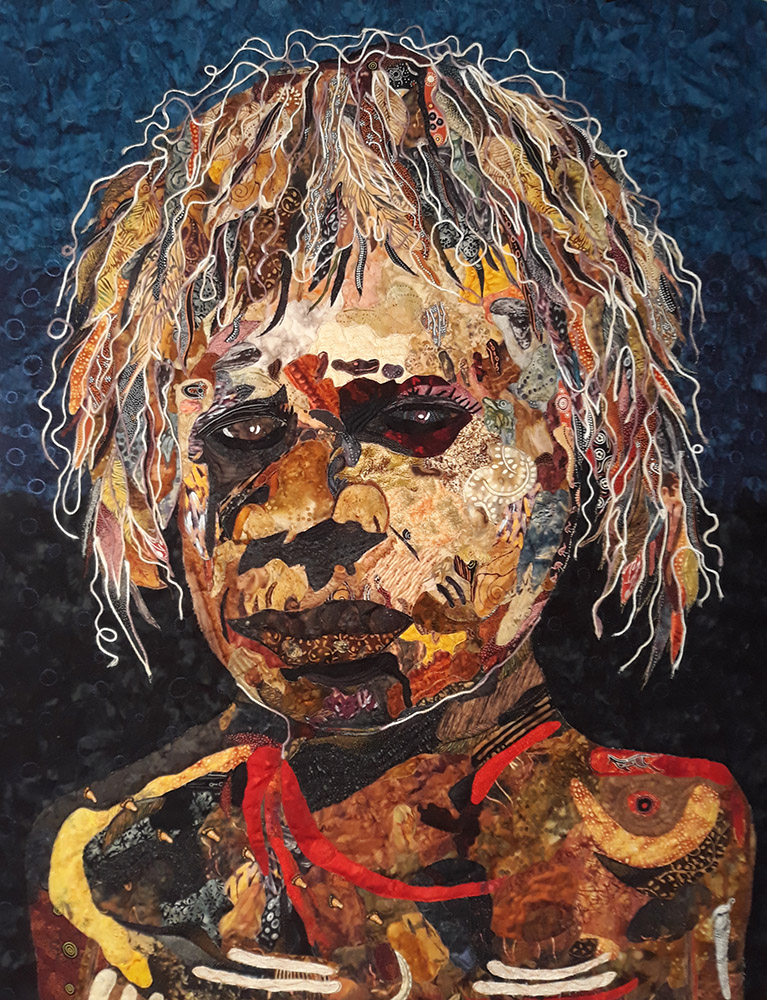
Sharon Oldfield of Brisbane, Australia, found my quilts on Pinterest and hoped to attend a class of mine in New South Wales but instead purchased the Fabric Collage Master Class Manual. Wow. What a beautifully haunting portrait she has created.
From Sharon:
While holidaying through Western Australia 4 years ago, I visited the Norval Gallery in Derby. The first painting to tug at my heartstrings was Contemplation. The artist Mark was in the studio so had a great chat with him, bought his book and continued to drool over his work. After purchasing Susan’s Master Class, I thought one day I’m going to attempt Contemplation. It’s my second fabric collage, so a bit of a daunting task! As I spend a lot of time putting fabric on, taking fabric off, I try to keep Susan’s words in my head, just play with the fabrics! While at times I’m frustrated with not capturing ‘a look’, it’s best for me to take a break, then go back to my fabric stash and I usually find something I had earlier dismissed and that is very comforting.


In the center photo, you can see that Sharon made the tip of the nose lighter. That small change added so much to the form and contour of the nose. Keep in mind that lighter values or colors appear to come forward visually to help create dimension in your subject.


Sharon says she wasn’t happy with her first attempt at the hair, above left. So she took a break and read my blog post about creating hair and was much happier with the result in the middle photo—I agree! She also added wool couching (seen in finished photo) to get the finer effects of swirling hair and achieve the painted white ochre look. She says Aboriginal men put this in their hair for ceremonies.
Mark Norval’s work can be seen at his gallery’s Facebook page here.
Rosell Crockett
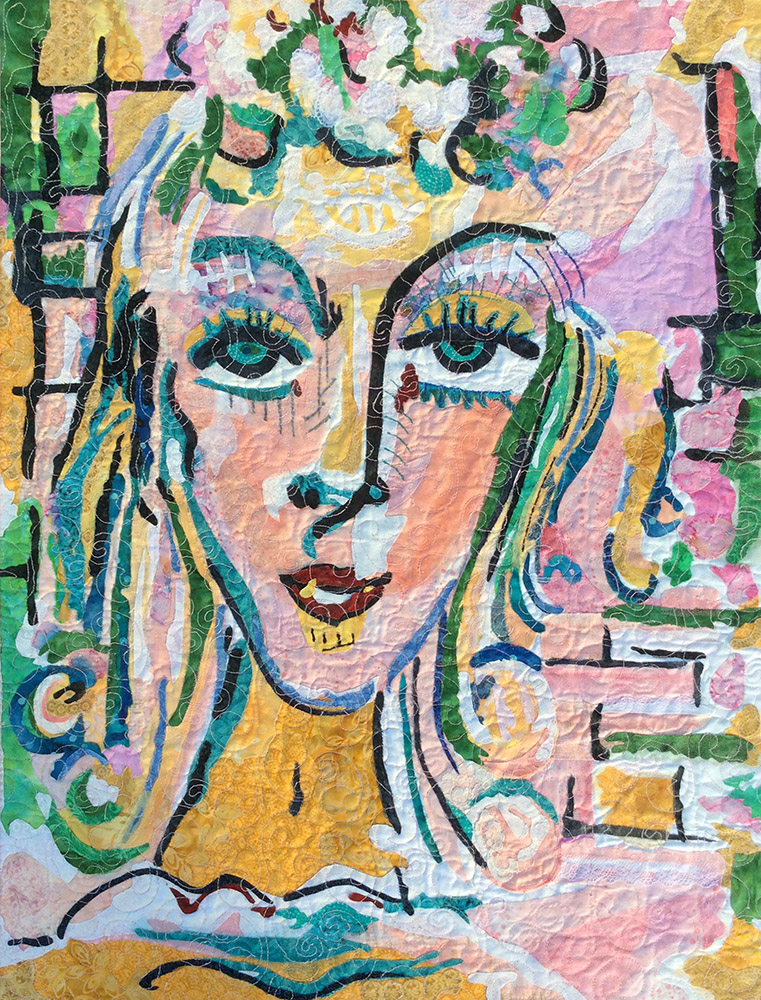
Rosell Crockett of Athens, Georgia found her inspiration from a challenge posed by a museum to her local guild. You can learn a lot from studying other artworks about how to create form, even when it is done in an abstract style. In fact, there’s a long history of learning an art form by copying the work of the masters. Just be sure to get permission first, if necessary. Art students have been visiting museums to sketch the masters for ages. My quilt “Tickled Pink” is based on a woodblock print by Albrecht Dürer from the early 1500’s. I had loved his “Rhinoceros” since first seeing it in high school. The copyright had long expired (if there ever was one?), putting works such as his into public domain.
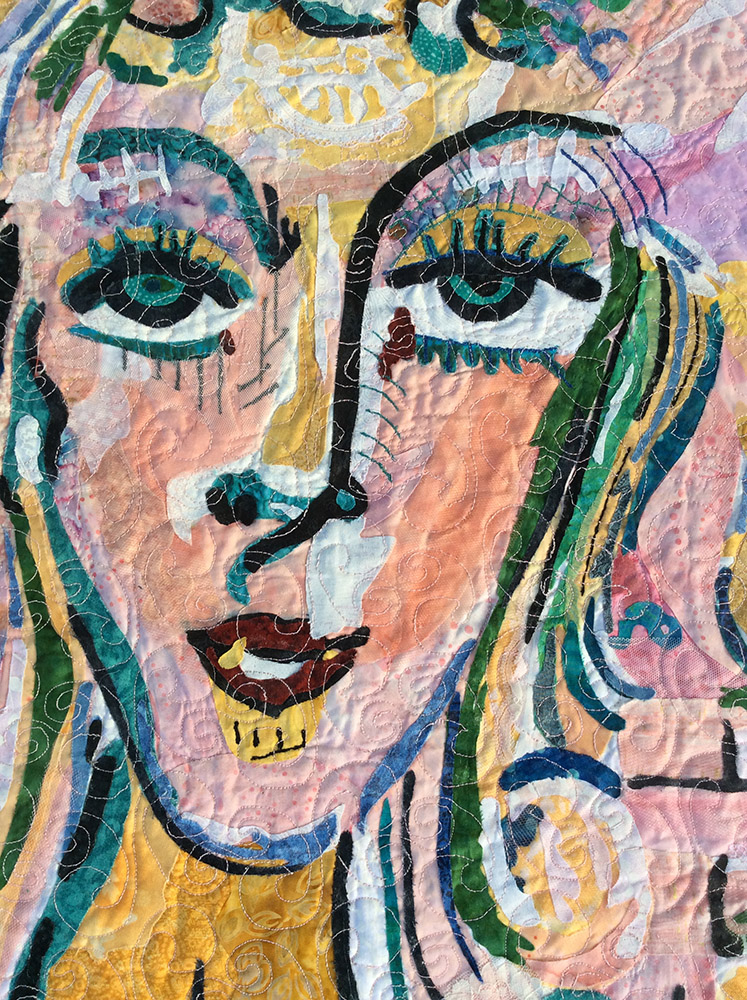
Rosell said she was going for a painterly look and she certainly achieved it—what a beautiful lovely “watery” yet textured look she has recreated in fabric by layering sheers—much like the layering of paint washes by the Old Masters.
From Rosell:
This quilt was done for “Art in Bloom” at the Steffen Thomas Museum of Art. The artist’s work was shown online and the local quilt guilds were invited to pick a piece and reproduce them in quilts.
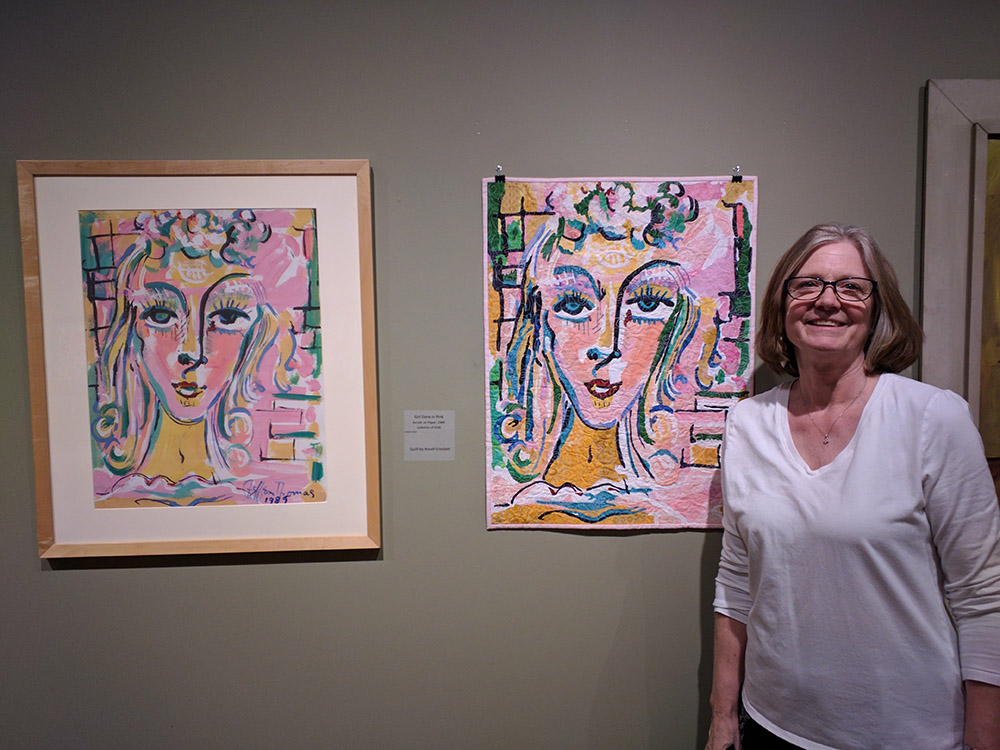
I selected Girl Done In Pink and used your technique of fabric collage for my quilt. I watched all of your videos and stared cutting and gluing. I had never seen the painting in person until the day of the show. I didn’t even know the dimensions of the painting. I took a screen shot of the postage photo online and made an 8 x10 print to work from.


I chose your fabric collage technique because I thought I could get a painterly effect by the layering of fabrics and overlaying of tulle and shears. I was able to use lace and heavy stitching to mimic some of the paint layers. I used an overall quilt pattern with pink thread over the completed piece. After the Museum show, I submitted my quilt to our juried guild show and won a second place in the art quilt category.


Marcy Spieker
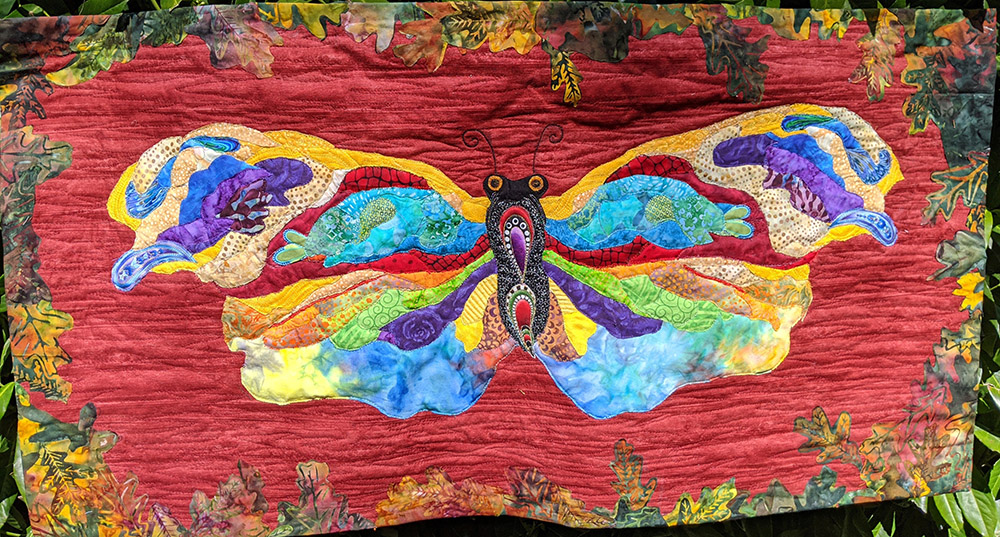
I met Marcy Spieker of Edmonds, Washington last year about this time when I was teaching in the Seattle area. Marcy says she struggled a bit at the beginning and the end. This is very typical. Those are the “choke points”—getting started and finishing. I was happy to be there to help her over the beginning hump (so glad Marcy came back for day two!), and I’m happy she found inspiration later in my book Serendipity Quilts for the background and glued collage binding. Her Mariposa now looks like she’s ready to lift off the quilt and start dancing. If you need help getting started, or getting unstuck (in art or life), you might read “Bird by Bird: How I Use a Book on Writing to Teach Fabric Collage.”
From Marcy:
Started in the workshop that you put on for Quilters Anonymous. The 1st day of class I was totally shut down. I have always been a piecer and could not adapt my brain to collage. I was so sad when I left. The next day you said that was totally normal to go through that. It felt so good to know that what I was feeling was a part of the journey. I rallied and with your help this is what emerged.


After the butterfly was finished, I agonized about the background. I wanted to collage the background using the fabric that is now the border. The butterfly disappeared. I chose the red and browsed through Serendipity Quilts and was inspired to still use the original fabric, but as a border.
Kim Keller
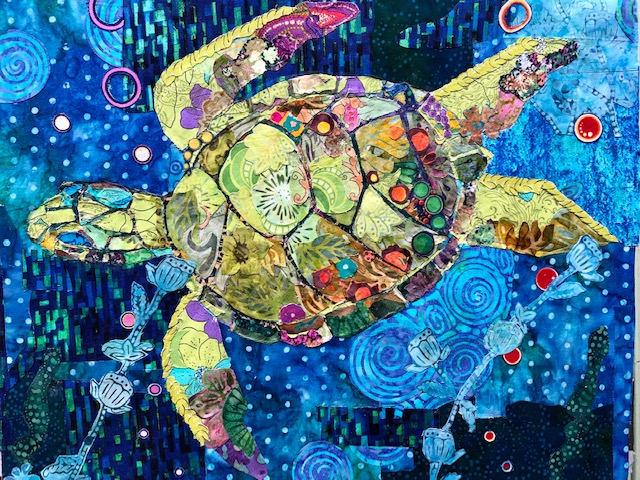
Kim Keller of Franklin, Pennsylvania made this out-of-this-world sea turtle using my new Sea Turtle eWorkshop. She used her own pattern rather than the one provided. I love the decorative polka dots showing up as a recurring theme to tie the turtle and background together.
Notice that she makes the “dome” of the shell by using lighter fabrics on the top side of the shell and darker underneath, as though light is filtering down from the surface of the ocean. Maybe that’s why this piece has such a wonderful sense of movement. Kim claims to be not to be not a sewer or a quilter but she’s got an artistic eye and fabric can be just another art medium, if you treat it that way.
From Kim:
I am not a sewer or quilter, but I am learning fabric collage. This piece will be mounted on a wood cradled panel after just a little more tweaking.
Pat Beaudoin
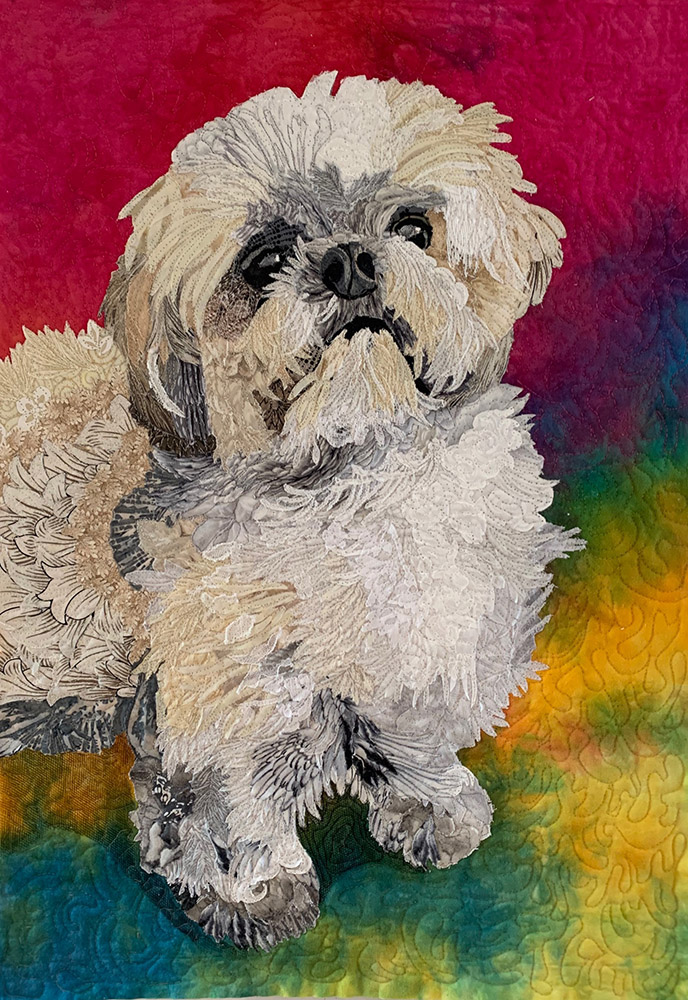
Pat Beaudoin of Dundas, Ontario has had quilts featured in two previous Finish Line blog posts: a sun she created from the Fabric Collage Master Class Manual and the dog she mentions in her comments, Emma. At times I’ve noted how coming to a class having done some “homework” ahead of time gives you a big leg up. When Pat attended my October 2019, Maine Harpswell Retreat, she had those fabric collage pieces already under her belt. She started off at a run and hasn’t slowed down yet!
In her two dog portrait quilts of Emma and now Bernini, Pat has certainly developed a style of her own. She has a good eye for fabric collage and uses her fabrics to their full advantage. Notice that Pat doesn’t attempt to make the fur by creating each individual hair. By cutting around the print designs in her fabrics, Pat produces clumps of fur and then blends those areas together by bridging them with more printed fabrics. Nice work, Pat—and what a lovely and soulful face on Bernini—you nailed it.
Dear Reader, if you need some tips for your furry friend, here’s a blog post on creating fur in fabric collage.
From Pat:
I started making collage quilts after I started Susan’s Fabric Collage Master Class online. I made the spiral and was hooked. I was lucky enough to get into one of Susan’s classes in Maine. Before the class I did a friend’s dog and started a lioness during the class. It was great to get Susan’s feedback and learn how to see the details that make all the difference.


When I showed some friends the dog I had done earlier, they asked if I would do one of their dog – Bernini. They gave me the picture and I started it while in Florida in January. Bernini was finished while in quarantine after coming home in March. He is now hanging in his owners’ home.
Betsy Habich
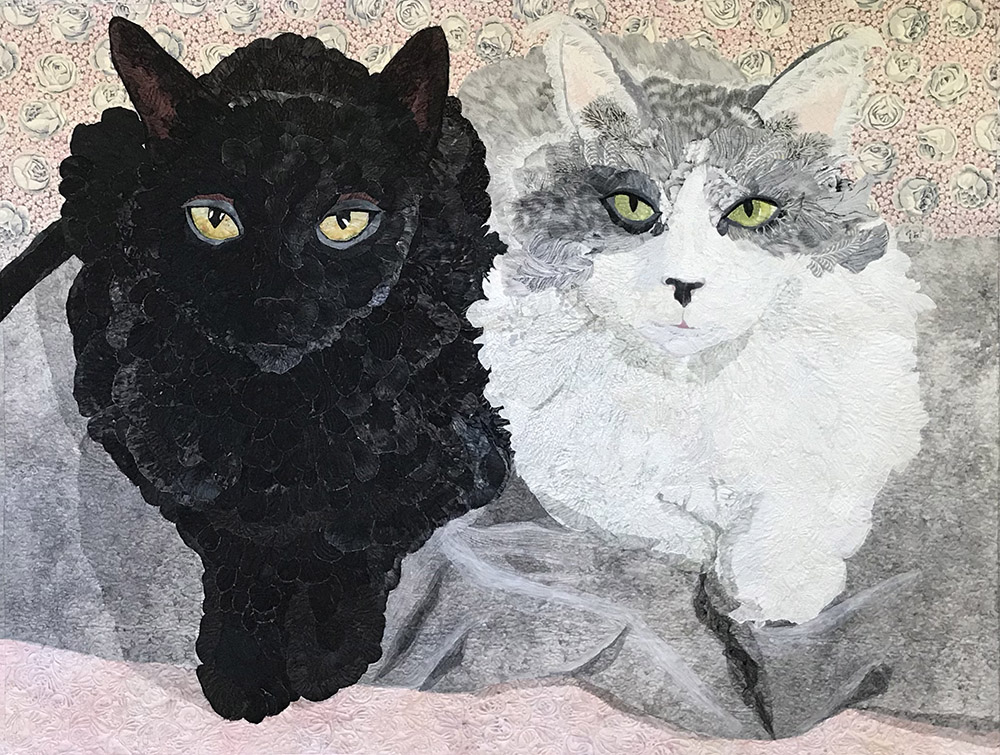
About a year ago Betsy Habich of Beverly, Massachusetts, began this very large quilt of her two cats in my 2019 Harpswell quilt retreat—the same retreat the aforementioned Pat Beaudoin attended. Because of size and time considerations, Betsy concentrated her attention to Tommy’s portrait, below. Solid black (or white) colored animals can be especially challenging to recreate in fabric collage—it’s often hard to get a nicely detailed photograph of them to work with. Betsy handled Fredlet’s coloration just fine, and it’s a pleasure to see her finished quilt. It’s purr-fect. 😉
From Betsy:
Frenemies Tommy and Fredlet loved to snuggle up together, unless they were fighting. Tommy had a big personality (cat-anality?) and extravagant feathers to match on his ears and toes. Fredlet was a gentle boy, and easily intimidated, with thin soft fur barely covering his eyebrows and lips. We loved them both and miss them!


Begun in Susan’s Fall 2019 Harpswell workshop, this is my first big glued collage. I kept thinking all the edges of all the pieces were glued down, only to find more loose edges, but a nice dose of heavy quilting fixed that problem! After completing the fabric collage, I had fun adding various types of tulle to help blend colors, and add shadowing. Tulle is scrunched, glued, and stitched down to portray the rumpled robe the boys are sitting on.


From the original photo, one can see that all-black Mr. Fredlet was a light-absorber. I played around with the original in Photoshop Elements, making one copy in which he was correctly exposed, and another in which Tommy was correctly exposed. In the process, I also discovered the very helpful photocopy filter, which I have fallen in love with! Why oh why did I not know about this earlier in my life?? In conjunction with adjusted exposure, most of the lines I needed were right there.
Since many of my students don’t have the knowledge or computer software to manipulate photos to refer to for fabric collage, I don’t bring it up as part of the preparation for fabric collage—plus, it’s not something that I often do. However, the way Betsy was able to manipulate her image in Photoshop did help her quite a bit in being able to see the details in the very dark and very light extremes and details of her cats’ fur. Fredlet’s details were buried in so much shadow that some photo manipulation was almost necessary for Betsy to recreate her fur baby, and it definitely worked for her.
Such beautiful work. Well done!
So much fun to see Betsy’s completed kitties! I was her neighbor in that 2019 class. And I can’t wait to see Pat’s lioness. I am blown away by Bernini. Fabulous!
Wow these are all so fabulous! Fun to be able to see a few process photos. I couldn’t pick my favorite. You inspire so many, Susan! I made a few back in the days when your first book came out. I’m almost ready to give it another try after having bought your second book and looking at your blog the past few months. Mostly I paint now but your blog helps me in painting also. I still have bins and bins of fabric! Maybe this winter….
Stunning work,
Fabulous work. I love the kitties – the folds of the fabric are wonderful in this piece in addition to the beautiful felines.