
My original post pretty thoroughly explained my method for creating eyes and other highly detailed features. However, there’s always room for improvement, and sometimes there’s no substitute for actually seeing something done. So, this week I’ve updated my “Eye for an Eye” post with a video of the whole process.
In both the text below and in the video, I refer to working “top down from the bottom up.” Starting with the smallest part of the detail—in the case of an eye, the pupil (or pupil and iris combination)—prevents the larger details from being covered up, allowing me to continue to cut to the lines of my design. If I started with, say, the eye socket and cut one big piece, it would cover all the details—folds at edge of eyes, canthus, whites, iris and pupil—that I need to make the eye look like the design I have so carefully drawn. In a portrait, it may make the difference between achieving a true likeness and creating an image that only approximates my subject.
The purpose of this way of working is to avoid the use of templates. Templates slow me down—I prefer to work with more immediacy. Taking the time to trace the drawing I have already made and cut out pieces of paper, number them, pin them to fabric, and cut around them doesn’t sound like my idea of fun. Just as importantly, this way of working, as you will see in the video, allows me to create much finer detail than using a template. Imagine trying to add a thin line of highlight or shadow around the edge of an eye by cutting it out to the exact shape and size! Talk about frustrating. This way I never have to deal with all those itty-bitty pieces, where one good cough could send all it all fluttering to the floor.
I think the video will clear up any lingering questions you might have about this particular approach to details. It may even give you the confidence to throw away the template paper—or at least leave it in the drawer.
Imagine you’re in one of my five-day classes. You’ve chosen an ambitious project: a fabric collage portrait of an important person in your life.
But this is day two of the class. You’ve learned some stuff:
- You can use glue with fabric.
- You’re beginning to understand how value determines form.
- You’ve chosen a great photo to work from and have created a design on which to base your fabric collage quilt.
You have the start of a cheek, maybe a chin. Or perhaps you began with the hair. Or even the clothing.
You haven’t yet got to the scary parts. The eyes. The nose and ears and mouth. The parts that will really identify the person your portraying. Those features are just waiting for you to lay scissors to fabric.
Where do you start? You don’t know?
This is about the point at which I’ll stop the class and do a quick demo. In a fifteen-minute tutorial, I show my students a technique that allows them to create features such as eyes with minute detail and while sticking precisely to their designs. And all without the use of a template. That would take too long.
I sometimes describe it as working top-down from the bottom-up.
Top-Down, Bottom-Up
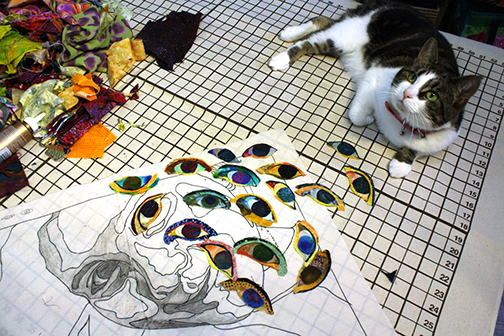
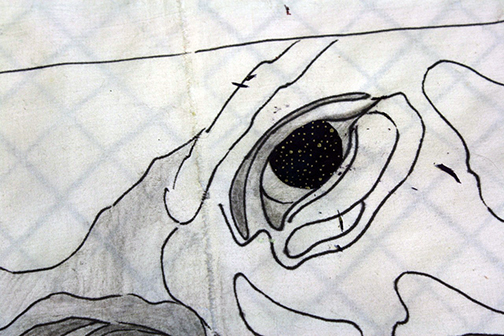
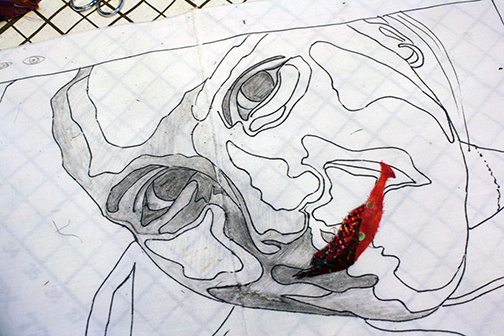
Let’s take the example I use in class. I have a design I made based on a photo of my niece, Maia.
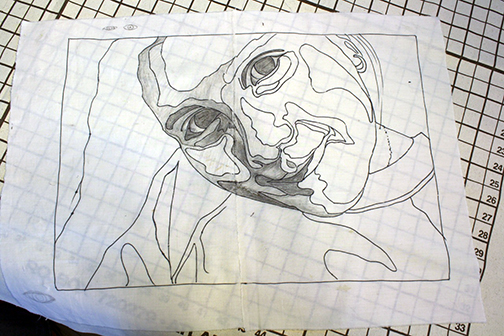
I’m going to concentrate on her left eye.
The temptation is to start with the biggest part of the eye maybe even the eyelids, and add fabric on top of that—building up. This temptation is especially strong for those used to working with templates. This technique I’m describing here I believe is both quicker and easier.
Step One
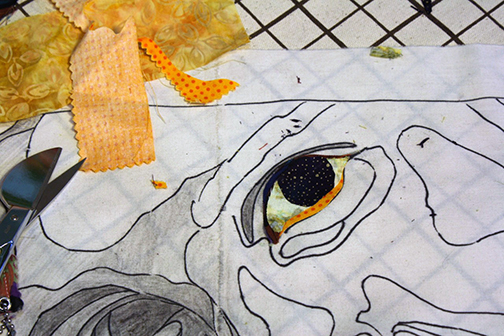
Instead of starting with the biggest area of the eye, I start with the smallest—the pupil. Actually, it’s the iris, but I tend to choose a fabric that’s either all dark (incorporating both pupil and iris) or has a darker area in the center (suggesting a pupil).
Above is the finished iris/pupil. How did I do it? Follow the steps in the slideshow below. Hovering over a slide reveals descriptive captions. Clicking on one will launch a slideshow with larger pictures.
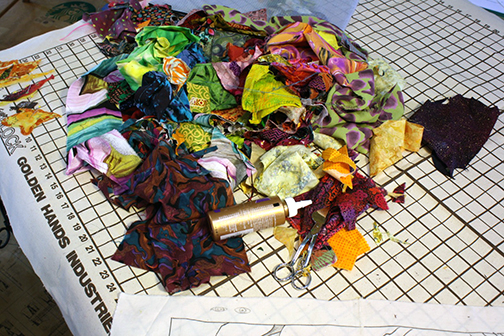
I start by selecting a dark fabric. This time I chose one with some sparkle in it. I then used my pelican-bladed applique scissors to first roughly, then exactly trim the pupil to shape.


Step One done. Easy-peasy.
Step Two
Now I’m ready to move on to the “white” of the eye. Very rarely is the white of the eye white. A little variation of shading will make it look more realistic.
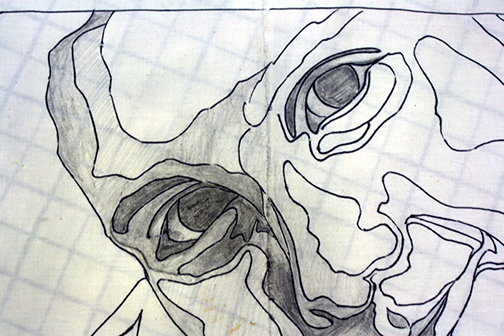
Based on the original photograph, I shaded the drawing to match, creating a sort of cheat sheet that will get covered up with every layer added. According to the pencil shading, the inner corner of her eye should be darker.
I’m going to use the print in the fabric to create both the light “white” of her eye, and that darker corner, with one cut of fabric. Check out the slides below to see how I choose that fabric and how it went together. In this sequence I’ll work each corner of the eye individually.


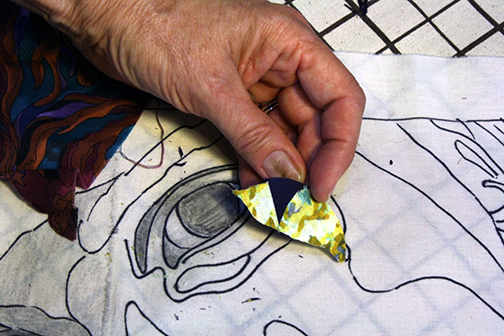
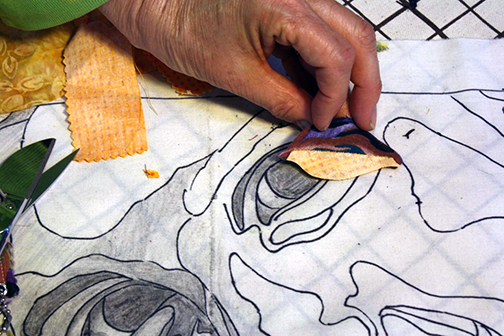
I choose the fabric by placing it under the iris, already cut to size. I place it so the print is positioned to best match the drawing.
Then, BEFORE I CUT, I glue the two pieces together, the iris onto the larger piece of uncut fabric.
Once the two are secured together, I carefully trim the fabric to match my drawn design and cut away some of the extra fabric from behind the iris that I don’t need.
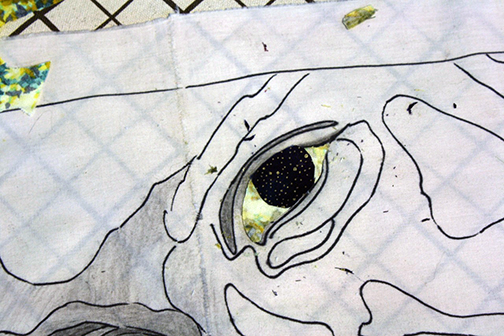
This is what the back of the eye now looks like. Yes, I used the BACK of the print for the white of the eye. Sometimes it’s the backs of fabrics that work better for the desired effect.
Step Three
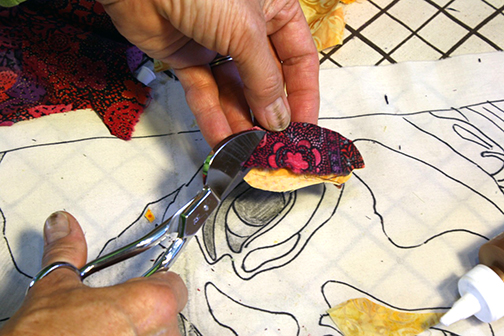
It often looks good to add a dark line above the eye, like applying eyeliner. In contrast, a lighter line below the eye adds some life. I’ll tackle both those in the next step.
I’ll continue to use the same technique. First, I choose a dark fabric for the line above the eye. In this case, again, I look for interesting patterns in the print that mimic or accentuate the shape of the feature I’m working on. I attach the previously glued iris with its white corners to this new fabric. Then cut down and trim the fabric to shape.


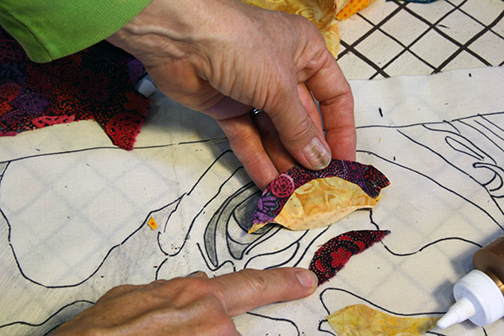
Notice how fine I can make both the dark and light lines above and below the eye appear. All because they peak out from BEHIND the eye. No tiny little slivers of fabric needed and the eye unit is stable enough to pick up and move around.
The photo below shows what the back now looks like. All you can see are the back sides of the last two fabrics I used. Yes, the layers start building up. Don’t worry about it. The machine will quilt right through all that in the end. Unless you’re a hand quilter, and then you’re on your own.
Step Four (more of the same, really)
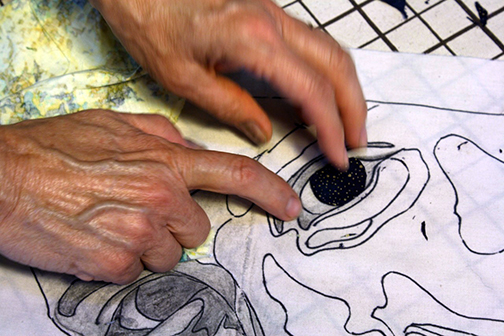
I keep working outward. Now you can begin to see why I call it working top-down, bottom-up. In this step, I’ll add the upper eyelid and the crease under the eyebrow, enlarging the one portable, stable eye unit.


Notice that after I rough cut the newest fabric piece to shape, I often pick the unit up in order to trim the fabric more easily and get a smoother final cut. I’ll also trim away some of the extra fabric from the back, if I think of it.
And then you just keep going as long as you have those little shapes, lines, and creases to assemble. You could easily do the whole eye and socket as one unit.
Other Features
Now that you’ve learned how to make an eye, do you see how this particular layering sequence can be applied to other facial features? How about lips?
And it’s not just facial features. Any image that has small detailed areas can be broken down into parts: the windows and doors of a building (with their trim, highlights, and shadows), animal details (noses, claws, paws), car or truck parts (rear-view mirrors, tires, hubcap reflections), etc. etc.. But, back to eyes….


Windows
Real eyes have a ton of detail. There’s highlights and shadows, color, and shades of value. There’s a lot going on there. As there should be in such important facial features. And a fabric portrait will be most effective when it also reflects that complexity.
‘Cause that’s what it comes down to in the end. What you’re trying to accomplish. Your goal. Regardless of whether it looks “realistic,” your portrait should feel alive.
Eyes are the window to the soul. They’re also the window into your fabric collage portrait. Whether it’s a person or an animal, getting the eyes (and other features) right is especially important.
Susan,
I’ve taught collage for years using your book. Do you have a new one or is the old one still in print???
Someday I would love to take a class with you.
K
Found out the answer!!
Love this information. I have your book and thank you for the demonstration. I do hope we will have you at our guild in the near future.
Eye for an eye: stunning video. Thank you so much.
What a great tutorial! Thanks so much!
This is going to be so much easier now. Thank You for the tutorial. It never dawned on me to use bigger pieces for the tiny slivers that are needed. I had a ‘duh’ moment when watching, like why didn’t I think of that…that’s why you’re the teacher.
Thank you so much for passing on through teaching, sharing and your spirit.
Thank you for including the video with your blog Eye for an Eye, very informative and helpful.
I’ve got to agree w/Brenda’s “D’oh!” moment … You can’t imagine the agony I went through making the eyes for the Sun exercise in the Serendipity book! All the little slivers & snips of fabric that made them up was ridiculous, & I have to admit that the pull of creating templates was strong 😄. AND I glued every piece to the muslin background, so tearing (literally) it off to begin again was frustrating. Obviously I didn’t go back far enough in your blog for this most excellent tutorial. But my Sun turned out great (eyes are a little “chunkier” than the rest of the quilt) & will go to university w/my niece who wanted it for her first dorm room, so it’s all good. Thank you, Susan!
Thank you, Susan. Very enlightening!
Your work is over the top awesome!! Thank you so much for the inspirational video!
I love when an artist is willing to share her knowledge!
Thanks again!
Terry
This video convinces me you could do an effective online class! Although I would love to go to your workshop in person this would be a possibility. Thank you for sharing so much information!
Thanks for the excellent video! Like so many who commented before, this makes the words I read so much more understandable. Trying to get up my nerve to do more than just think and watch!
Susan, thank you so much! You are the master of collage. Thanks for sharing!!!
Such great information here, Susan. I just love it! Short of having a full week with you (on my wish list), having these little tutorials really make your process clear. Thanks!
Love watching your video. Very creative & clear. Makes me want to try it. Amazing artist! 😉
Thank you for your generosity in sharing techniques. Because of my love for fiber art I am seeking to learn as much as possible. I will be planning to take one of your workshops.
Thank you for an excellent video, step by step shown clearly. Would love an on-line class!
Excellent video!!! So grateful for all your shares <3
You are simply brilliant. You have inspired me so much to create my own art using your techniques combined with more traditional quilting techniques. THANK YOU! You have opened my eyes to more art! You explain things so well and your craftsmanship is amazing.
This is just an excellent video. – thanks so much
I’ve seen u give the eye demo a dozen time but this is so great. I don’t have to rely on my faulty memory with this step by step demonstration. This is AMAZING!!!!
Thank you so much, very enlightening.
Love your serendipity book, you are an amazing artist and person.
This is fascinating! I do lots of hand quilting but have never tried a collage. Please tell me what scissors you were using and what glue. You really have a gift with your color choices!
Thank you so much!
Kathryn
Wow thank you this eye for an eye video is very informative great learning tools.
This is SOOOOOOO helpful! Thank you for sharing your techniques. You are helping my artwork come to life.