
I hope you read last week’s, “Kissin’ Cousins: An Online Class Preview Part 1.” If you haven’t, maybe you should click on the link and read it now. Go ahead I’ll wait till you get back.
That post, and this week’s addition, both preview my online class, which I hope many of you are eager to try. By following the same steps as those that my online class will have—and using my quilt “Kissin’ Cousins” as an example—I hope it will show you how you will be able to apply the skills you add in the online class to your own subject.
As I said last week, the class will have six parts. They will closely resemble something like this:
- Getting Started: Choosing a Subject and Making a Design
- The Fabric Collage Technique: Fabric Selection, Cutting, and Gluing
- Backgrounds: Highlighting Your Image
- Details: Jazzing It Up
- Netting and Tulle: Adding Layers
- Quilting and Finishing
Last week I covered Step One in the fabric collage process, Getting Started: Choosing a Subject and Making a Design. This week I get to the real meat of the process, piecing the image itself, as I move on to Step Two: The Fabric Collage Technique: Fabric Selection, Cutting and Gluing.
Blending and Value
Before I start covering each of the elements of Step Two—fabric selection, cutting, and gluing—let me take a minute to introduce you to a couple of concepts that link all three of these elements together: blending and value.
I use the term blending to refer to using fabrics in such a way that one blends into the next to create form. Value refers to the relative lightness or darkness of a particular color.
As I tackle each element in this step, I’ll refer back to both blending and value. The fabric I use, how I cut it, and how I glue it all affect how well each fabric blends into the next. An awareness of value helps me choose my fabric and determine how I’ll cut it. The two concepts are intertwined. For fabrics to blend into each other, they need to be relatively close in value.
Fabric Selection
In the photo below you can see some of the fabrics I selected for “Kissin’ Cousins.” I placed the fabrics for each kid next to their faces. Some of these fabrics I used, some I didn’t, and I certainly added more in the process, but it was a start. In general, I chose cooler colors for Sam—blues, greens, and even purples mixed into the yellows—while I tried to work some warmer, pinky yellows into Maia’s face. The three fabrics above Sam’s face are for his hair.
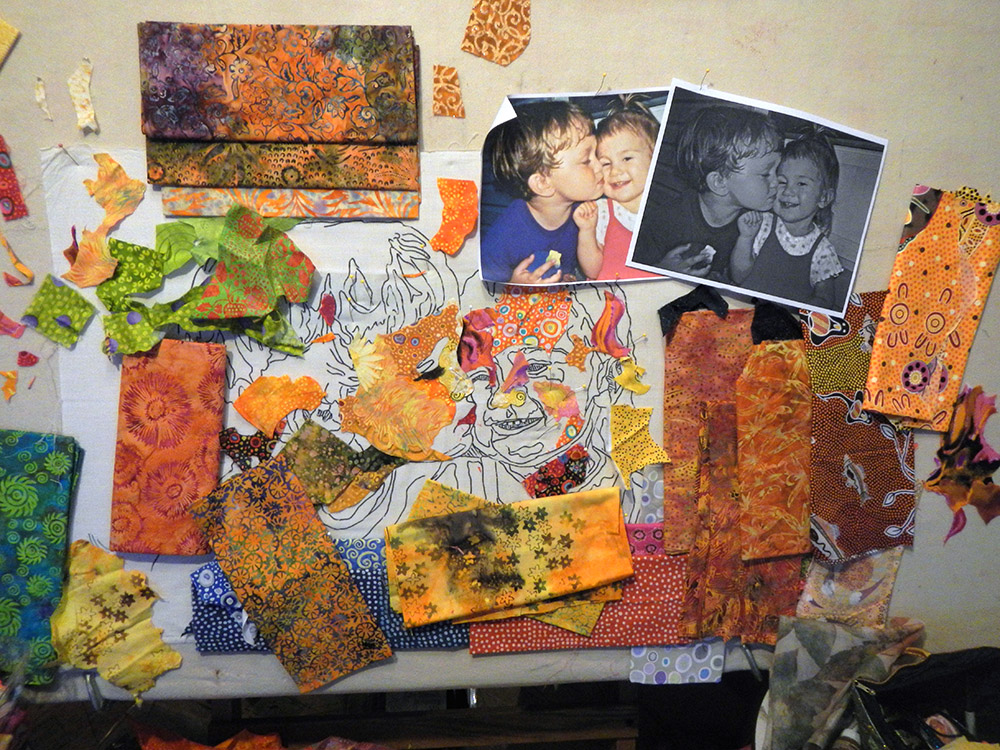
I chose yellows to be the predominant color of this piece. I love yellow—it’s sunny and warm. I didn’t want to use “naturalistic” colors, e.g., flesh-colors. As I noted in my blog post “Color Is Irrelevant,” I can choose whatever color I want to create my images as long as I pay attention to value. Notice that I arranged the fabrics roughly by value—from dark to light. That way when I was looking for a fabric of a certain tone—shadow, mid-tone, or highlight—I could find them easily. Because most of these were printed batiks they have a range of values within them as well, which I used to my advantage.
You could say that the fabrics I chose were medium to large prints. It may seem counter-intuitive, but it’s actually easier to blend large, fluid patterns than it is solid fabrics. I’ll delve deeper into that next when I talk about cutting.
Cutting
This element of fabric collage seems like it ought to be pretty basic. We all know how scissors work, right? Not really. It’s not about your hands. It’s about your eyes.
For me, half the fun of fabric collage is the thrill of the hunt, finding just the right piece of fabric to do the job. This means using the patterns, prints, colors, variations in colors, and textures as they exist in the fabric.
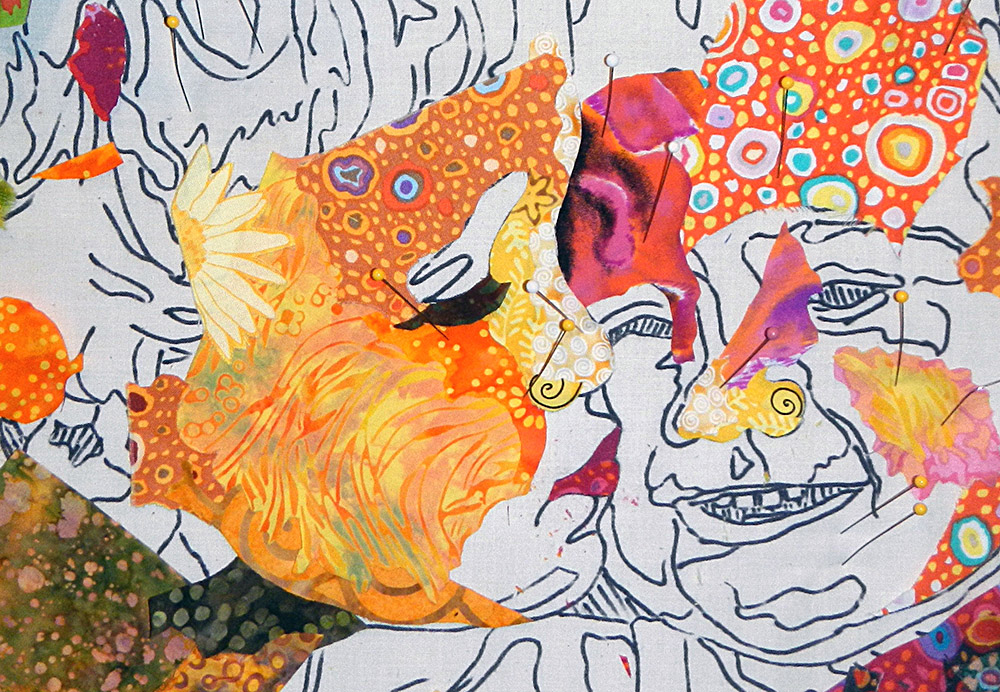
Look at the closeup of Sam’s cheek and jaw. In the highlight of the cheek, the part closest to the viewer, I used the curves in the fabric to establish the roundness of his toddler face. The variation in color also works for me to define the highlights and shadows—the bright yellow is mostly along the highlight of the cheek. As a rule, lighter fabrics come forward while darker fabrics recede. Where the cheek fabric is darker is where it blends into the fabric I used for the jawline, which itself uses the print to help define the shape of the jaw. Also, the irregular edge I cut (using the print as a guide) blurs (or blends) the line between the two fabrics. If I had cut the edge of the cheek fabric straight, the hard line would have stuck out instead of blending.
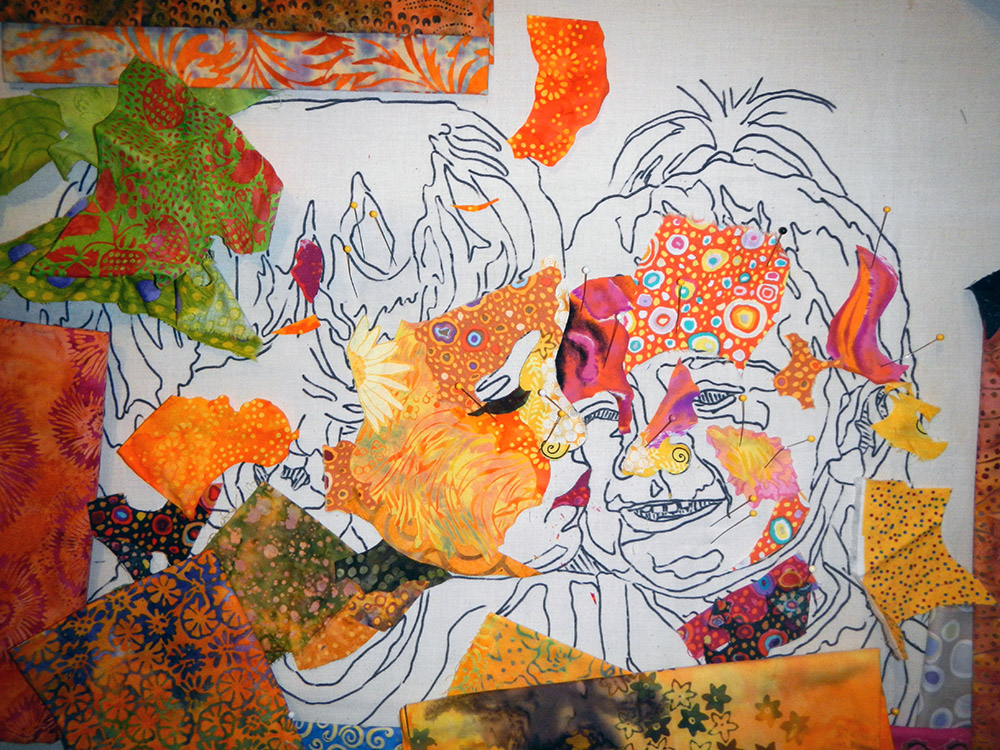
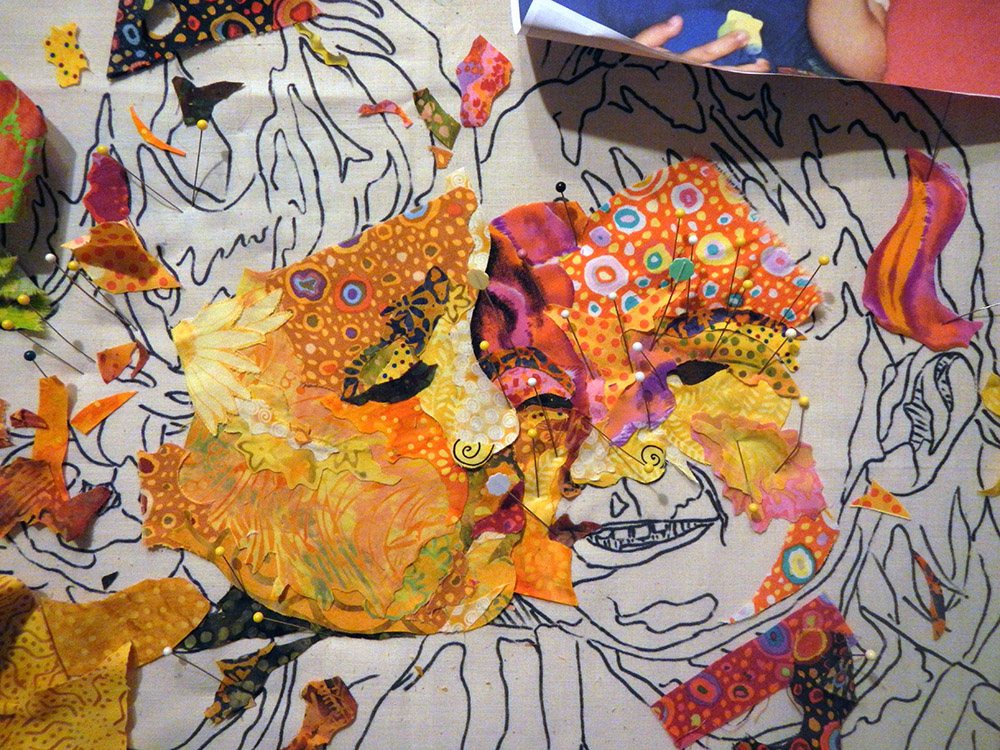
I cut fabric according to the print in the fabric. To get started, I tell my students to cut their larger pieces of fabric into palm-sized (or smaller) irregular shapes. In the photo below, you can see I have several pieces already cut out and just sort of laid in place: in Sam’s hair, for the shadows on his neck, on Maia’s cheek, in her hair, and on her forehead. I cut these pieces out not based on the drawn design but on what I saw in the fabric. I saw the flow of hair in the fabric. Or I saw the curve and highlight of a cheek. I cut them out not to fit my design as a template would, but using the print as a cutting guide. Rather than forcing fabric to fit into my design, I allow the fabric to dictate where possible.
Where I don’t let the fabric dictate is when it comes to the outside shape of the features. Notice I cut very carefully to the design to get the curve of the noses just right. In this piece the eyes were relatively simple. Sam’s are closed and Maia’s are squinty. There’s no need to build them the way I demonstrated in the post “An Eye for and Eye.” I did use that “top-down, bottom-up” approach for building Maia’s mouth, however.
Where students run into trouble is either when they cut their fabrics too straight, and generally right across the existing print, or they cut pieces that are too similar to one another, once again ignoring the print in the fabric. I’ve given this a lot of thought as the issue of cutting fabric comes up repeatedly in class. I’ve come to the conclusion that, like handwriting, people have a style of cutting that is as unique as their signatures. It’s often quite a challenge to get them to cut not according to their habitual way but according to the print in the fabric.
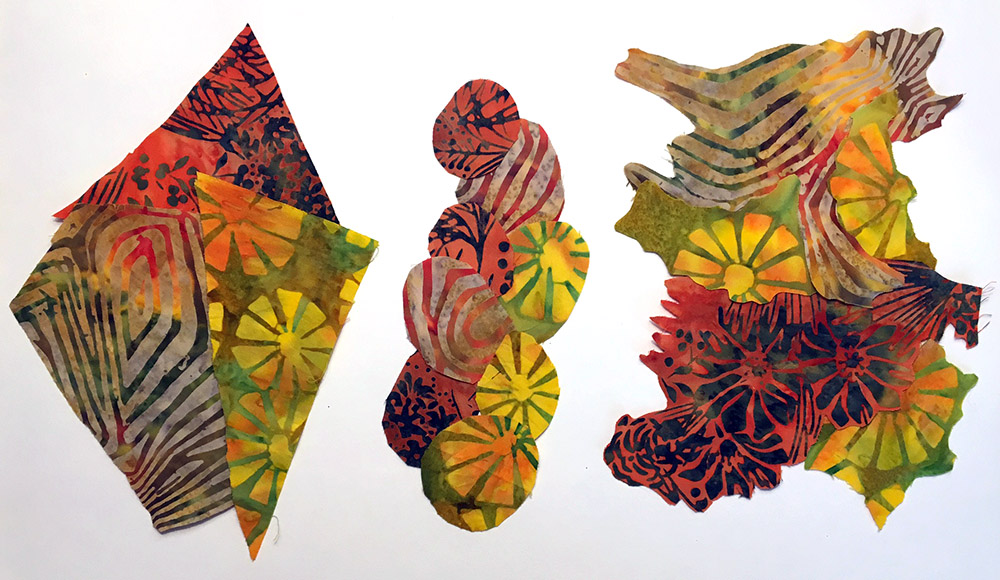
I think I need to show you what I mean. Here are three nice fabrics. They’re all printed batiks, my absolute favorite type of fabric to use. Where would you cut first? How would you cut them to be useful in a fabric collage?
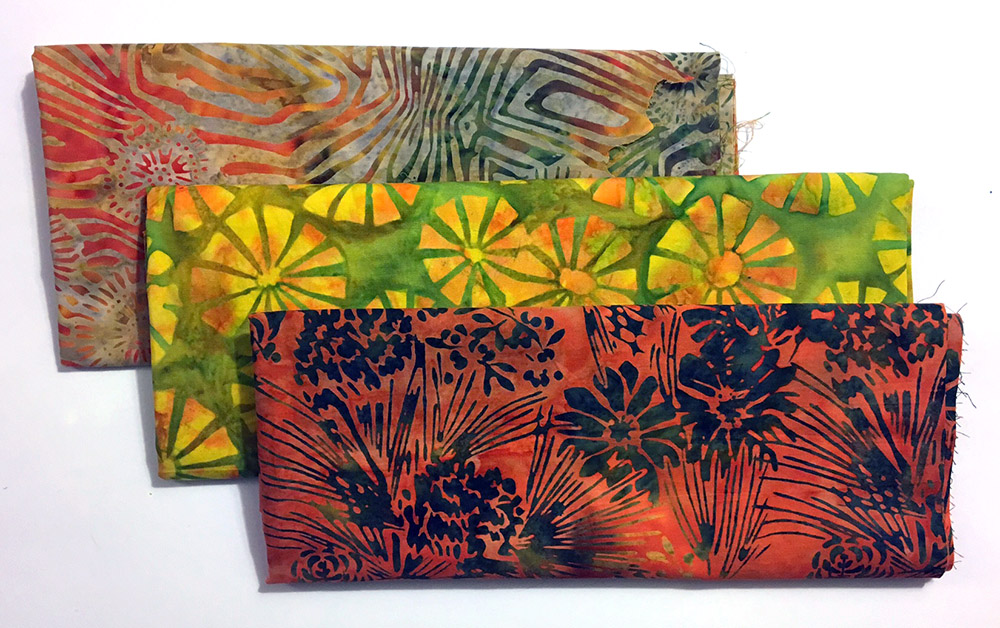
Below are three different ways to cut each into palm sized chunks. On the left, the fabrics are cut straight, with no regard to the print within them. In the middle are some ovals which again ignore the print. On the right are some shaped cut as I would do it. Notice they follow the prints within the fabric. They are irregular, in size and in shape. No two look alike.

The reason for cutting fabric this way is evident in the photo below. See what happens when you start laying the fabrics next to each other? With both the straight edge fabrics and the ovals the edge of each piece is clear and even jarring. In the version on the right, because the edges are irregular, the colors and patterns in the fabrics begin to blend.
Gluing
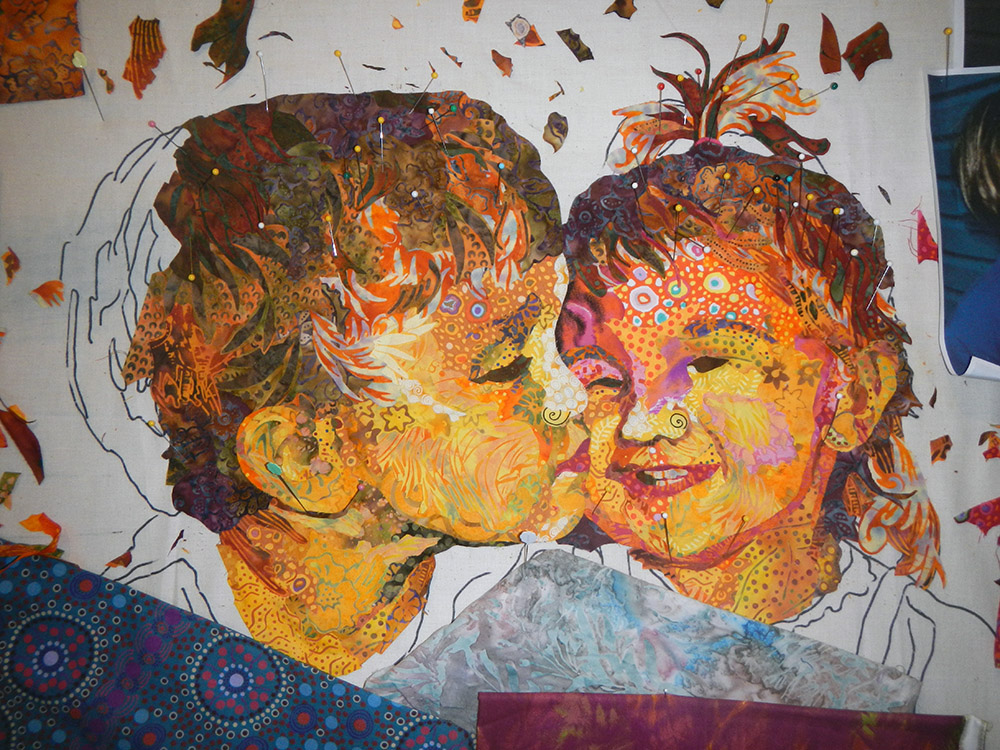
In the photo below I’ve made more progress with the piecing. I’m temporarily holding all the little pieces in Maia’s face with pins. It’s about time to glue those pieces down before I lose them or disturb them.
I’ve covered gluing extensively in my post “Why Glue?” which I also updated with video. You can refer to that for the “how” and “why” of gluing.
What I want to point out, is the way I glue. Specifically, only tacking down the fabrics, usually by gluing at the center of each piece, so that I can continue to layer other fabrics under the ones that are already in place. This is important so that I can blend one fabric into the next. Look at Maia’s pink cheek in the photo above then in the photo below. If I had glued that pink fabric all the way to the edge I couldn’t have slipped the others under it to continue creating her face.
If you simplify fabric collage down to its very essence, it’s these three things: choosing fabric, cutting, and gluing. This is the heart of the process and the part that takes the longest—like days, weeks, months–depending on complexity and size. You have to just keep plugging along, filling in one area after another. Note the size of the pieces of fabric I used for these portraits. They’re pretty small. It may be tempting to use big pieces of fabric to quickly fill in the blank spaces. Resist the urge to cover an entire head of hair, or cheek, or even nose with just one piece of fabric. It won’t look dimensional. It’s the relation of one fabric piece, next to the next one, next to the next one, that blends, that creates form, that gives dimension.
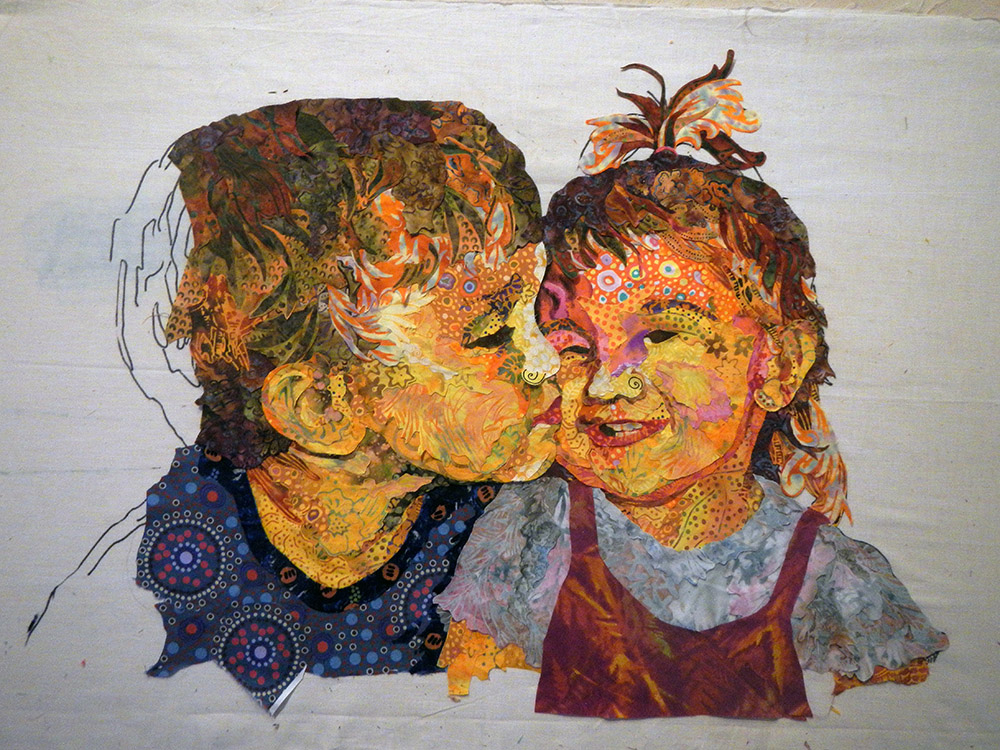
I decided to crop the back of Sam’s head in order to better center the kids when cropping the piece. I kept their clothes pretty simple. And I’m glad I didn’t do their hands, which would have added difficulty and distracted from the faces, which are of course the whole point of the piece.
Being open to change, to discovery, is also a part of fabric collage. This makes it different from a more traditional approach to quilting, where pieces are cut and planned according to a pattern. Sometimes my students have a hard time letting that go (especially those I catch making templates!). You set things in motion with the initial choices of fabric, then try not to control too much and see where serendipity takes you.
Stay Tuned
At this point “Kissin’ Cousins” is pretty far along. The piece is blocked in, but it’s not done. The image will continue to change throughout the next three steps as I consider backgrounds, add details, and use sheers for even more layers. Check out Part 3 of this series next week.
What proved this point to me first were her teeth, you somehow found the perfect piece of fabric that was perfectly marked to resemble her teeth. I would never have found that in my stash.
Thank you for treating us to this preview! I can’t imagine what more detail you will add to the classes. Will you go into even more depth? Will there be videos too?
Hi Susan,
Once again, your blog contains such helpful information! My biggest take away today involves cutting. Your photos and explanation are incredibly helpful. I definitely have a cutting signature–need to work on that! Thank you for your thoughtful insights. Thoroughly enjoyed your workshop, presentation and visit!
Hi Susan, My friend took one of your classes. I was so impressed with her finished piece (you may remember “Winnie” the purple dog) that I had to know more! Thank you so much for your many online tutorials — both the blogs and videos. Your instructions are very clear and thorough. I’m currently using your gluing technique for a much less complex collage. I’m looking forward to trying my hand at doing the full monty! I love your work â¤ï¸
will your online class be a live/real time class, or will it be something I can purchase and view on my own schedule?
Thanks,
Lisa
I love your posts- this one was soooo illuminative of the need to cut irregular edges- I could not believe the difference! Thank you so much.
Thank you for offering this preview, it just serves to excite me even more and I can’t wait to take your online class. Lily 🙂
Thank you for your online posts – living so far away I would never be able to take an in-person class. Thank you again & looking forward to your actual online class.
I am just beginning this journey into collage quilting, but I feel like I have been doing it in my head forever. Thank you so much for sharing the process and making it possible to believe I can actually DO it! I am so excited to get started with your online class!