
Some of you have been waiting—oh so patiently—for an online fabric collage class ever since I announced my intent to produce one a while—okay, about a year—ago.
While this process has been more challenging than I expected. We, my husband Tom and I, have been making progress. So in this blog post, and in the next few posts, I’ll give you a sort of overview of how I used fabric collage to create “Kissin’ Cousins,” a portrait of my son Sam and his cousin Maia.
The class, when produced, will have six parts. They will closely resemble something like this:
- Getting Started: Choosing a Subject and Making a Design
- The Fabric Collage Technique: Fabric Selection, Cutting, and Gluing
- Backgrounds: Highlighting Your Image
- Details: Jazzing It Up
- Netting and Tulle: Adding Layers
- Quilting and Finishing
So taking “Kissin’ Cousins” as an example, for the next few weeks, I’ll demonstrate how these steps are applied in the making of a fabric collage quilt. Hopefully, these posts will give you an idea how you will be able to apply the knowledge you gain in the online class to a subject of your own choice.
Getting Started: Choosing a Subject
We’ll start with step 1, Getting Started: Choosing a Subject and Making a Design, which has two parts: picking an image to work from and using that image to create a design which you can then transfer onto a backing fabric.
Some people have asked where do I get my ideas for my pieces and by extension where should they look. I tell them to look for the things that interest them most. Where does your heart lie? That’s where you should seek inspiration. If there’s a particular person, place, or thing that really gets you excited, start searching for your image there.
Sometimes you choose an image. Other times an image chooses you. This was the case with the image below.
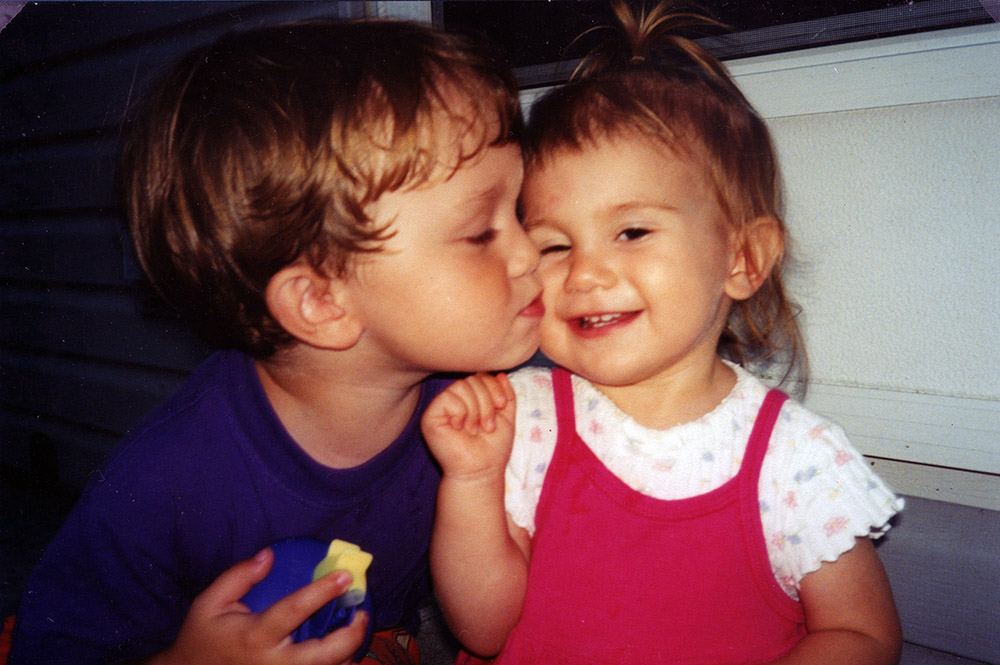
This picture of my son Sam and his cousin Maia (now both in college) is beloved by my parents, their grandparents. My parents made the observation almost as soon as this picture was taken, that it would make a good quilt subject, wouldn’t it? So really, you see, I had no choice.
That said, is the image objectively a good one to work from?
Here’s a list of the criteria to consider when looking at an image:
High contrast: Dark and light in equal measures. The deepest shadows should be close to black and lightest highlights close to white.
A variety of values: Are there some good in-between values as well? Does it have shades of color, or value, that gives form to the subject? (For more on value, see my blog entry, “Why Color is Irrelevant.”)
Sharp focus: Is the focus clear enough to blow up to the size needed to work with?
Close cropping: For a recognizable portrait, get in close. If someone is standing fifty feet away, you won’t have the detail needed.
Three-quarters or profile pose: A subject staring straight ahead is the most difficult. It’s easier to define a nose if it’s not foreshortened.
Looking at my photo in these terms, I think it has both strengths and weaknesses.
- There are areas of good contrast in the photo. Look at Sam’s hair especially, where there is both a strong highlight and quite dark areas.
- As far as value overall, however, the faces themselves are not particularly varied. I find this with many photos of children. Their skin is so flawless it looks rather flat. It will take some skill to pick out the areas of intermediate values between the highlights on the cheeks and tip of nose and the shadows under their chins.
- The focus is a little soft but not a problem.
- The cropping is nice and tight, with not much extra space around the subjects.
- The pose—e.g., the direction the faces are turned: Sam’s is fine. A profile can work pretty well. It’s easy to define the shape of the nose and ear. We’re viewing Maia from nearly straight on, which is more difficult. The foreshortening of her button nose could be a challenge, though there is a little turn to it, casting a shadow to one side—which is good. That little turn to her head, also will make her ear relatively easy to define. She’s smiling, which means there’s teeth. I avoided teeth for years, they’re not easy. Fortunately, she doesn’t have many of them yet. And their eyes are closed or squinted, meaning hardly any detail involved—all the easier for me.
Final verdict? It doesn’t matter. I am going to do this quilt come hell or high water.
However, would I suggest this for a beginner? Maybe. Maybe not.
If the student is as attached to this photo as I was, then I would of course encourage them to try it. I would, however, point out the challenges to come and if they showed any hesitation, I might suggest they start with something easier. For example, I might suggest they not try to do two darling faces right out of the starting gate. The pressure of making a likeness of someone so near and dear is an obstacle in itself.
Especially in the online class, where I won’t be there looking over my students’ shoulders, I will encourage—and have examples for—choosing a simpler, more straightforward subject.
In my classes, students can and have used fabric collage to create just about every imaginable subject matter. From still lifes to landscapes and buildings to old cars and tractors to animals and people. You can check some of them out in either my On the Road posts or The Finish Line posts. Projects tend to progress easier for those who start out with a really good image to work from and have a connection to the subject matter. Or, on the flip side, who have no connection to their subject whatsoever and feel free to “cut loose and let go,” the motto of my Serendipity Quilts book.
Getting Started: Making a Design
After choosing an image to work from, the next task in creating a fabric collage quilt is making a simple design.
The basic steps are:
- Enlarge selected image to letter size: 8½ x 11 inches.
- Use tracing paper to outline shapes based on value.
- Enlarge tracing to desired size of completed quilt.
- Transfer outline to foundation fabric.
Okay, so you can go deeper than that, but that’s the basics. Here are the steps as exemplified by “Kissin’ Cousins.”
Step One: Enlarge selected image to letter size: 8½ x 11 inches.
Letter size is nice because it’s convenient. Most people have home printers nowadays, so it’s easy to print out an image as big as will fit on a regular piece of paper.

Why not bigger? Why not print out the image at the finished size? That seems logical. The bigger you print it out the easier it is to see details, right? That might be true if you have an extremely high resolution image. But the resolution on most personal and cellphone cameras just isn’t that great. If you blow up an image too much, you’ll actually lose detail.
I keep the original handy. It may be easier to see some details in that original version and I often refer back to it throughout the collage process.
Notice that I printed the image both as color and as black and white. I did that to draw out the differences between shades of value. I also tweaked the brightness and contrast in an image manipulation program (Photoshop). You could also try posterizing it or playing with changing its colors. These all may allow you see the image in ways that could help in separating out values.
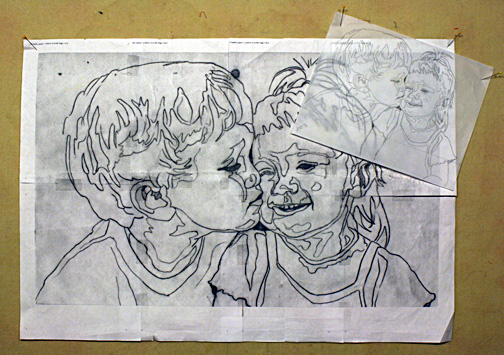
Step Two: Use tracing paper to outline shapes based on value.
Tracing vellum is nice and transparent, if you can find some, but regular old tracing paper will do if that’s what you have. Using a nice, sharp pencil (I like mechanical pencils for this), I outlined the larger shapes based not on, say, parts of a face—nose, mouth, eyes—but in terms of value. A nose will be made up of several shapes—dark, medium, and light areas. I go into greater detail in creating a working design in Making a Pattern for Fabric Collage.


I resisted the urge to be extremely detailed. All those lines would have been too confusing. Also, once I start collage piecing, the design will get covered up quite quickly, making all those details a waste of time. If the drawing starts looking like a crazy paint-by-number guide, then you probably have too much detail. I looked for lightest areas and darkest areas to draw around. The middle values would get filled in as the piecing process progressed.
Step Three: Enlarge tracing to desired size of completed quilt.
When in doubt, I go big. How big? One rule of thumb: a face should generally be at least 10 to 12 inches top to bottom. Even bigger is better. Imagine trying to create an eye the size of your pinkie nail. Now imagine it the size of a golfball. Make it easy on yourself and go bigger.
The easiest way to get your tracing enlarged is to take it to a local copy shop. Most big box business supply stores have a copy center. Tell them how big you want the finished pattern to be and let them do the math.
Another method is to enlarge it at home and “tile” it together. That’s what I did with this piece. If you look closely you can see that the enlargement is actually made up of eight pieces of paper cut and taped together. To do this, I scanned my tracing then printed it out at the percentage I had calculated (250%). Actually Tom did the scanning and printing. It’s nice to have in-house copy service.
So how did I figure out what percentage to use? I simply divided the finished size by the original size then multiply by 100—again, Tom did it that way. I on the other hand, use a proportion scale, something I learned in my pre-computer graphic design days. Now of course, there are apps for that. But whatever method you use, it doesn’t matter which dimension you measure from, height or width, as long as you stay consistent when measuring both original to finished.
Step Four: Transfer outline to foundation fabric.
Next I needed to choose a plain, regular weight fabric for the foundation that I would be gluing onto. I usually use muslin, or some sort of inexpensive neutral colored fabric. I cut the piece slightly bigger than my paper pattern. When I slipped the pattern behind the fabric, I could see it well enough to use a permanent marker (I use a regular weight Sharpie) to trace the image onto this foundation. You want a nice solid, definitive line. This will be your guide and reference. There are no templates in the way I work.
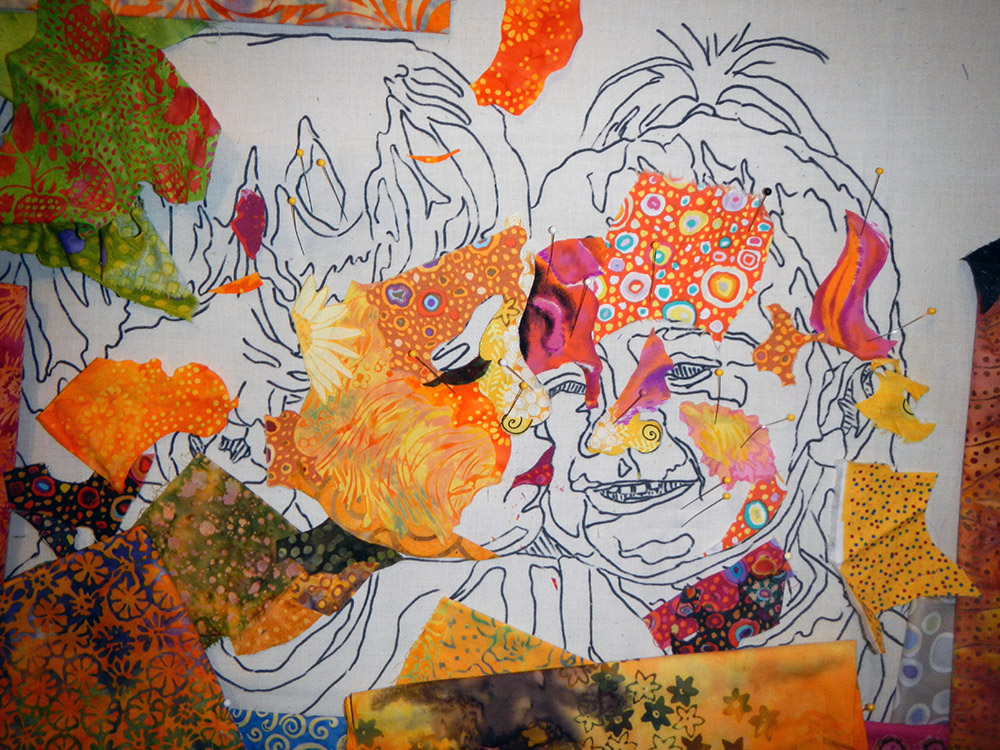
I guess that back when I started this portrait, I didn’t take a photo of just the outline traced onto the foundation fabric, but in the photo above you can see enough of it to get the idea. I could have made the original tracing even simpler and it still would have worked. The most important thing is to get the features—eyes, nose, mouth, ears—positioned in exactly the right places and shaped correctly—in order for the darlings to look like themselves. Further in the collage process, when I’m selecting and cutting fabric to fill those shapes, I’ll be thankful I have an accurate design to work from.
Stay Tuned
So, that’s it for this week. Next week we get to the heart of the process, The Fabric Collage Technique: Fabric Selection, Cutting and Gluing.
Kissin’ Cousins On-Line Class Preview Series
Thank you for this!! A great challenge, I am sure but wanted!!
I have your book, which I have referenced through the years. Thank you for this very generous gift! Do you ever teach in other parts of the US? I live in KY, maybe Paducah? Best regards.
I teach all over the US. I have nothing planned for Kentucky. The Paducah show doesn’t go long enough. I prefer to teach five day classes.
I have wanted to do a fabric collage and have had the image for 4 yrs–way before discovering you and your work. YouTube shared your crocodile. Interview in my feed, and I’ve been obsessed with you and your beautiful process ever since. already have your book… Now onto class! Ty, Susan. You are generous and an amazing artist.
Very interested in taking this class. How much will it cost?
I’m not sure yet how much it will cost. The first version of the class will be process based. In other words, the online workbook I’m creating will teach the technique but not a particular project. Follow-up classes may address particular projects. Feedback will be handled by a private Facebook page.
Me he animado a realizarlo.
esperaré ansiosa la próxima clase
Vejo voce na proxima semana.
Wait until next week.
Thanks Susan for very helpful information on how to get started.
Coming to Atlanta any time soon? Very excited about this on line class as I have batik scraps 20 years old although I gave bags to my sister who has take two of your classes.
Sharyn
Really looking forward to taking the class. I along time fan:-) Lily
that should read ( A LONG TIME FAN) !! Blonde Moment methinks Lily 🙂