
A couple weeks prior to my recent fabric collage class in Santa Fe, my students participated in pre-class coaching. I started doing these Zoom meetings for my Live Online Classes, and now provide them for all my classes. Aside from helping with student’s fabric choices and fine-tuning their drawings, something we may discuss is cropping the photo image of their subject before they make a line-drawing to enlarge and work from.
For this purpose, cropping refers to how much of the subject we’ll see in the final collaged image. Sometimes no cropping of the source photo is required. The photo that’s being worked from already shows us what we want and need to see—ready to trace for a pattern.
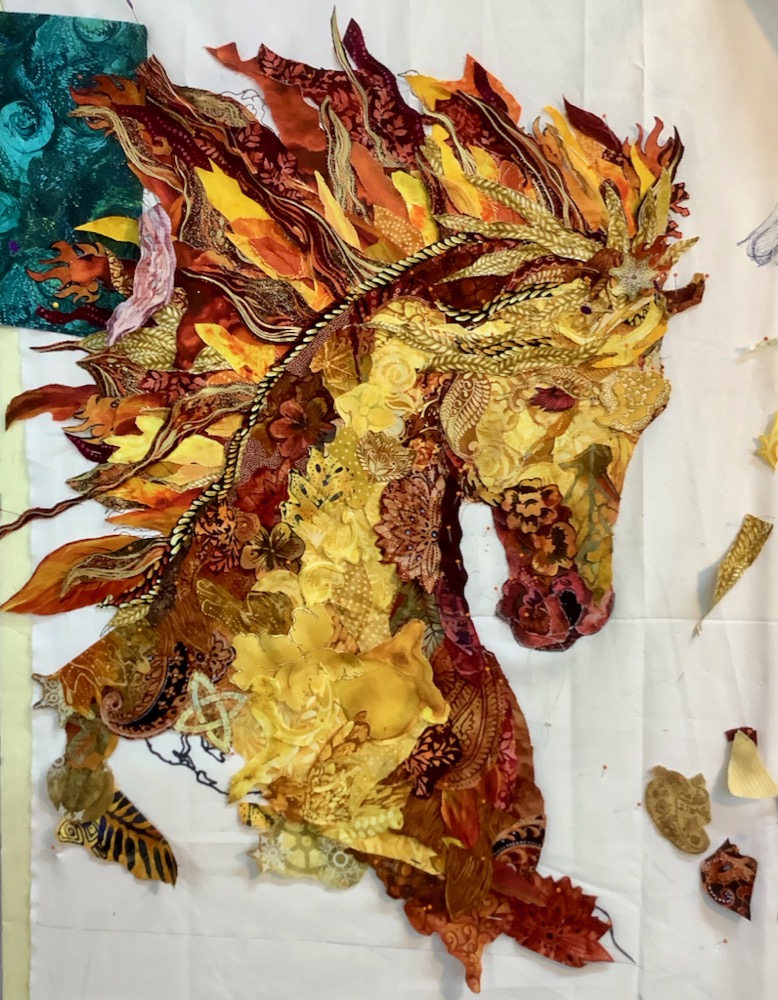
In these pre-class coaching sessions, however, I may suggest cropping out some of the subject. When I do, it almost always has to do with making the student’s task more manageable in the long run. For instance, in the photo above, artist Iris Pattillo, radically cropped her lunar-year fire-horse image from its original rendering (a copyright-free image seen below) to create her collage.
Top Tip:
Cropping can be your friend.
Benefits of Cropping
What do I mean by “making the student’s task more manageable”? I mean that by using judicious cropping one can: eliminate unneeded details; enlarge the important aspects of the image so that features such as eyes, noses, and mouths are easier to work on; and allow the size of the finished quilt to end up smaller than it otherwise might be, sometimes an issue for those with shrinking wall space for display.
Let’s take a look at the work of three of my Santa Fe students—their collage subjects and the cropping that helped them. Click on any of the smaller photos to view them enlarged and to scroll through the photo galleries.
Iris Pattillo


By cropping the source photo, Iris reduced the focus of her collage to the horse’s head, neck, and mane. When she then enlarged just that area as a line drawing, she had plenty of space to work with, using all her great contours and patterns in “fire-fabrics” collection.
You can see above, that by the end of class, just a portion of that full fire horse image became a healthy sized collage, even before it’s gotten a background. Imagine how large the collage would have become had Iris included the rest of the horse.
Cynthia Felts


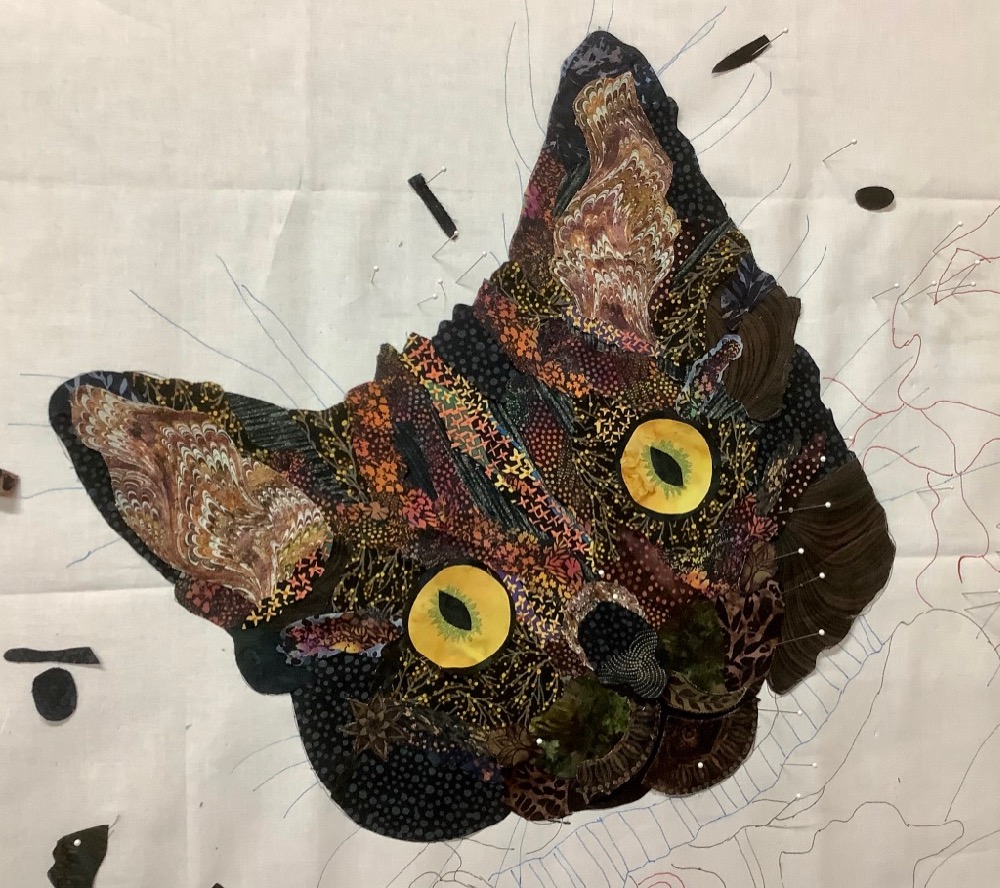
Nico-Nico, the kitten who has now become a cat, was the subject of Cynthia Felts’ class collage. The original photo is adorable. However, there’s little furry kitten legs and paws and a relatively awkwardly angled human fingers also included. The question I posed to Cynthia was, are those things important to her vision for this collage?
You can see her answer in these photos. I forgot to take a measurement of the collage-in-progress, but I’m guessing a 20 inch or so cat head? I’ve said before that single-colored animals pose more difficulties than animals with color breaks—needing to create all details relying only on the light/dark values of one color.
But there are plenty of times there’s no choice in the matter—such as a particular black cat. Cynthia helped herself out by arriving with a nice selection of black-based prints that worked together very nicely for her cat collage.
Carol Bittner


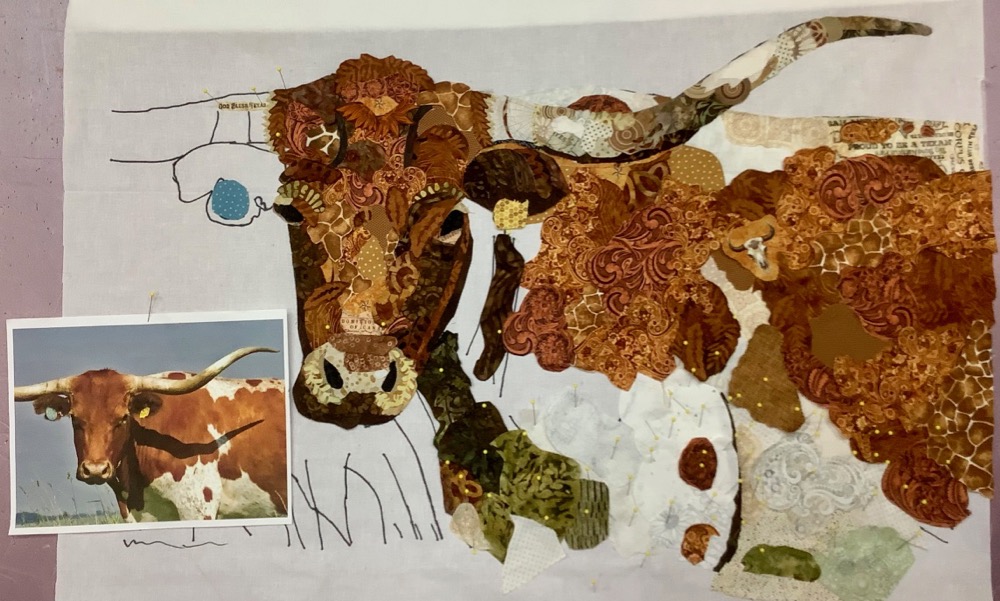
Since Carol raises Longhorn cattle, she decided one of them would be her subject, and began a portrait of Harold—a perfect candidate for cropping. In the photos above, you see the comparison between the full mass of Harold and the cropped version, which gives us and Carol, enough information for identification and to keep the overall size reasonable.
For any subject with a face, a good place to start with, “how big should this be?,” is by measuring the area connecting the facial features. A general rule of thumb is to be able to fit the face—the enlarged drawing of the face—onto a regular (8-1/2 x 11 inch) piece of paper. There are always exceptions, and you can always go bigger as Cynthia did with her cat. But if the area from the top of forehead (not top of hair or head) to bottom of chin, and side-to-side of the face fills most of that paper, it should be large enough to manage the eyes-nose-mouth features without too much frustration with small details.
Top Tip:
Cropping can be your friend.
In follow-up posts about this MISA-Santa Fe class, you will see these wonder-full fabric art collages again from beginning to end as they progressed through the week—plus the work of ten other talented artists. Be sure to check out my following Saturday posts.
Check out more of my Fabric Collage Top Tips.
Remaining Fabric Collage Classes in 2026
April: There’s still time to register for April’s Fabric Collage Immersion: A 10 Day Workshop at Woodland Ridge Retreat—Pre-class coaching begins next week—three spots remaining
April 21, 2026 – May 2, 2026
Menomonie, WI
FOR MORE INFORMATION
July: 5-Day Live Online Fabric Collage Class via Zoom
July 13-17, 2026
REGISTER HERE
More about my 5-Day Online Fabric Collage Classes
September: Susan Carlson Fabric Collage in Bar Harbor, Maine 2026
September 14, 2026 – September 18, 2026
Bar Harbor, Maine
FOR MORE INFORMATION