
Here’s a gentle reminder that your fabric collage quilt is a piece of art. Like a painting or a photograph, the image you create is meant to be presented in its best possible way—and thoughtful cropping can be a help to that.
How and where you crop a piece is subjective, but there are some simple ideas to keep in mind to give you a starting point.
Top Tip:
Crop your fabric collage quilt as though you were framing a piece of art. Because it is.
One aspect of an artwork is that the piece exhibit visual balance. It shouldn’t feel like the image is “off balance” with too much “weight” on one side or another.
One key tool in creating visual balance in your fabric collage quilt is cropping: how much space is given for the background—behind the sides, top, and bottom of the subject.
Above photo: detail of “Kaloli Moondance,” full quilt is given as final example in post.
Extra Space Below Your Subject
In a previous life, I was the manager of a picture framing shop. I enjoyed helping people decide how to frame and display their treasures. A basic rule-of-thumb in the picture framing world is that when matting a piece of work, the width at the bottom of the mat should always be slightly larger than the width along the sides and top.
When I started collaging my fish quilts, I used the same idea for where to crop the background. In the examples below, if you discount the fins and concentrate on the bodies, you’ll notice that there is more space below these fish than above them.


The idea to add extra space below a subject—either with matting or as a background—is to provide a “base” for the piece—to give it visual weight. Without it, the subject could appear top-heavy in its frame, out-of-balance. It’s a subtle effect—we may not even realize what’s “off”—but good to keep in mind nevertheless.
I was curious to see how the collage quilt, “Tortuga Verde”, from my Sea Turtle eWorkshop stood up to that framing rule. In picture framing, along with more space on the bottom, it was usual to keep side and top matting equal in width. Turns out I was pretty close on this one with cropping the turtle’s background.

Knowing the rule means you can break it if you choose to create a sense of imbalance in a composition, as in the two examples, below. On the left is with the extra space on the bottom. The fish on the right has a more equal cropping all around the fish. Even though the bulk of the body is fairly well centered, it appears top-heavy, sinking to the bottom.


Below, I’ve added an annotated frame (shown in white) touching the very outside edges of the fish, making it easier to understand how I cropped the quilt. There’s extra space at the bottom and the pointiness of the top fin and tail come closer to the edges than do the nose and lower fins. When considering the main body mass of the fish (shown in yellow) it’s now more centered on the background.
Note that there’s also a little extra space in front of the fish—which leads to the next “rule” of cropping—give some space in front of your subject.

Space in Front of Your Subject
It is also pleasing to the eye to leave space for your subject to either “move into” or, in some cases, “look into.” Here are a couple of examples.

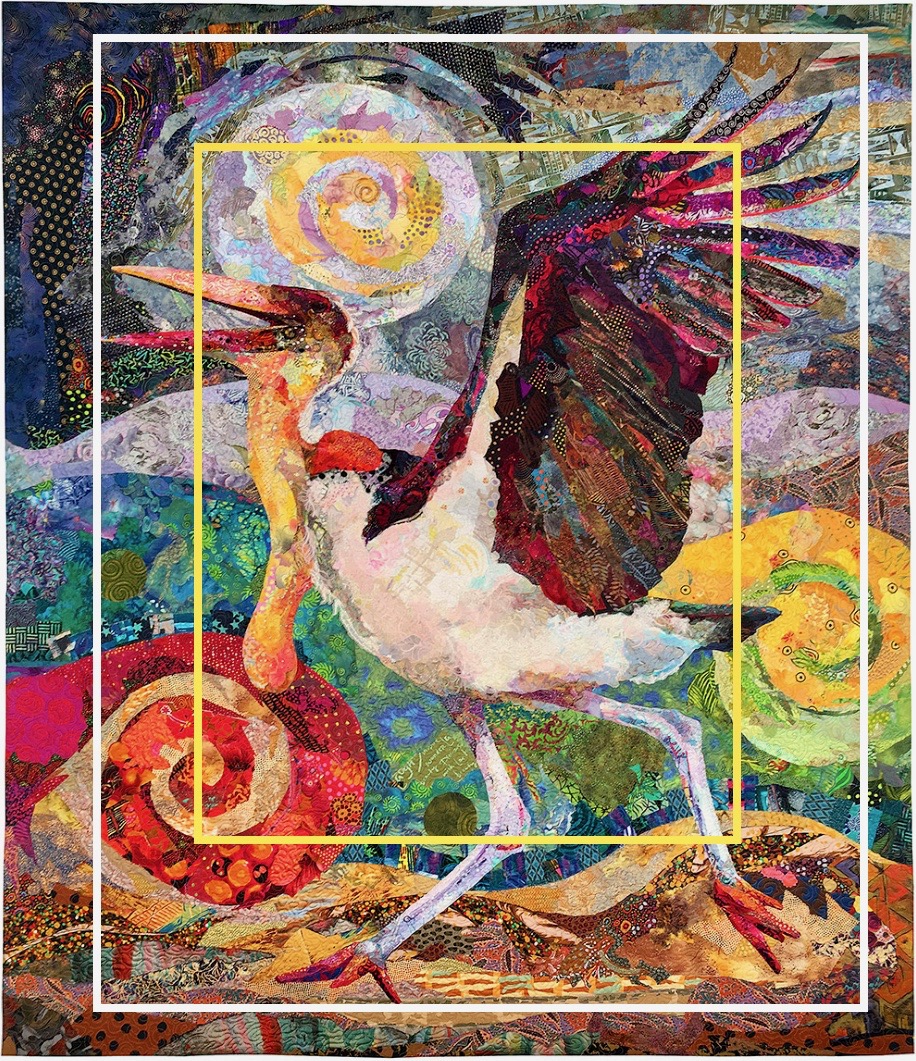
So all of this is well and good for the simpler designs of fish and turtles, but what about a more complicated quilt design? I put the annotation tools to my marabou stork in “Kaloli Moondance,” with results below—white frame is outer edges of the bird, yellow frame is the focus area—the weight—of her body.
It’s interesting to see how well she fits the cropping rules when at the time I was following my instincts for how she fit in her space. I guess that’s what I’d like to leave you with—follow your instincts, your gut. But if your gut feels a little off, maybe these cropping rules and examples will give you some ideas to work with for how to present your own artwork.
Top Tip:
Crop your fabric collage quilt as though you were framing a piece of art. Because it is.
I don’t believe I ever paid attention to that. But I will now!!! Have been a big fan of yours from the very beginning although I have not tried to do collage. But I. am know. Love seeing your work & your students. Wishing you good health and another good year.
Barbara
I don’t believe I ever paid attention to that. But I will now!!! Have been a big fan of yours from the very beginning although I have not tried to do collage. But I am now. Love seeing your work and your students. Wishing you good health and another good year.
Barbara
I really appreciate this insight, Susan. I had no idea about these “rules”. I have always just cropped when it looked right. I will be curious to look at my past work to see if I instinctively cropped as you suggested.
This is really helpful! Thanks, Susan!!!
Susan,
I am always amazed at how timely your posts are! I am working on framing some small pieces today! Not only do you help us understand how to see(value), but also how to feel(visual weight within a piece)! I’m endlessly grateful for your teaching and am amazed at the continuing possibilities for growth in collage!!
Thank you so much for sharing this!