Two Excerpts from
Online Master Class Manual
Lesson 2. The Fabric Collage Technique
(Excerpt #1)
Fabric Selection
1.) Gather an initial selection of fabric you think you’d like to use in your fabric collage quilt, knowing that you can change your mind at any point. You have to start somewhere.
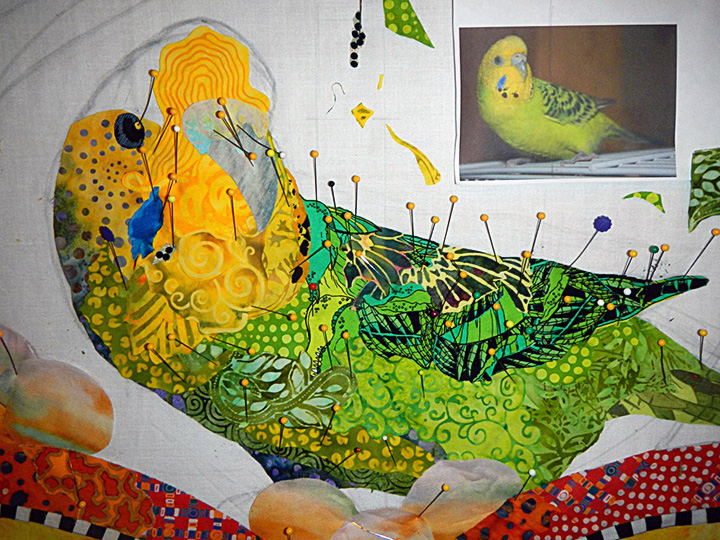
The fabrics you choose should be based on your subject matter and how you want to treat it. People who are drawn to my work and the work of my students are often attracted to bright, bold colors—often looking to not use “realistic” color in their quilts. They create animals, people, and just about anything else, in all colors of the rainbow. But if you prefer naturalistic colors, that’s okay, too. It all works.
In any case, you still need to narrow down a color palette before beginning. I suggest to start with a color scheme. It may be concentrating on one particular color, or on a few colors.
The video below describes how to choose fabrics based on your subject matter.
2.) Now select fabrics with a variety of values and printed designs within your chosen color scheme. It’s helpful to organize your folded fabric from dark to light (as I did in those value-example photos) to see if you are lacking any values.
I highly encourage the use of printed fabrics to interpret collage subjects as I do. It may seem counterintuitive but these fabrics are easier to blend than unprinted fabrics. As I said, blending is the key to this technique and the key to creating form.
You may find that some of your fabrics have a combination of all these elements—a wide variety of value, color, and pattern. For instance, printed batiks are often good for this. If they are in the color scheme you’ve chosen, add them to your palette.
(Excerpt #1 ends)
(Excerpt #2)
Your foundation fabric will help keep your fabric pieces in place temporarily even without straight pins and even if you’re working on at a slight angle. However, pinning the fabric in place is a good habit, so that an errant sleeve or unexpected sneeze doesn’t send pieces flying. Hold them all in place by pinning into your foam core or styrofoam insulation pinning board.
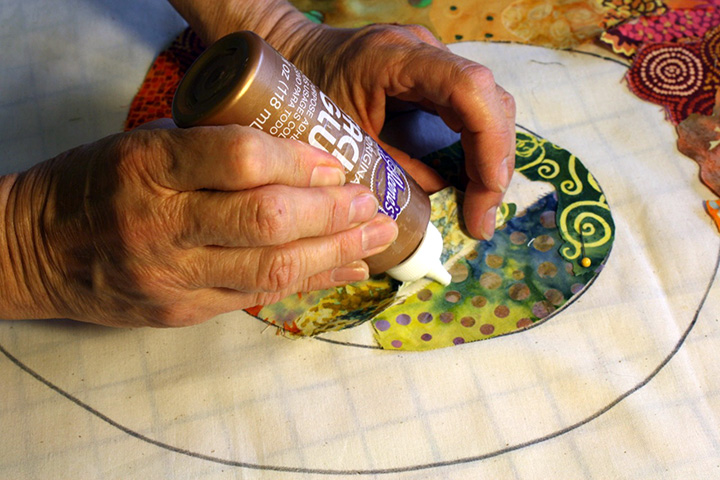
When is it time to glue?
• When you get to a good stopping point and are ready to begin collaging a new area.
• When it becomes difficult to work around all the pins.
• When you run out of pins!
Gluing
Let’s start with a quick video demonstration of how to glue.
For answers to frequently asked questions about gluing, such as why I use glue instead of fusibles, visit my blog post “Why Glue?”
But here’s the basic answer: I use Aleene’s Tacky Glue Original Formula and I like this brand and formula because it has a thickness to it that doesn’t sink into the fabric as readily as some other glues will. Also, it dries flexible so my quilts retain their pliable quality and don’t look or feel stiff in the end.
When you’re ready to glue, simply lift an edge of the fabric and apply a small dab to its center. Notice I said I apply glue to the center of the pieces. Leave the edges loose at this stage. This allows you to trim edges if needed and to slip neighboring pieces of fabric under the loose edge.
Once the dab of glue is in place, smear it flat with the bottle tip, your finger, coffee stirrer or other such implement. This prevents the glue from soaking through the fabric and creating spots. Use only a small amount of glue, just enough to tack the fabric shape in place. This makes it stable and allows you to remove the straight pins, but still allows you to easily pull it up, even when the glue has dried, if you change your mind about that piece of fabric later.


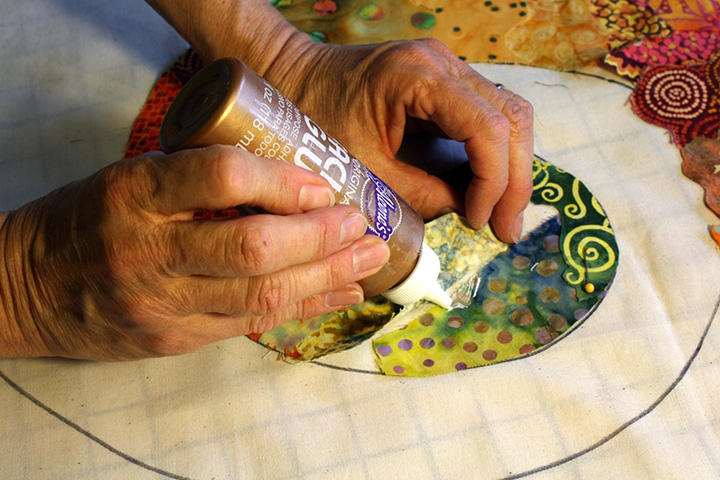
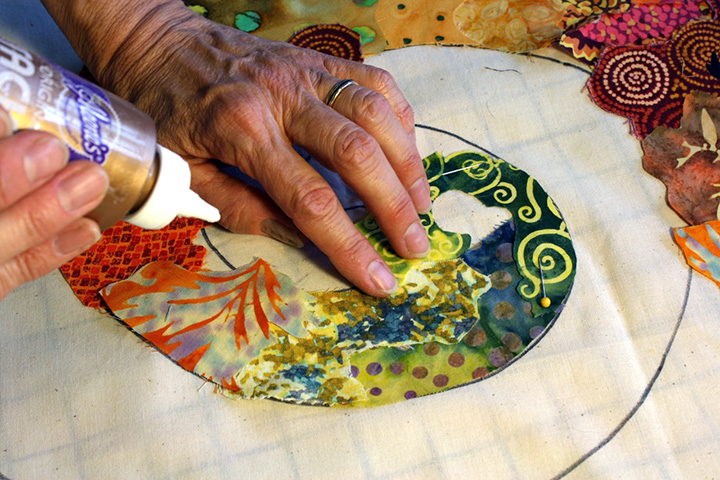
At this stage, only tack down the fabric shapes by gluing at the center of each piece, so that you can continue adding other pieces, tucking some underneath or overlapping the ones that are already secured. Paying attention to how the qualities (color, value, print) of one fabric piece relates to the next and so on, is how you achieve a blending of those shapes—or contrast if called for.
(Excerpt #2 ends)