
Using Sheer, Netting, and other Semi-Transparent Fabrics—Fabric Collage By the Numbers #11
Recently in this series we talked about using sheer fabrics (netting, tulle, and so on) in sequence: when to use them in the fabric collage process. In the post today, we go back to the original post about using sheers, which shows how to use them to create highlights and shadows in specific areas or to use it over the entire collage in what is referred to as “shadow quilting.”
If you are only familiar with sheers as used in wedding dresses, prom gowns, or ballet tutu’s, you will be surprised at how well they can be used in quilting, and amazed at the variety of styles, colors, and patterns in which you can buy sheer fabrics. From netting, to tulle, to chiffon, to gauze there are dozens, nay hundreds and thousands of different sheer and translucent fabrics out there. Maybe you never thought they would be useful in fabric collage. Let this post convince you otherwise!
Tom and I are using part of our summertime to provide you with a sort of DIY Summer Collage Camp—or a Winter Collage Camp for those of you in the Southern Hemisphere. We’re calling it “Fabric Collage By the Numbers,” addressing all the steps of creating a fabric collage quilt. We hope you’ll participate from wherever you are in the world—no travel involved.
Pulling from six and a half years of fabric collage blog posts as reference material, we are delving into that content to give you a summertime lineup that you can follow along with. At the start of this series, there were eight weeks left of summer (not by the calendar but by the very subjective lens of the Maine climate!) so each week we’ll deliver two posts for a total of sixteen in the series—unless we re-discover more relevant posts along the way!
Posts from our Summer Special include; #1—choosing your photo (posted on July 7), #2—choosing a subject (posted on July 9), #3—making a pattern (posted on July 14), #4—how to choose fabric (posted on July 16), #5—making a fabric palette (posted on July 21), #6—using glue in fabric collage (posted on July 23), #7—sequence in fabric collage (posted on July 28), #8—sequence in faces (posted July 30), #9—adding sheers in sequence (posted August 4), #10—using your background to tell the story (posted August 6), to eventually hanging your fabric collage on the wall (planned delivery on August 27), we’ll cover each step with at least one previous post.
You may have read some of these posts before, so this will be a refresher for you. The information may also be reminiscent of information found in our online learning resource the Fabric Collage Master Class. If so, know that you’re not imagining things. Much of this information is gathered, reorganized and expanded upon in the Master Class. For more information about the Fabric Collage Master Class, click the button below.
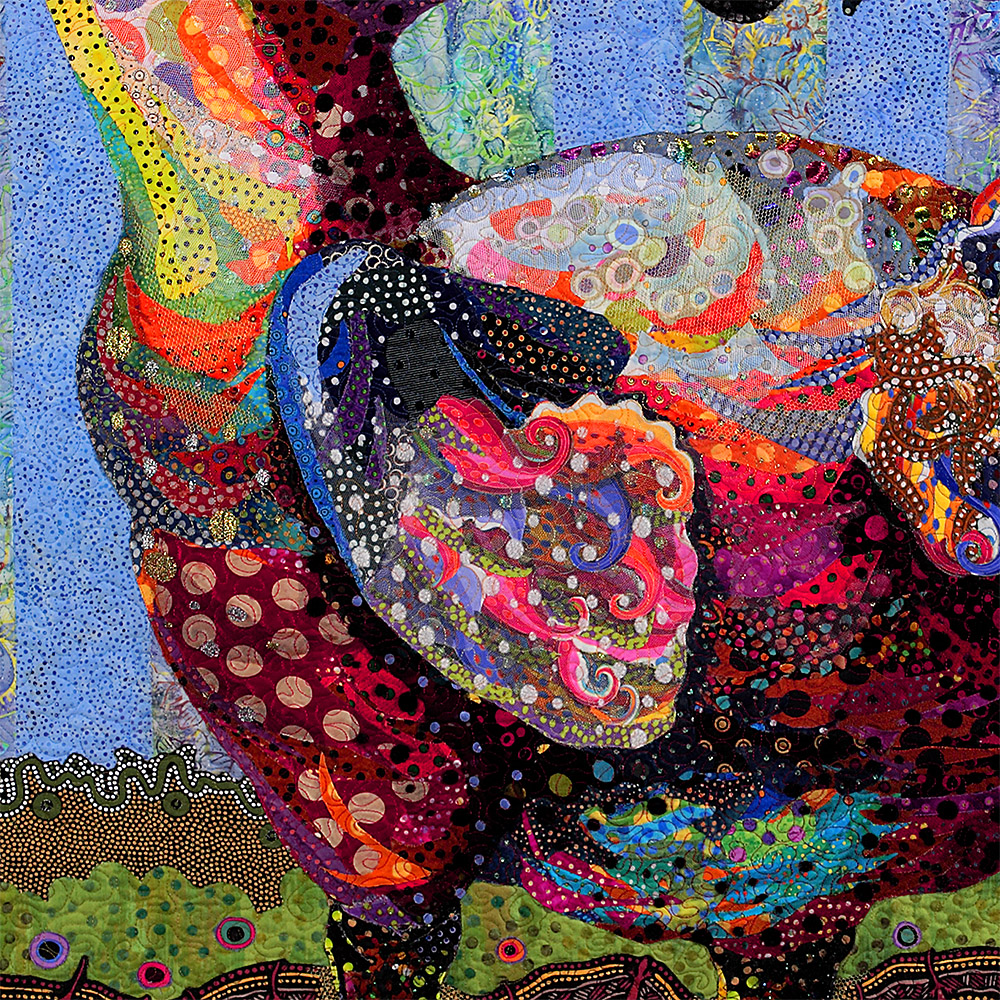
Using Sheer, Netting, and other Semi-Transparent Fabrics
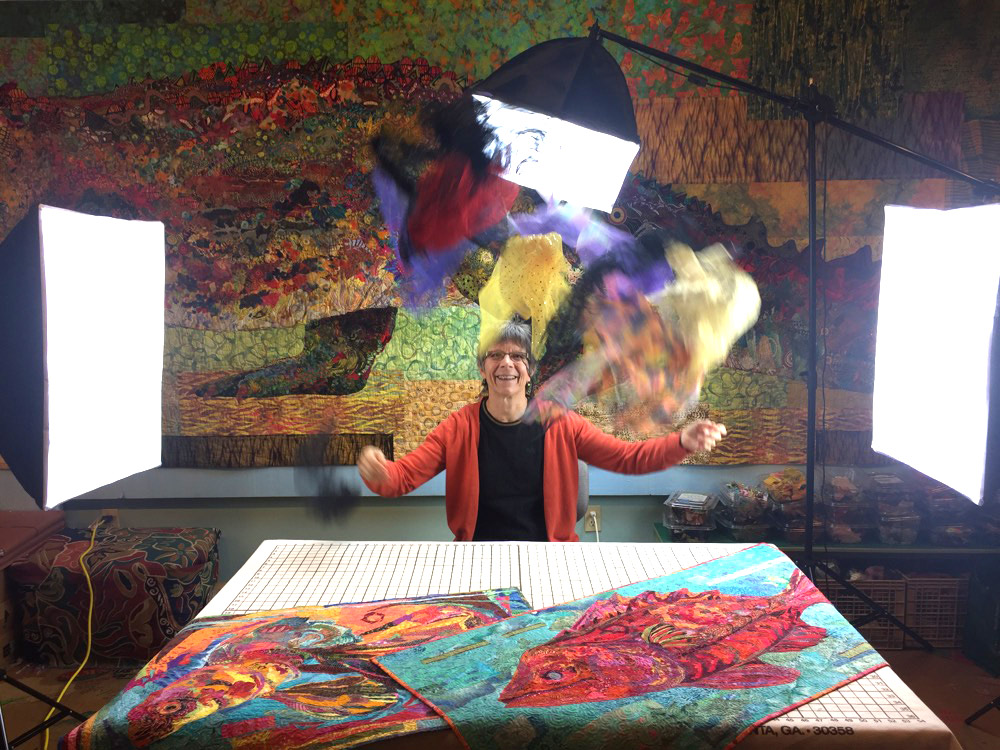
It isn’t always clear to those who haven’t seen my work in person how much netting, tulle and other semi-transparent fabric I use in my quilts. For simplicity’s sake I’m going to call them all sheers (even though sheer is a type of fabric itself).
I use these fabrics near the end—or final draft—of my piecing to add a final layer of detail. They’re one of the last things I consider, obviously, because they’re transparent and need to be placed on top of other fabric—such as the collaged image.
Sheers serve several purposes. I use them to create highlights and shadows. They can be used to smooth the transition between fabrics. And they add visual interest, some glitz, when needed. In other words, they change, without completely overpowering, the look of the fabric underneath. The effect can be subtle or it can be striking.
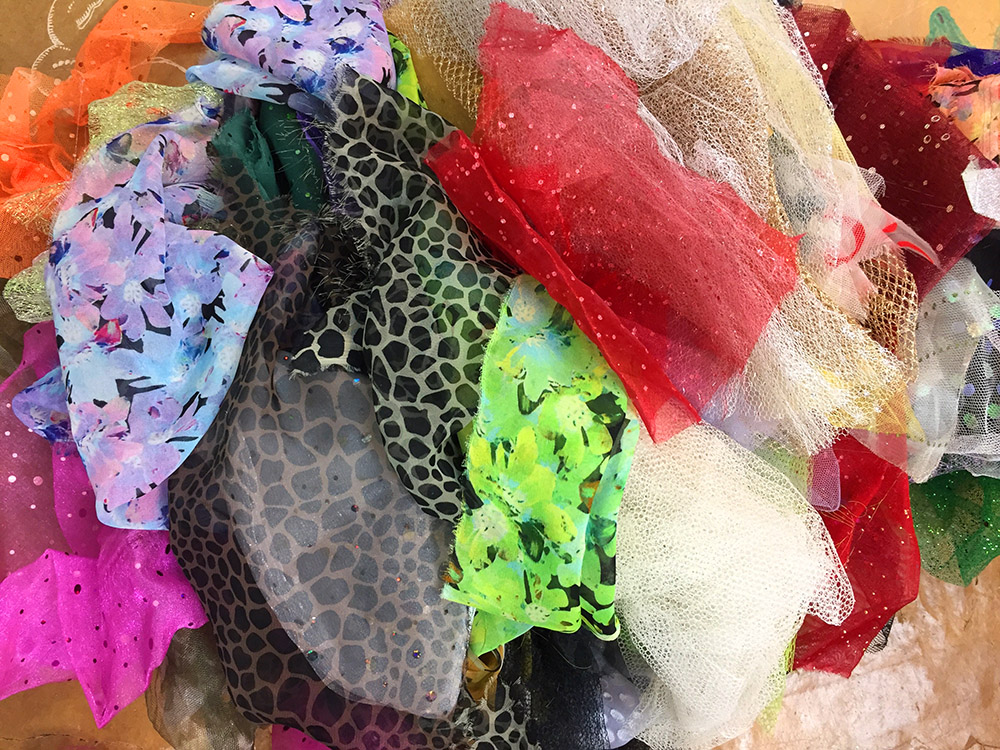
Netting, lace, organza, chiffon, tulle (also called bridal illusion)—I use it all. I have literally dozens of them in different colors, prints, weights. They tend to be polyester, which is usually quite inexpensive, making them doubly hard to resist.
And—surprise, surprise—I prefer to use sheers that have a print in them. Plain netting is okay, but why use it when there are so many with delicious prints to choose from that can help define form or add interest. I am especially fond of flocked netting or netting studded with glitter.
Many people who saw “Crocodylus Smylus” in Houston at the International Quilt Festival remarked that they hadn’t known how much “bling” I had used in creating her. It’s hard to see except in person as many photographs don’t pick it up. Most of it was added using glitter-studded netting.
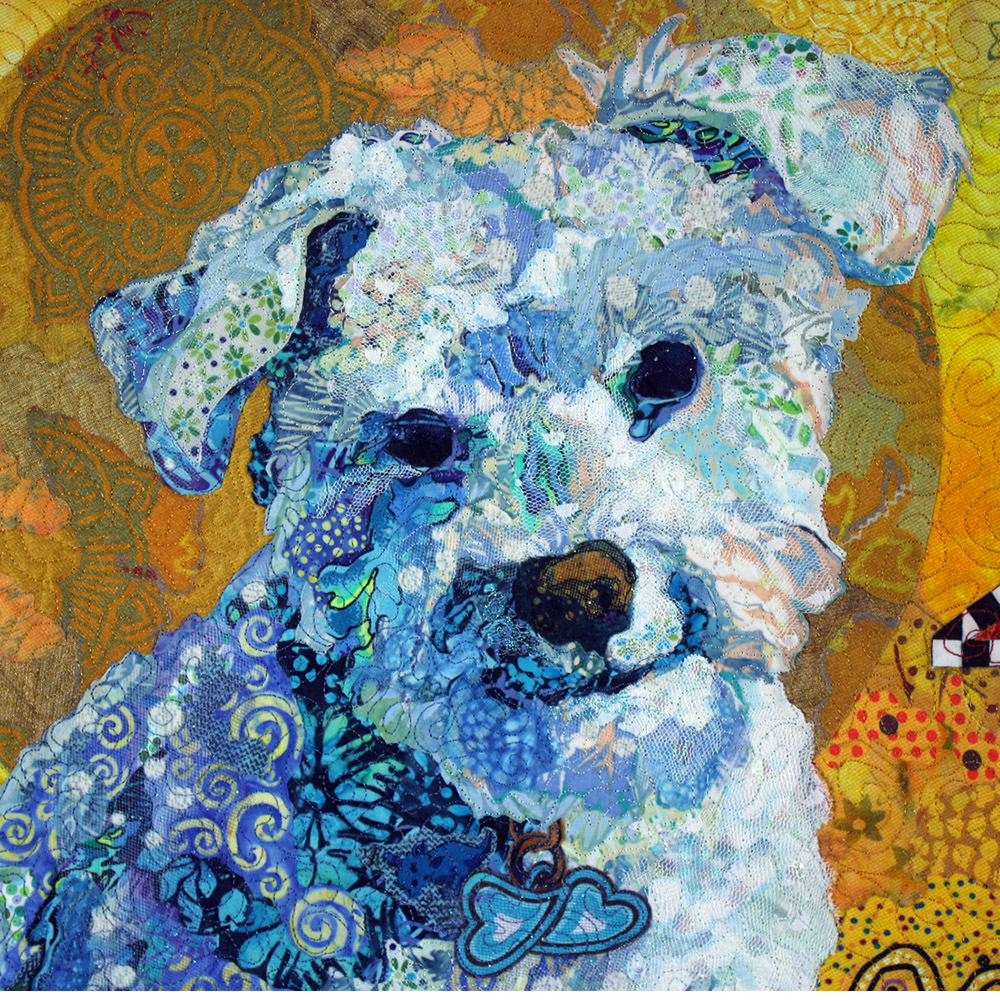
I don’t use sheers in all my pieces. I’m thinking especially of “Dixie Dingo Dreaming,” the portrait of my dog Pippin, in which I used no sheers at all. I had a couple reasons for abstaining. First, I had made it my goal to use only Aboriginal-themed (cotton print) fabrics—to fit with the “dingo” Australian theme. Second, I used no glitzy materials because Pippin wasn’t a glitzy sort of dog. She was a more of a roll-in-dead-fish sort of dog.

On the other hand, “Golden Temple of the Good Girls” has a fair amount of sparkle. They’re all girls, they are our princesses, so adding sparkle seemed like a natural thing to do.
An Example
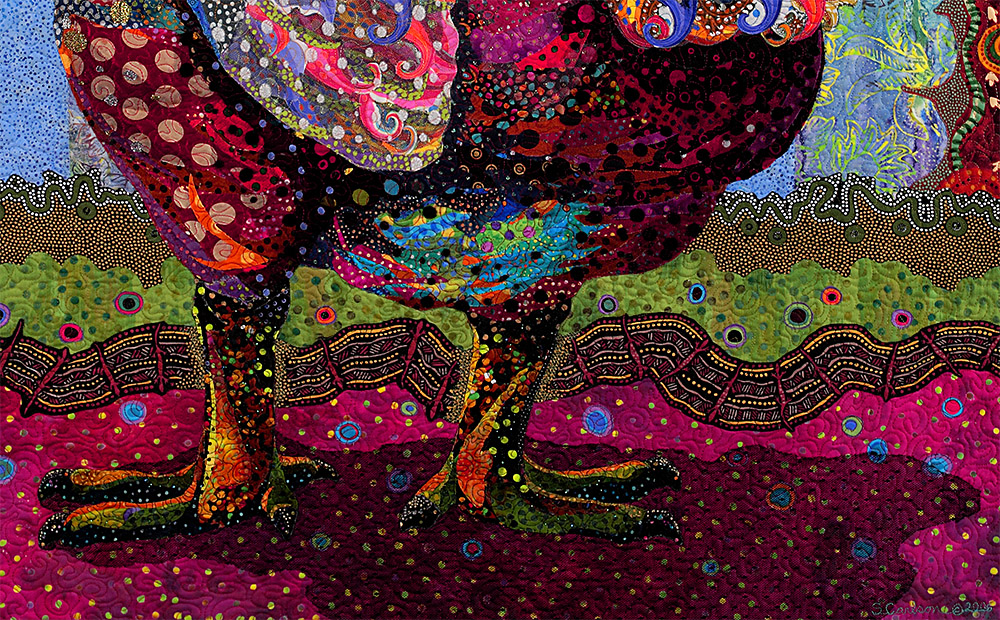
As I said earlier, I basically use sheers in four ways. I’ve already demonstrated in the above video how I used glitz in Stevie the crocodile, so I’ll use another quilt, “Polka Dodo,” to show examples of the other three ways sheers can be used—though glitz was definitely a big part of his look.
To add glitz- To add highlights
- To add shadows
- To soften or blend fabrics
First the quilt:

There’s a lot of dimensionality to “Polka Dodo.” At least there’s a lot of dimensionality to the finished piece. Take a look at the quilt before any sheers were applied.

Now look at his head after I used sheers to add highlights with some white spotted netting. By the way, I set myself the challenge of using only polka dotted fabrics—including the sheers—in “Polka Dodo.”
Look at the light sheers on the neck, head and cheek. The use of light sheers helps to bring that part of the image forward. I also used it on his back, as if the light were shining from above. Notice that much of the sheer is not simple netting, but is iridescent or metallic polka dots. The same is true of the shadow on the lower jaw and neck. Those black polka dots are actually black flocked netting.
Let’s move on to using sheers for shadows in other parts of the quilt.
The shadow under his feet is a successful and simple use of sheer fabric. A medium weight netting embedded with tiny polka dots overlays the area defining Dodo’s shadow, shading the underlaying fabric, just like a shadow would in real-life. It’s difficult to see but there is also a dark sheer under his floofy tail and around his wing. In both cases, creating a shadow helped to define those body parts and bring them visually forward.
Finally, and perhaps least obvious is the use of sheers to blend. Look at the white polka-dotted sheer on top of the wing.
To my mind, the wing was too complicated before. Interesting as it was, all those individual pieces of fabric competed for attention with one another. I needed to unify them somehow so the viewer saw “wing” before they saw “curly blue and pink feathers.” The white spotted sheer overlaying the wing helps to lower the contrast between the feathers. It blends them together to accentuate the stubby wing shape. (It also lightened the overall color of the wing, bringing it forward and helping to separate it visually from the body.)
How To
In class, when we get to the stage of adding sheers, my students don’t know how to proceed. How is it done? Do you really just keep on using glue?
Yes.
It takes a little finesse but glue gets the job done. Cut the sheer just as you would cut any fabric for fabric collage, to the exact shape you want it. Rather than applying the glue to the sheer, put a few dabs (not a glop or line) of glue on the fabric you want to adhere the sheer to. Then smear the glue with your finger until you can no longer see it. At that point, the glue is still tacky enough to stick the sheer to it. When applying sheers, I tell my students to use a consciously lighter touch with the glue.
Then, of course, your quilting will hold the sheers—and all your fabrics—in place.
No Discrimination
I hope this post drives home the fact that any fabric can be used for fabric collage. Some may be more useful than others, but your imagination shouldn’t be limited by believing that you can only use cottons or only use opaque fabrics. There are no rules, which can be unsettling at first. Keep at it. You’ll get used to it.
Hi Susan, I am working on an amazing piece and I want to add a layer of organza in one of the corners with a picture on it. I don’t want the organza quilted, because I don’t want the picture distorted. Have you ever adhered organza using a fabric medium? This is an art quilt that I hope will end up in a museum so I want the organza applied where it will not come off.