
Sometimes it’s the simple things that take the longest to figure out—like creating a “perfect” circle in fabric collage. Even though I’m willing to let it waver ever so slightly, sometimes you have to go a few rounds to get it right.
Let me explain.
For my quilt “Earthshine” (formerly “Blue Moon Sam”) I decided to collage a portrait of my son Sam as a crescent moon. Now, crescents are really arcs or slices of circles. Which means that in the end, they ought to have the semblance of smooth curves.
The problem I encountered was a common one. If you come close to making something a circle (or square or whatever), but don’t quite make it a circle, the viewer’s eye notices. Maybe they don’t know right away what’s bugging them, but they get a feeling of unease, of wrongness.
When I started this quilt I wasn’t sure if I’d show the entire crescent or not, and besides, I had other issues to address first, such as Sam’s face itself. But once I did decide how much of the moon would show (like all of it), I could see that my first draft of the crescent’s curve was off—I had that sense of unease and wrongness.
After a day or so of fiddling with the edges, stepping back, taking a photo to compare, fiddling some more, I figured there had to be a better way to “perfect” the curves. I was moments away from printing out one of those photos I had taken and searching for various sized plates to trace around onto the printout, in order to better see where I was off (a low-tech option), when I noticed Tom sitting at his computer. He had a much easier time creating the circular overlays I needed by using a computer program, instead of the plates-in-our-cupboard direction I was heading.
As you can see in the photo below, those lines that Tom drew could show me where the outer edges of the moon should fall to give me the smooth circular curves I was looking for.
Round 1
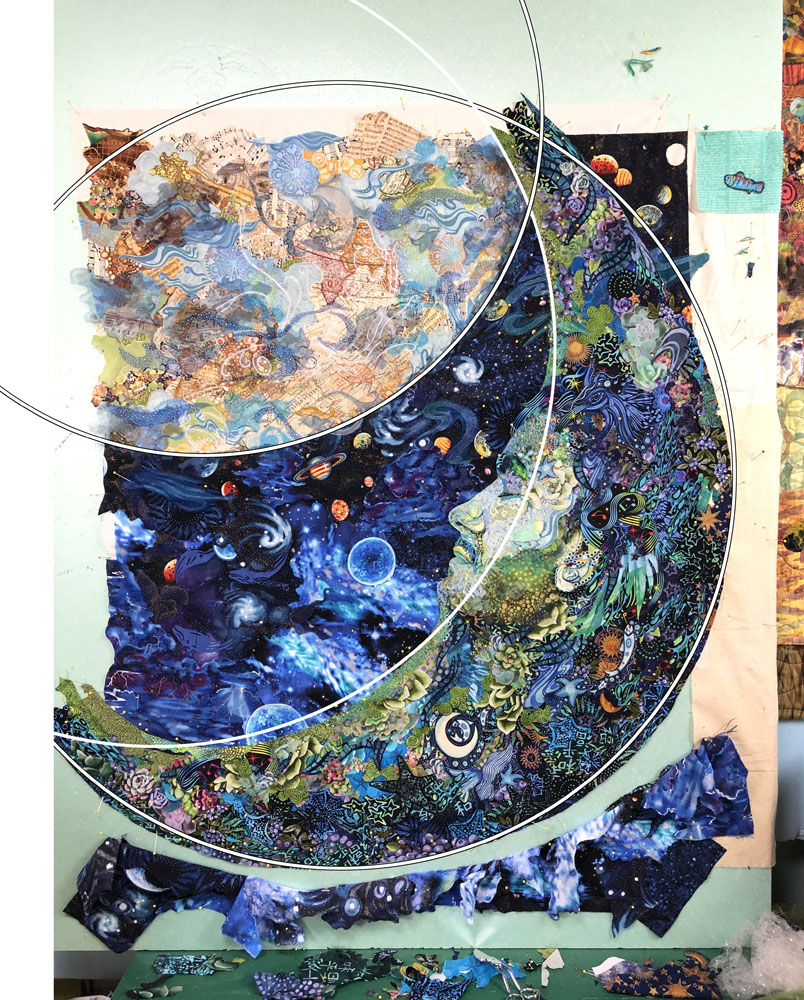
You may remember this photo in the “Part 3” post of this quilt story. I had just cut away the bottom part of the rectangular border, and decided to make the outer arc of the crescent the new lower edge of the quilt. I could now see very clearly where adjustments to the curves and points of the crescent (no wonder they didn’t look right!) were needed. Just for the heck of it, I asked Tom to draw the Earth’s curve as well, and it confirmed my feeling that that curve was fine.
With a printout of the above image in hand I was able to make better use of my time getting the crescent edges looking correct.
Round 2
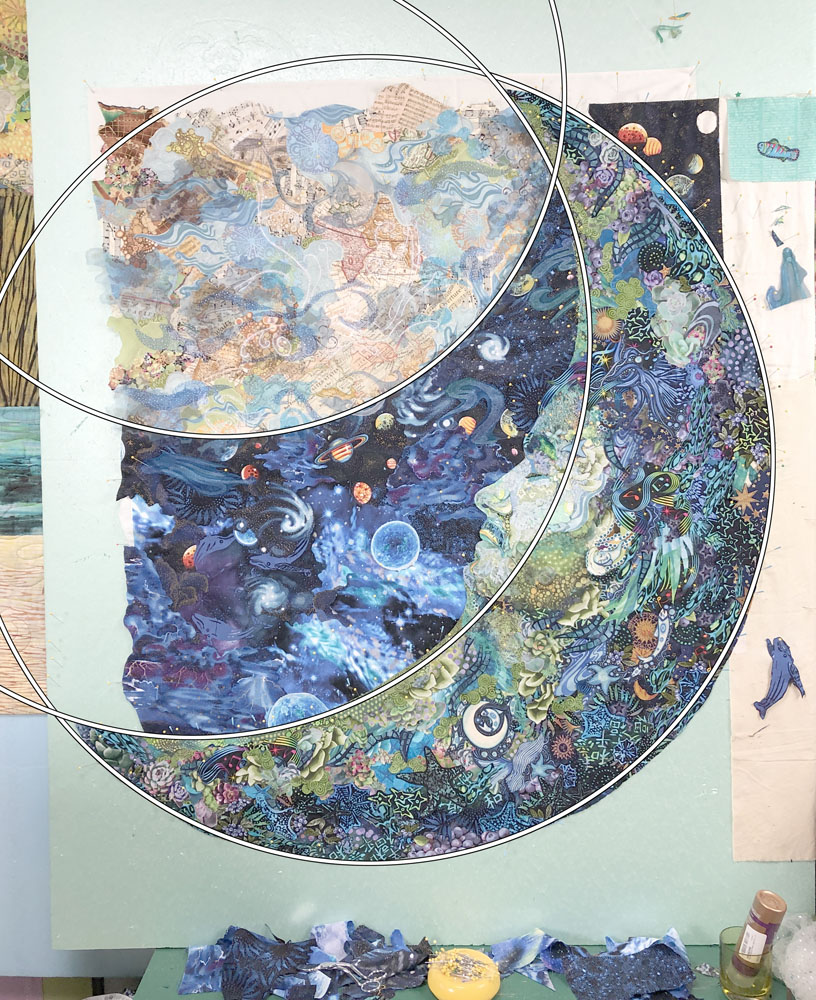
So after some more work and referring to the printout, I was able to get closer to a true crescent—though you can see in the photo above, that the lower right arc is still straying beyond the line.
This is where I realized that even though the computer-drawn lines appear thin enough, they actually cover more of the moon edges than you’d think, reducing my arc-accuracy. It makes sense when you think of it, the printout drastically reduced my quilt image from 40 inches wide to 7 inches wide, so going the other direction, the drawn lines essentially enlarge from 1/16 inch to 3/8 inch, obscuring a significant enough area of crescent edge.
What this meant is that though I could get way closer to the perfect circles I was aiming for, when I stepped back and took my comparison photos, it still looked “off ” in places.
So I adjusted what I could and took another photo back to Tom and his computer, with a new request in mind.
Round 3
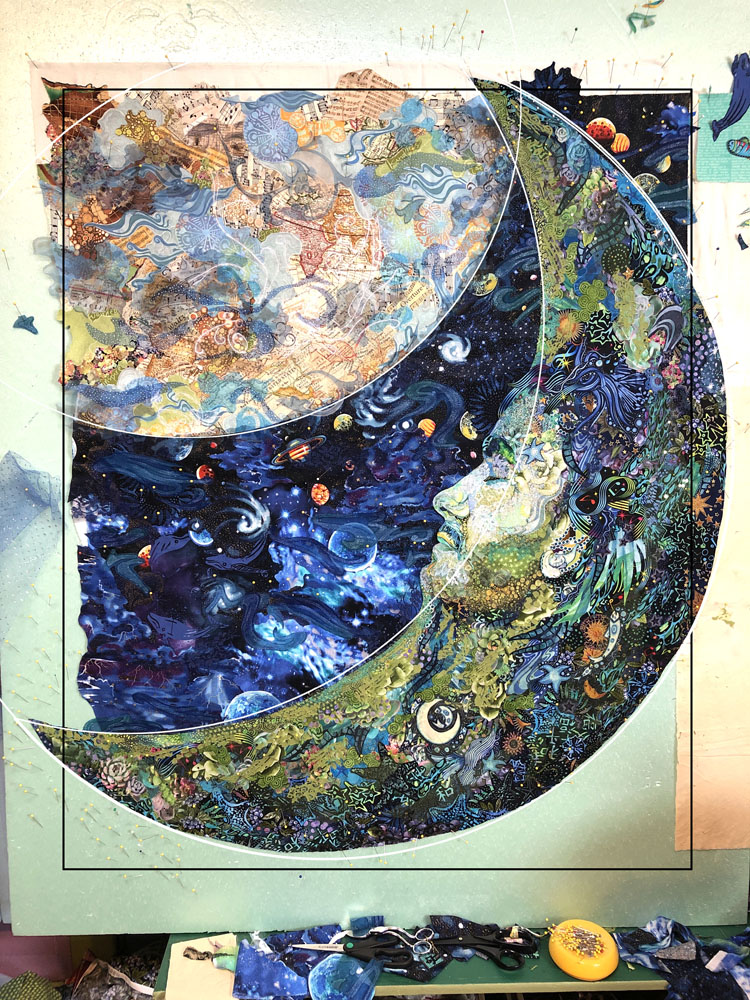
In this third round (above), I asked Tom to create thinner computer-generated lines and had him place them just outside of the image so none of the collage was covered. Now I could see exactly where the crescent still needed to be edited.
In this round I asked Tom to still include the Earth’s circle, and add a black rectangle to give an idea of how I may like to crop the top and left of the quilt. The crescent itself already creates the bottom and most of the right side edge. The drawn rectangle behind the moon shows me where I should extend both Earth and universe to have plenty of background available to square it up later, after quilting. In the end, I plan to have the tips of the moon extend over the edges of the background.
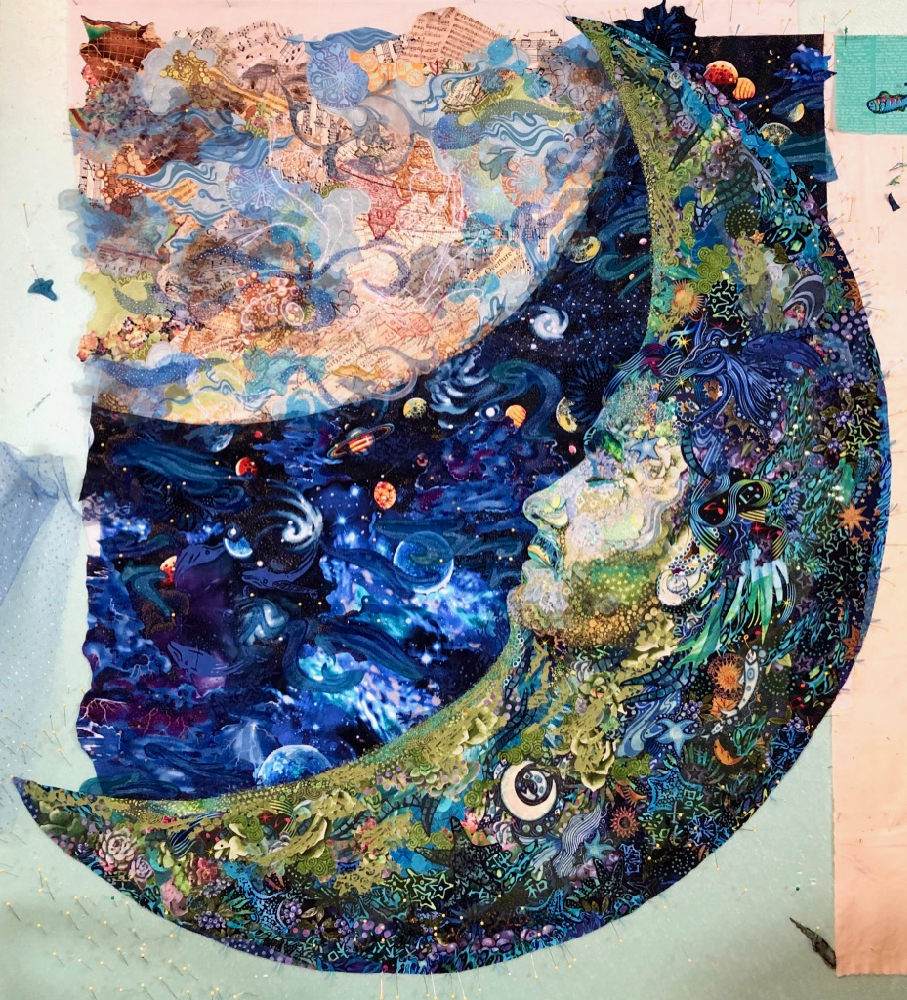
I decided to leave the inner arc of the moon as it is. The line shows a bit of gap here and there, but the arc itself creates a nice smooth edge and I like how it’s working with Sam’s face poking out of it. I also like how the very tips of the crescent turn inward. So I’m signing off on those things.
And for the outside arc, I placed blue-headed pins (so they were visually separated from my yellow-headed pins) along the lower outside line where I figured the outer arc would fall, look close to see them in photo below left.
Then I filled in the gaps with fabric, see photo below right. To see any photos larger, double click on the image.


I continued moving around the outside edge of the moon. Now I’ll glue down the adjustments, extend the Earth and universe background, take a new photo, and reassess. But for now, I’m finally feeling at ease with those circles.
Coming Up: On to the Fourth Draft
Aside from completing the crescent and background, I’ve been spending a lot of time playing with adding sheers, especially on the moon as a whole—you can see much of that in the progression of photos above. I feel I’m nearing the end—my fervor to add more and more layers is waning, mostly because I’m getting more and more satisfied with the overall image.
It could go on forever—a layer here, a layer there, a third layer here, and a fifth layer there…. But no, it must end! Finishing this quilt was my summer challenge after all. And although Labor Day weekend is seen as the end of the season, according to the calendar I still have two more weeks before the official end of summer.
So stay tuned.
Hello Susan,
How generous and reaffirming to read through your struggles and inner thoughts in solving those visual challenges. It helps so much to understanding my own obsession “To Get It Right”! I too have a summer deadline of September 18th. Plan to share on finish line.
Thanks for all your sharing and generosity.
Dear Susan, thank you for sharing your beautiful work and progress to an already wow!! work of art!