
I love Finish Line quilts. I love reading the stories behind the quilts and examining the images, letting them pull me in to see and notice all the details and touches that have been layered into them. And it’s certainly rewarding for me to know that I’ve been able to influence these quilters’ artistic journey in one way or another.
It’s also an opportunity to point out to you, the reader and perhaps a fabric collage student yourself, how each of these artists used, discovered, or altered the fabric collage techniques I teach. Each quilt has a lesson that can be learned if you listen to the story told by its maker.
So enjoy these quilts’ beauty, but also see what you can learn from them. It takes courage to put a quilt out into the world for all to see. And it is a generous act. Sharing is the way we make ourselves and the world a little better every day. Thank you, ladies—you’ve given me a lovely start to the weekend. Cheers!
And as always, if you too would like to submit and share your finished fabric collage quilt, please click on submit button below. Thanks.
Submit Quilt for "Finish Line"
Marguerite Kenagy
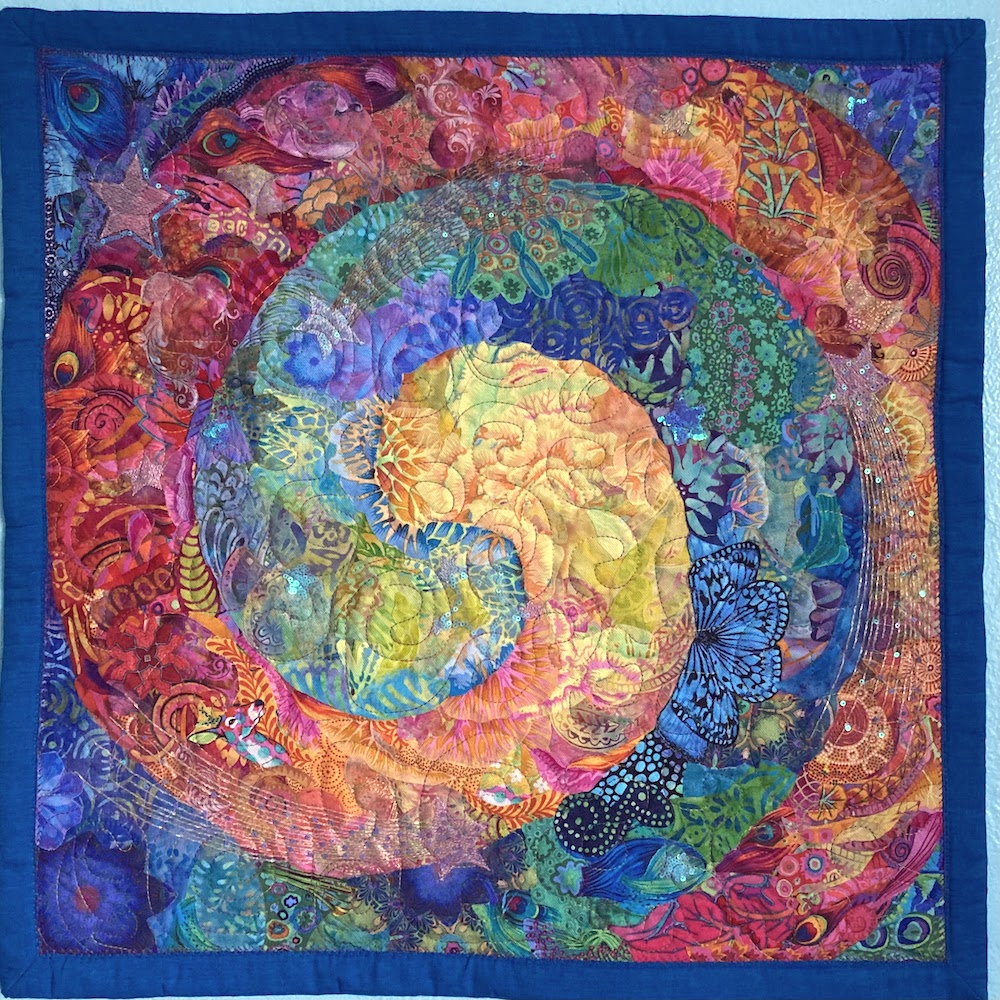
Marguerite Kenagy of Salem, Oregon, sent in an intriguing spiral. The blending of the colors and values and patterns in her fabrics is just perfect—and I love the shooting stars that add motion to the design. I especially appreciate (and smiled at) her story about being one of my many students who had been reluctant to begin making a spiral but who were won over by it in the end. Creating a spiral is a great exercise for anyone at any stage of their journey in fabric collage—and as I read more of Marguerite’s story, I got goose-bumps as I was reminded how a simple spiral is also such a deep and universal symbol.
From Marguerite:
I relied heavily on Serendipity Quilts, the Spiral eWorkshop, and your blog posts, and am so grateful for your generous teaching of this art form. I am one of those students who originally balked at doing a spiral. I started out attempting to do a realistic portrait of Amanda Gorman. She graced our living room for many months as I struggled, especially with the teeth and fingers. I eventually aborted and dismantled that project, and took your advice to start with a spiral. Although I started out reluctant, it wasn’t long before I was fully engaged with the project, absorbed in what it taught my about pattern, color value, tone, texture, transitions, shape and form. And grateful for some life wisdom gained during the process.


As I learn to live with Long Haul Covid as a chronic illness, my world gets smaller and smaller. I am far less active and more home-bound. I originally envisioned this spiral as a shell, an enlarged version of something small in scale, yet intricate and beautiful. It was a reminder to find beauty and reflection in my world even when my world seems small.
As my spiral evolved, I also came to also view it as celestial, a reminder that from my small spot on this earth I can see vast, expansive skies. I added sequin stars from a fun tulle fabric, which could represent celestial stars or sea stars.
Thank you, Susan, for taking me on this creative journey.
Robyn Ellis
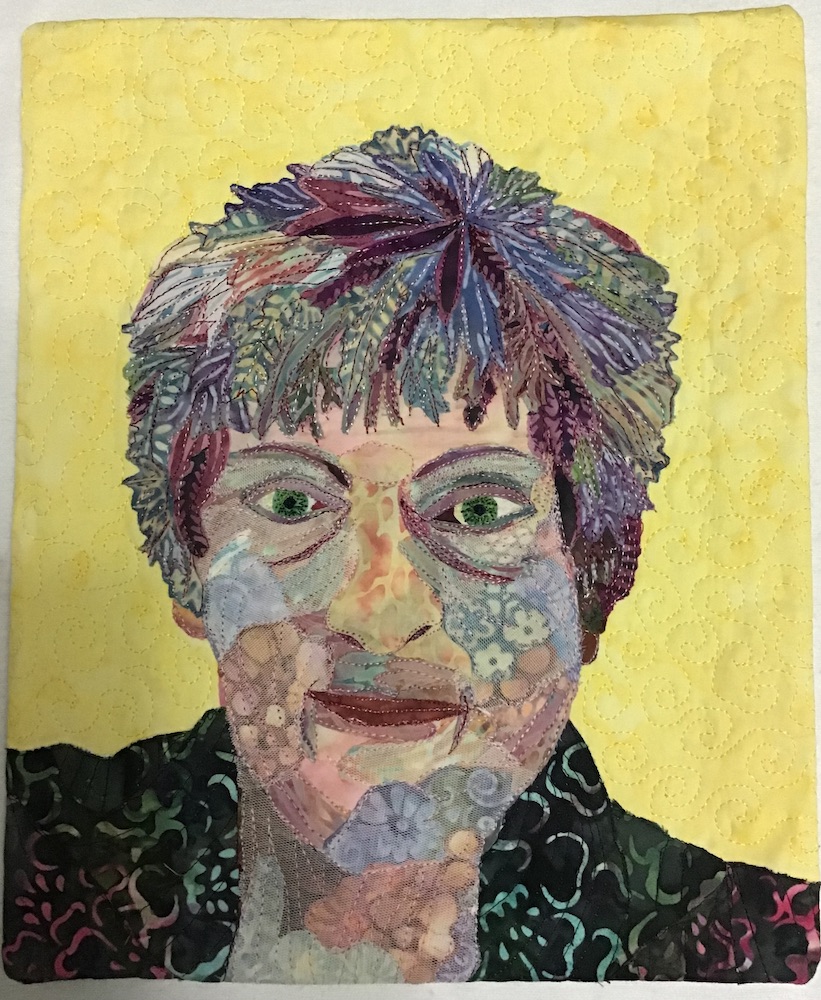
This self-portrait of Robyn Ellis of Sydney, Australia was created by working quickly and intuitively—as a small study of the fabric collage technique and also of herself. Nice to see you again, Robyn! 😉 I well remember Robyn from the classes I taught in Australia (here and here) and am stoked to see the finished collage portrait of her brother—I’m sure it’ll be a beaut! In reading Robyn’s entertaining portrait story, I think she inadvertently stumbled across one of the advantages of pre-cutting your fabrics into smaller shapes—what I call a fabric palette (“Creating a Palette for Fabric Collage“). She says that she started with the hair, took it all apart, took a break, and when she came back to the collage it went together very quickly because of all the fabric pieces she had cut up before. Good on ya, mate!
From Robyn:
My quilt group thought we would have some fun and make small self portraits, having seen something similar of the members at a local quilt show earlier in the year. They could be as whimsical or fun as we liked and we would view them at our Christmas gathering. I needed to get back into the swing, so I would try Susan’s technique. I have participated in 2 classes with Susan, the first of my brother holding that snake (going to be finished this summer fingers crossed) and a red panda that stayed true to colour.


I didn’t have a lot of time to spare, honestly didn’t want to spend a lot of time, so I’ll gladly admit there are many flaws. I’m in the process of playing musical rooms where the main bedroom has just become my sewing room. So time, and finding supplies is a little limited. Furniture and contents have been going up and down stairs and left and right between rooms. I started with a photo, and tried taking it myself using the iPad. That confused me, some were taken at the bathroom mirror, others not. The most common way I see myself is in the bathroom mirror, but left is not left, rather a reflection. Luckily, and by pure chance, I had been to the hairdresser that morning, and the mop was freshly cut and nicely styled. No makeup and I was super tired, not used to packing goods up and down stairs all day. No smile either, dental issues, teeth missing.
I started with the hair one evening, then took it all off the next day. But I had lots of cut pieces now, leaves, branches, petals etc. The next evening the hair was done in quick time, and I mean quick. This was the first time I had used multiple colours in a sizeable area like the hair so this stretched my skills and I loved mixing it up. I started with a fabric that had wavy lines, like fireworks bursting, and then it was a case of looking for the directional lines in fabric patterns of petals, leaves etc to get the shape of the hair correct and there was lots of layering. Easy.


Without looking further for more fabric, I then moved to the face using my limited palette of fabric, and ended up looking like I was bruised and battered. This was meant to be quick and fun. That’s when I discovered the assets of using fine tulle to calm down where I had gone too crazy. I had not used tulle or netting on the red panda, so this was my first try. A deep cream worked best. As I said, this was made very quickly, in fact the tulle, final detailing, full on glueing, background, all the stitching and quilting and facings were all done part of one evening, ok the night before handover. And yes the glue was still, hmm, wet. If it was another quilt, I’d still be agonizing over this eye or that freckle. So as you look at this, please remember that it was a super quick, fun piece and I love my ‘hair’, both the varied colours and the similarity to my actual style. The rest could do with more time.
I am glad I have been following Susan’s blog, as it is amazing how much of her instructions are embedded in and recalled as you work. I love, love the process, playing with fabric is fun, and now I feel I can reasonably make the precision pieces, but also a quick, fun mock-up as well.
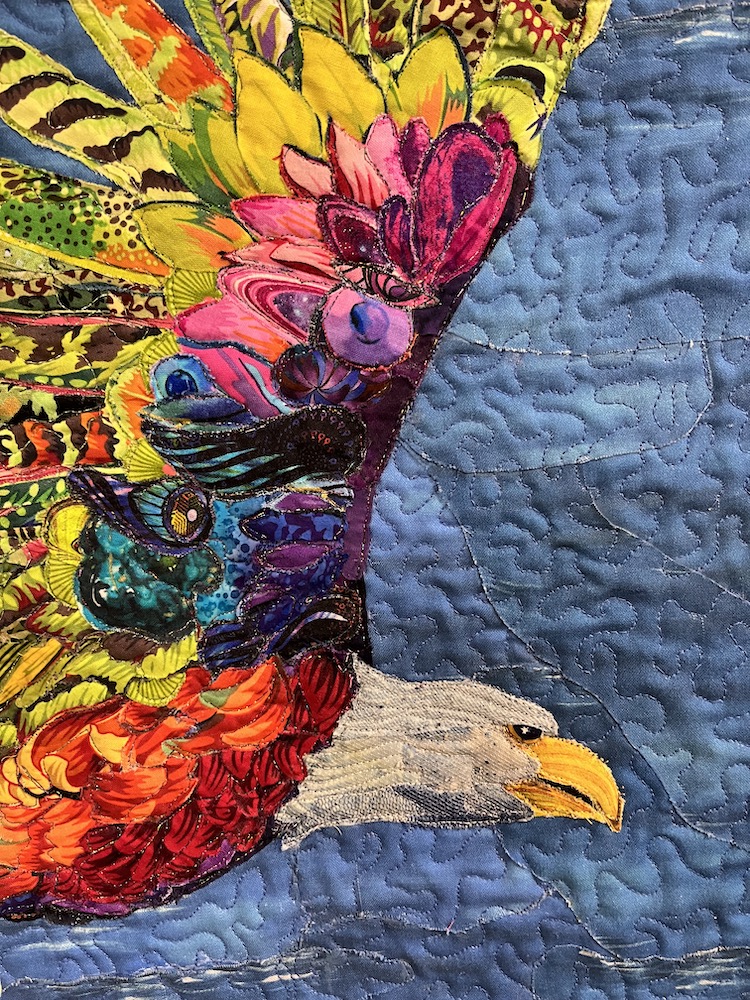
Linda Draft
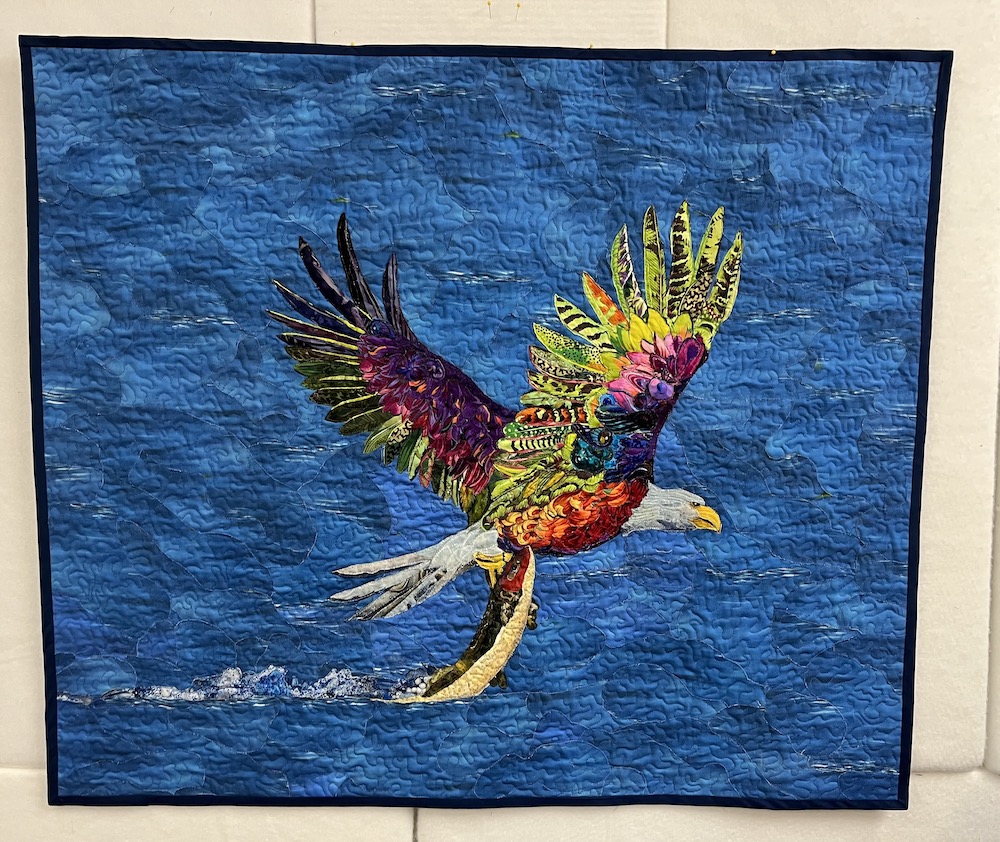
Linda Draft of Kenosha, Wisconsin, says that she “became an expert in ungluing.” Ungluing is indeed a skill that sometimes comes in handy in fabric collage. Another acceptable skill is to simply collage over what is already glued down. Either way works. It was a pleasure to help Linda in the Woodland Ridge class she mentions. I loved seeing how well her subject started coming together—she had prepared well and was ready to get going on this eagle—another example of great use and combination of color, value, and fabric prints in portraying a “realistic” subject in a fantastic way. Beautiful.
From Linda:
I read Serendipity Quilts several years ago and then in 2021 I had an individual zoom session with Susan that made all the difference in my first attempt at Collage Quilting. Starting in January of 2022, I studied all her videos, pictures and text through the Master Class Manual and had the honor of attending a class this past September at Woodland Ridge Retreat. Susan’s ability to teach what she’s learned through her own fabric journey is amazing and made all the difference in my work. So grateful for her sharing her expertise so willingly.


The inspiration for this quilt was a photo by Richard Bagdasarian who gracious gave me permission to use his work in December of 2021. I began preparing to create Scout, drawing the muslin tracing, experimenting with the colors I wanted to use, gathering fabric and deciding on the background. Unbeknownst to me, the quilt would take on greater meaning when in May of 2022, we traveled to Alaska and my sisters-in-laws went on an excursion. While on the speedboat headed to an island, they were offered the opportunity to throw a frozen fish into the water. They did, and an Eagle came swooping out of the trees and picked it up right in front of them, just like in Richard’s photo. So the quilt is a memory of the great times we had. I am so happy with the final result, but that wouldn’t have happened if Susan hadn’t lended her expertise daily during the September class. I can tell you I became an expert at ungluing! (A skill that made the final result meet my expectations.). It was also her artistic ability redesigning Scout’s head that made him an eagle with an eye that’s realistic and worthy of a majestic eagle.


Very inspiring to see the beautiful self-portrait. Both pieces are beautiful. Thank you for sharing!
And I forgot to mention the lovely spiral, a great reminder of how much fun they can be!
Finish lines are always so inspiring. Thank you ladies for sharing the stories of your collage journeys. All of the quilts are wonderful.
Just saw this blog. Been I bit busy Susan. Ian is finished, yesterday, with background, met the deadline. Now ready for quilting and there is a deadline for that too. Nothing like a deadline to move yourself. Thank you for your lovely comments.