
I’ve taught at Empty Spools Seminars at Asilomar Conference Grounds in Pacific Grove, California since 2009. That’s ten years of students—and many years I’ve taught two sessions. At 20 students per class that’s a lot of quilts.
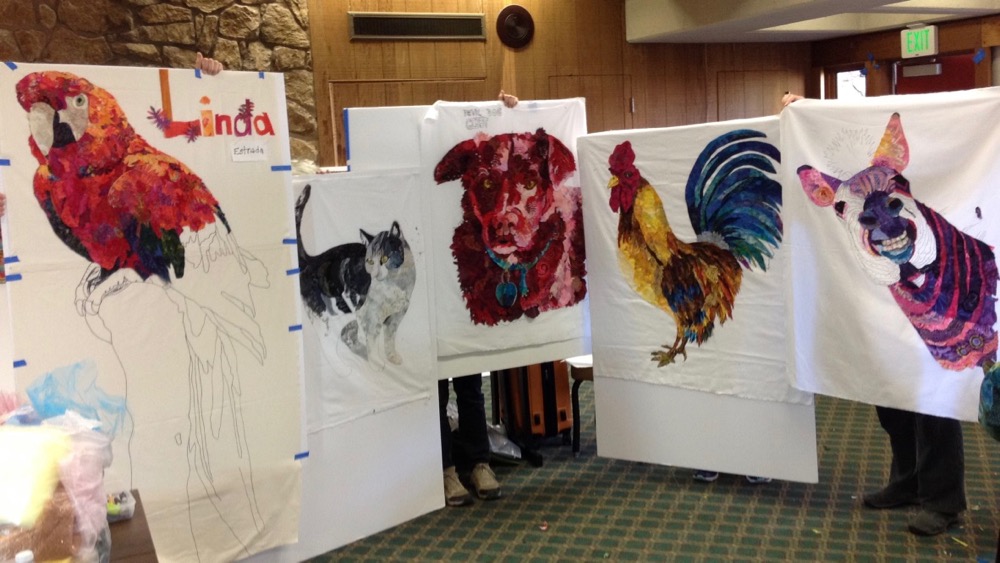
Well, a passel of these now finished quilts were brought back to Asilomar this past month—April/May 2019 (see week #1 here)—to be shown on stage by their creators, during a Show-and-Share portion of the evening activities. Over the course of the two weeks, there were (more than) enough quilts for their own Finish Line blog post—two posts actually! The ones included here in Part 1, are half of those I got to see up close and personal. I know there were a few more quilts I missed the chance to see again and was therefore unable to get finished quilt photos. Hopefully those folks will send me the photos I missed and I’ll get them included in the Empty Spools Part 2 Finish Line post.
And that goes for anyone who has a finished collage quilt from one of my classes or books or online master class manual—send me photos for a Virtual Show-and-Share!
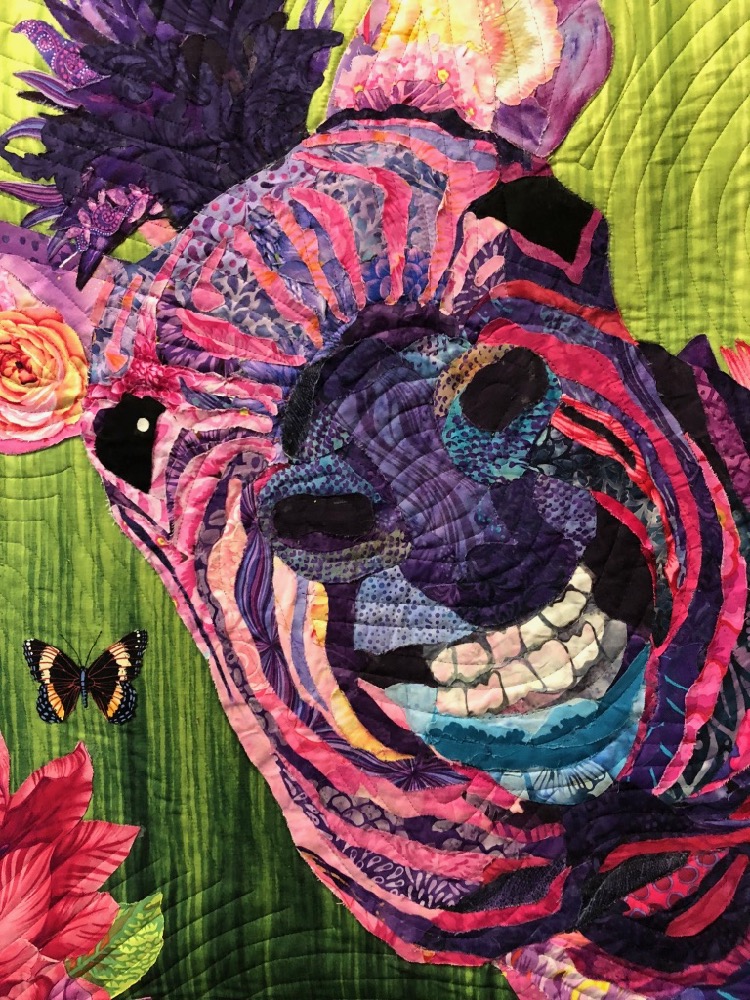
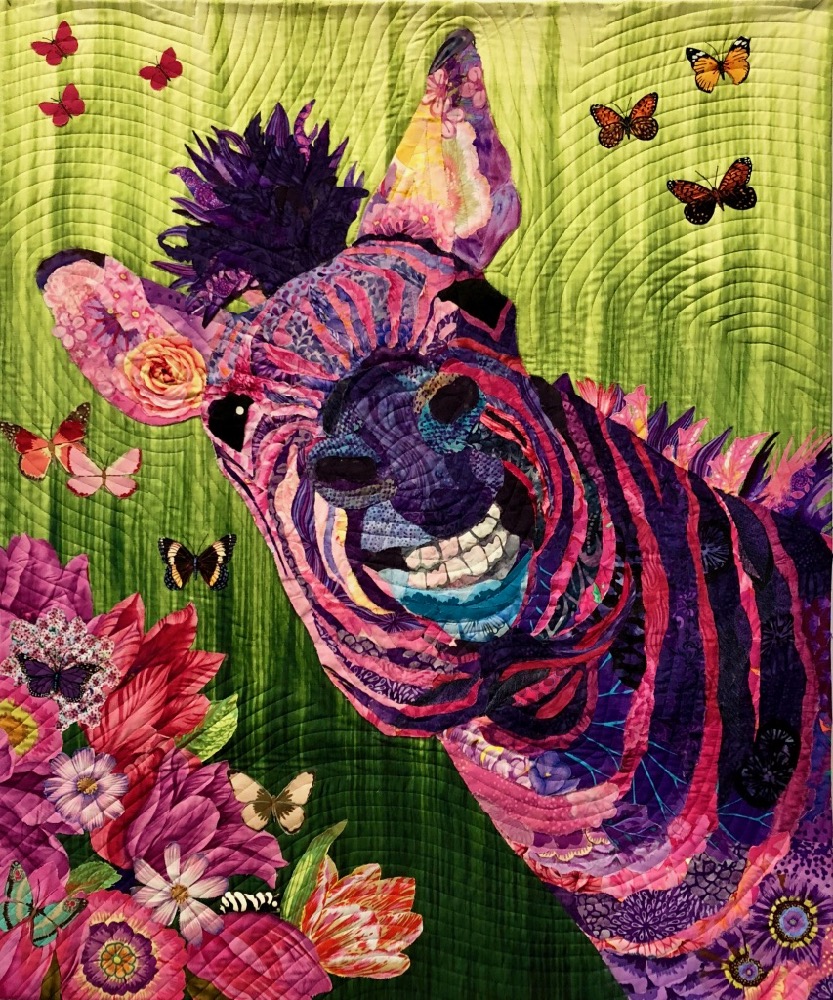
Lynne Todoroff (pictured in photo above) attended an Empty Spools class I taught last year in March 2018. Her quilt of Zelda Zebra and those of five of her classmates will be the ones featured in this Show-and-Share Part 1 Finish Line post.
Lynne Todoroff
Lynne’s collage is based on a photograph her husband took on a trip to Botswana. She reports that he’s very pleased with “Zany Zelda.”


Early this year, prior to seeing her at Empty Spools, Lynne sent me an email:
I have finished Zelda. I think she’s great and worth my struggles. I have learned plenty! But I’m always amazed at how my knowledge escapes me when I’m faced with a new (outside my comfort zone) technique. Always good to review to apply next time. I need many next times to get a handle on the glueing technique. Initially I used too much glue to tack pieces and then final glueing didn’t hold for some reason??? Zelda is very stiff and from a distance you don’t see the frayed edges. More practice cutting or handling pieces to reduce the fraying. I faced her rather than using your suggestions of collage or mounting on a frame next time I’ll think harder. The meat hammer came in handy to pound the edge.
I know the struggles my students have shouldn’t make me smile, but sometimes they do. The vision of taking a meat hammer to a quilt binding is a good example.
When I saw Lynne and Zelda again in person, we figured out at least part of the problem—and this is a good point for any glue-wielding collage quilter. DON’T block your quilt with water to square it up. This is water soluble glue I use and teach with, even a nice hot steam pressing can be a problem, which I found out for myself one time and was therefore able to diagnose Lynne’s problem this time. Learning how much glue is needed is part of the learning experience, but by blocking the quilt she not only released the glue, but dissolved it into the fabric and in the process stiffened it. Hence the need for a meat hammer.
I enjoy your blogs so much especially seeing how artists choose backgrounds. I must have an extra 10 yards of auditioned backgrounds😂 but that shouldn’t worry a quilter. And I’m starting to “see” fabric differently. I recently read a phrase, “Photography is the art of observation. It has little to do with the things you see and everything to do with the way you see them”—Elliot Erwin. I believe it can apply to fabric as well. Maggie and I will be attending Asilomar again this year the same week you are teaching. Zelda will be coming and I hope you have a chance to see her “up close and personal.” Many thanks for your guidance.
Robin Rose
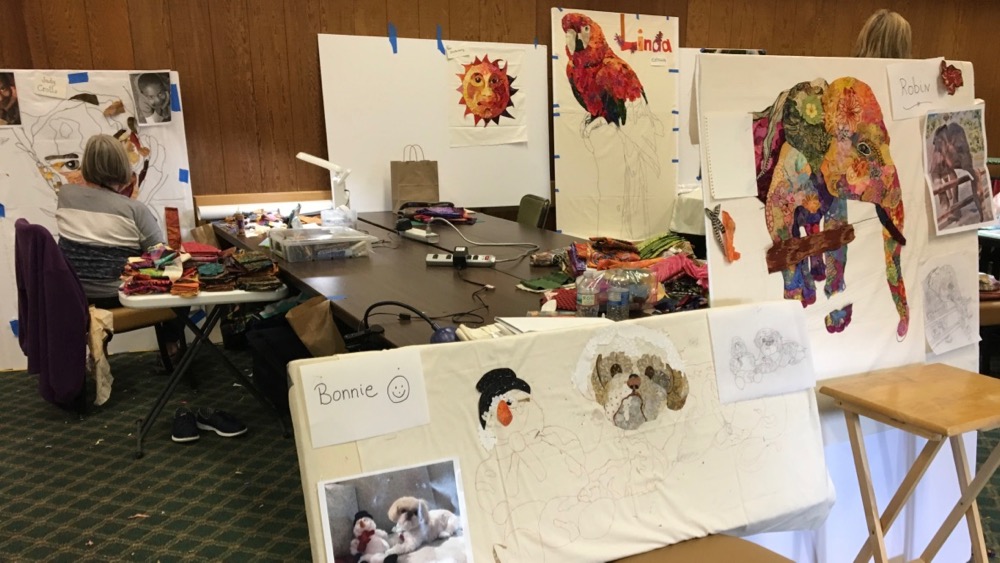
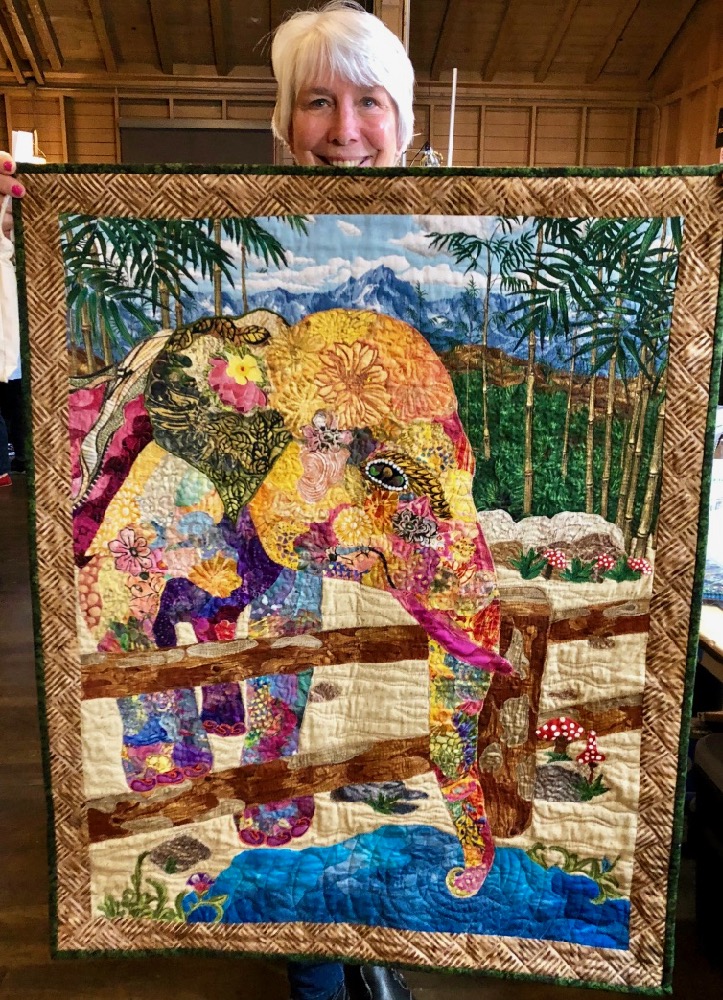
When Robin Rose showed her quilt of Mona the elephant on stage this year, she explained that she had arrived in my class last year prepared to create a grey elephant. Then as I circled around the class, I placed a cut-out flower on Mona’s forehead. The rest is history. If that’s all it took to put Robin on the path to give Mona her uniqueness, I’m pleased to have played that part.


From Robin:
I met and took a photograph of this elephant whose name is Mona when visiting Bali Indonesia in 2016. I took Susan Carlson’s class at Empty Spools in 2018. I believe it was Session 3. Mona has sparkly toile that Susan gave me for her head. I also added more on her tusk.
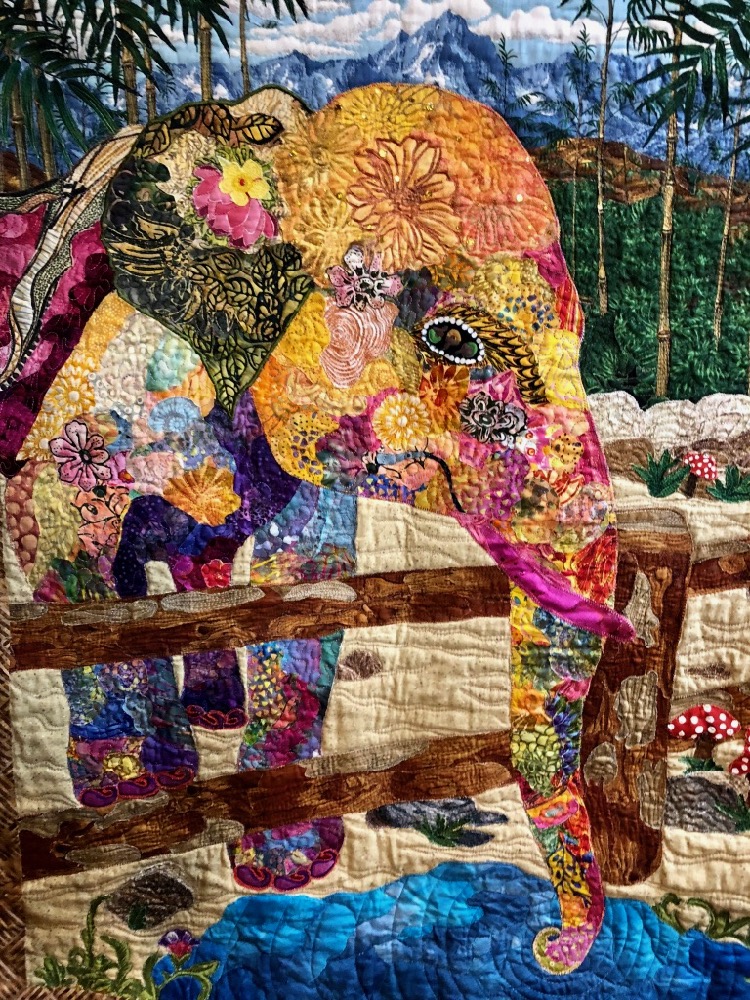
The mountains in the background came from an old panel I had with koala bears. I cut out the koala bears. The background is sort of representative of the mountainous areas of Indonesia. There was a pond behind Mona in the original photo, but I liked it better in front.
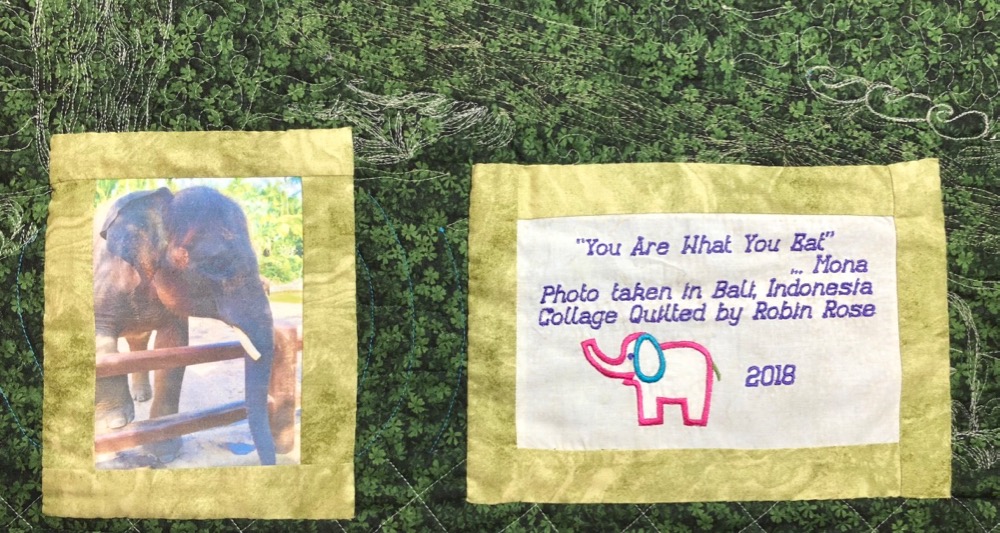
The back and labels which pretty much explains the mushrooms :). “You Are What You Eat.” My husband said the mushrooms justify a psychedelic elephant. I painted her toenails [below] with glitter nail polish. She was a delight to recreate in Susan’s class and beyond.


When I saw Robin again at Show-and Share night, I got the photo below and the detail photos above, with Robin pointing to a couple more things Mona has “ingested”—a cat and a can of cat food.
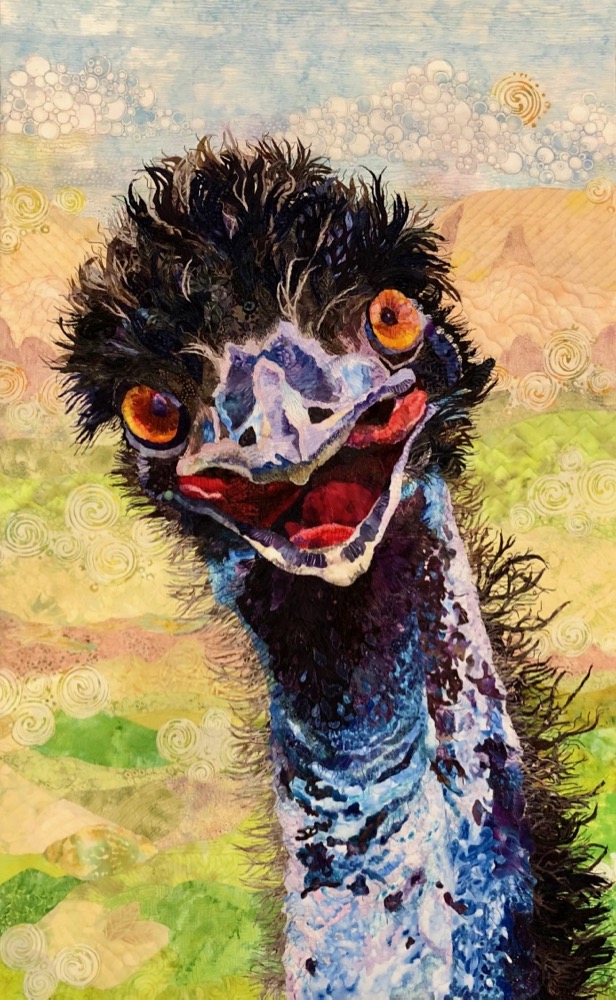
Melissa Sobotka
I had the distinct pleasure to meet Melissa Sobotka for the first time in class last year. Melissa is an award winning artist, a fellow art quilt instructor, and as I soon found out, a lovely, lively, and very fun person to be around. I got to spend a little time with her again this year as our teaching schedules at Asilomar overlapped on one of the weeks—and I look forward to the next time our paths cross.
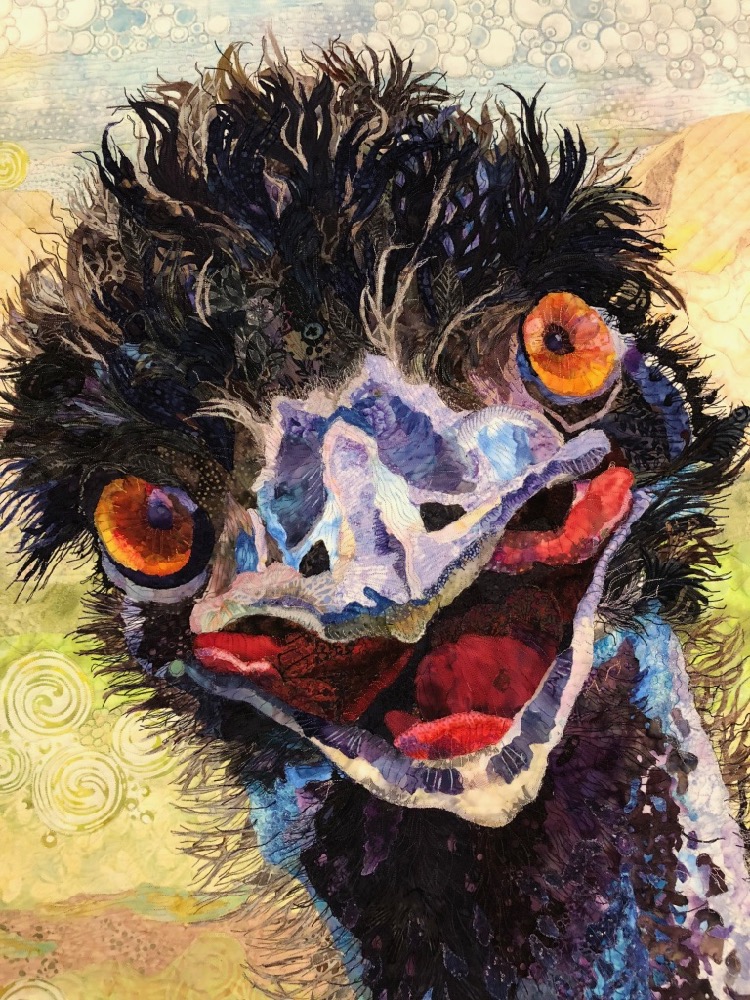
Melissa’s collaged emu inspiration was from a photo she took while teaching in Perth, Australia. As coincidences go, a month after class in April 2018, I traveled to Perth, Australia myself and probably saw this same fellow in the same wildlife park. He wasn’t as personable toward me though. As Melissa wrote to me:
As I tried to photograph the Emu, the animal awkwardly walked towards me, I said, “Hello Gorgeous.” It was at that moment that it tilted it’s head and posed as if to say, “Are you talking to me?”


DaVinci’s work has always been a great inspiration for me. Especially his studies of the ugly and the profane; the common man. I believe there is beauty in everything, even that which we may not perceive to be beautiful at first glance. This animal which looks prehistoric had so much personality, he made me smile. I hope he makes the viewer smile as well.
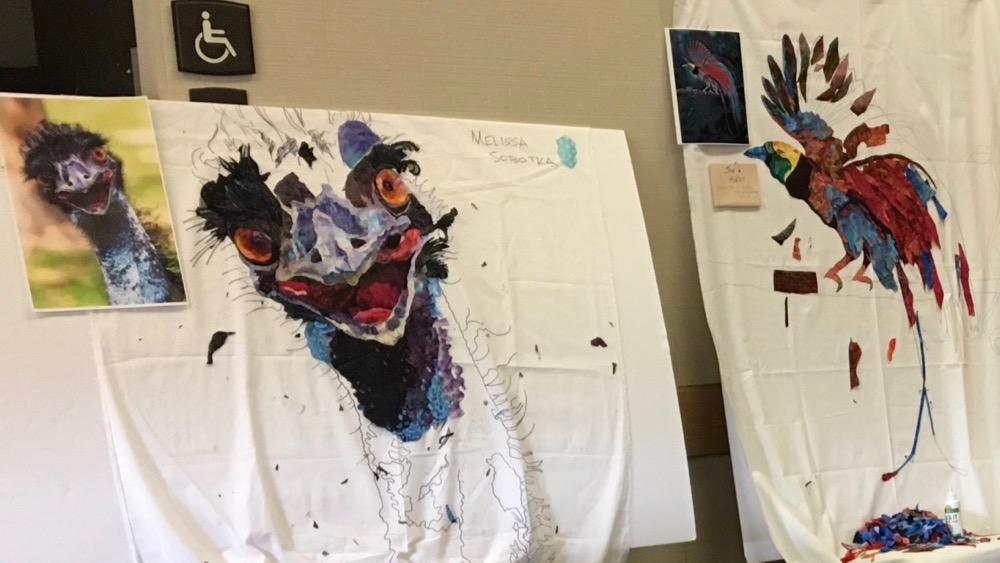
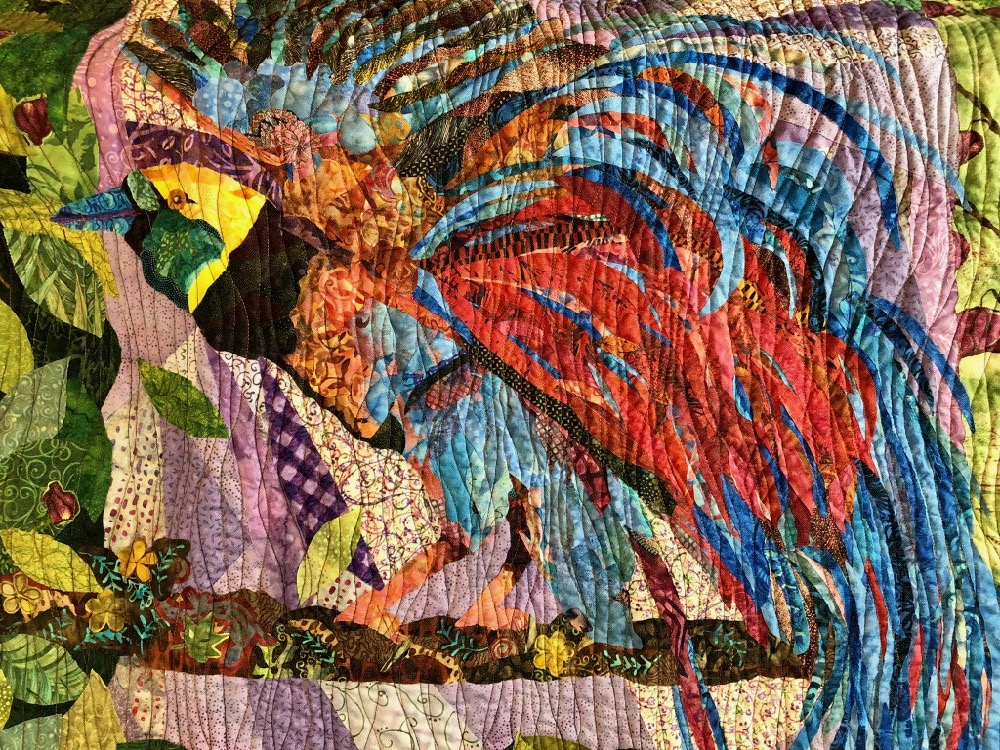
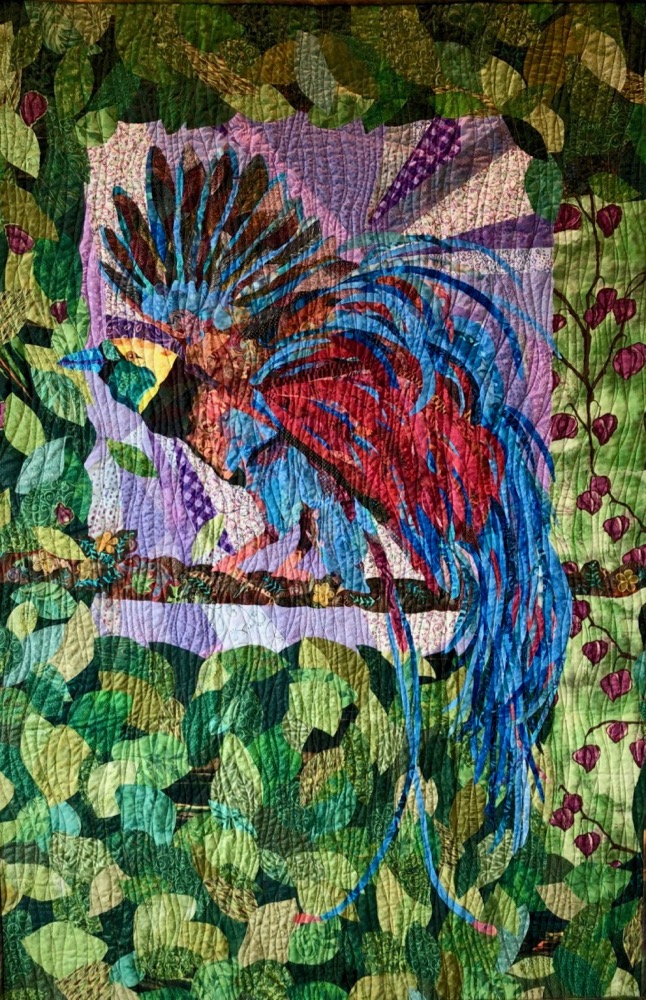
Jan Avent
As Jan was preparing for class, she sent me photos of five different Birds of Paradise, all amazingly beautiful and ones she had seen and photographed on a trip to Papua New Guinea. She said it was the, “hardest bird watching ever but so rewarding to see these magnificent birds.”


Jan’s bird was still in its formative stage as are most collages at the end of a class, above. But seeing it this year, Jan had not only finished the bird, but created a lush and colorful environment for him to live in, as he should.
Here you go! It’s a male Raggiana Bird of Paradise I saw on a bird watching trip to Papua New Guinea 4 years ago. The quilt is named “Waiting For the Ladies.”
I’m so glad you got to see it. Such a fun class and what a range featured on stage this year.

Linda Estrada
The last two quilts in this post were also shown on stage at Asilomar this year and were also begun in the same class as the ones above. So I’m including them even though they’ve also been in past Finish Line posts.
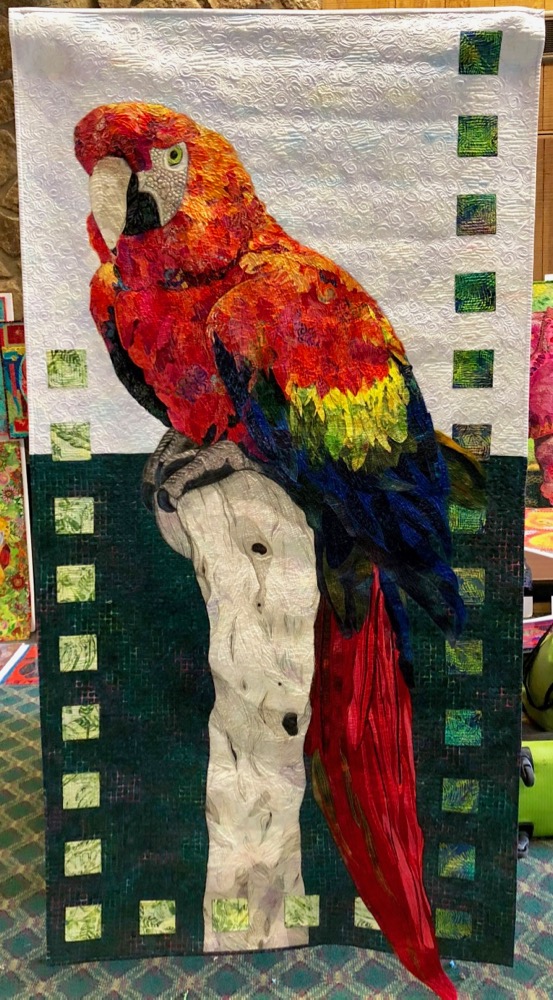
Linda’s very big bird was part of my second “Aviary” Finish Line post from the end of last year. I’ll let you link to that post to read all about “Mr. MaCaw,” shown as she began the collage in the photo below.
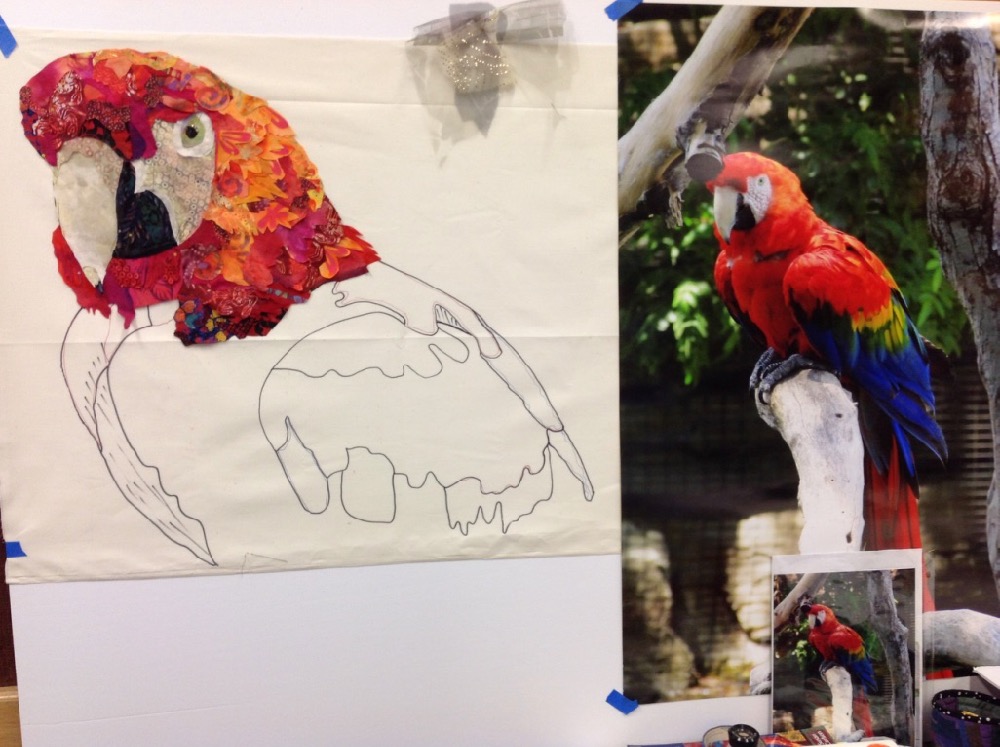


Since I was able to see him in person a few weeks ago, I took a few more photos to add to the previous post. Above right, is a detail of the interesting way his tail extends beyond the bottom edge of the quilt.
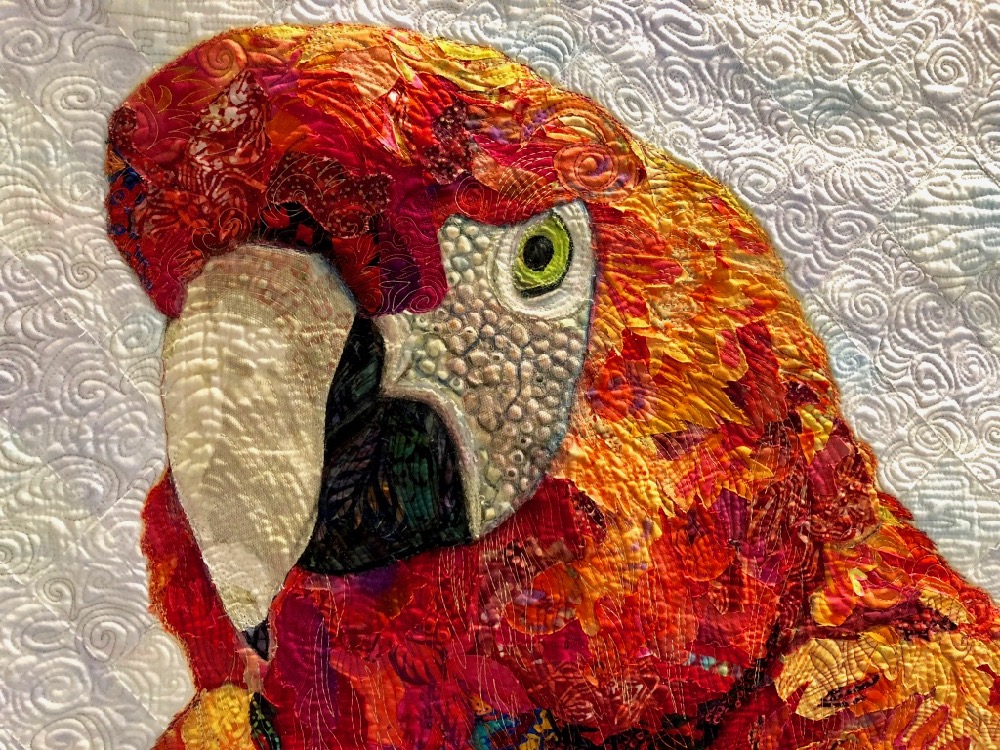
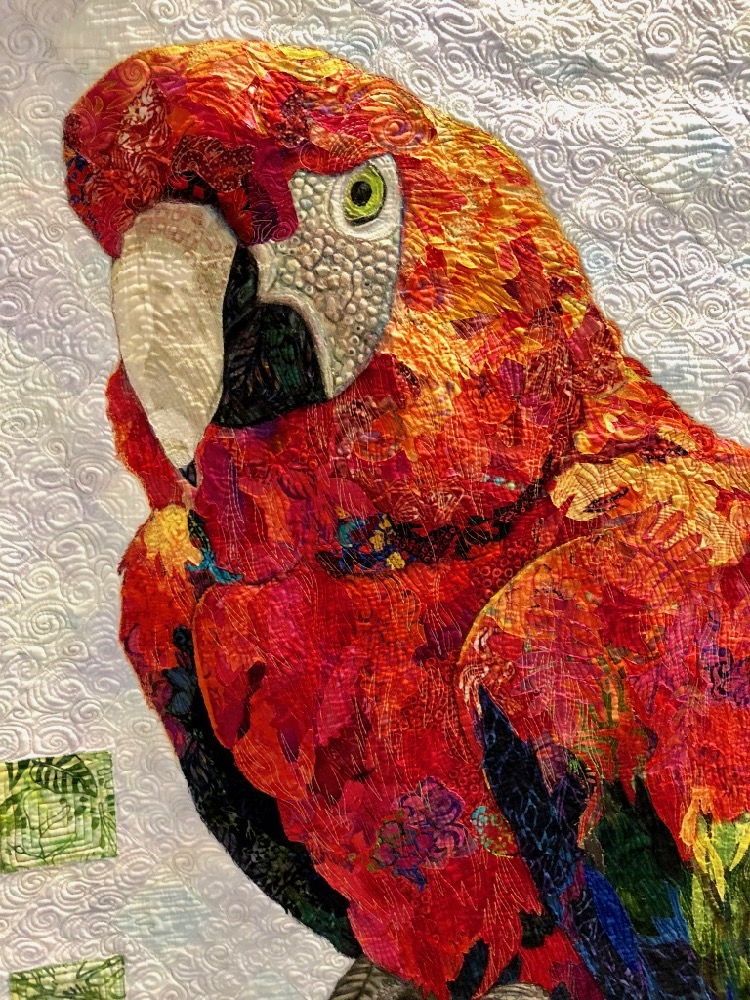
Below, you can not only see the feather details but also how Linda’s quilting added to the facial texture. And what she pointed out to those of us looking closely at this quilt, was the background. Linda wove a lattice of strips of different white fabrics giving a subtle color and texture variation to an otherwise “empty” area. Details easy to miss when you’re faced with a six-foot bird.
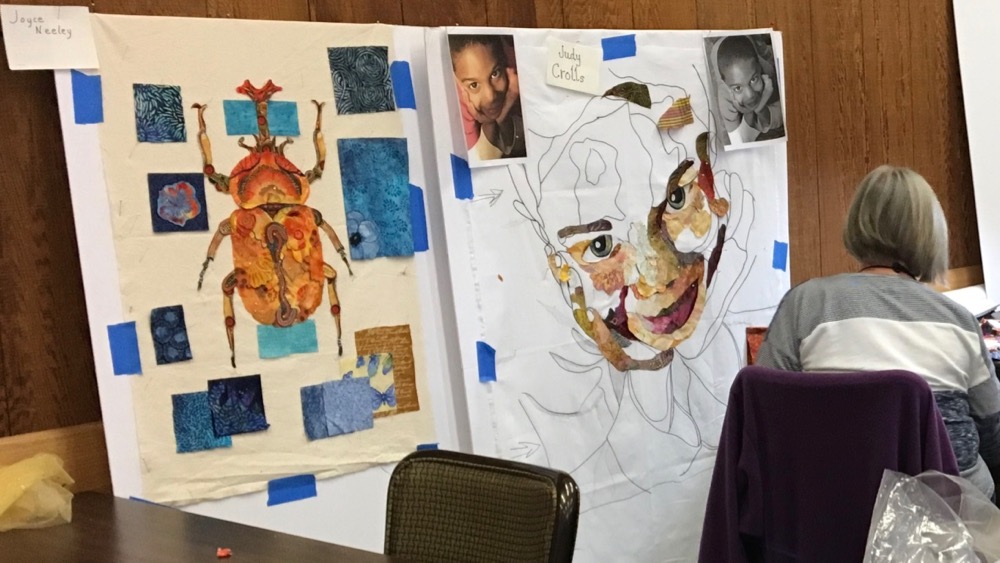
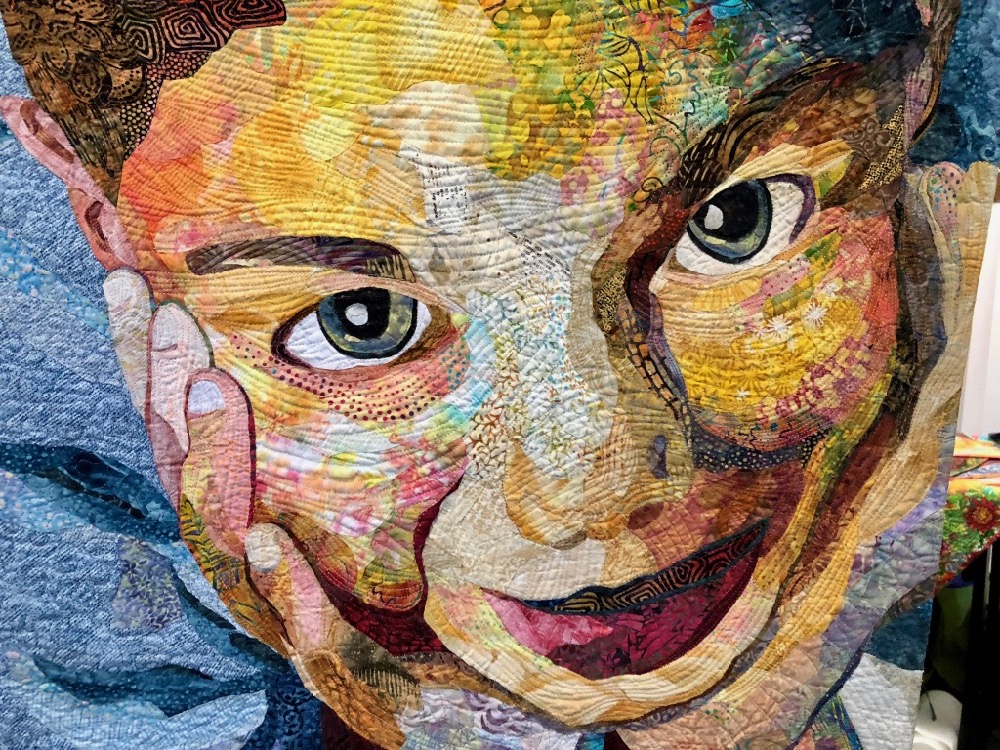
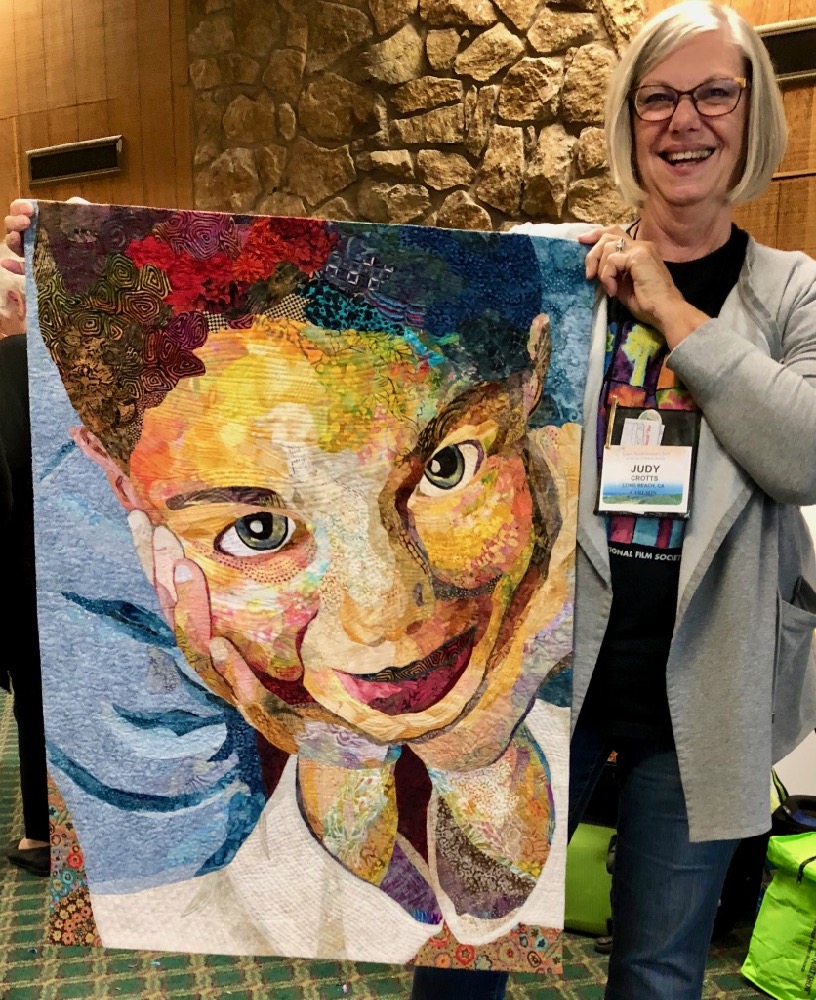
Judy Crotts
And to wrap up Part 1 of this special Show-and Share post, is the quilt of Corbin, Judy’s grandson. Not only was Judy in last year’s class with me, but also in this year’s second class of mine at Asilomar. You’ll see her again next week in my “On the Road—Part 2” post, working on more family members (fur-babies this time).
“Through Corbin’s Eyes” was included in the Finish Line—Road to California Showcase from February of this year. Again, I’ll let you link to that post to read more—the beginning of the quilt is below.
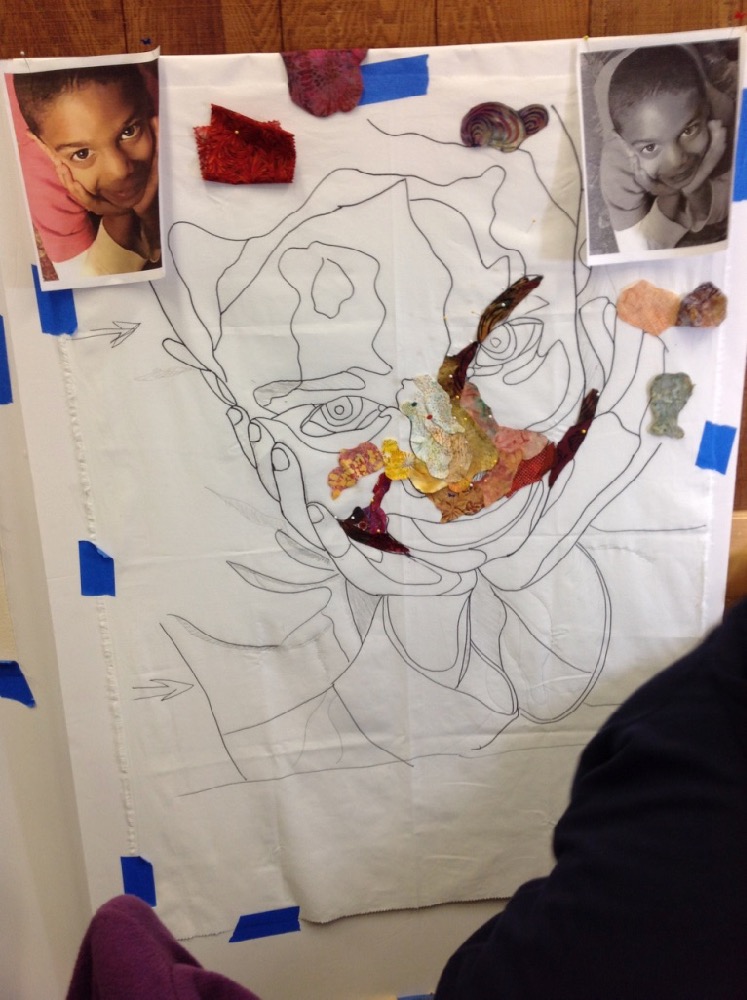
During last year’s walkthrough, Judy remained in the classroom (below) to work on Corbin’s portrait as long as she could.
An extra detail shot below to add to the original post.
Thank you Judy, and to all the past students, who got up on stage at Asilomar—and now on the virtual stage—to share your quilts with us,.
More Show-and-Share continued in Part 2, in two weeks.
It’s so inspiring to see the before and after photos. Everyone’s work is so beautiful! Thank you for sharing! I’m registered to take a class with you next year! I can only hope to create something half as fabulous as these girls! Good job everyone!
Melissa’s emu is absolutely splendid! The elaborate cutting of the fine feathers adds so much to the final result. To be very proud of.
Awesome,,
Stunning works! These gals are to be applauded.
I think the zany zebra is one of my favorite collages. It is so joyful . It made me smile. I love the use of the background.
I also noticed the use of flowers instead of whiskers. It inspired me to go back and work on Stinker so more this weekend. Thanks for sharing, Bambi
Wow! Thank you for sharing such inspiring work!
When I started viewing these I immediately said to self, “Zany Zelda is my favorite”. But as I read through, each subsequent collage became my favorite. They are all fabulous! Susan, you deserve a lot of credit for inspiring so many wonderful works of art.
Your students’ works are AMAZING as are you Susan!!! BRAVA to all!!!