
Another year, another fabric collage milestone.
Last March, 2018 I launched the Fabric Collage Master Class. This was my attempt to distill as much as possible of what I knew about fabric collage into one online learning resource. I used text, photos and especially video to lead users through the fabric collage process.
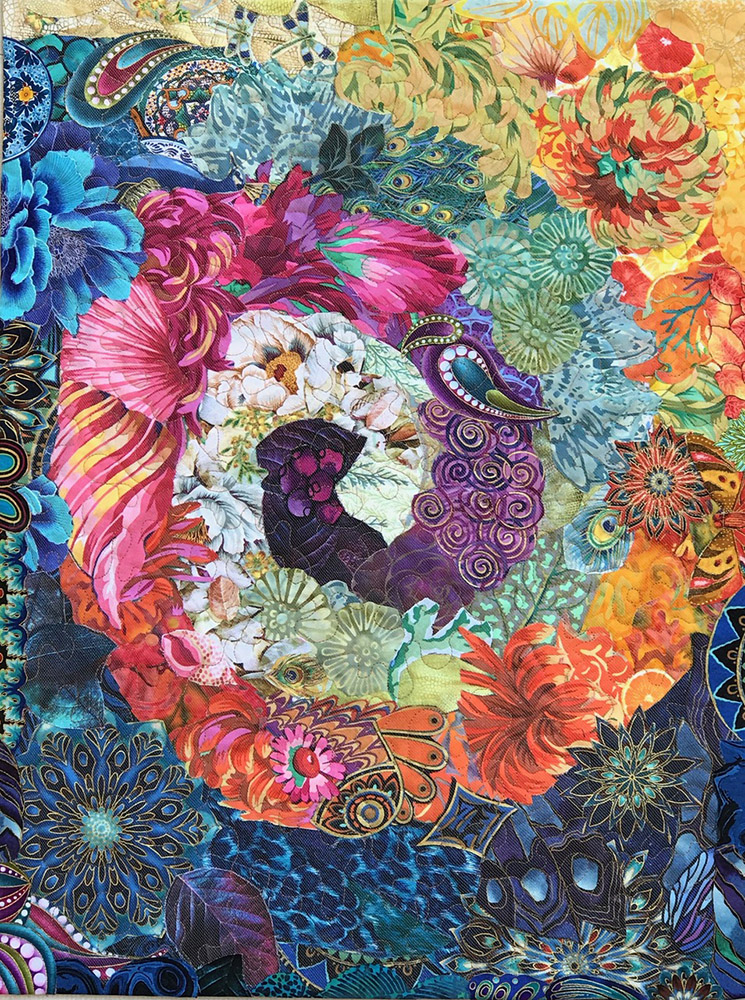
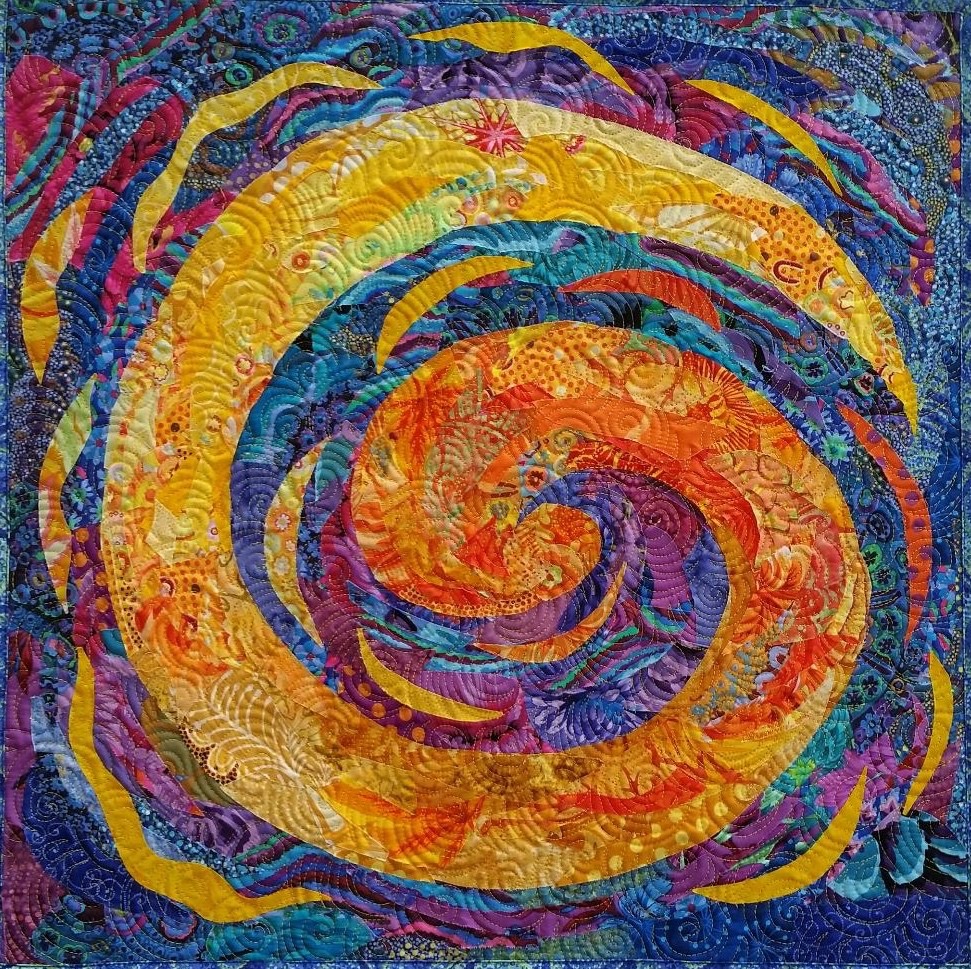
For this post I asked users of the Fabric Collage Master Class to submit their work. Their submissions range from examples of the spiral exercise that accompanies the Master Class to quilts based on my patterns to quilts of their own original design, such as the triple portrait above, “Selfie with a Brownie Camera,” by Christine Earl.
Each is splendid in its own way. And I am of course very proud of how well they turned out. But I am mostly proud of how self-motivated each of these quilters was. No matter their prior experience or the difficulty of their subject, they all persevered through the challenges that everyone experiences when learning something new.
Each artist below provided me with a short write-up of their experience or description of their quilt. So I’ll let them tell you their stories. Click on any smaller images to see them larger.
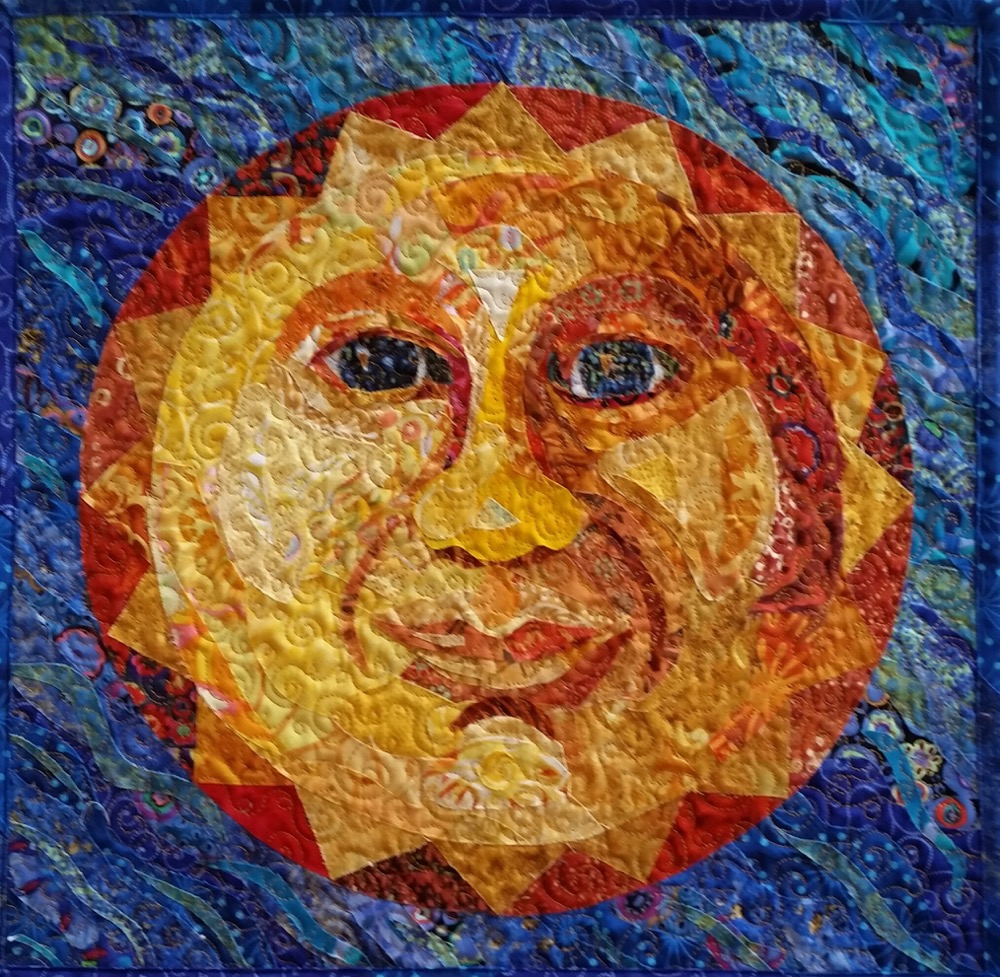
Paula Dean, New Kent, Virginia
“I joined your Master Class this past fall and have enjoyed the journey. I am an art quilter and usually work with my own painted/dyed fabrics. I have some past experience with fabric collage but your class really took me to the next level.
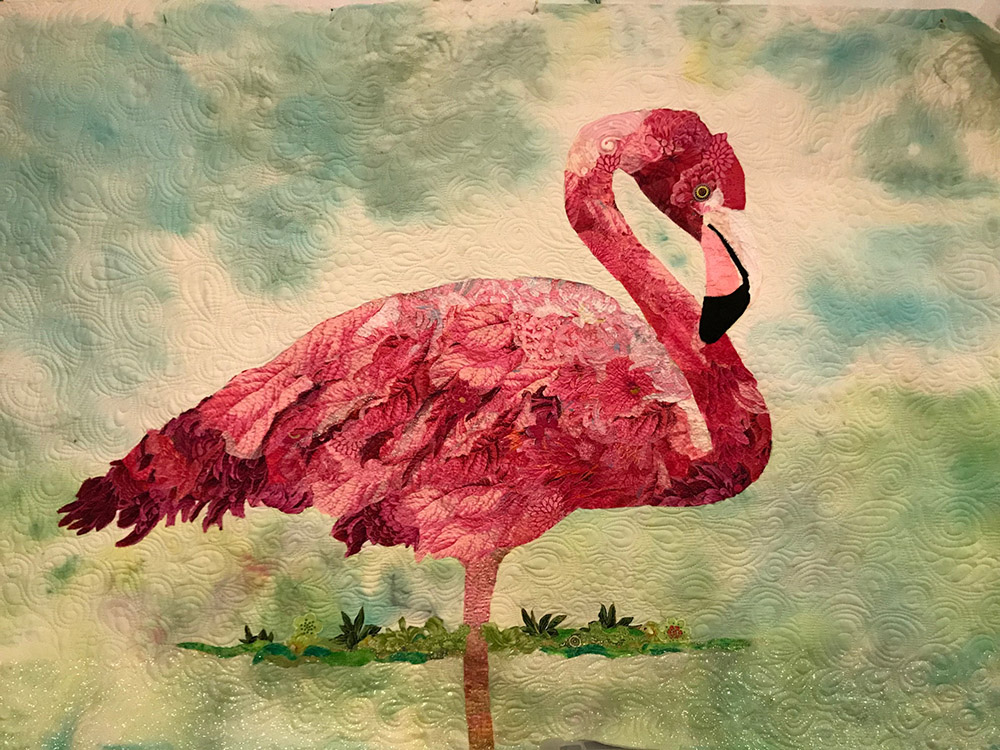
“This is Foofie. She is the first of two projects I started since joining the class. Foofie is named after my quirky great Aunt who was named Ruth but the littles ones could only say Foof which morphed into Foofie. If she could have been a Pink Flamingo she would have.”


“My process is to collect inspiration photos from various trips and also photos my daughters take. I like to draw my images many times before beginning a project so I am familiar with all of the angles. The background is hand painted and was completed after collaging.”
Christine Earl, Ladysmith, Vancouver Island, British Columbia, Canada
“I created this piece while taking Susan’s Online Master Class. I have the Serendipity Quilts book and have done spirals, a couple of suns, and one or two others using her techniques before taking the course. The course is where I started using the glued collage technique as taught for the entire quilt. I’m glad I did because practice helps and I now feel confident with the glue bottle!”


“I’ve done several more since taking the class last year. My inspiration for this is a family photo dating from 1952 or 1953. It’s a selfie of my Dad, his twin sister and her husband (or fiancé depending on the actual date it was taken). My Dad, Tom, on the right and my Uncle Jackie on the left are sharing the tasks of pressing the shutter and holding the camera steady, and Auntie Hazel is in the centre. They have their arms around each other and Hazel is getting squished with her glasses all askew. She looks really happy being surrounded by her two of her favourite men, and I think they are all having fun with the camera, not knowing how the photo will turn out.”
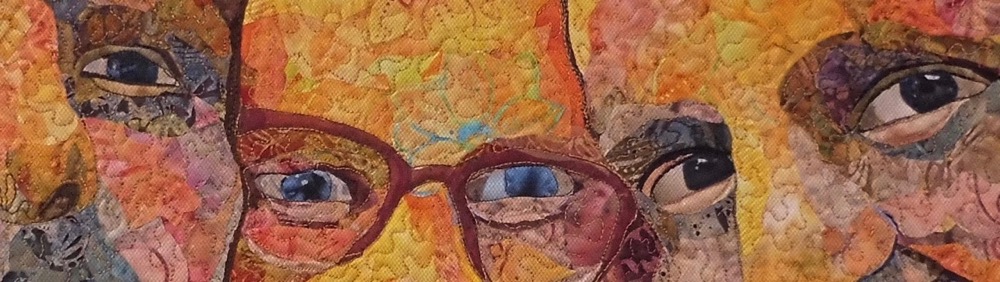
“My Dad developed the photo himself and the original is about 2 inches by 3 inches and a little blurry but I decided to forge ahead anyway.
“There’s more about this on my blog quiltiqhttps://quiltiquity.com/2018/06/06/more-from-the-brownie-camera/ and https://quiltiquity.com/2018/06/18/portrait-completion/.”
Dawn Erikson, Chapel Hill, North Carolina
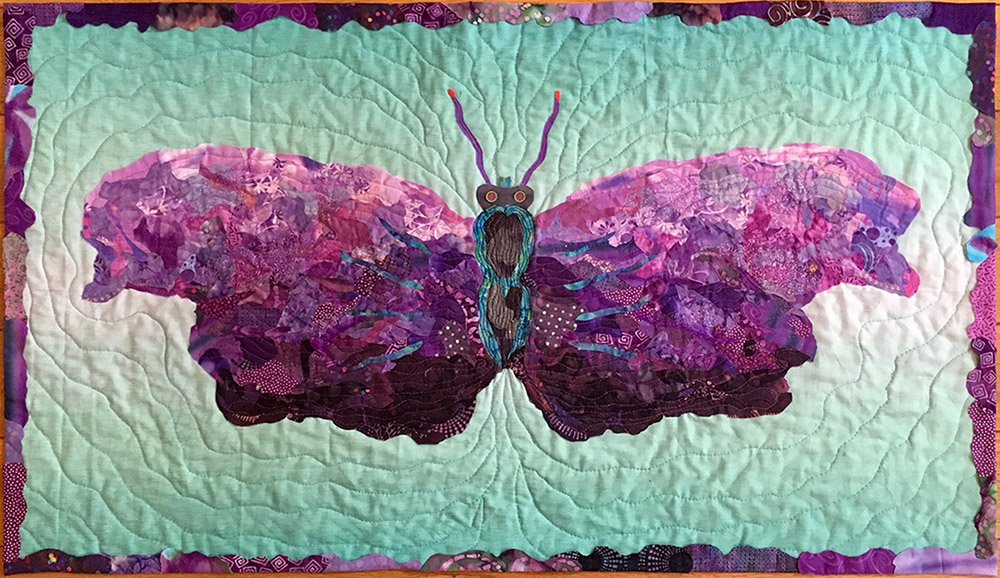
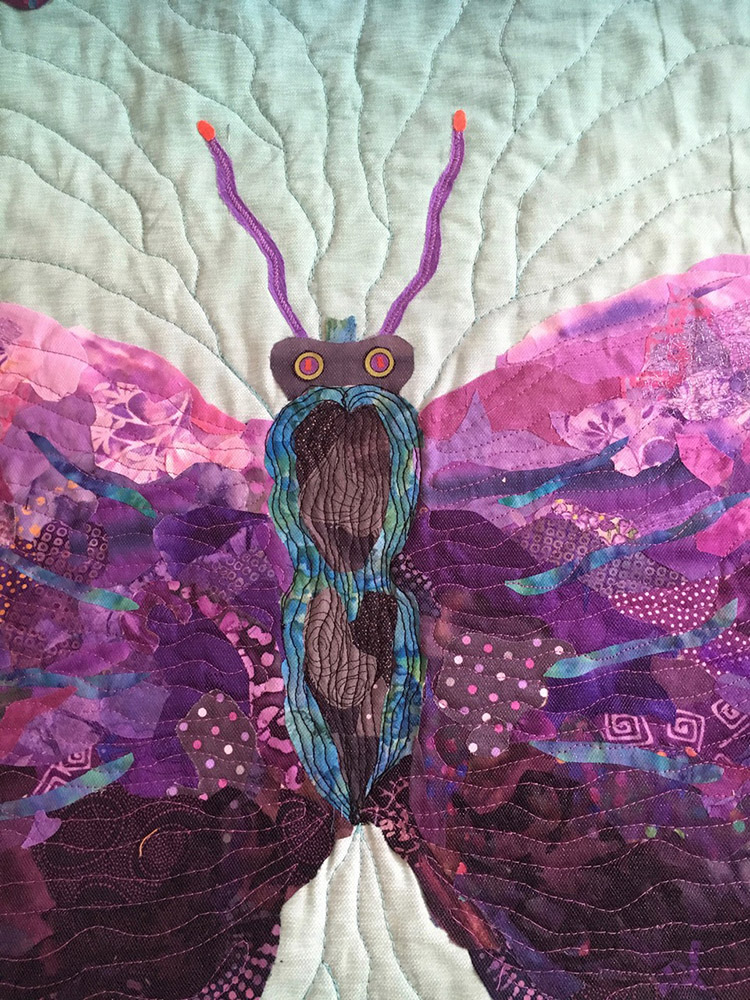
“I created this quilt as practice of Susan’s technique in anticipation of a retreat I would be taking later in the year. I wanted to be familiar with the technique of creating a fabric collage quilt so that I could get as much out the retreat as possible. This is my second fabric collage, after first doing a spiral from the manual’s instructions. This is from Susan’s pattern Billowing Butterfly and I think it appears billowing and a bit haunting, so it is titled “Haunting Beauty.””
Suzie Hall, San Jose, California
“I’m a mid-level quilter and have been quilting for 20 years. I fell in love with Susan’s book years ago and was thrilled to find out about the Master Class. My first attempt at a collage quilt was a year ago when I took a class from Lisa Walton, and was introduced to collage using fusible material. Susan’s Master Class is my first foray into collage quilts with this particular [glue bottle] method.”


“The process was frustrating and freeing all at the same time, turning out to be a good lesson in attempting not to be “too planned.” I started with the class exercise —the spiral—and when I finished the top, I was so jazzed that I moved onto a larger piece before I finished the spiral.”


“Thoughts: 1) I completely understand why batiks are a good option as I had lots of issues with fraying. 2) You need to have access to lots of fabric in order to get more interest in the piece (I guess I have a lot in my stash). 3) Learning to glue is an art. 4) It was too easy for me to fussy cut designs and motifs, and so I felt I took more of a simple/easy approach to both the swirl and my second project, the lemon slices (have not included pics). I think the true art form is actually creating texture and shading from your fabrics and not necessarily rely on just the motifs to do all the work—a la Susan’s approach and style!”
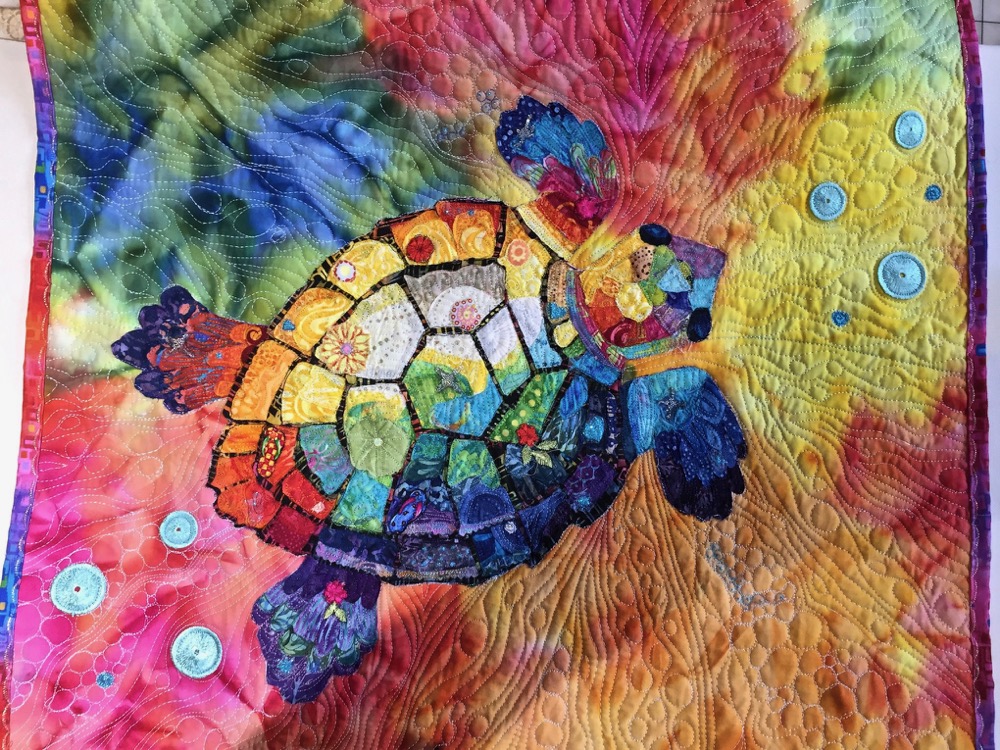
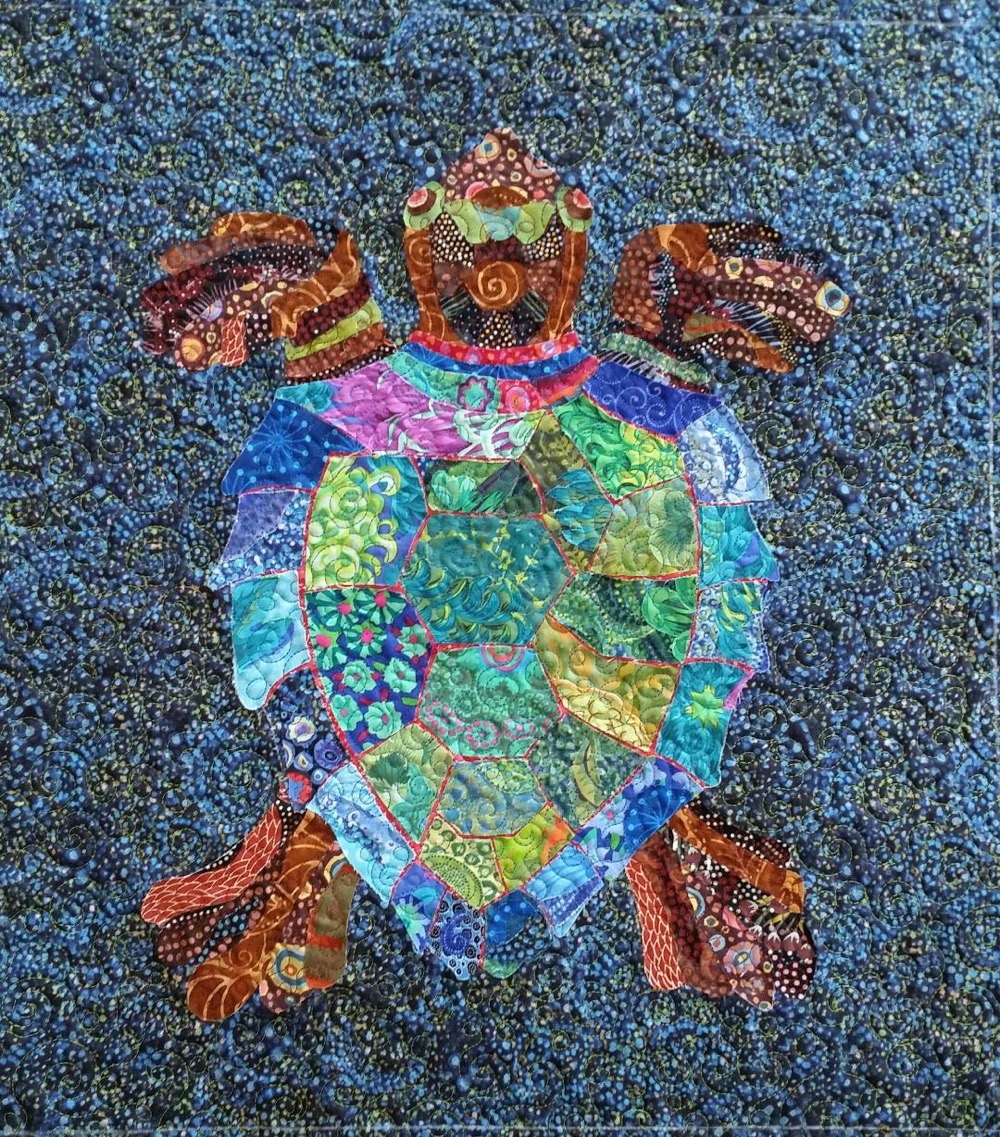
Nancy Hayes
“This is my beginning attempts [below] at the turtle. I decided to go colorful, so I used so colored pencils to lay out where I planned the color changes and then went to work.”


“I wanted bright colors and layers so I think I got it. I’ve included photos of the whole project and a few close ups of the piecing and quilting.”


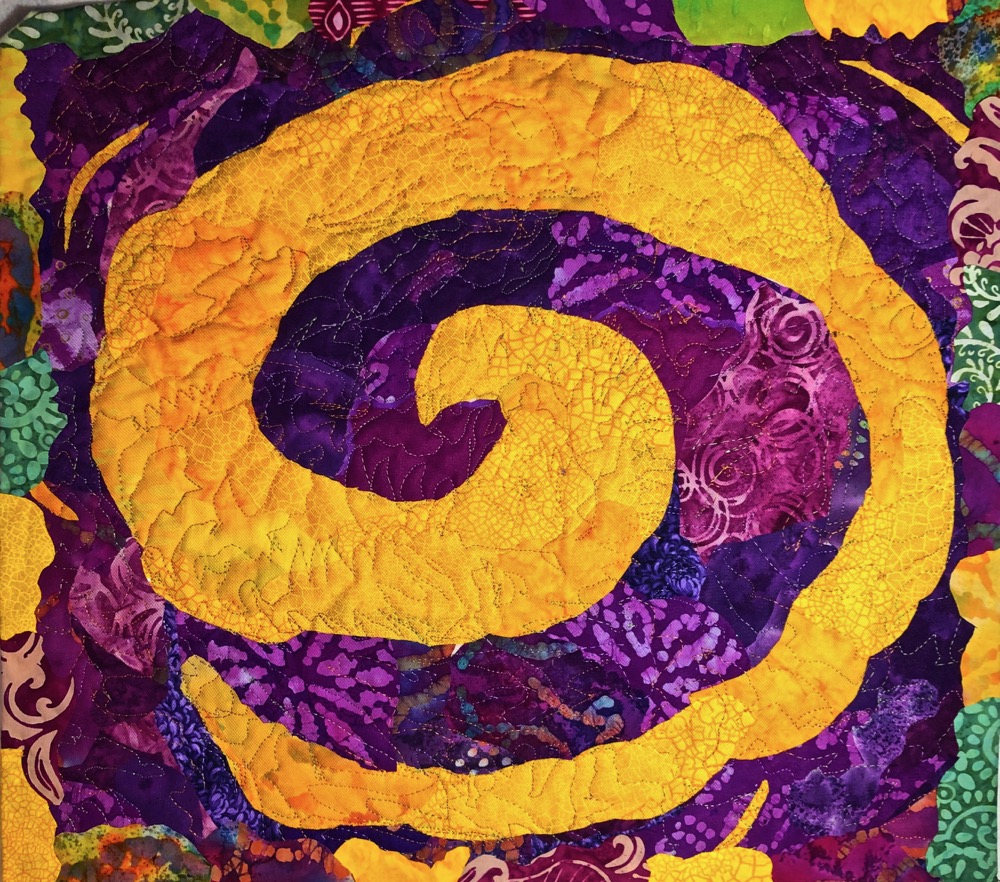
Dale Johnson, Esmont, Virginia
“My Spiral is named in honor of my Mom Margaret, who passed in October 2018 after a long journey with Alzheimer’s. The title is “Mom’s Journey” it is 18×20 inches with one of the corners a little rounded. It was completed on March 4th, six months to the date of her death. Wow, that was not planned!”


“This is my first design using the process which Susan teaches. I have found it to be liberating and healing for me. My first attempt also in free motion quilting, and as I was doing so I found myself quilting in and out, and around just as my Mom’s Journey was for 10 years.
“I am so grateful that my husband honored my request to have this Master Class as my 64th Birthday present.
“Excited to see how my Sun Portrait progresses! Love the beginning of my new journey in quilting!”
Kathy Kennedy, Llano, Texas
Various Quilts
“My beginning journey into collage quilts from Susan’s book, “Serendipity Quilts.” This was very fun to me and relaxing while being challenging at the same time.”
“This was a lot harder than the spiral. I took lots of photos to see what was wrong and also got my hubby, who is an artist, to take a look and tell me what he was seeing. He was very helpful.”
“I wasn’t real happy with the results of this one, I used the fabric on hand and wished I had extra money to buy different fabrics. But it happily hangs in my 7 year old granddaughter’s bedroom now!”
“I wasn’t happy with how he turned out because I don’t like the background that I ultimately chose. It was fabric I had on hand and wasn’t able to purchase new fabric. I donated this to our local Art Guild’s silent auction and it did make some money for them. So I guess that’s a good thing.”
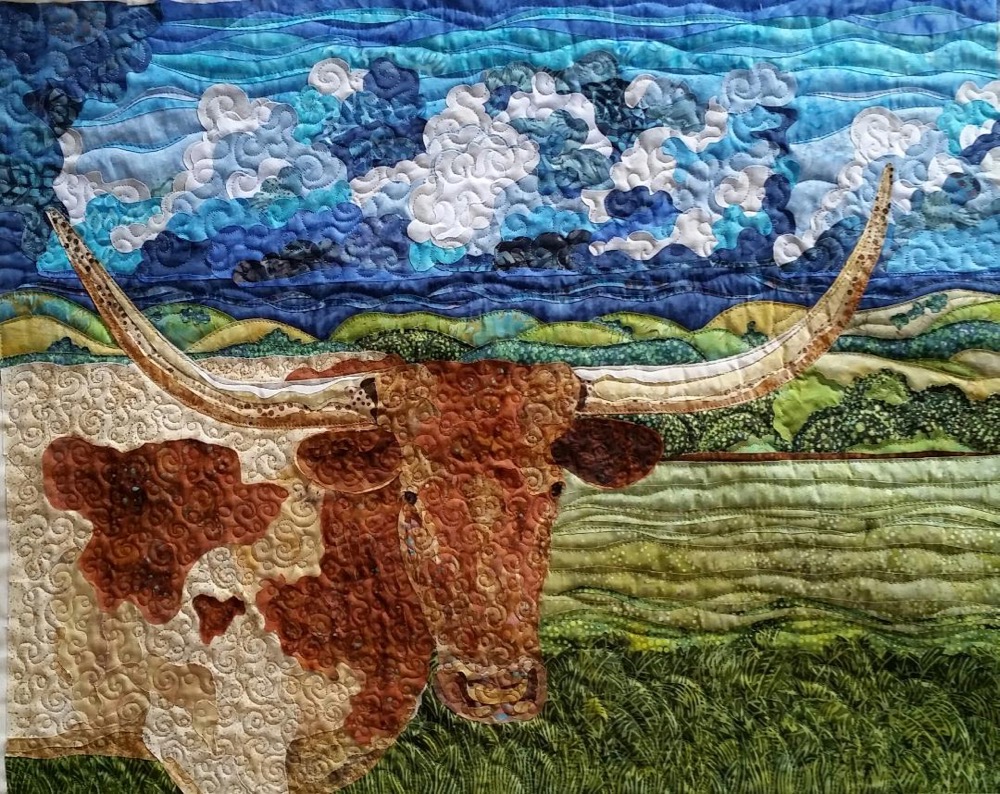
“I created this quilt because I wanted to enter a collage quilt into our annual local art exhibit, Western Trappings on the Llano, an exhibit of western art of all mediums. I figured everyone loves longhorns, right? I was hoping that would get my foot in the door, so to speak. I had never entered anything for a juried exhibit or entered anything in a quilt show. I started quilting full time about two years ago when I retired from being a legal assistant. This one about killed me! It took a long time and lots of tears and threats to throw it in the trash! My husband is very supportive and talked me out of it! After I submitted my entry, I was terrified and anxious as I awaited the answer. But ultimately my entry was accepted into the exhibit and it sold! I was very happy about that and it gave me more confidence to continue this journey!”
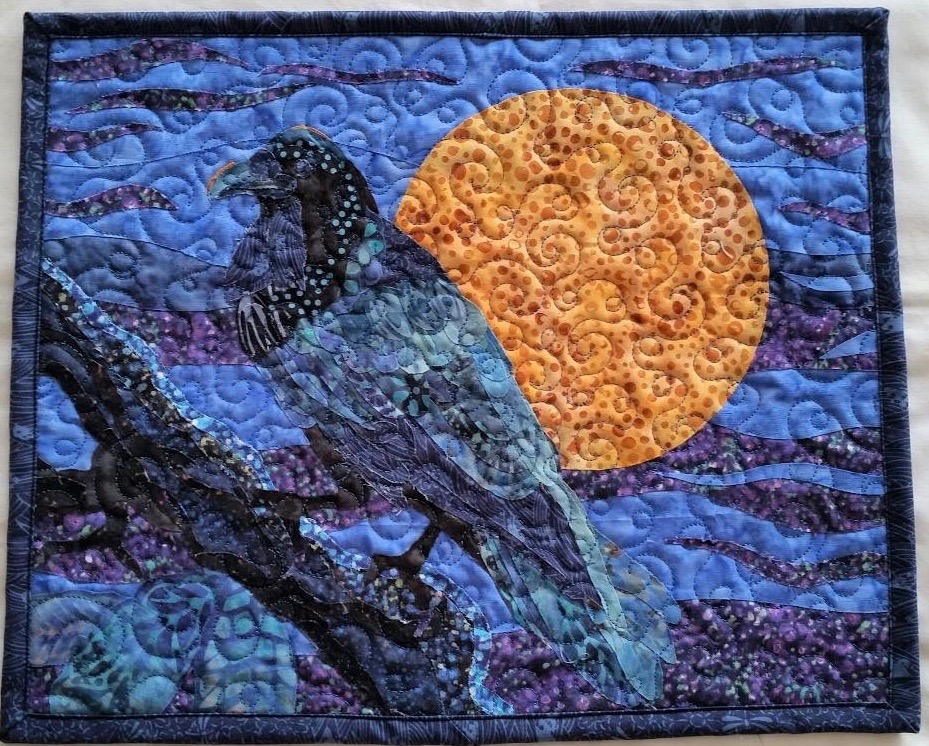
“A friend asked if I could make her a small art quilt with a raven. I accepted the challenge not having a clue how to start and terrified, of course. It was challenging, especially the dark colors. She was happy with the result and I made a little money!”
Judy Liebo, West Linn, Oregon
“Patience is not my strong suit and since I do a lot of art quilts, I felt comfortable jumping right into a project without doing any spiral practice pieces. I know they are helpful but I just kept dragging my feet about it.”


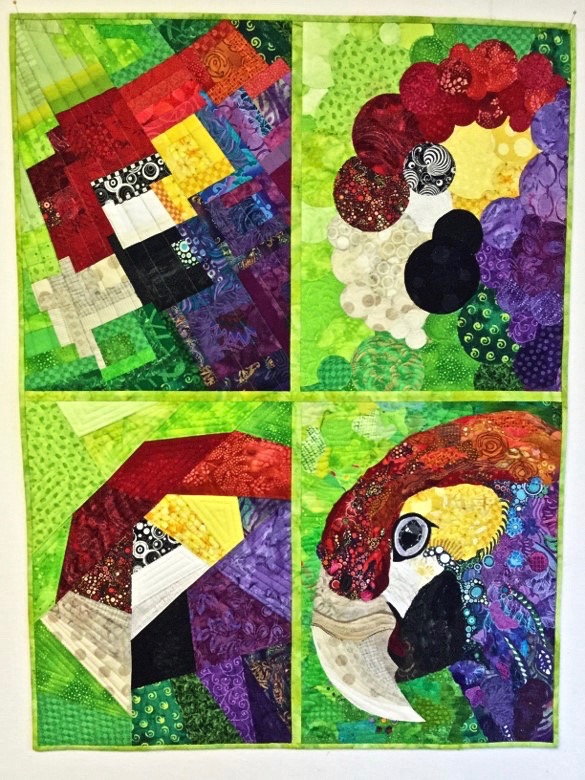
“I found an image in one of the Dover copyright free books and thought it would work. I like working in bright colors and macaws come in a huge variety of hues. It was fun watching him come to life. Sometimes it was a little hard cutting a chunk out of the middle of my fabric, but the results were worth it.
“I wanted the finished quilt to be a little bigger so I did a series of other techniques including an abstract log cabin, circles and linear. They were attached with a quilt-as-you-go technique.”


Cathy Smith, Jimboomba, Queensland, Australia
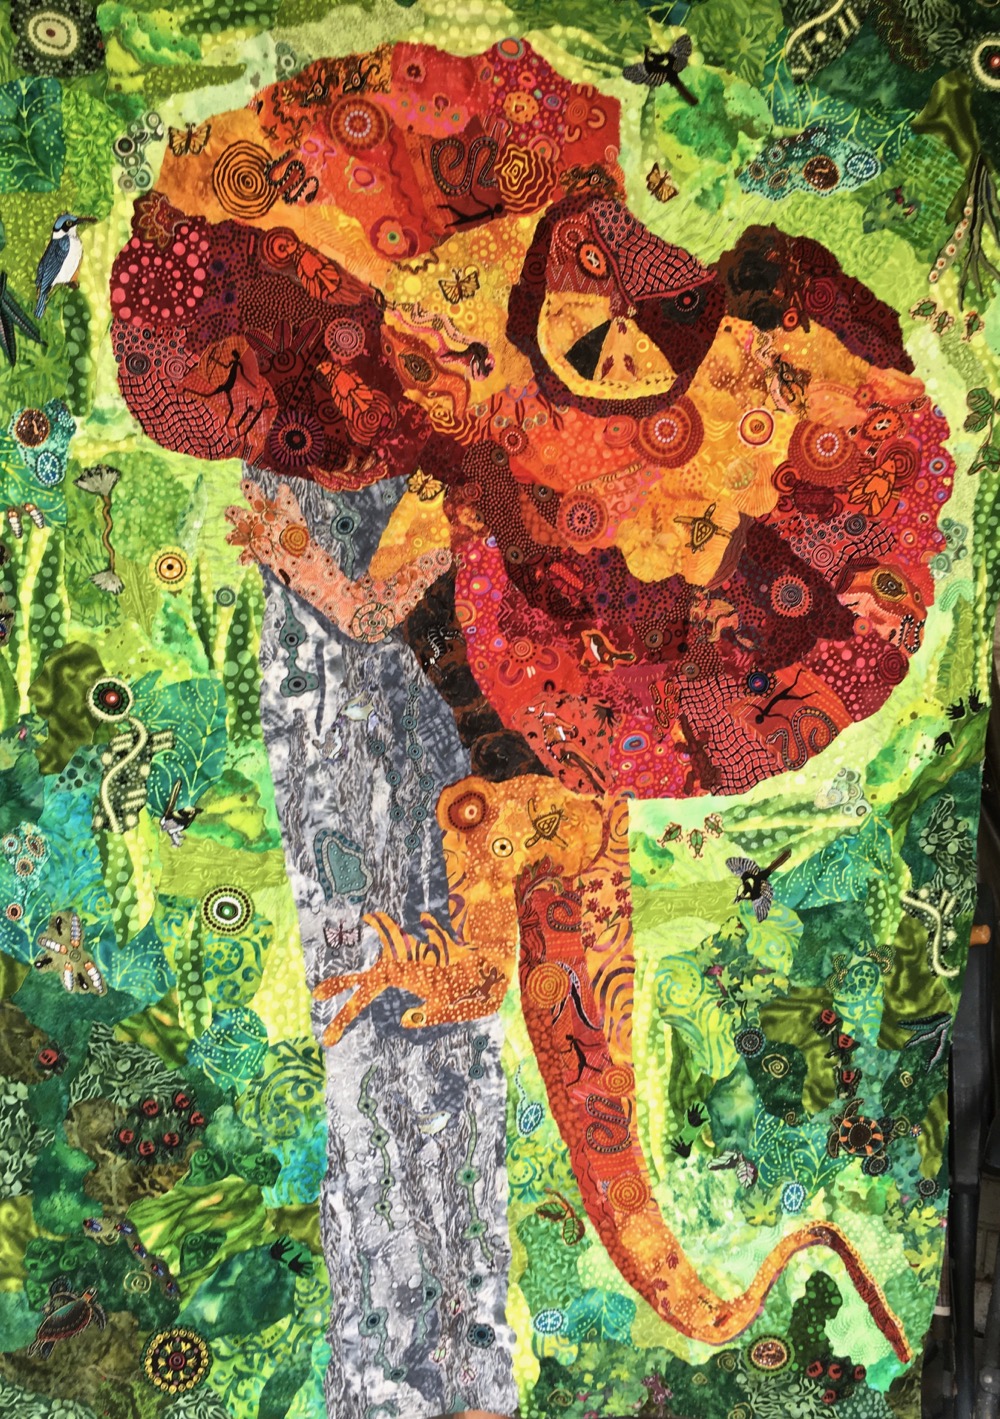
“Susan’s Dixie Dingo was my inspiration for this. I wanted to make an Aussie animal with Aboriginal fabrics. Red and orange fabrics were easy to find, but yellow and green much harder, so I added motifs cut from the fabrics to my mainly batik yellow and green background.”
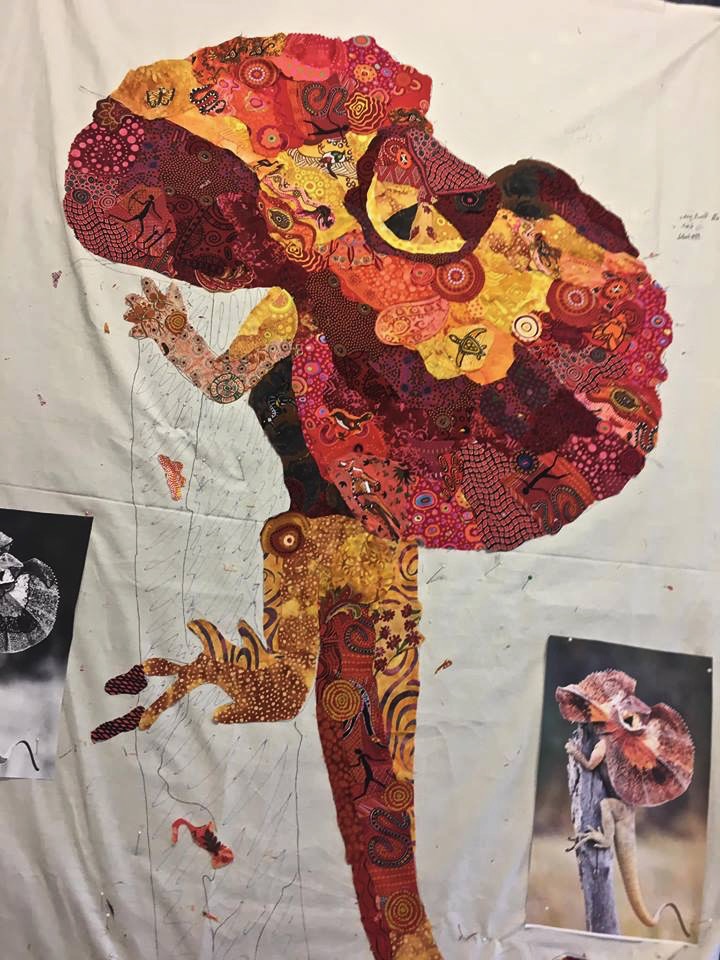
“I wasn’t sure what to do with the background, so I asked myself Susan’s 5 questions [available to read in this blog post], which helped me decide that the crucial elements were bright colour, aboriginal fabric, and collage. I needed light green to be a good contrast with the red and orange, so I surrounded the lizard with light and moved to dark green.
“I’m an experienced quilter but my two cats made from the Serendipity Quilts “Bible”, were the only collage I’ve made previously.
“I spent much of my time in January and February making my Frilly, reading/watching the Master Class as I did so. Not as good as an in-person class, but much more affordable!”


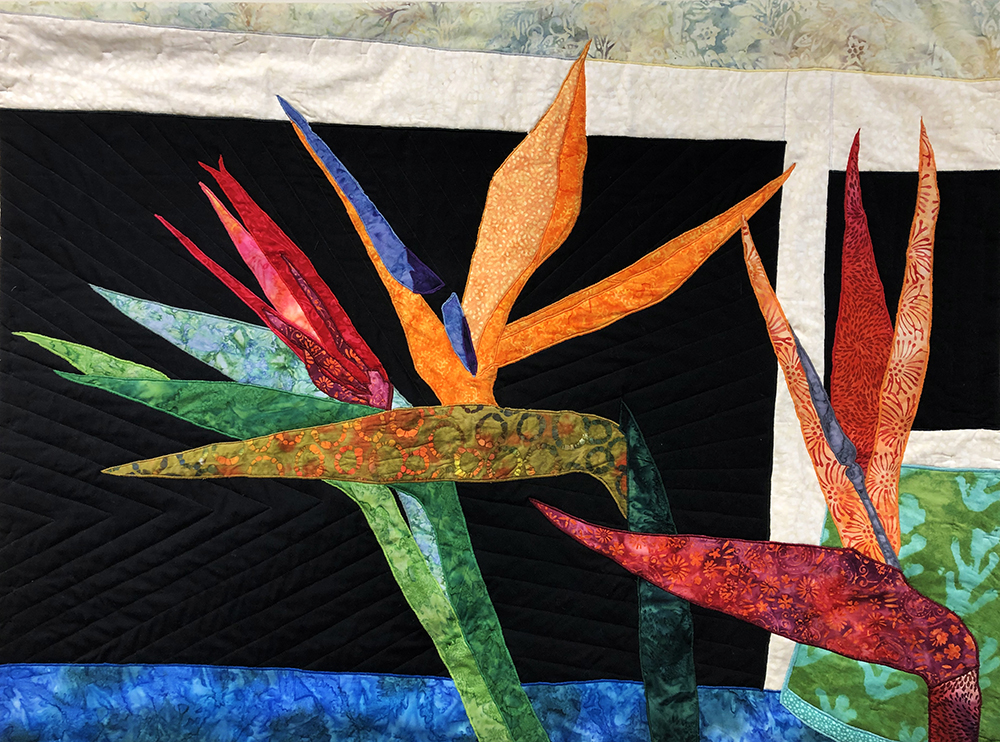
Rebecca Linson Szetela, Acton, Massachussetts
“My art quilt is inspired by what I have learned from Susan Carlson’s Master Class plus her books and other video resources. This past winter I went to the New England Quilt Museum in Lowell during Susan’s exhibit there and I was completely blown away by her work. I had never seen anything like it. I kept looking and looking because I could not figure out how she got such amazing effects with fabric. I was so excited by her quilts that I went back to the museum 2 more times, bought her two books, found YouTube videos she had made and started to design an art quilt of my own. I then bought her online master class and became a donor via Patreon. The art quilt I designed and created (which is my first ever) was inspired by my understanding of how Susan creates her designs.
“Back in the 1980s my mom and stepfather lived in Nairobi, Kenya and I got to visit. There were these beautiful flowers planted in downtown Nairobi that I had never seen before called Bird of Paradise. When I was trying to decide what image to use for my art quilt I tried several other ideas from photos I had taken but none of them was working. Then I started thinking about my deep love of flowers and I thought, What is the most amazing flower I have ever seen?“


“I have never made an art quilt before this one. Over 20 years ago, before my son was born, I made a traditional sampler quilt and a small crib quilt (which never made it to the crib, it’s on my wall!) but this is the first art quilt I have ever made.
“I do also have an art background (I have a BA in Art History/Studio Art from Tufts and Boston Museum School) and have been an artist just about forever. Before my son was born, I was a stained glass artist for many years as well as an artist in silk painting (Batik).
“I had not created any art for over 10 years as I was very busy starting and then managing a sewing studio to teach kids and adults how to sew. I am still running the sewing studio, but recently I felt a strong need to get back to my art. I took a drawing class to get me back on track and then I went to the Quilt Museum and saw Susan’s quilts. Susan’s artwork and her process has me totally hooked. I can’t wait to start working on my next art quilt.”
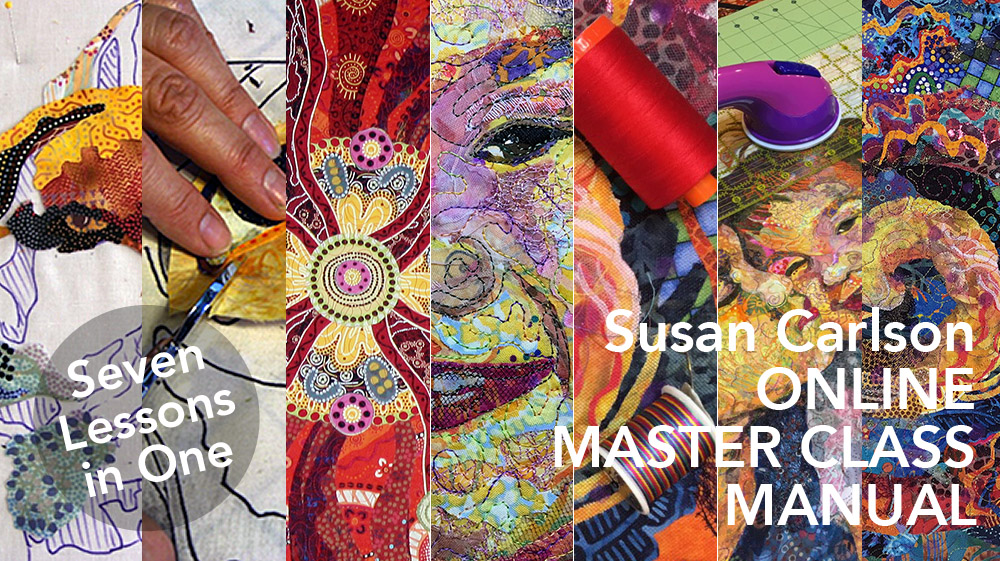
Fabric Collage Master Class
For instructions on the entire fabric collage process, you can purchase the Susan Carlson Fabric Collage Online Master Class Manual. Using video, photos, and text I take you from soup to nuts, beginning to end in creating your own fabric collage masterpiece.
I am so impatiently waiting for things in my life to settle down so I can order this manual. I’ve done fabric collages in the past. I firmly believe this class will be like getting my PhD! Can’t wait.
Thanks for the inspiration! They all look great!
I am so impressed with everyone’s collage–they transferred the knowledge you put forth in the manual. Great work on everyone’s part!!
The online class manual is a blessing and easy to follow. I highly recommend getting it. Watching the videos over and over helps too! I have been inspired by the fantastic artistic designs and the process that Susan’s teaches.
Kudos to all these brave and adventurous souls who tackled fabric collage without Susan’s in-person help. Her videos and written instructions are excellent, and I applaud you for going forth!
Well I would say that this brand new How To Use the Fabric Collage Master Class neatly takes away any excuse anybody has for not doing fabric collage successfully!