
These blog posts are often inspired by whichever fabric collage class I happen to be teaching at the time. Last week I started my Fascinating Fabric Collage Bugs and Butterflies Zoom Follow Along so I’ve been, of course, thinking about specific collage methods for creating the bodies and wings of insects. Towards the end of this past Thursday’s presentation, I brought up ways to add details to a bug collage—”skinny lines”—as I call them. But time goes so quick when it’s a live demo, and there’s always so much more to tell!
Insect wings often have very narrow “veins” that define areas of color (like panes in a stained-glass window). These narrow (or “skinny”) lines can be challenging to create if not approached in certain ways. Many of my current Zoom students will be creating insects with wings, however the focus of this Follow-Along project is to “cut-loose” and look for lines in the patterns in our fabrics, doing much of the work for us.
However, there is another way to create the lines and “panes” of insect wings—one that is a more detailed approach, especially appropriate for those who are wishing to more closely re-create a particular wing pattern on a specific butterfly—a technique I’m not particularly delving into for this looser bug class. It’s a very specific layering sequence I used on my portrait quilt “Monarch Maia,” in order to capture the realism of Monarch butterfly wings.
So, as a benefit to my Zoom students as they follow along with me for the next few weeks, and to you the rest of my blog readers as well, I thought it appropriate to update the Creating Skinny Lines in Fabric Collage post with the step-by-step Monarch wing demo from the Monarch Maia Quilt Story. The monarch wing lines are really just an elaboration on the “leave a gap” lines on my sea turtle collage example in the “skinny lines” post—same idea, different subject matter.
Maybe this particular idea, or one of the other skinny line techniques, will help you the next time you need to create fine details in your fabric collage—be it bugs, butterflies, turtles, fish or faces—all of which are demonstrated in the following Further Thoughts On: Creating Skinny Lines in Fabric Collage post.
Further Thoughts On: Creating Skinny Lines in Fabric Collage
Update: Giving “Monarch Maia” Her Wings
Excerpted from Quilt Stories: Monarch Maia (Update with Slideshow)
Published April 4, 2020
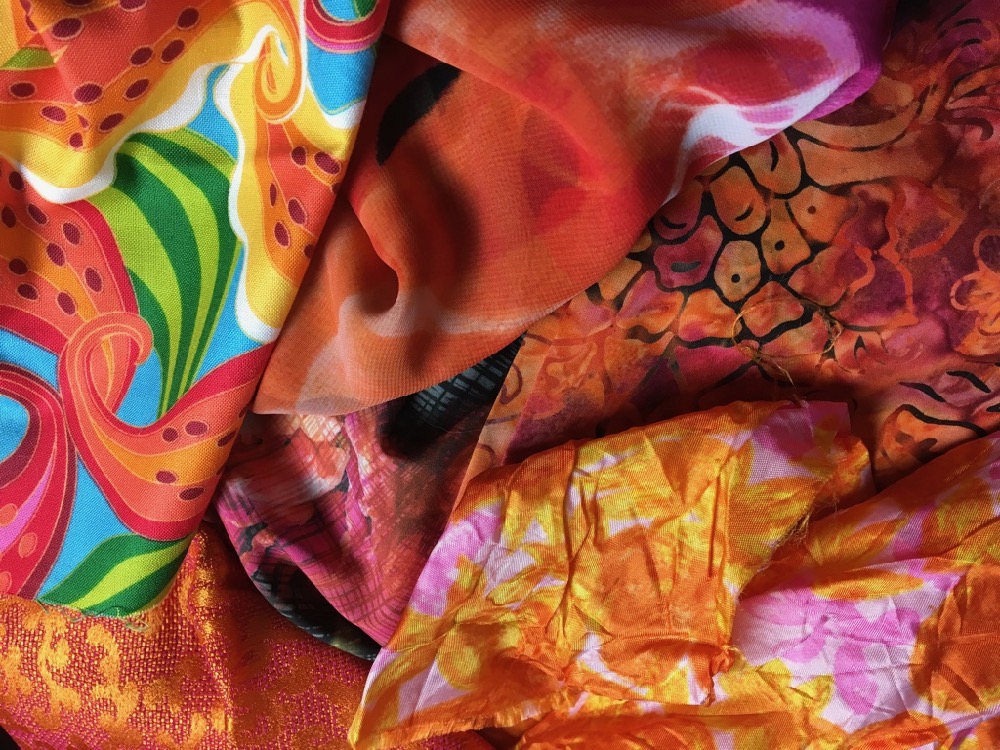
There was no choice as to color for the wings. They were going to be Monarch orange and black. I happened to have a good selection of orange to choose from!

And it’s not just cotton fabrics that I can use in fabric collage. Here’s a closeup below, that shows the variety of fabrics I threw into the portrait— cotton prints and batiks, printed chiffon and silk, and a shiny looser-woven rayon.
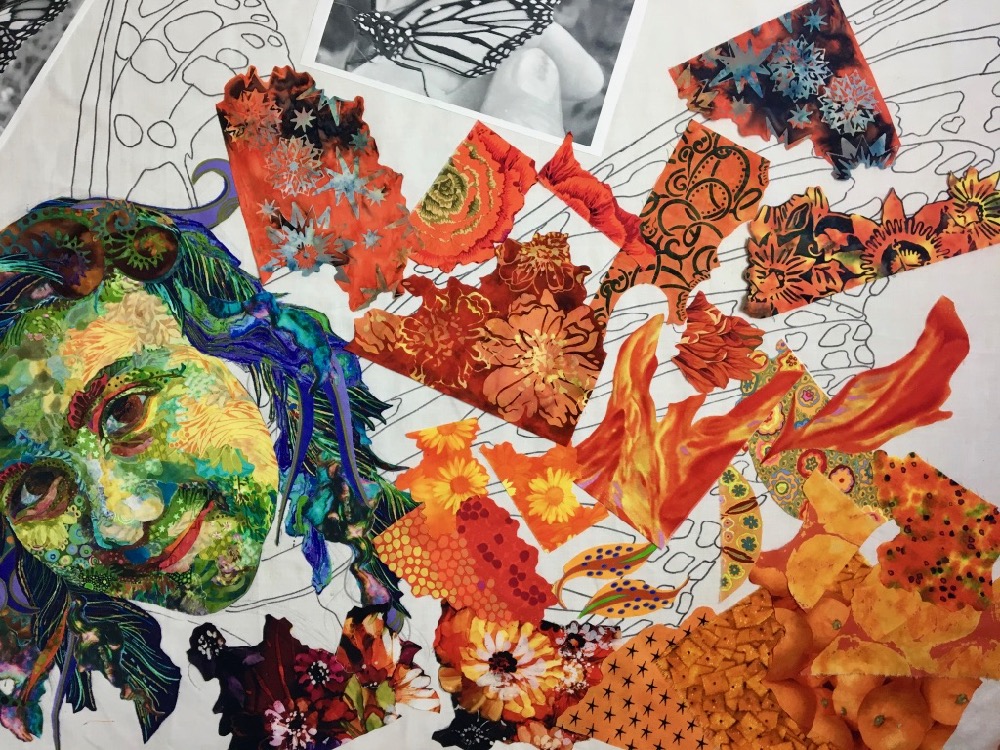
Below I’ve hacked into the beautiful fabrics to create my working palette. This is a step that gives pause to many beginners, it seems like such a shame to cut into these perfect fabrics when you don’t even know if they’ll be used. But you need to do it. You need to be able to move those fabrics around, hold them up, see where they might work. The variety is necessary because if you look at the original picture of the butterfly, you’ll see that the wings are a variety of shades, from near yellow to rusty orange. Notice I’m not afraid of throwing in some novelty fabrics. At the lower right are some oranges—as in the fruit—and some printed Cheez-Its.
The sections of orange in the wings are reminiscent of stained glass in a window, so I’ll refer to each individual section as a “pane.”
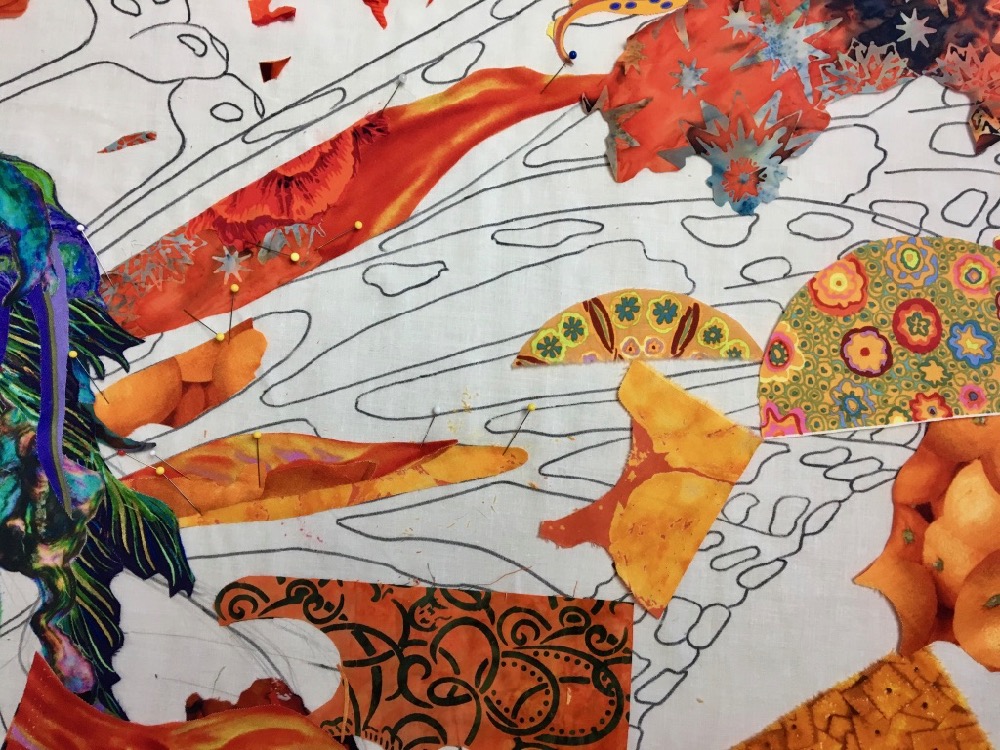
I do have some nice orange fabrics in my stash to work with. I might have easily and successfully used one piece for each pane. But that’s not my style. Each pane uses multiple pieces of fabric, which to me is much more interesting and visually rich.
I had a good drawing for the wings, so I stuck closely to the shapes I drew for each pane. Once the orange shapes were filled in as a first draft (though by no means done), I pulled some “whites” for the dots along the edges of the wings, saving the black outlines for last. I put “white” in quotes because pure white would be pretty flat and uninteresting (in my opinion). Instead, I looked for printed fabrics with whitish areas within them. I found some interesting possibilities, mostly with warm accents that reflect the orange of the panes.
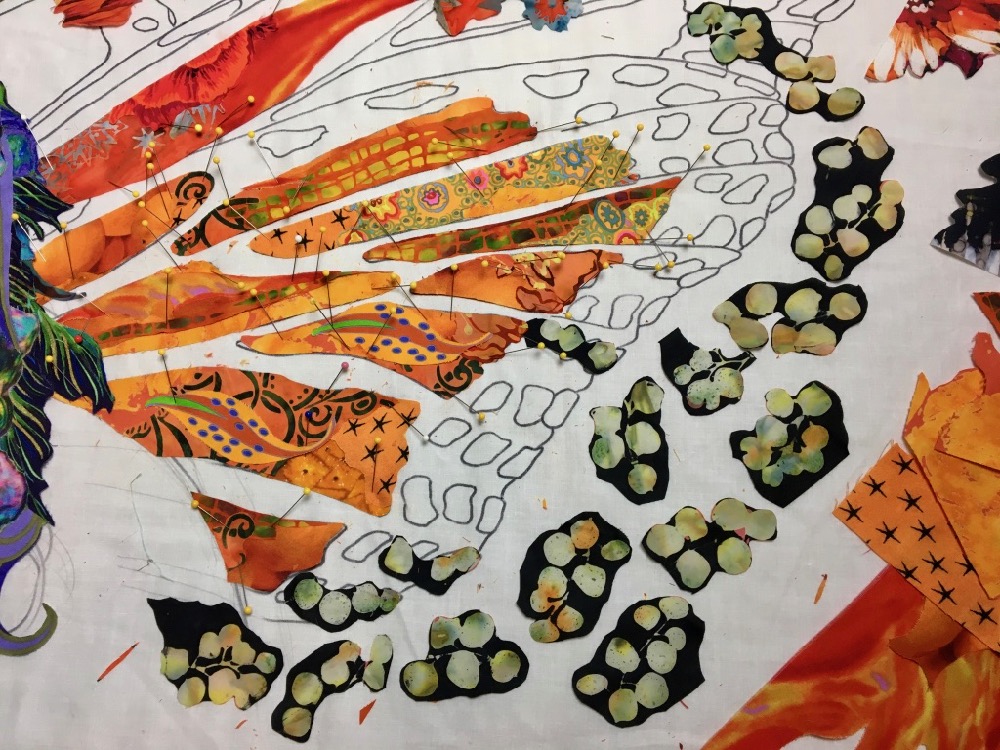
Once I had these spots cut out, I started laying them in place. This was a case where I didn’t need to match the shapes I had drawn exactly. Instead I let the shapes in the fabric do the talking for me. Notice that because the dots will be surrounded by black on the wings, I don’t have to trim the black on the fabric away.
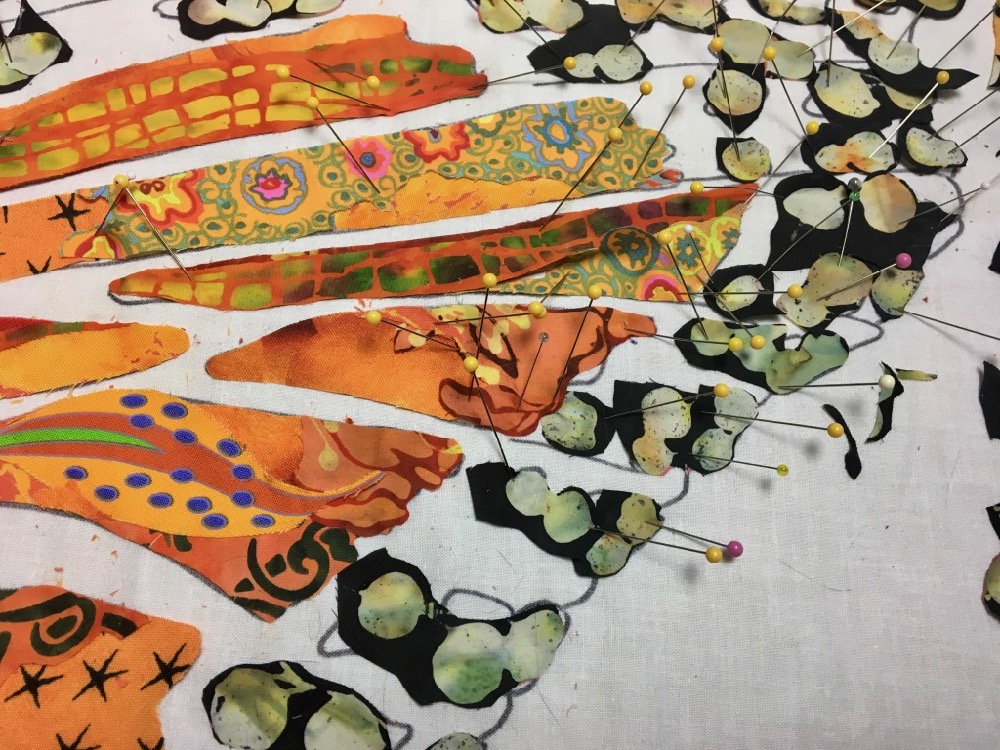
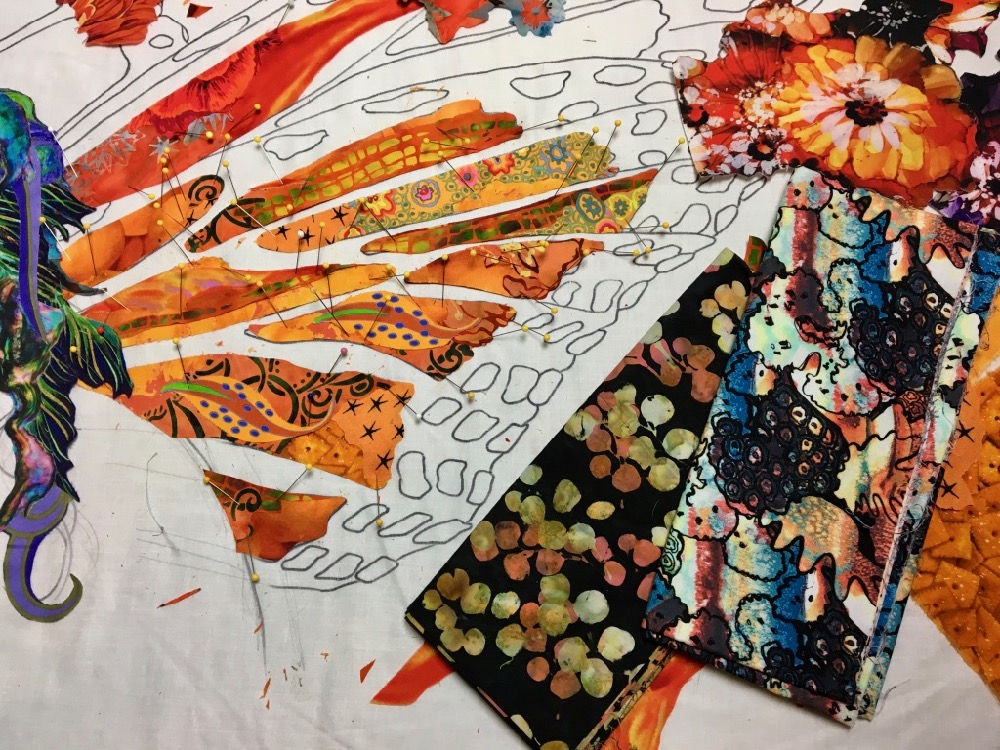
Just as white is not just white, black is not just black. Here’s a selection of blacks I chose for the edges of the wings and lines between the panes.
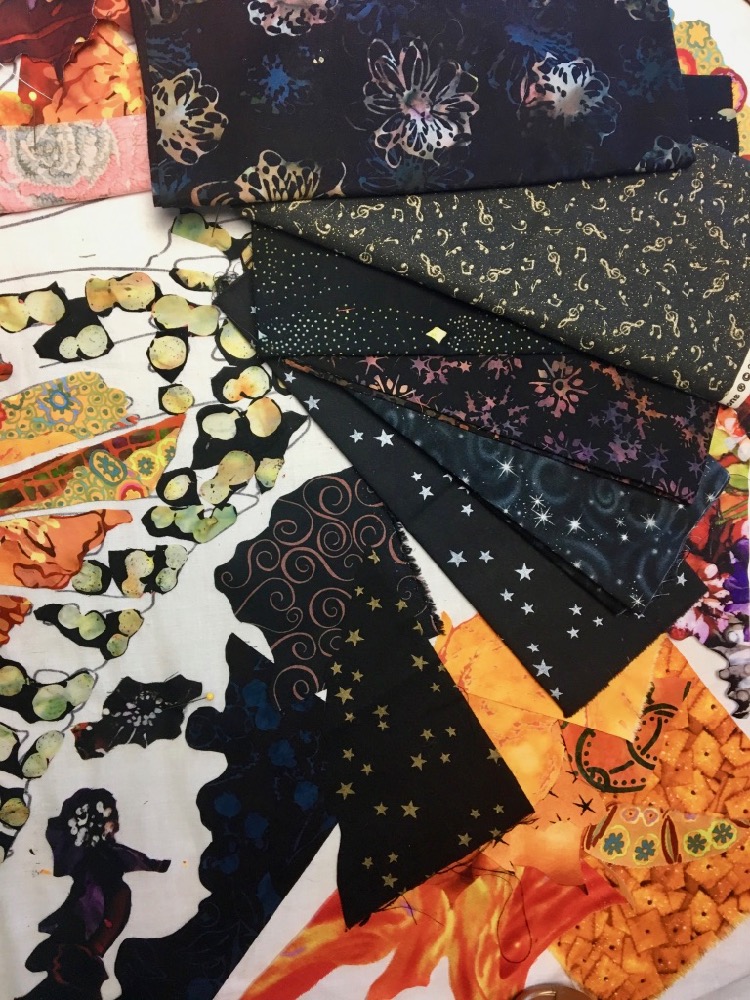
Again, I cut down the larger fabric yardage into hand sized shapes for my working palette.
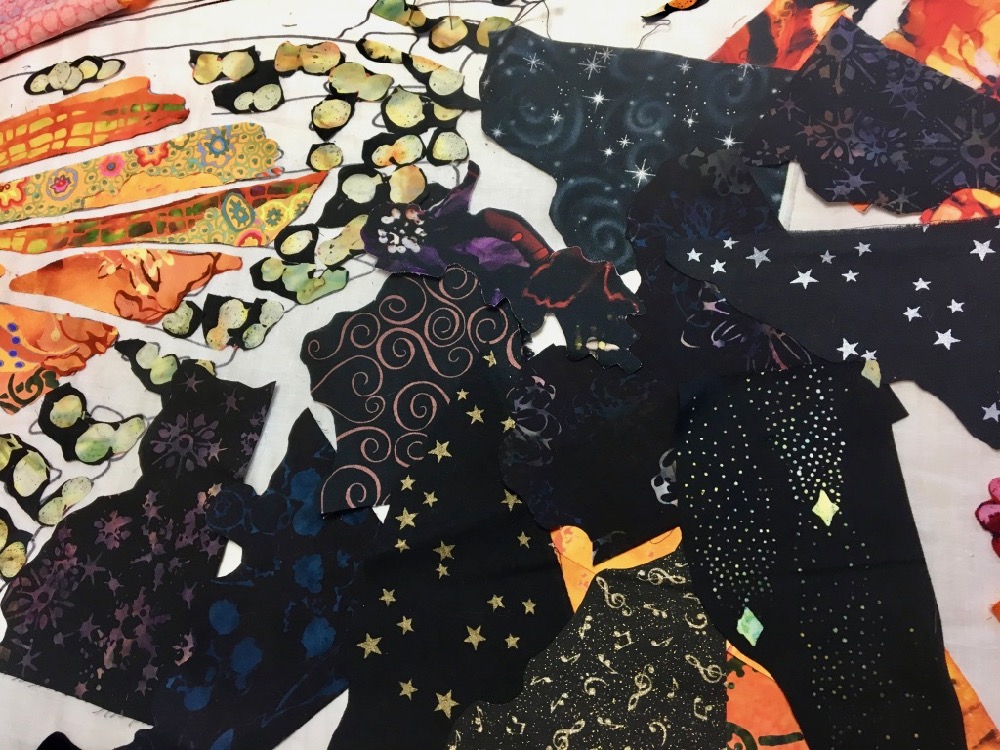
Because I cut the orange panes to fill the drawn shapes, and because I kept the outside edges of each shape loose, I could slip pieces of the black fabrics under the existing panes and dots.
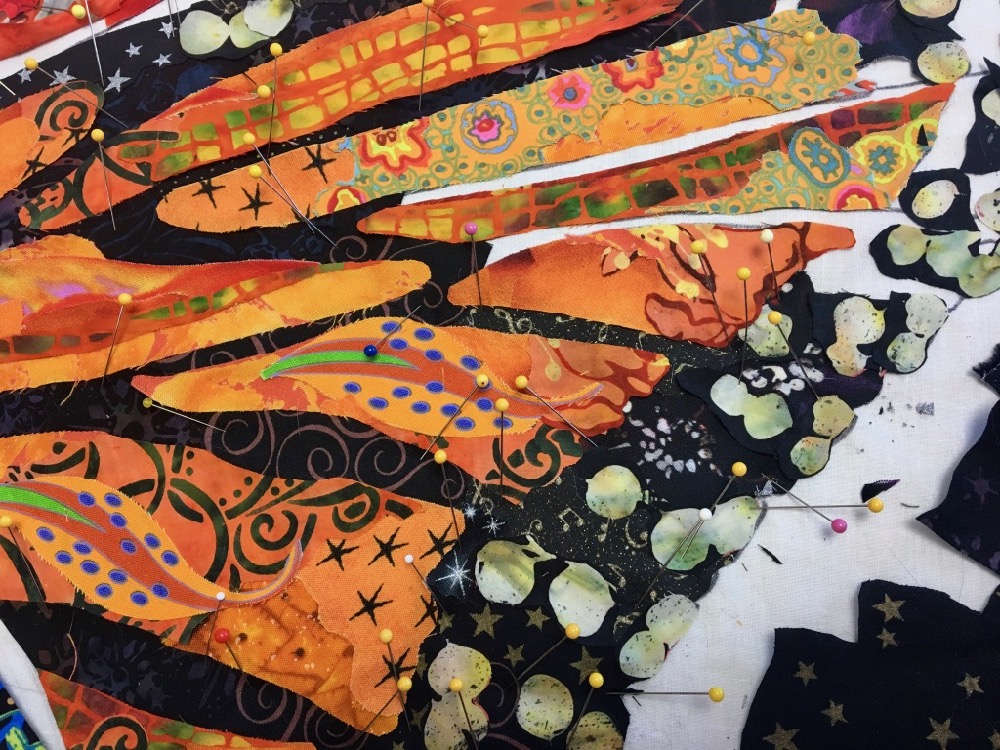
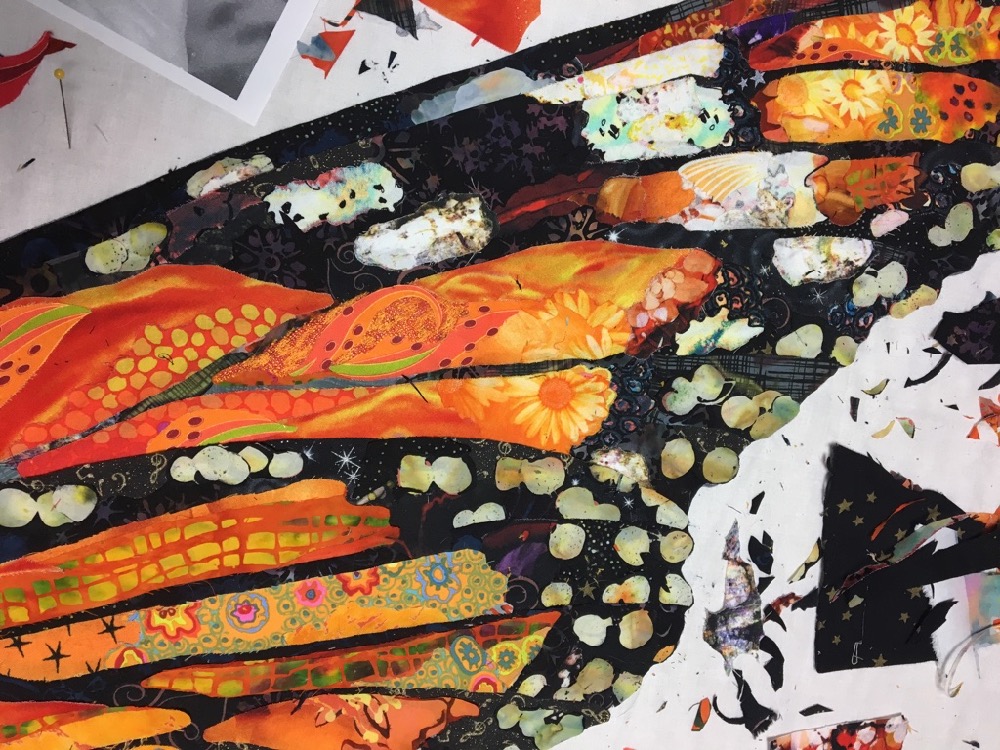
In the completed first draft of the lower wing, you can see how I used a wide variety of blacks to fill in the “background”—the variety gives interest to a potentially uninteresting area.
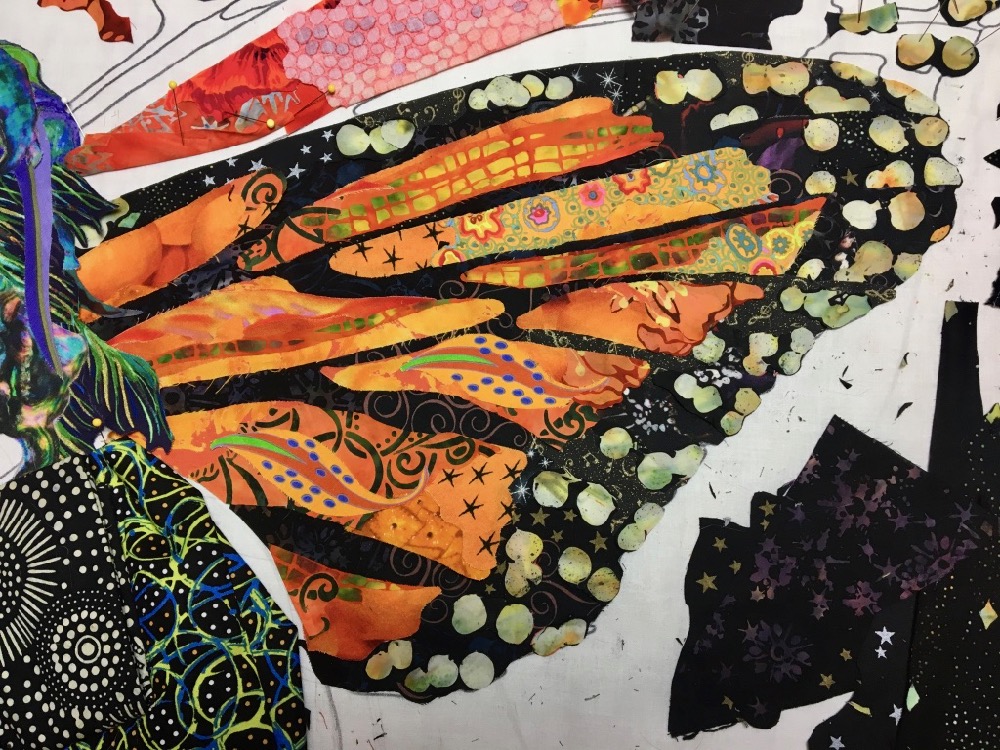
I then moved on to the upper part of the wing. A monarch wing is orange, black, and white, right? Look at the variety of fabric prints I could use within those basic colors, the richness of visual texture.
I work with what’s in front first, so the back wing was the last part of the portrait to work on.
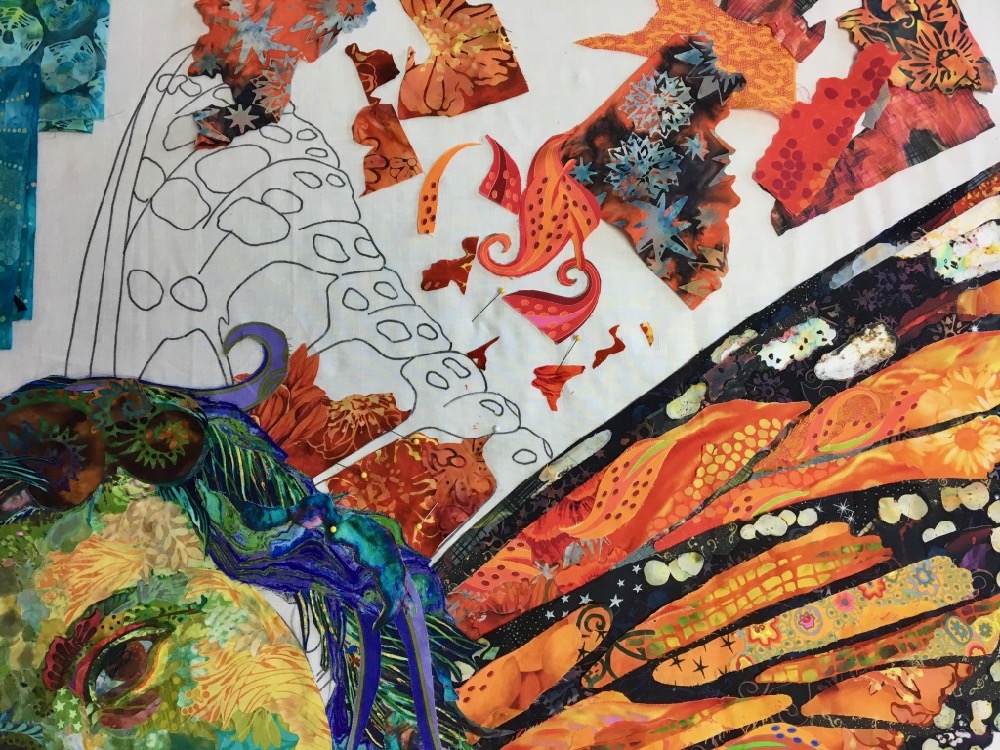
And here’s a first draft of the wings. Later, you’ll see how I come back to it with sparkly tulle and netting to add the final details.

Original Post: Get in Line: Skinny Lines in Fabric Collage
At some point in every fabric collage quilt, typically as you’re adding those final details, you’ll need to add a little thin line to your piece. Whether it is in order to outline a feature or as part of the feature itself, such as laugh lines around an mouth, these little details add a lot but are sometimes frustrating to manage. You may think to yourself, There’s no way to cut that thin without the fabric falling apart. If you even manage to cut it, you fear it will self destruct when you put glue on it. How do you cut a line so thin that you can barely pick it up and glue it down?
Fortunately there are three methods you can add to your bag of tricks for handling these pesky little pieces.
Mind the Gap
The first way to create a really thin line is to leave a gap between two pieces of fabric, keeping the edges unglued. Then you can come along after and add pieces that slip under the two existing fabrics, filling the thin gap, like a reverse applique.
The best example of this method is the spaces between the scales on my Serendipitous Sea Turtle. (Pattern available here.)
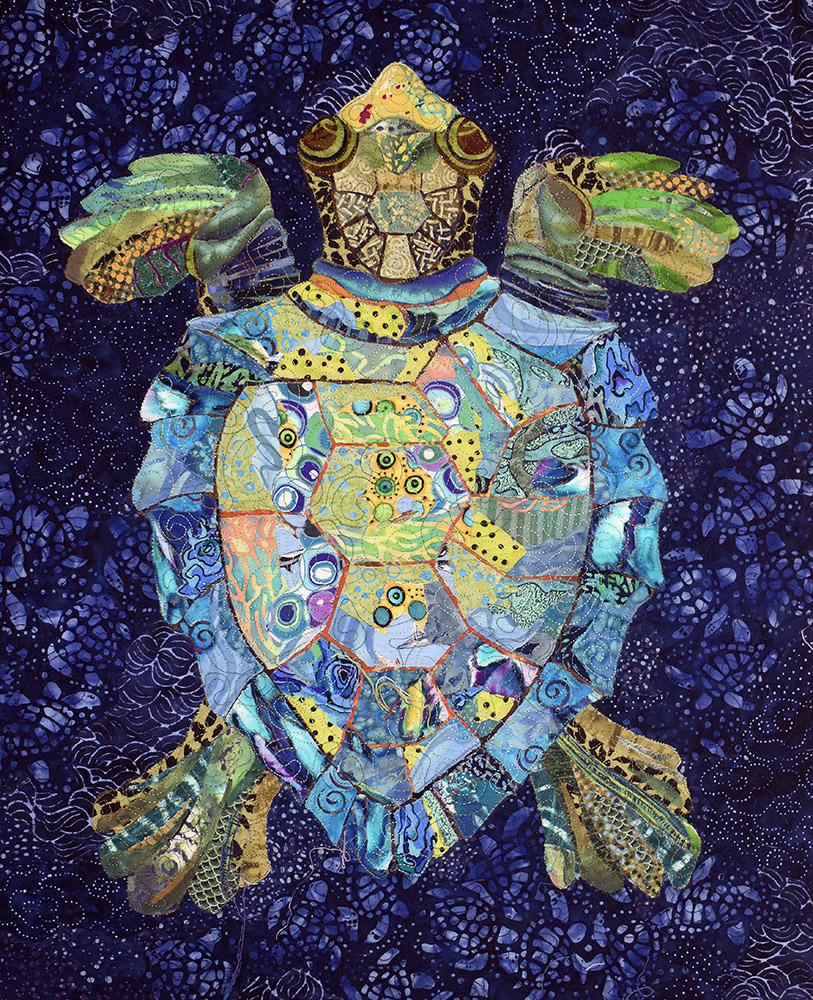
Look at all those thin orange lines on his shell. It would be a nightmare trying to cut and glue all those skinny strips of fabric. Instead, I made the individual plates first, leaving gaps between them. As I collaged and glued each plate in place, I left the edges loose. Then I used manageable quarter-inch (or so) wide strips of fabric in the gaps, placing them under the edges of the plates.
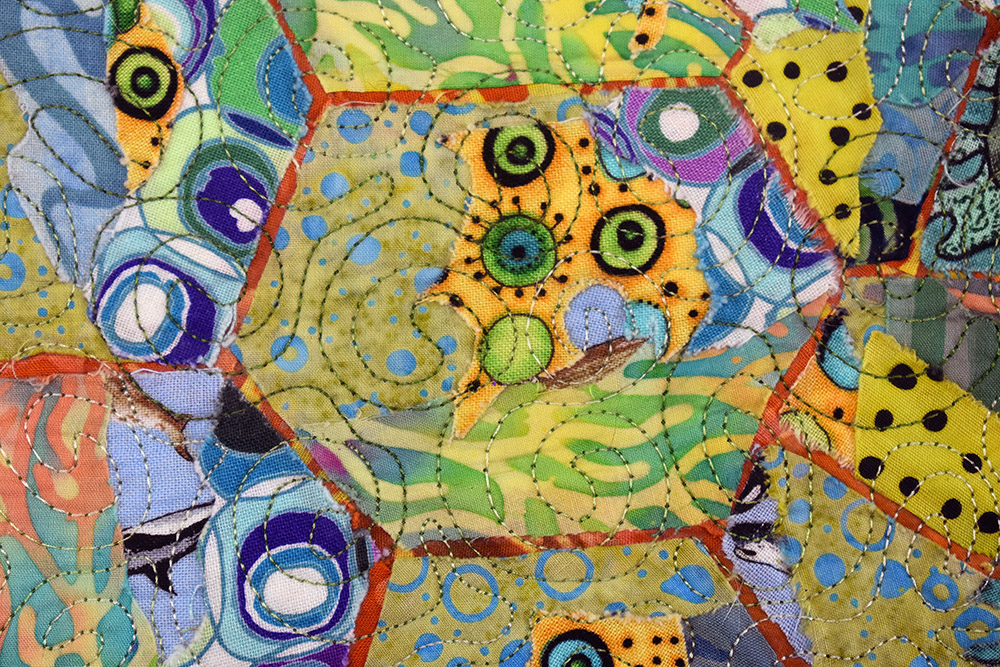
In the close up above you can see how the orange lines actually lie beneath the scales. In the following video I show how it’s done.
Top Down, Bottom up
The second way of making very thin lines with fabric is a technique I describe as working from the top down, bottom up. I first demonstrated this technique in my “Eye for an Eye” blog post, which shows how to create features such as eyes that require a high level of detail.
The basic idea is to glue a piece of contrasting color fabric to the back of a piece already in place. Then you can trim away what you don’t want, leaving as thin a line as you would like.
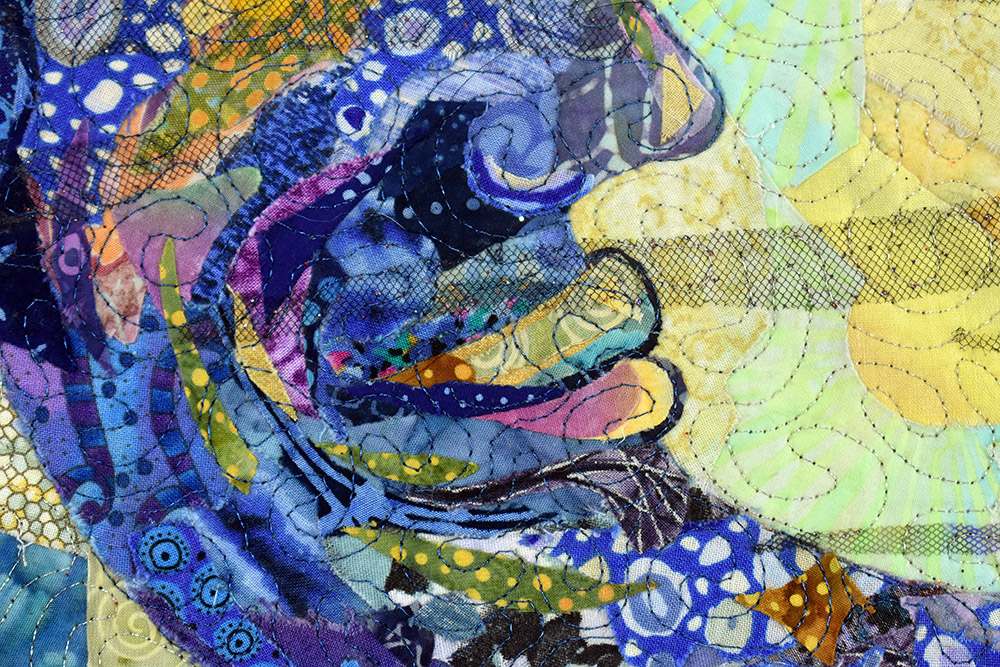
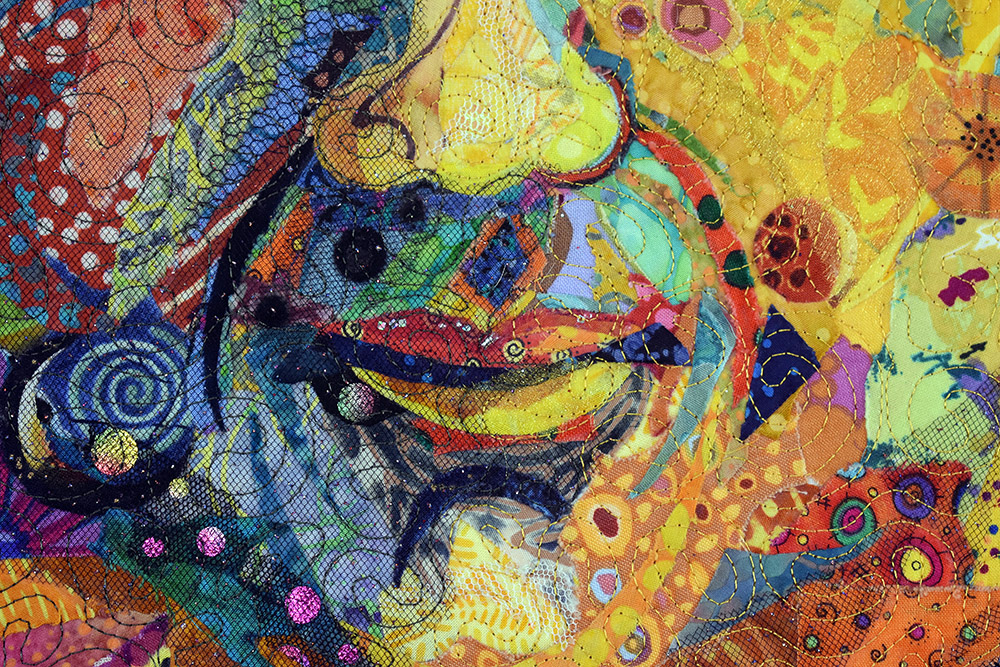
You can see an example of this method in the lips of my moon face. (Pattern available here.)
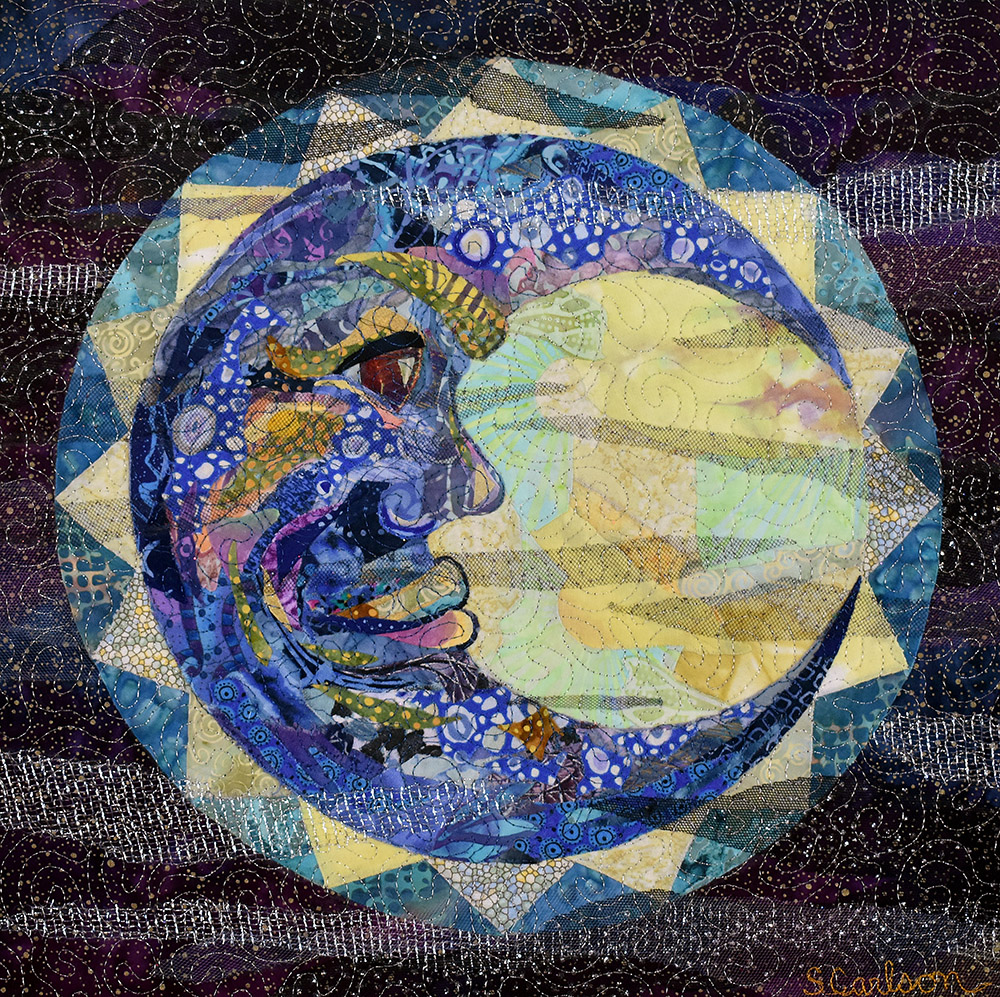
The yellow of the lips was blending into the fabric behind them, so I needed to outline them in a darker color fabric. Gluing the dark blue fabric to the back of the lips, I was able to trim away all but the thinnest outline.
Using the turtle as an example again, in the following video I show how to use this “top down, bottom up” method.
Cut and Stick
Sometimes you just have to use the most obvious and straightforward method of creating a thin line: cut it and glue it down. The previous two methods are used at the edges of existing pieces of fabric in your collage. What about when you want to add details on top of existing pieces? Sometimes these little pieces make all the difference. They add interest and richness. They help define features. They’re decorative. They’re fun!
Look at all the detail these little lines add in the following examples.
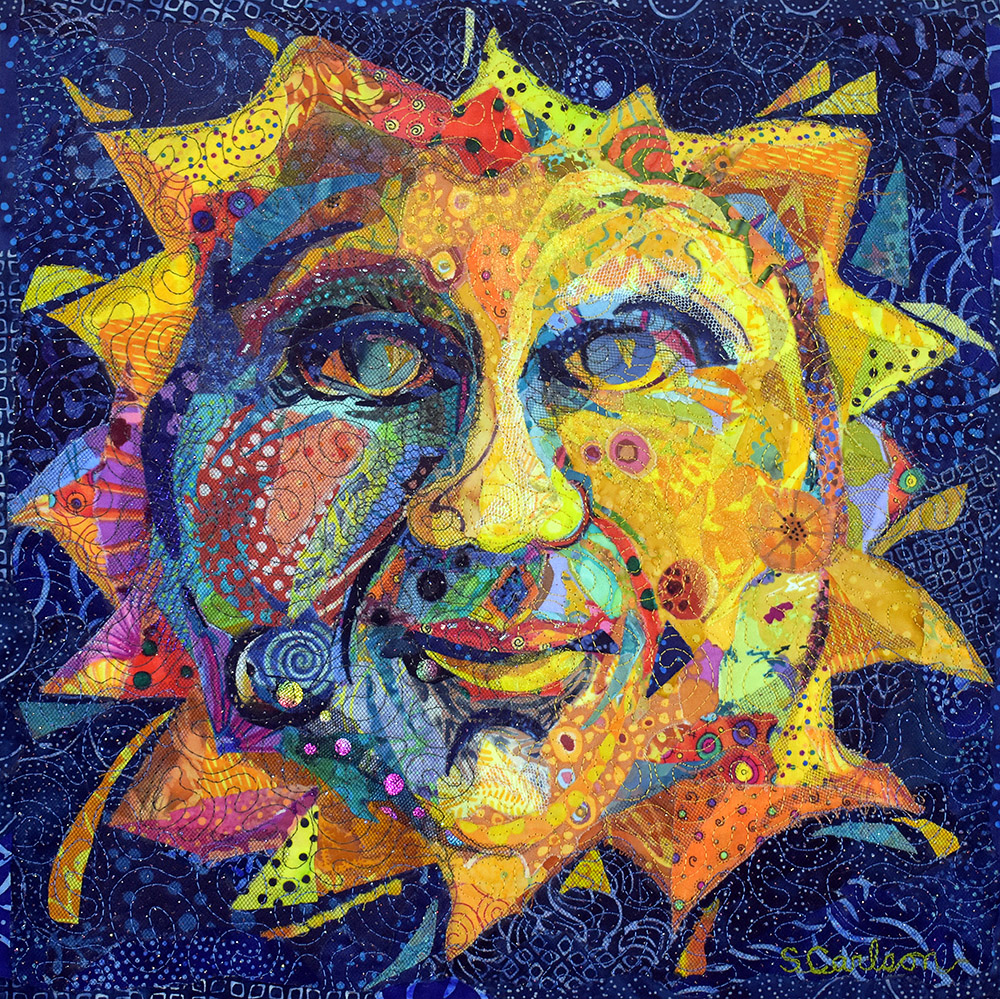
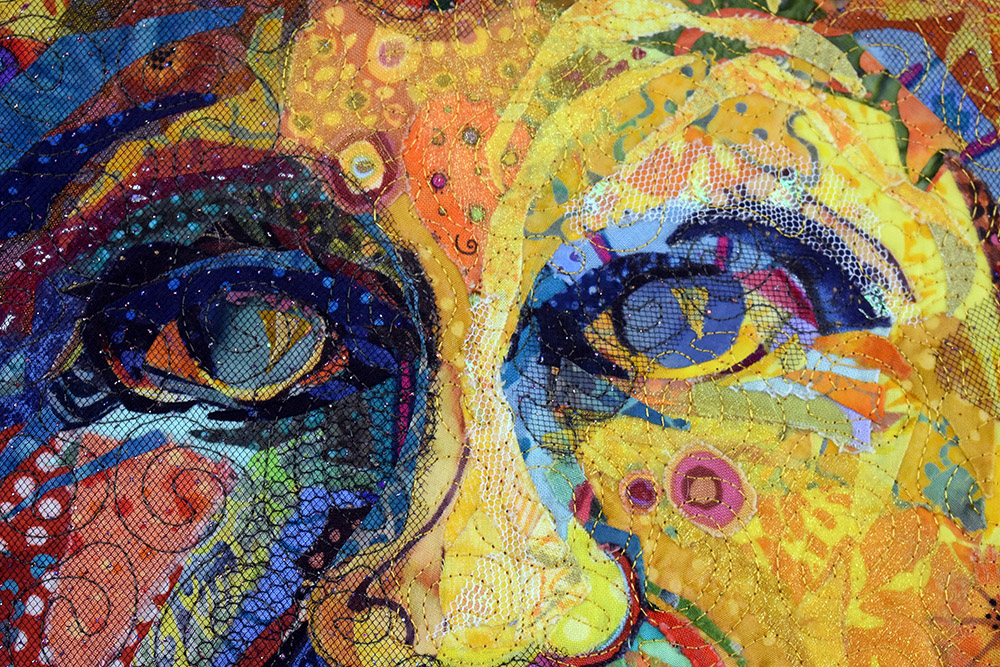
In my sun face, “Soul Sol” (based on my Sun Portrait pattern), I added “character lines” around the mouth and eyes.
In the fanciful fish below, based on my Winged Butterfish pattern, there are lines everywhere. Once I got started adding all these fun little flourishes I couldn’t stop! (Note that the eye is made using the top down, bottom up method.)
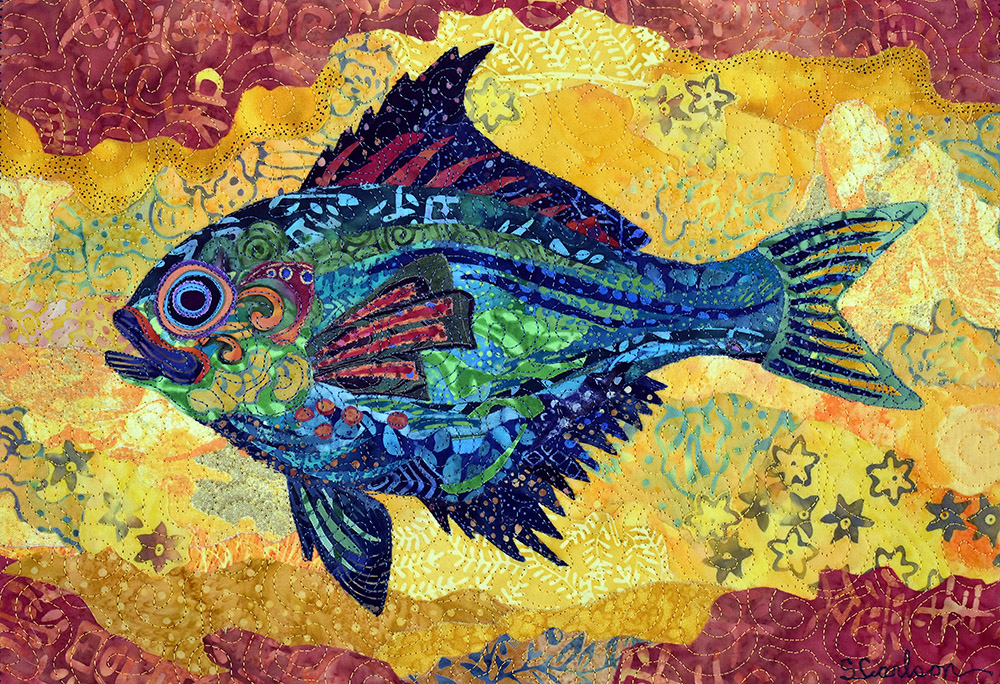
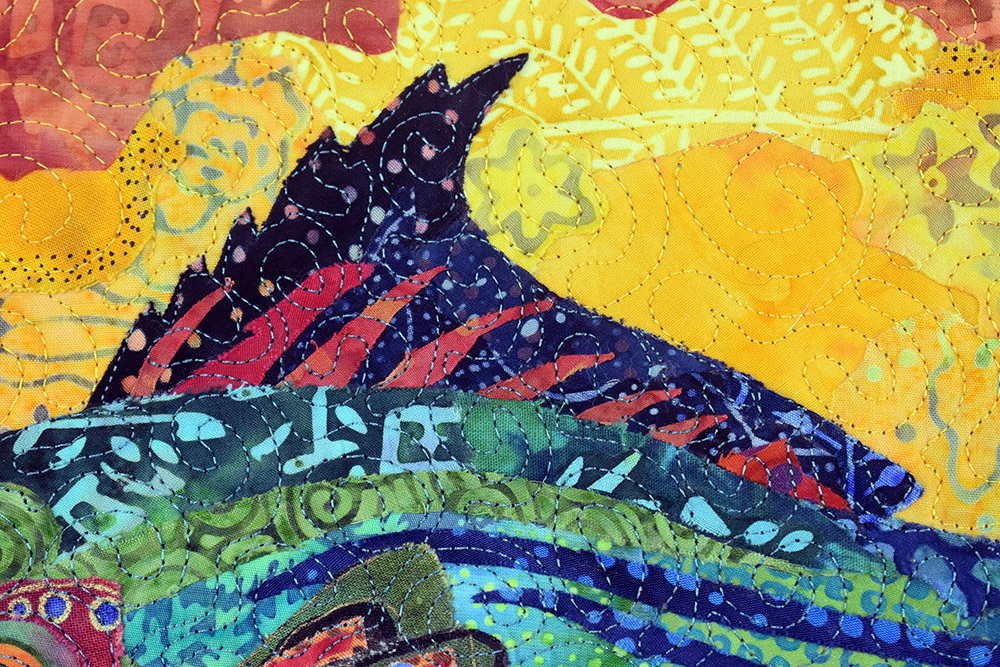
I added some prickliness to the dorsal fin with red spikes.
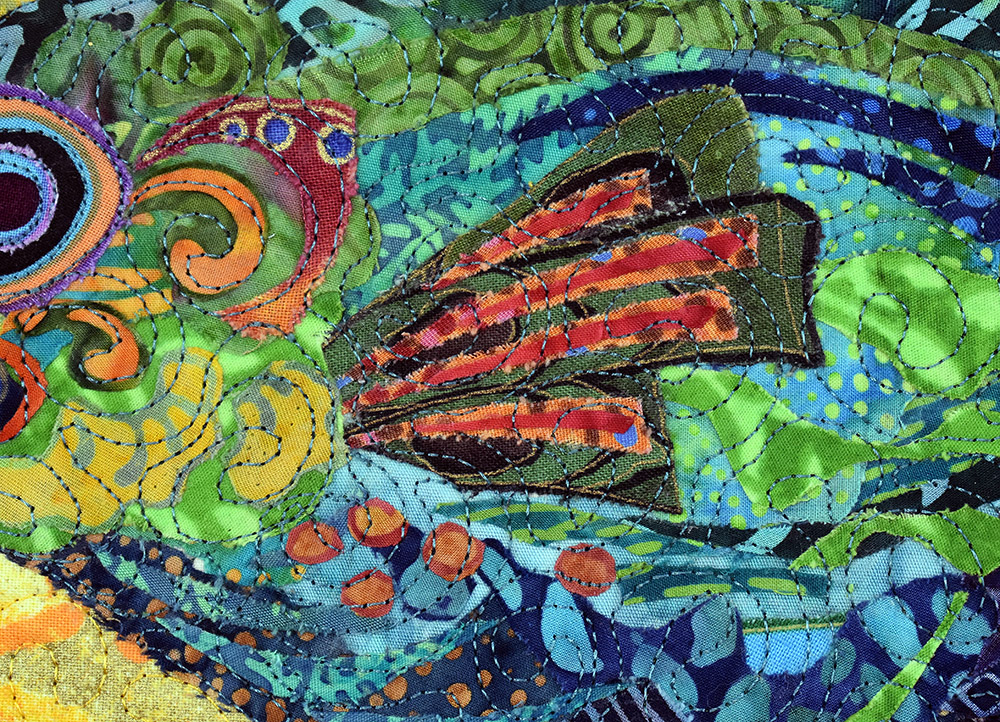
The pectoral fin has lines added on top of lines, four layers in some places.
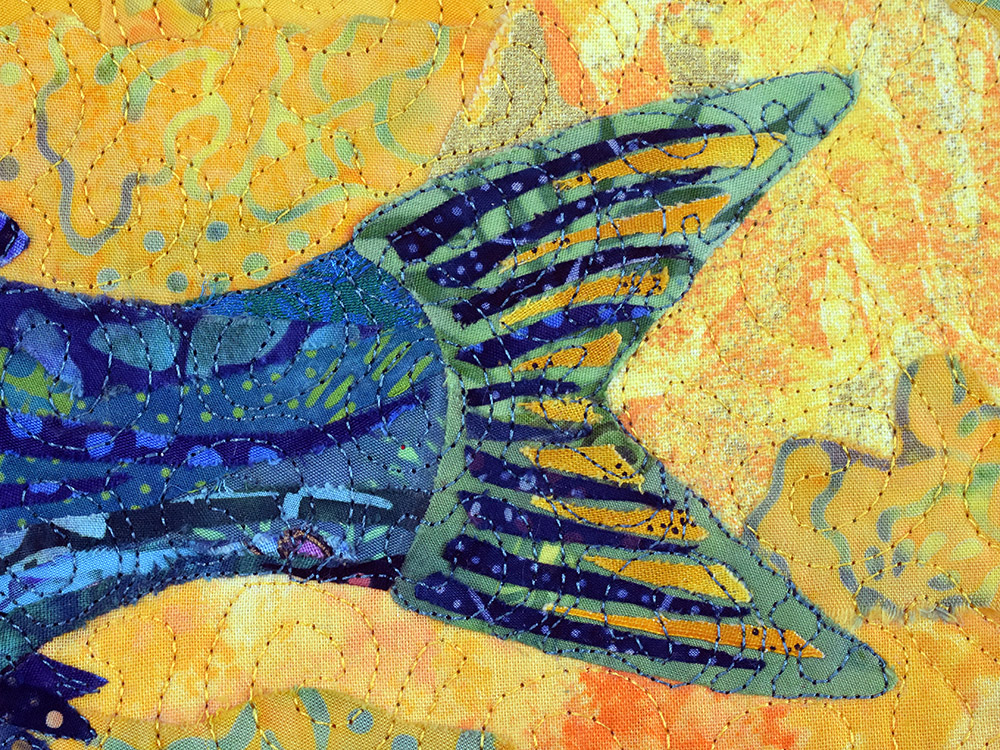
And the tail uses both blue and yellow lines. Do they sometimes get too thin and fall apart? Yeah they do, but then I just pick up another scrap and try again. But when I’m looking for those scraps to cut even smaller, I look for my finer woven batik fabrics first, they behave better. See the difference in the two details in the fish tail above—the blue spikes are cut from a batik print, the yellow is a regular weave quilting cotton. The yellow took a little more finesse to cut and glue before it frayed apart, but in the end, they both worked.
The video below shows how to use the scraps you’ve already produced in creating your piece to add detail. I also show what I consider to be the easiest way to apply glue to these tiny pieces.
I am always encouraging, urging, pleading with my students to add more. More is better! More detail. More layers of interest. These three methods should give you ways for adding the details your fabric collage quilt needs to make it one of a kind.
So many gorgeous fabrics!
Thank you for this! I’m about to add black lines and spots to my ocelot piece. This confirmed my plan!
This was perfect for the dog I’m just beginning to work on. His charm is in his messy curly look. ????