
For this edition of the Finish Line—completed student fabric collage quilts—I’ve created a retrospective of fabric collages that were started this year, most of which were begun in one of my classes.
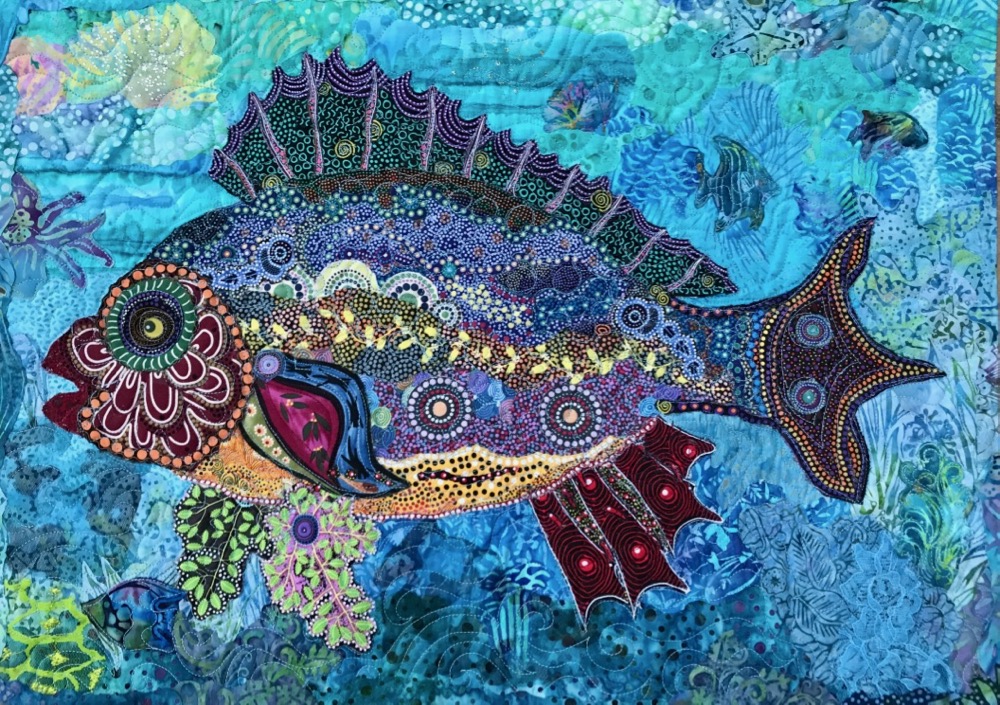
As the final post of 2018, I thought it would be appropriate to look back at some of the places, people, and quilts that I spent time with. One such person was Lynda Flynn (above) who I first met in one of my Harpswell retreats, then renewed her acquaintance in subsequent classes. Check out her new fish below.
Note that I have provided links to the blog posts I produced if you want to read more about that particular class. Click on the title of each section to view the post.
February: Calgary, Alberta, Canada/Lecture and Class
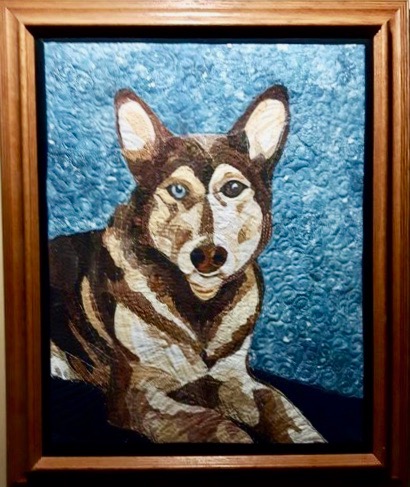
After a lecture attended by a local quilt guild in Calgary, I was approached by Renee Chester of Mayerthorpe, Alberta, Canada. She had been following my work for a long while and showed me a photo of a collage quilt she had made based on my blog posts and video links. Renee says:
I made Hayden for my son. This is his dog. This was my 1st collage ever. I watched your videos and read all your tutorials for making collage. It finished at 17 x 19 so I framed it in a 18×20 frame. I used the tulle on the complete picture. I tried to fabric paint the dog instead of quilting it using different shades of thread.
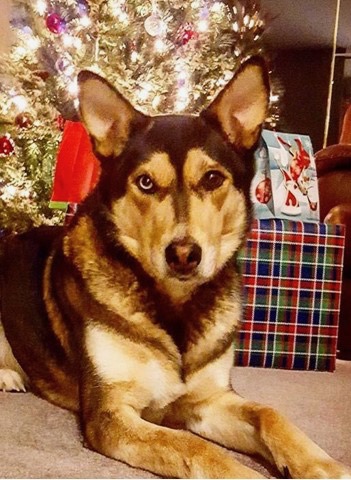
I want to thank you again for being such an inspiration. I went to your talk and show in Calgary. Here is the picture of Hayden finished and I framed it. I will be giving it to my son after it is displayed at our quilt show on March 17th. I really enjoyed your history and how you got to where you are today… I can’t wait to see where the future will take you. I hope you enjoyed Calgary Alberta Canada during your visit.
Yes I did enjoy Calgary, Renee—thank you for sharing, and saying hello.
March: Asilomar Conference Grounds, Pacific Grove, California
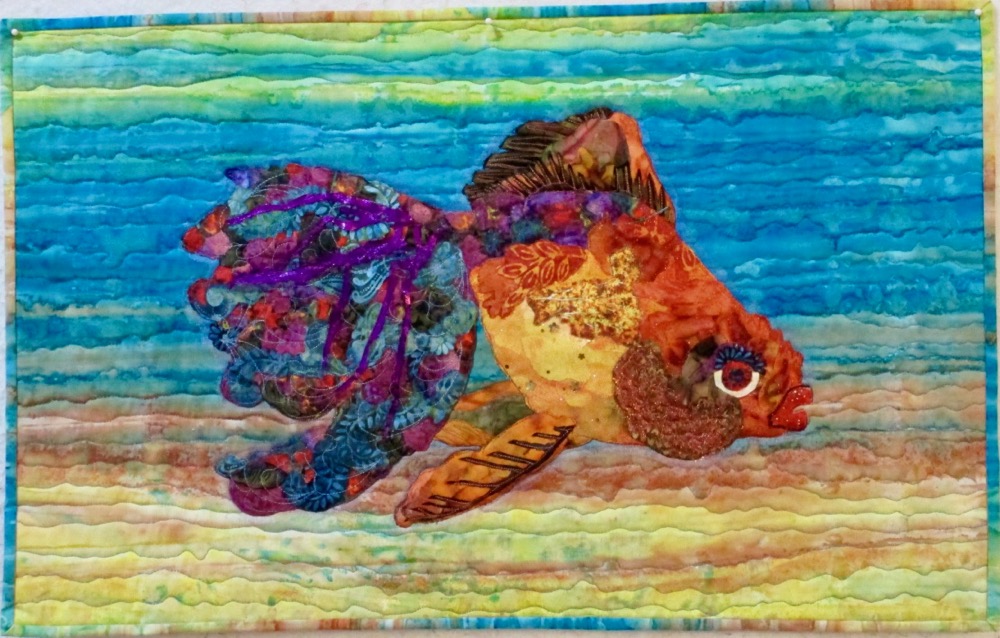
Nancy Doran attended the second session I taught this year at Empty Spools. I love her lighthearted approach to the fish she made. A bit of sparkle and glitz used for fishy highlights, to bring in the New Year.
I always like to attempt something small when starting an unfamiliar technique. This image fit the bill and the result is “Mimi, Headliner at La Cage a Poisson!” Ready for her debut, here is “Mimi.” Thank you for all your help getting her “headliner” ready!


April: Alegre Retreat, Gateway Canyons Resort, Gateway, Arizona
Contrary to what Penny Haney says below, it never crossed my mind that she wouldn’t finish the portrait of the adorable chihuahua she started in my class at Alegre Retreat this past April. It was only five days, but I worked with Penny enough to see her determination show through.
Bet you thought I would not finish. I loved the process and was very sad when the piece was completed. The piece is 44” X 34”.


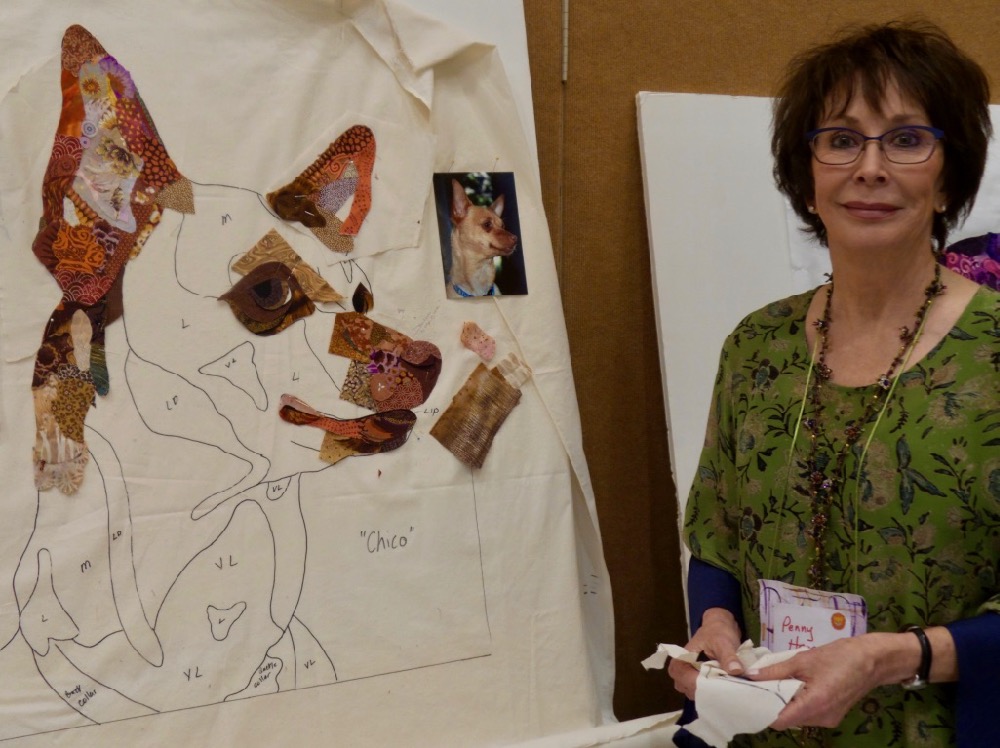
Even though Penny only got so far in class (above), I could see she was understanding the process. How nice it was to see the final image along with the in-progress shots she sent me for this post. I had fun looking for those hidden animal prints she talks about below, merged into the form of Chico.


Penny says:
The title is “Chico and Friends.” There are several animals interspersed in Chico [see the closeup above and below], including a pig, several dogs, a rooster, a beaver, a monkey, a cheetah, a bull, a buffalo and several others. I also printed off on fabric some dictionary terms, such as dog and chico. I had so much fun designing this I really was depressed when I finished it. Well I guess I’ll have to start another. Susan really inspired me and I’d love to take another class from her.


Click on any of these photos to see them in detail. I think Penny did a great job catching Chico’s expression.

May: Perth, Western Australia, Australia
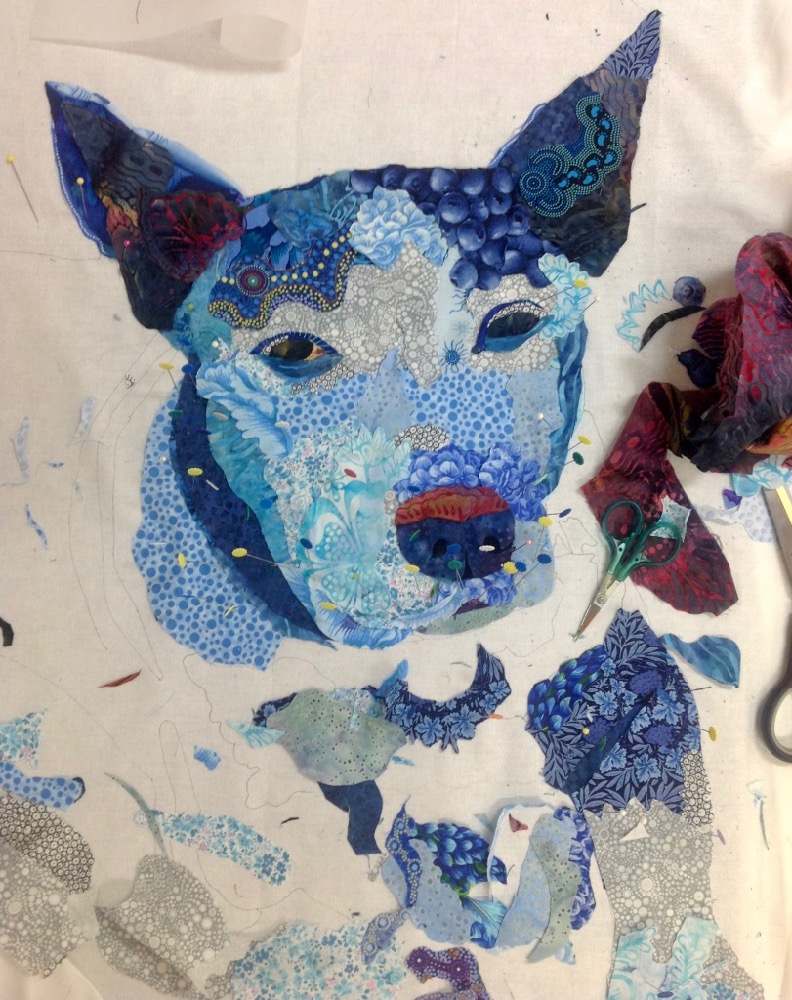
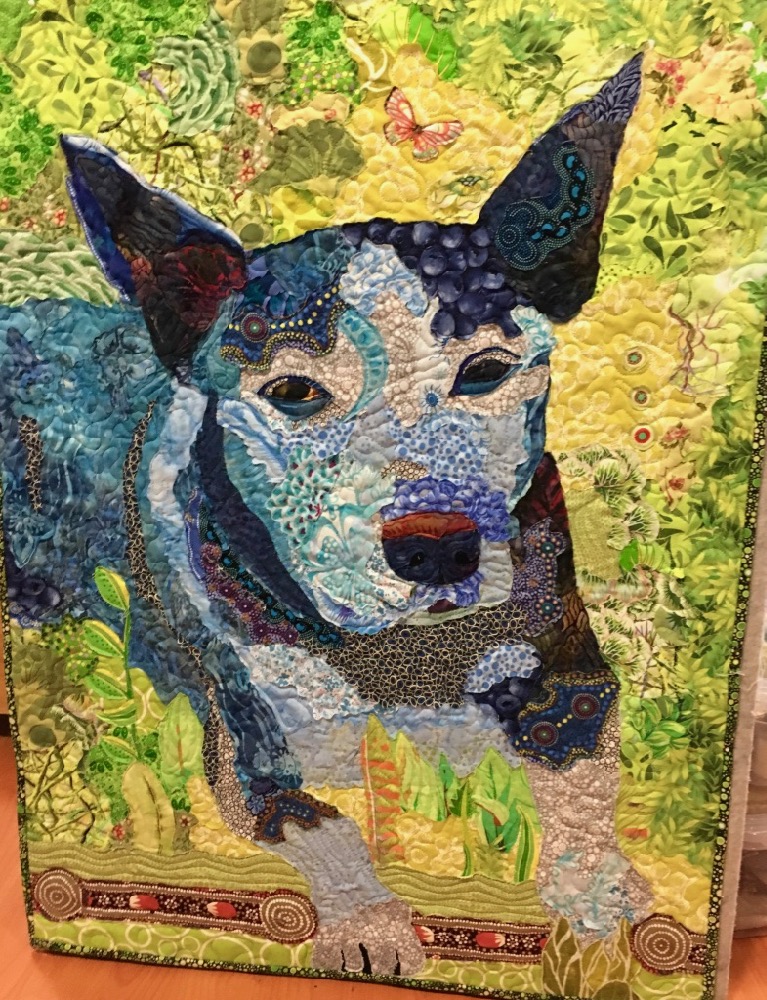
I met Lorraine Canestrini when Michelle Pearson invited me to come teach at her Perth quilt shop Handcrafter’s House. Lorraine’s “Blue Dog” reminded me a bit of my own dog, Pippin, who we suspect had more than a little Australian cattle dog in her. Though I never met this pup, he touches my heart and makes me smile.
Lorraine shared:
I don’t often finish projects that I start as I am always eager to start something new. However I totally loved this process and not only did I get it finished, I can’t wait to start another one.
The Quilt is called “Blue Dog” and is from a photo of our pet dog Toe. No one knows why my then teenage son named him Toe but it seemed to suit him. He is a cross between a Staffie Terrier and Aussie Kelpie. Unfortunately he passed away recently but of the ripe old age of 16. The Quilt is a wonderful reminder.


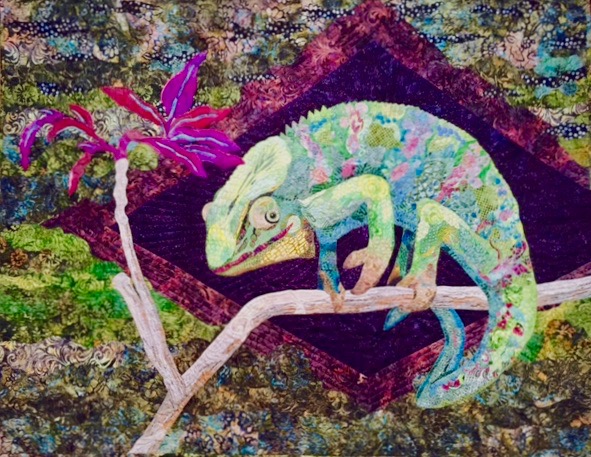
Jan Rowe also attended the class at Handcrafter’s House. As you can see, she had much of her chameleon done by the end of class, but she finished the background on her own.
I’m thrilled to show you my finished Chameleon. I had such great fun making him and quilting the finished top. I’m entering the quilt into next years QuiltWest exhibition in the theme category Complementary/Contrast. Thank you for an inspirational workshop.


I remember that Jan mentioned to me that she had tried to get into classes of mine in both New Zealand and years later Melbourne, Australia. She finally got lucky this third try, which she related to the quilt she created in class.
I have called the quilt “CheekyFellow” but I think an alternative name should be “Third Time Lucky.” In Tanzania and again at Iguazu Falls the little blighters (critters) scampered off before I could photograph them. At the Museum of Natural History in NY I was lucky. It just stood on a branch and stared. The colours I’ve used are totally imaginative but its pose is based on my single successful photo. All the fabrics are trapped under fine black or dark green tulle.
May: Urunga, New South Wales, Australia
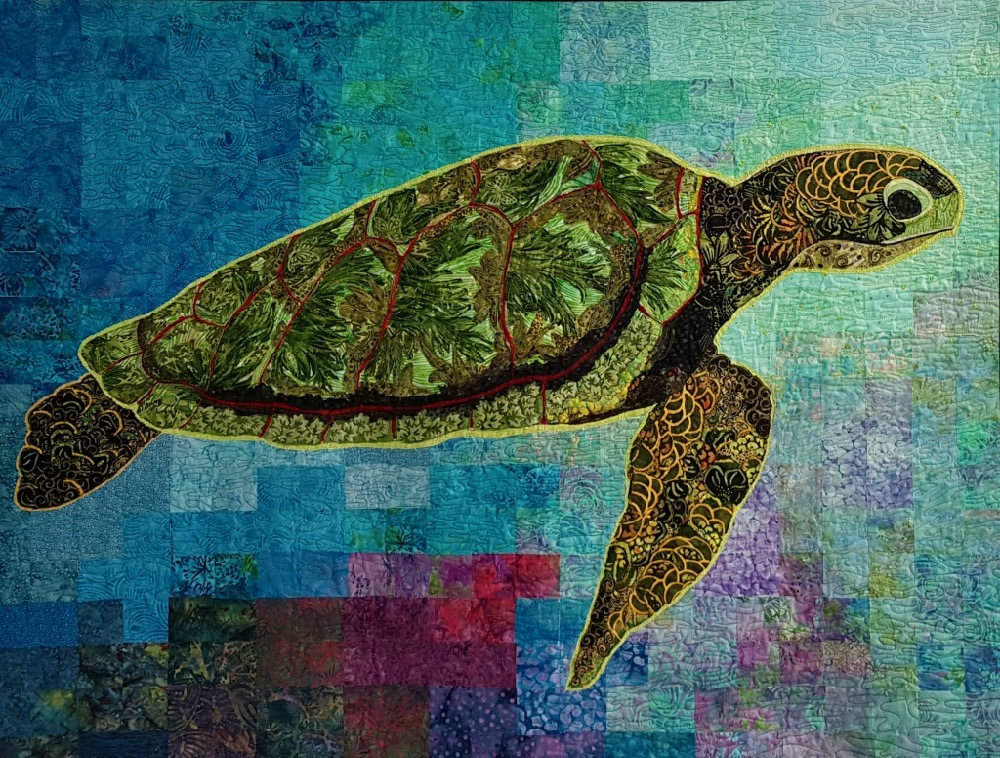
On the same jaunt to the Land Down Under, I spent 4 days at Caroline Sharkey’s “Sewing Up a Coastal Storm” Retreat. There I met Annette Brennan, who worked on the turtle fabric collage that would become “Myrtle the Turtle.” When I emailed her recently to ask if I could use her work in this Finish Line, she sent me the following:
I only started patchwork and quilting when I retired from a rather hectic career. A present to myself was a new sewing machine and patchwork lessons—little did I know what it would lead to !!! I devoured all the treasure trove of information, photos, blogs, lesson etc on the internet. I found Susan’s beautiful works and followed her blog and wished there was some way that I could attend a workshop given I live in Queensland, Australia—then it happened—Caroline Sharkey in her wonderful way had Susan tutor a workshop for us on the Eastern side of Australia in her adorable town of Urunga.
Having never ventured in to the arena of fabric collage I was pretty certain what the subject would be—a turtle more specifically “Myrtle”. My husband and I have spent many hours snorkeling through the Great Barrier Reef and there are few things as precious as a beautiful turtle gliding past you. We had many hours of GoPro videos of our adventures with the marine life off Lady Elliot Island and thought that I would use one of the still images in Susan’s class at Urunga.
Unfortunately after believing that I had the great picture, I found out on day 1 that my ambitious spirit would most probably not be met with a readily completed first piece of a collage quilt. I then quickly opted for a more appropriate image for a novice.
I wanted the colours to be based towards the greens, with the use of blues and aquas with some darkness and light that reminded me of our great natural wonder. So rather than using the colour photo during the workshop I migrated to the back and white so as not to restrict my vision to the natural colours of the creature.
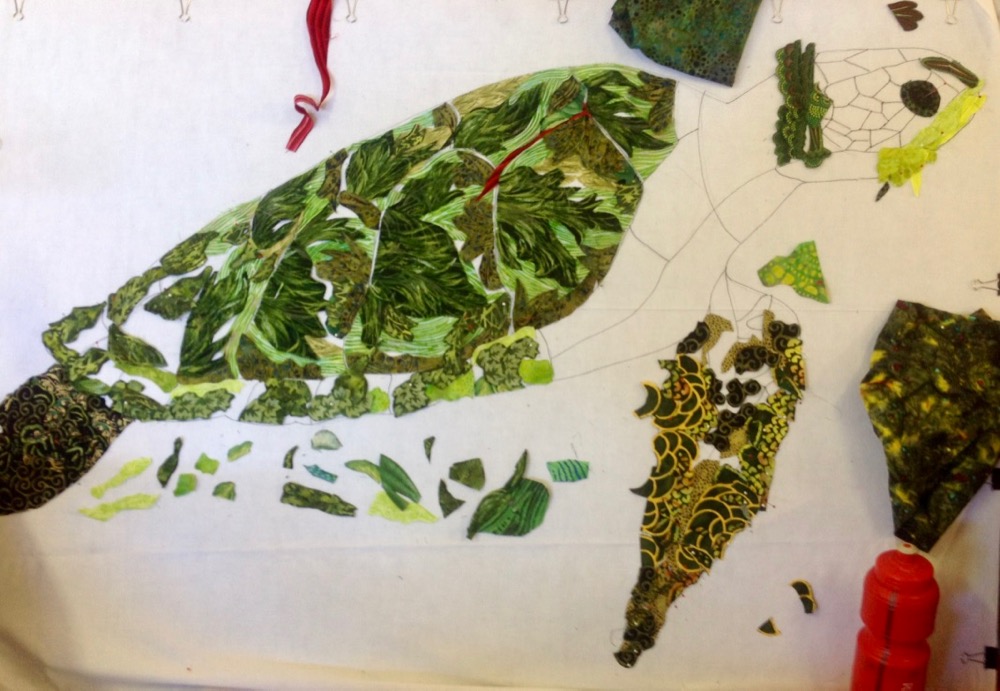
I would have to say that it took a while for it to click on how to look at the fabric and how this could then be used in the collage. I also had trouble in cutting into fabric to retrieve a certain section sometimes nowhere near the edge of the fabric. As a daughter of mother who grew up during the depression and war, it was contrary to the beliefs installed in me to not waste anything. Gradually I overcame this by focusing on what was necessary to create the image I wanted for Myrtle.So as the 5 days progressed and the ideas started to gel with both input from Susan and many discussions with the class participants, Myrtle started to take form. I found that her shell was rather easy to commence but really struggled with her head. Gradually she started to become easier after I did her fins and then balanced her by incorporating some of the associated fabrics. The concept of layering, while discussed by Susan, was a little foreign but progressively understood and then proliferated during the composition of the quilt.
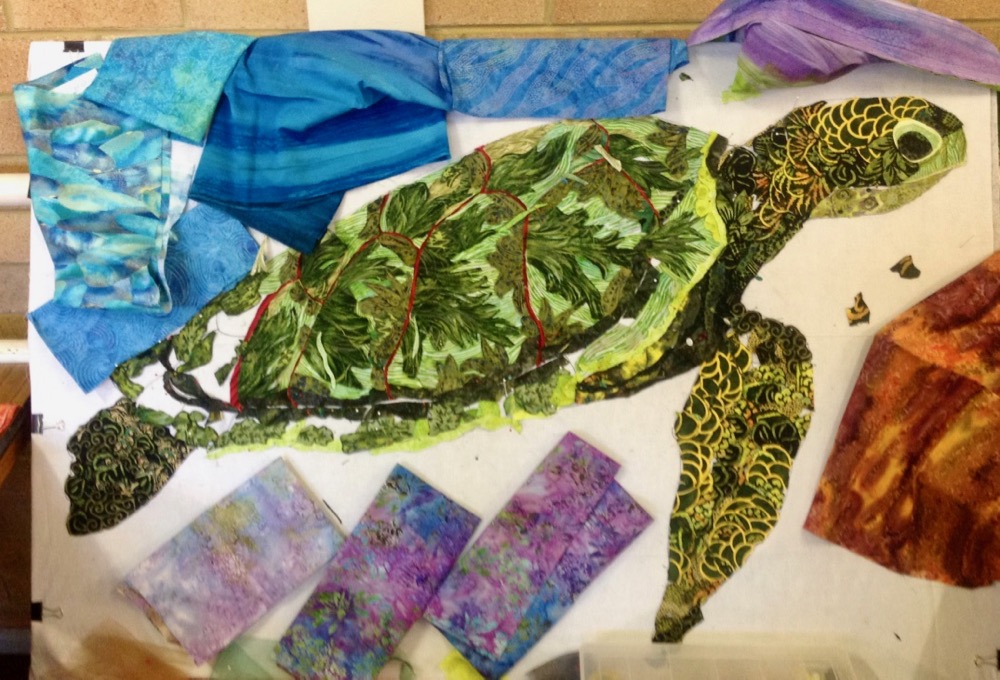
With never enough time in a class (albeit a 4 day workshop and with many participants) I started to get concerned about how I would present her on backing fabric and probably agonized too much too early but wanting to get any snippet of help before we all travelled thousands of kms away. Upon returning home I was determined to get Myrtle completed and then worry about how to present her. It the peace and quiet of home and returning to our videos of the underwater of the Great Barrier Reef and trying out a couple of ideas I settled on a more traditional colourwash background and her outline highlighted. She now hangs proudly on the wall in our home.I still devour the internet looking at images of art quilts and in awe of some of the pieces I see in the blog but at least now I know that I can in some mediocre way produce my own work.
I’d like to thank Annette for a thourough and entertaining account of her trials, tribulations, and eventual success with Myrtle. I applaud anyone who steps out of their comfort zone and tries new techniques, such as fabric collage. Annette did a lovely job on conveying her Great Barrier Reef memories in this quilt. I see a serenely gliding sea turtle, who is by the way, far and away from mediocre. Keep collaging, Annette.
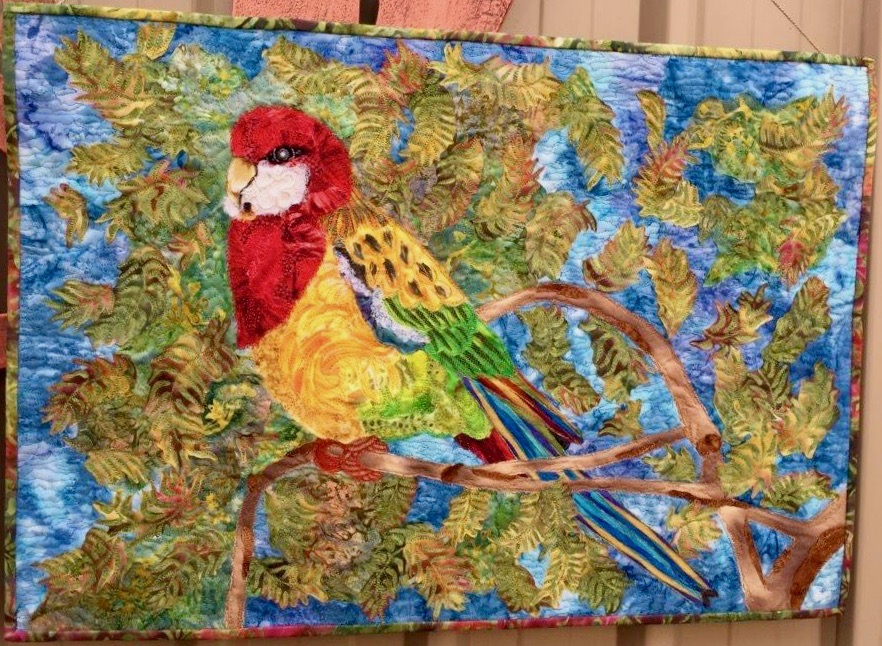
Pamela McIntosh was also in Caroline Sharkey’s quilt retreat and explained her fascination with rosellas, an Aussie bird, and Silky Oaks, a native plant species to me. Both are dear to her herself and her husband—she has always loved rosellas and they had planted a Silky Oak in their yard years before.
So when Pamela chose fabrics to bring to the workshop, she included pieces of her wedding dress fabric and lace in the mix. Her dress fabric made a perfect bright white base for the birds face, and lace added a beautiful touch of texture and detail. Again, click on any photos for larger versions.


Note how the bird’s tail changes during the collage process in the photos above, and again before the end. Though Pamela was well familiar with this bird, the collage process is also a practice of looking closer at your subject, and she made some nice editing choices.


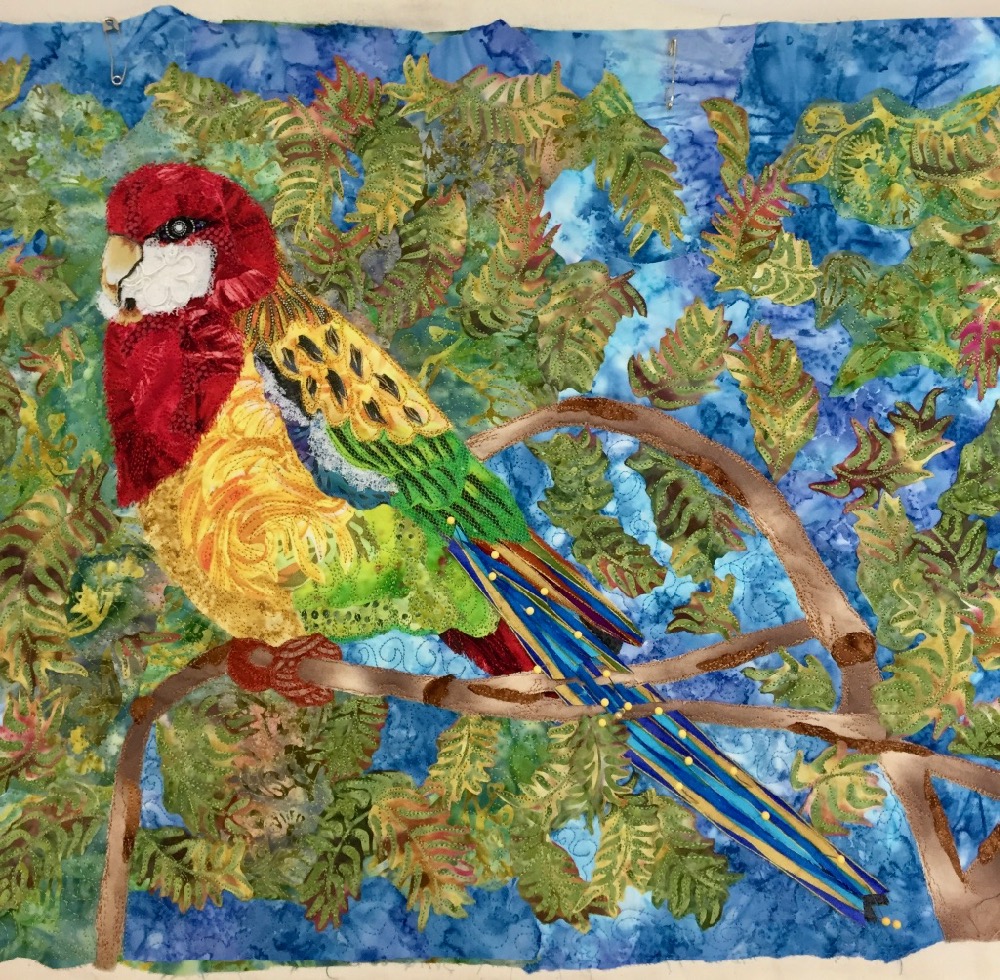
Pamela wrote:
A friend was looking at photos of this on my phone long before I’d finished and she said “I can see an R (for Robert my husband’s name) in the picture.” I hadn’t even seen it, so there is my story, so I called it “Bobby” for my husband.
Thank you again for the lesson as it’s different than all the other textile art work I have done over many years, I can’t believe the amount of work it takes, so you must spend a lot of time on all of your work.
I do intend to start another one in the new year as it was very artistic the way you do things, and I love different things.
June: Morro Bay, California
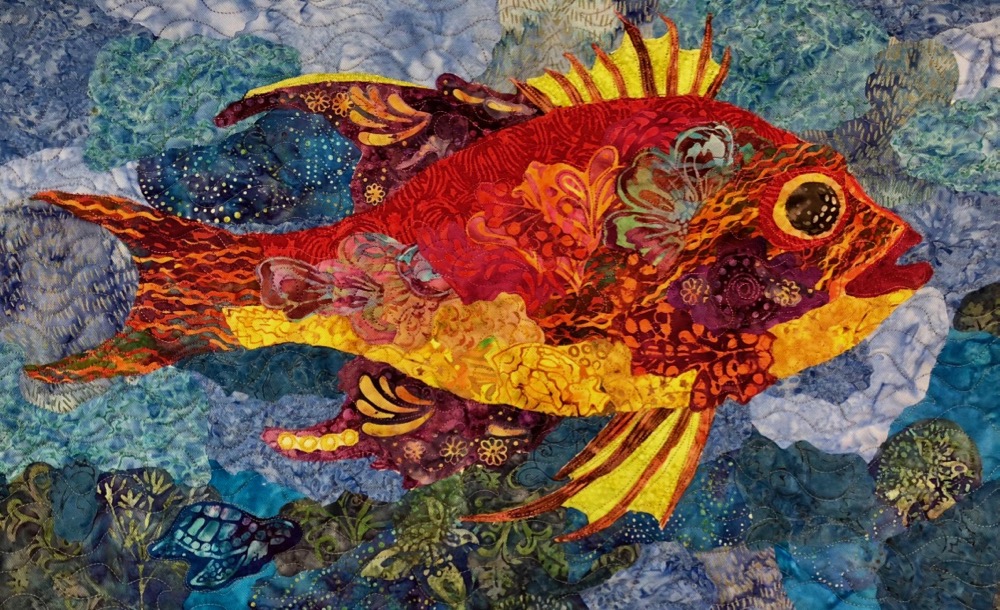
At the Seven Sisters Quilt Guild Show I met up again with Lynda Flynn, who has taken several classes with me. This was a two-day Fish, Bugs, and Butterflies class, so Lynda brought a finished fish, below, with her that she had completed as a “warm-up” exercise. Pretty nice!
Then she began a new one in class….


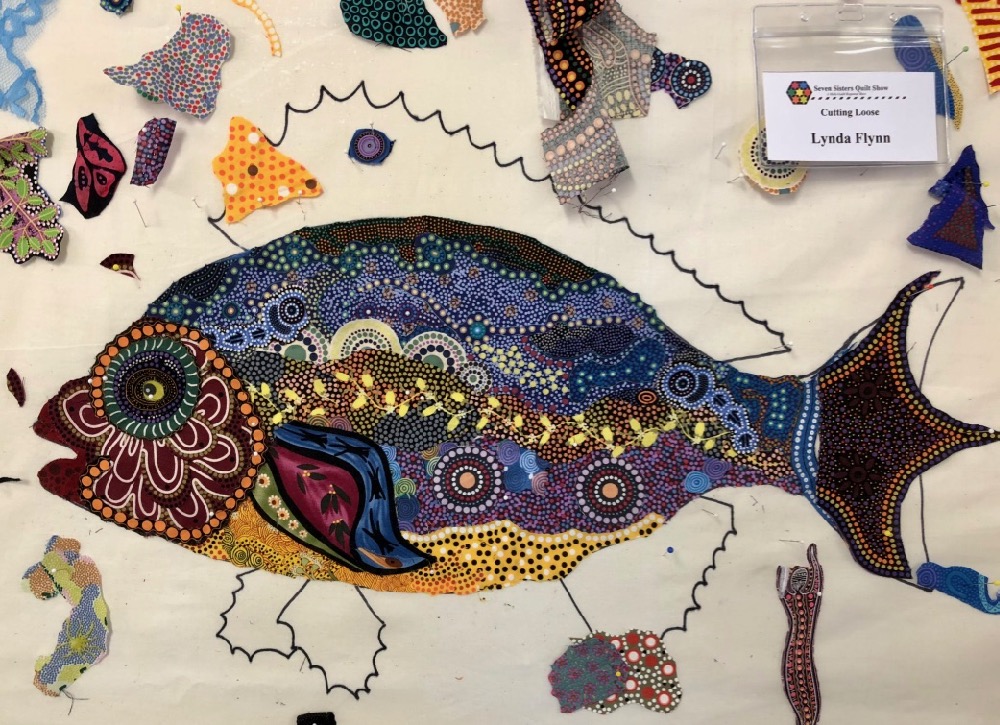
Lynda’s nephew christened the new fish “Mathilda” because she used a lot Aboriginal Australian design fabric. The large scale designs found in this fabric worked great for the visual texture and flow of this fish. As a contrast to those very definitive prints, Lynda finished off the background with watery batiks to provide a very pleasing visual balance.
June: Morro Bay, California
Also at Seven Sisters was Bonita Shaw, another previous student who was a pleasure to see again. When I asked her, Bonnie explained her unique choice of subject matter for this “fish, bug, or butterfly” class:
I picked the Mosasaurus after seeing Jurassic World, one of my favorite movies in the Jurassic Park series. I wanted a fish that was not your grandma’s tadpole! So abracadabra and there she is.


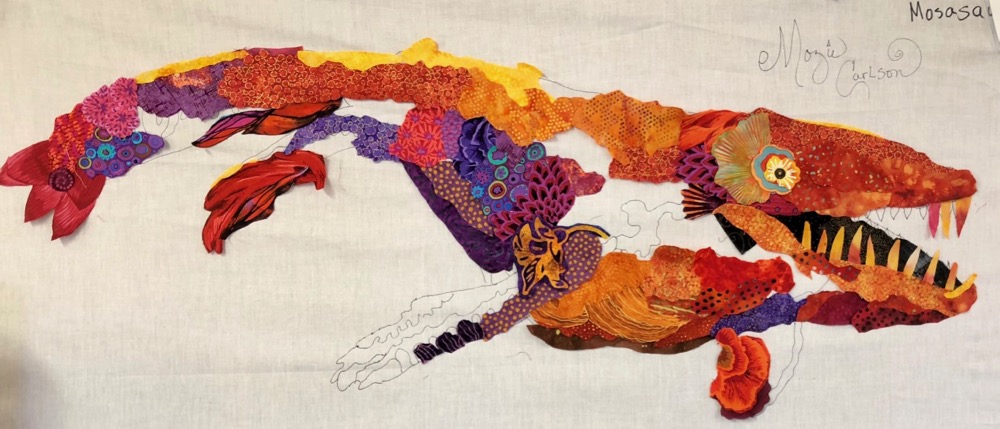
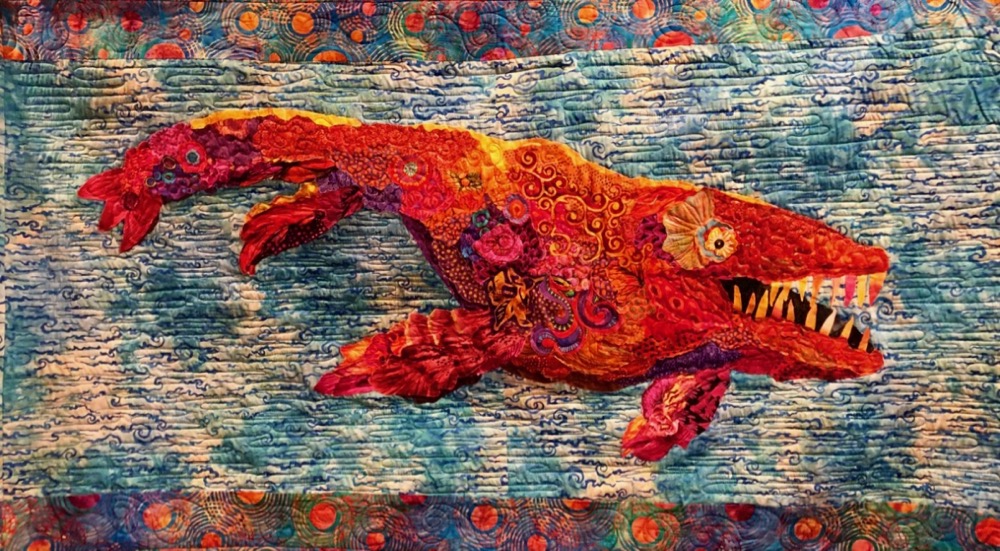
In case you’re wondering, in a previous class of mine that Bonnie attended, she inspired several in that class to name their quilts after me, appending “Carlson” to whatever they had decided to name their quilts. Here, Bonnie continued the tradition. Thanks Bonnie. 😉
September: Madeline Island, Wisconsin
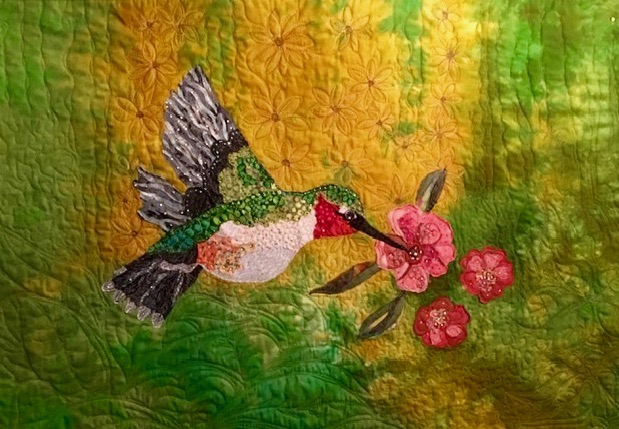
Joan Gale attended my class at MISA—Madeline Island School of the Arts—where she started her lovely hummingbird. She says:
My husband loves humming birds and works so hard to get a couple of them to come around. So I decided to make him a wall hanging of a hummingbird for our family room that he can look at any time, even in the winter. I was lucky to find a large piece of hand-dyed fabric that was perfect in its entirety for the background. I then quilted the background with designs of garden flowers like hosta and black-eyed Susans. Lastly I added crystals which gave it some nice pizazz.


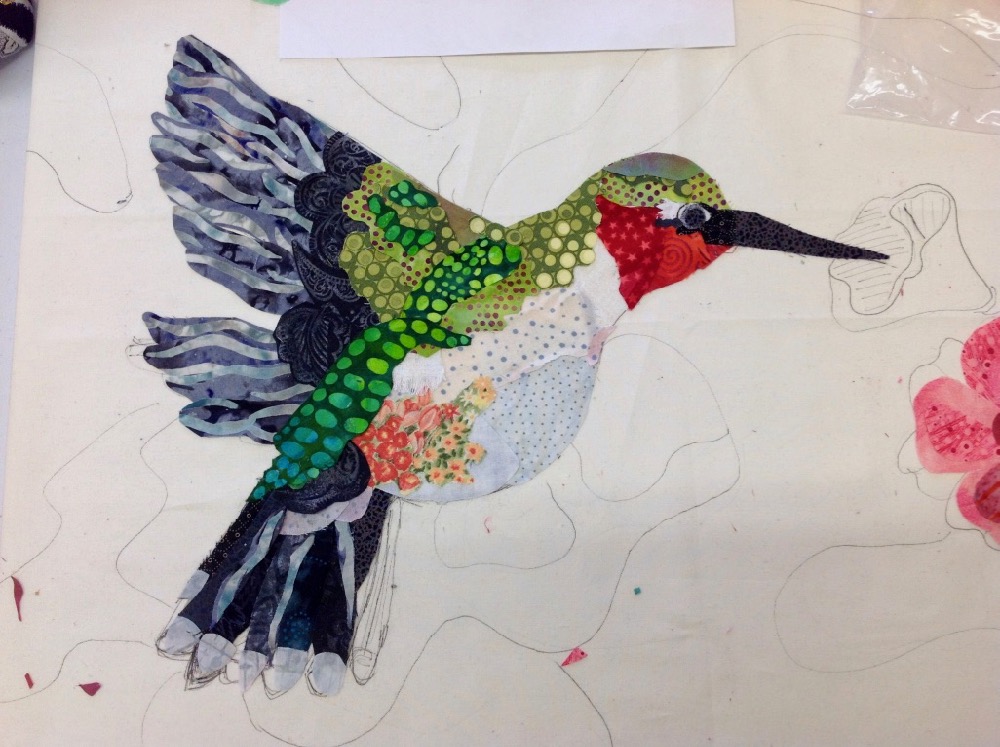
Joan and her husband live in a cold and wintery part of the States like I do, so seeing this quilt does bring back memories of warmth and the humming flight of these birds—as well as the lovely retreat week on beautiful Madeline Island.
October: Harpswell, Maine
Even with so many classes I teach every year, each seems to have its own personality, either with the chemistry between the students themselves or with the variety of subject matter. I have been blessed with classes that just “click” and this Harpswell retreat was no exception. But what stands out in my memory was the abundance of smiling portraits—of children.
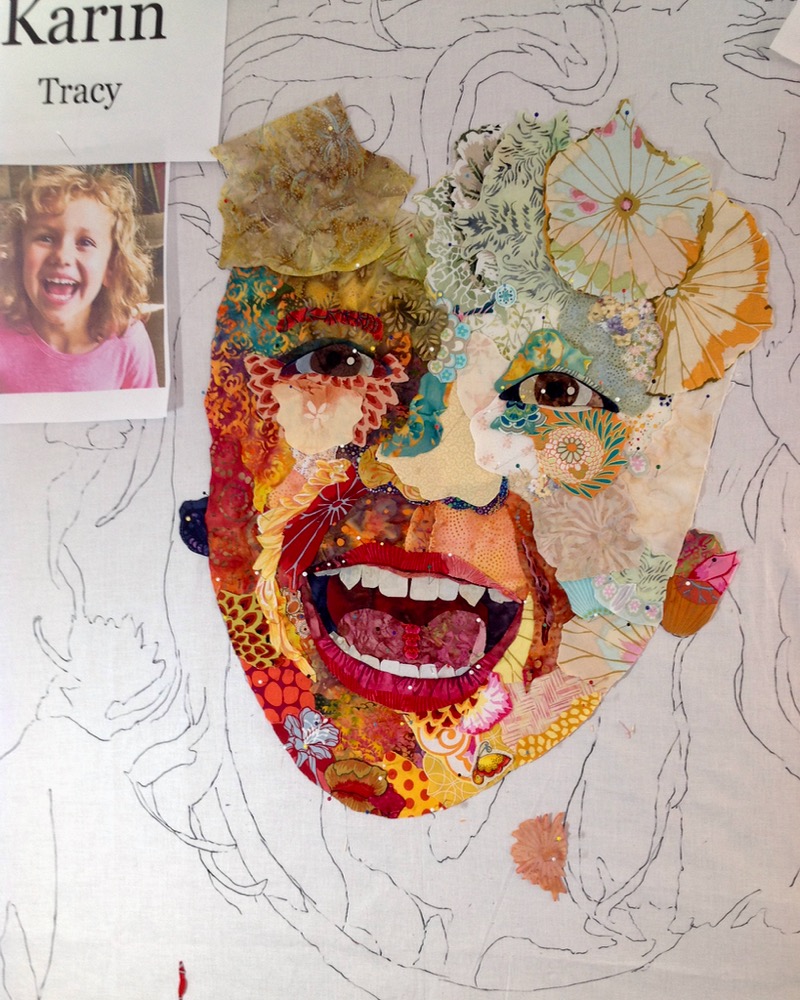
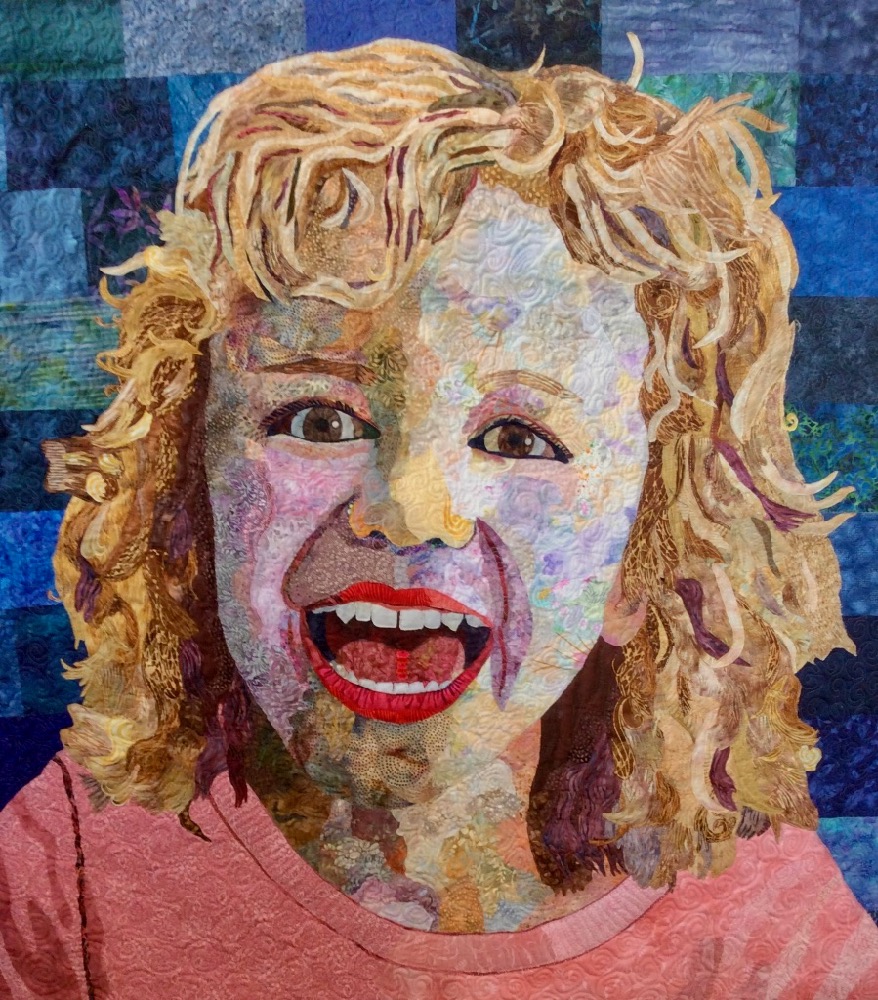
When asked what the most difficult subject matter is, I’d say off the top of my head, that it’s portraits of children, especially if their teeth are showing. So I took a deep breath when I saw what this class had in mind for our time together. A good thing is that most took my recommendation to “go big,” and in the case of Karin Tracy, she went super big on her portrait of her granddaughter Alia. I don’t have exact measurements at my fingertips, but I guesstimate that her face is about four feet top to bottom, which makes her mouth, and teeth, a workable size—which doesn’t mean easier, just easier to manipulate.
And as Karin related to me, she had stroke of luck with a fellow student in the class:
Making this quilt was the most challenging thing I’ve ever done. There is only so much you can accomplish in the classroom time and I’m grateful for all that I learned there. Being this was a portrait where a child’s teeth were an important part of the picture, I was especially fortunate to have a children’s orthodontist in my class to get tooth placement just right!


It was only three months ago that she began the quilt in my Harpswell, Maine retreat, so I was quite amazed when I recently received an email of the finished quilt. Karin wrote:
I have worked on this everyday since I left the class in October. I have redone everything (except the eyes and mouth) several times. I have decided it was finally good enough for my first project.
After I left the class I spent many hours every day for the next 6 weeks working on this. I’d go to bed at night feeling stuck but then I’d wake up in the morning with solutions to try…and eventually I completed it. You just have to be patient and allow the process to unfold.
I think that Karin’s observation of being patient with the process and letting it unfold—to persevere—is a great recommendation. Fabric collage is not a difficult concept of cut and glue, but learning how to best do it does take time. And another thing she touched on was to realize when a project is done—when you’ve learned what you need to learn with a particular subject or goal, and then to finish it and learn something else from the next project.
However, I’m not sure that “good enough” is the correct description of this portrait. I think it’s fantastic.
November: Madison, Wisconsin
Marty Petillo is a member of the Madison Contemporary Fiber Arts Group. I met her when I was there to give lecture and class at Blue Bar Quilts, only a month ago.
Marty used one of my beetle designs as a starting point for her quilt. With subject matter decided, she could focus right away on her fabric selection, which can often be overwhelming in itself. So, I’ll make the suggestion of, “what’s the story?” Here is Marty’s answer:
The story: My husband studied ground beetles for his dissertation. He remembered them as very beautiful. That’s the inspiration for “Happy Beetle”. My beetle is all dressed up and on her way to party in a friend’s tree house.
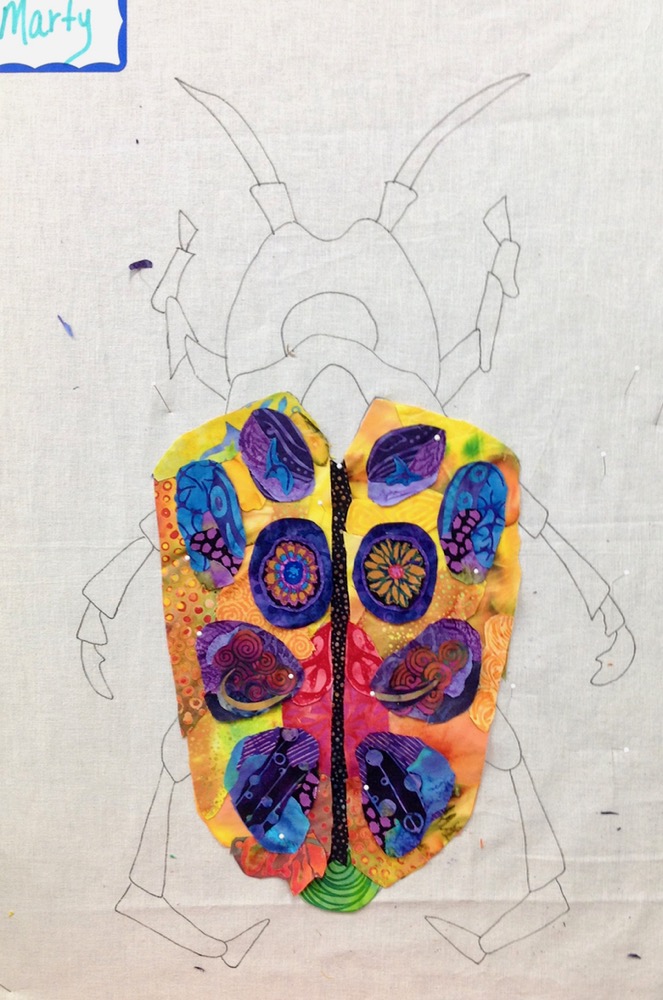

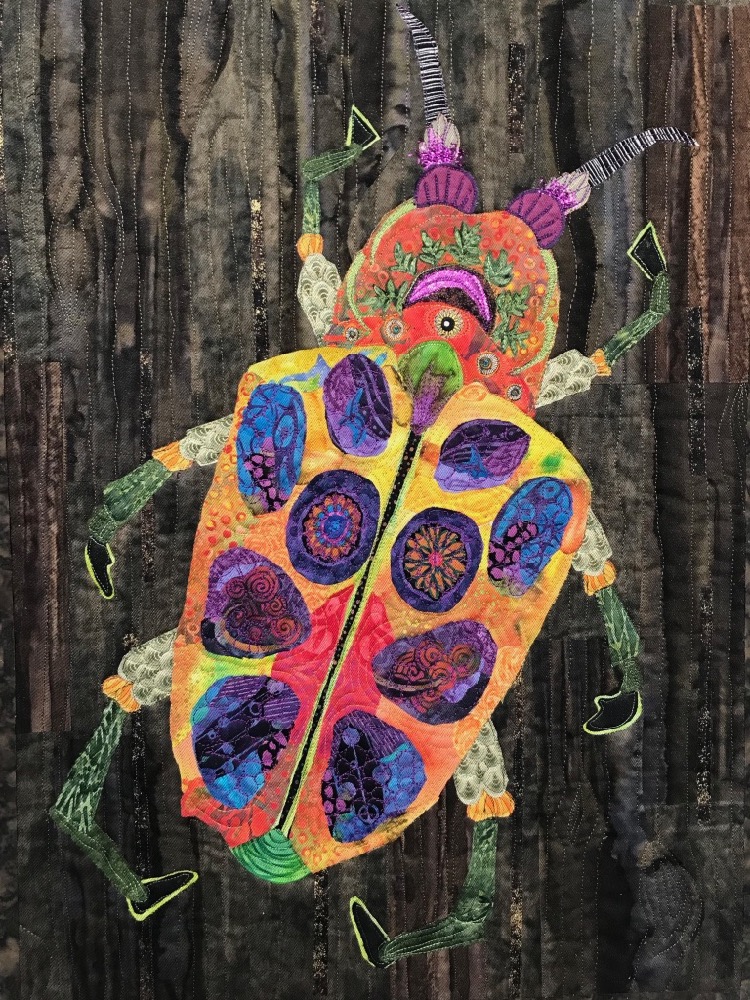
Then comes the background, which is a continuation of Marty’s story, combining five different fabrics, collaged to create interesting tree bark for her beetle’s habitat. Prior to quilting, she covered the entire piece with fine black tulle. Marty finished with:
Thanks so much for the fabulous workshop in Madison at Blue Bar Quilts. It was a fun taste of your many fun techniques. I finished my Happy Beetle today so I thought I’d share it with you. I pieced the background as you suggested and glued the binding—kind of messy the first time but very easy. I still have to sign the front. I’m quite happy with the result.
Happy New Year!
Lovely, but the photos did not all appear. Several of the finished ones do not appear in my post, from Mathilda on down. Can you repost with the rest? I’d love to see them!
This happens to me and I have to reload the page and then they show up.
Why a fantastically beautiful retrospective of students’ work for 2018! With your help, the students did a superb job. I can hear your voice in my head as I see the during and finished quilts as you guided your charges. Super!
These are wonderful! …I really need to get mine finished….
What great works of art you inspire. Thank you.
These are just fabulous!
Thank you Susan for sharing all the beautiful works of your students and I was lucky enough to be one of them. It was great to see my Rosella on your blog page and also to see Annettes turtle as she was in the same class.
Happy New year to you and Tom
Beautiful work.
I love these quilts and would like to attend the May course in Portland. I have looked everywhere on the website I can think of – how do I register for this course? On the course outline I see information on how to reserve the hotel, but cannot see (I must be missing it) information on how to register for the class.
Thanks Pat, 2019 Maine Retreat signup will be posted on Saturday, January 5th. However, my schedule changed and there will be no May Maine retreat.