
This post introduces what I expect to be a new series: This Week in My Studio. As the title implies, in these posts I’ll be showing what I’ve been up to recently in my work space. This might mean a close look at a quilt I’m working on, or it may mean following along as I reorganize my fabrics, or even featuring all the different places my cat Djinni has claimed as her sleeping spots!
I hope in any case, that what I share can help you in one way or another—by giving you some new ideas or a fresh way of looking at things, or just to entertain you for a small part of your week. You may even find the theme of a post familiar or comforting as you say to yourself, “See, even Susan has a pile of fabrics she doesn’t know what to do with!” Let me know what you think and share your own experiences in the comments below. Have any topic requests? Include them in the comments section as well.
This week outside my studio, storms moved through leaving us with a beautiful snowy landscape. It’s the first year in many that we have snow accumulating from storm-to-storm which has created a nice snow base—with no melting due to a month of frigid temperatures. I’ve been able to go snowshoeing from right outside our door! Tom’s great about keeping the path between house and studio open for me, and the little bird prints under the dried worm feeder greet me at my studio door.


Inside my studio this week, I’ve been doing a Do-Si-Do, as Tom says. As he defines this use of the word, it’s how that in order to accomplish one thing, you have to move, complete, or otherwise take care of a few other things. Ever been there? This week I was doing a Do-Si-Do between fabric, pins, and glue.
What I really needed to accomplish was further progress on our February Fish Workalong. This week’s “homework” that I gave myself as well as our Thursday evening attendees, was to complete a first-draft of our chosen fish—by adding the tail and fins—plus considering background ideas and fabrics. Getting the fish tail and fins pinned and then glued, was straightforward though it does take time, which is not a bad thing to immerse yourself in.
However, the hunt for background fabric possibilities involved minor trail blazing to reach fabric shelves obscured by: a rolling six-foot shelf storing a portion of my lace fabric collection, my travel suitcase of class materials, stacked baskets of fabric on top of flat surfaces, two big studio lights, and a camera on a tripod. Oh, and the basket of cat toys.
I had been avoiding that rearranging task for months, but now I needed access to my stash of orange fabrics. Other fabrics pulled for other projects have been piling up for awhile, ready to be put away once access to shelving was restored. You may have a guess as to what I’ll be doing this weekend—the Fabric Do-Si-Do will continue.

The Pin Do-Si-Do refers in part to tidying up my nice and big pinning wall. For the second half of last year, I decided to pin up a few unfinished projects along with smaller finished collages (above photo), to inspire me for both personal and class ideas in directions to go.
This week I started un-pinning and re-pinning the projects that will be worked on next, and shuffling other mobile pinning boards out of the way (photo below). By the Thursday evening presentation I was able to pin the big blue fish quilt you see below left, onto my board for the Zoom meeting backdrop—my computer is just outside of the photo. The other bits and pieces of artwork you see are yet to be dealt with.

For my class presentation prep, having an open area on the board was what I needed to temporarily pin on some of the possible fish background fabric I found (photo below). In lieu of using an iron, I spray fabrics with water to easily smooth out any folds. It’s like magic to me—the folds just melt away—and while the fabric dries nice and flat, I do other things.

For more info about my pinning wall (the “permanent” expanse is 14 feet long by 7 feet tall, other panels are movable)—check out this post describing my studio and especially constructing the pinning wall (otherwise my studio has changed a bit since the original posting date!).
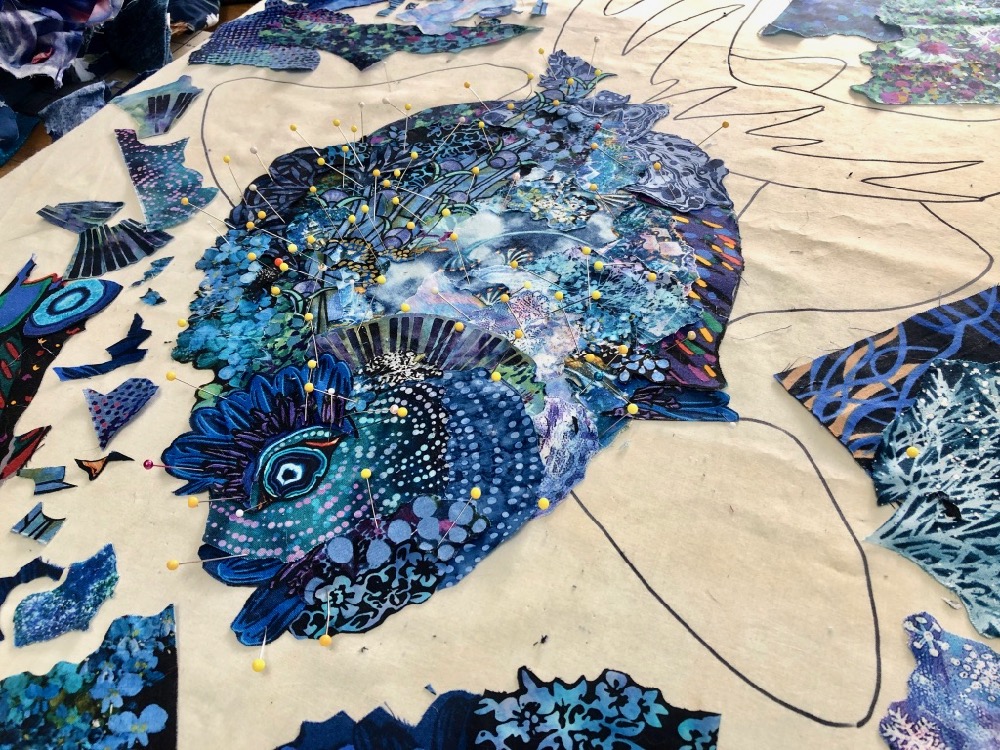
As Thursday rolled closer, it was time for the ol’ Pin and Glue Do-Si-Do with my blue goldfish class demo. In the middle of a collage, I never have enough pins—regardless of having, probably, thousands of them. What happens to them all?? So I look around for something to un-pin (another reason to tidy up the pinning wall). But usually they are right there, sticking out of the piece I’m working on. I pin liberally. When I run out of them, it means it’s time to glue and “release the pins.”
In the photo below, the tail has been glued. The amount you of pins you see on the magnetic pincushion are just what was freed up from the tail. It took me another few hours of gluing and unpinning to finish the rest of the fish. To read (and watch) more about gluing, check out this post: “Why Glue?”

The reward for this week’s Fabric, Pin, and Glue Do-Si-Do was to see it all come together. Below, is one of the possible fabric combinations for my Goldie’s background. There were at least another four or five “favorites” that the class, and Tom, chimed in on.
We’ll see where this project goes and what happens over the course of next week, in my studio.

It’s not too late (there’s a week left) to join in on this February’s fish class!
Sign up any time this month and receive any recordings you may have missed
and, if you can, attend remaining session live.

February 6, 13, 20, 27, 2025 — 7 pm, Eastern Time
Fantastical Fabric Collage Fish Zoom Follow-Along
REGISTER HERE
Price: $78
For more information click here
BONUS VIDEO: February 2025 Fish Follow Along Highlight
How do you know when it’s time to glue? One hint is when you run out of pins. Another, as in the case below, is when the pins start getting in your way. This video demonstrates how I tack things in place with glue in order to secure my collage as I work—and to free up pins so I can add more fabric!
It’s so much fun to see you at work and know that I’m on the right track with my own work space. Thanks for this look into your world.
Thanks Grace!XO It was fun putting together this new idea for posts!
It really shows how re-reviewing videos would help. I got to gluing and now I see that there is a much better way to do this – lol.
So much of this is about practice, Kim, and like I said in class, doing this enough so you learn what works for you or not (like glue on fingers or on a Purple Thang) 😉
Thanks so much for this post. Looking into others’ studios is a one of my favorite things. My studio is small so most of my furniture is on wheels. I was moving things around this week in search of a particular type of string. . Remembering where rarely used items are can be a problem. I moved my stand-up easel twice because I forgot where I stored that string!
I look forward to the next in this series of posts.
Hi Frances! Yes, shelves and such on wheels are very handy! At this moment, I was just clearing a space to roll a 6 foot garment rack to get it out of the way for some more shuffling! Your comment reminds me I need to take some “before” photos — fingers crossed my space works and looks better for it!