 Video")
I was recently interviewed by National Quilters Circle after winning their Best Art Quilting Blog. One of their questions was “Describe your dream sewing room/quilting space. ” My answer was “I think I have it.”
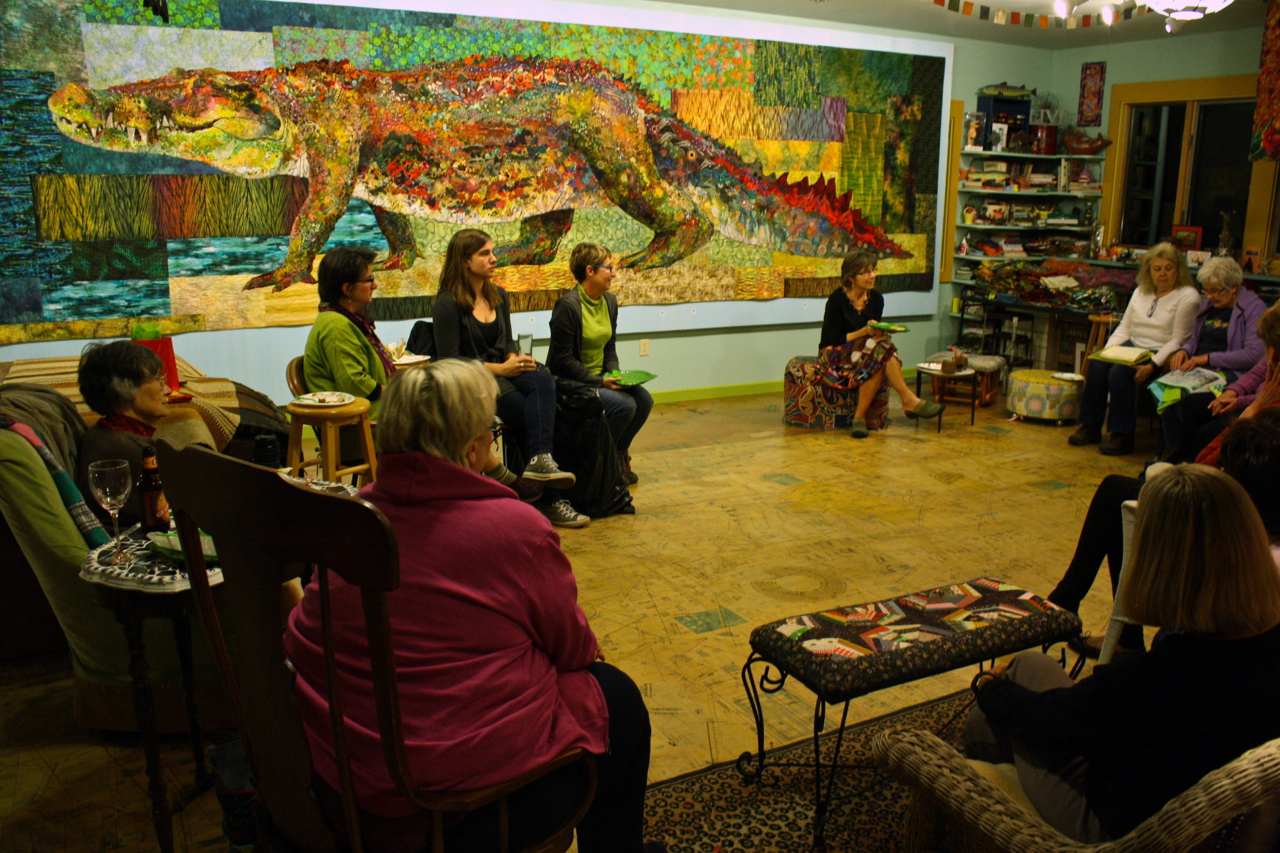
This studio, as I describe in the original blog post below, has enabled me to create quilts I could never have done otherwise—for example, “Crocodylus Smylus”, although my 14-foot pinning wall needed to be added onto in order to fit all twenty feet of her. Since her creation, she went off for a few weeks to the Wisconsin Museum of Quilts and Fiber Arts for her debut. After that she was shipped to Australia for the Australasian Quilt Convention, which took almost six weeks there and back. Then she traveled to Houston for the four days of the International Quilt Festival.
Otherwise, “Stevie” has lived on my extended pinning wall. Now that she’s going to be a featured quilt in my solo show at the New England Quilt Museum, she’ll be gone for three whole months. I figured I would take advantage of her absence to remove the extra panels of my pinning wall and reveal the windows and doorway that were covered up.
The video below shows the process of removing Stevie and those extra panels. Tom is climbing the ladder to remove the many pins holding her 35-pound weight as I support the parts of her already freed up. This is a two-person job to be sure!
(A note about the ads included in the video. Those appear because the music is copyrighted. Use is allowed but only if the ads appear. I don’t usually allow ads in my videos, but the music was just too perfect not to use.)
Original Post
For much of my life, my creative space has been an appendage, an after-thought, a space co-opted from existing living space. You know what I mean. There was the craft room in a converted basement, the closet that doubled as a dark room, and of course a series of guest bedrooms too full of fabric to ever host guests.
Then, for twelve years, my studio was a yurt, a 28-foot round, insulated tent. It was a wonderful work space with lots of light provided by a big central skylight and vinyl windows. The space was heated with a wood stove that my husband Tom, lovingly stoked for me on cold mornings—after he saw my ax-wielding kindling-cutting skills [More like do-it-yourself amputation skills. —Tom].
Three years ago it was time to say goodbye to the yurt and build a new and improved studio. Better storage was needed (corners give extra space), and straight walls would give me the ability to have a nice pinning wall. I put a lot of thought into the various design elements and Tom put much of his time and effort into its construction. I love my studio. It’s not over the top, but it has the elements that I need. Here are what I identified as necessary to this creative space:
- fabric storage
- sewing machine table
- adjustable piecing board
- pinning wall
- work table
- other storage
- desk for computer and paperwork
- good lighting
Here’s my floor plan. It’s mainly an open 28 x 32 foot box out of which I have carved space for each of those elements.
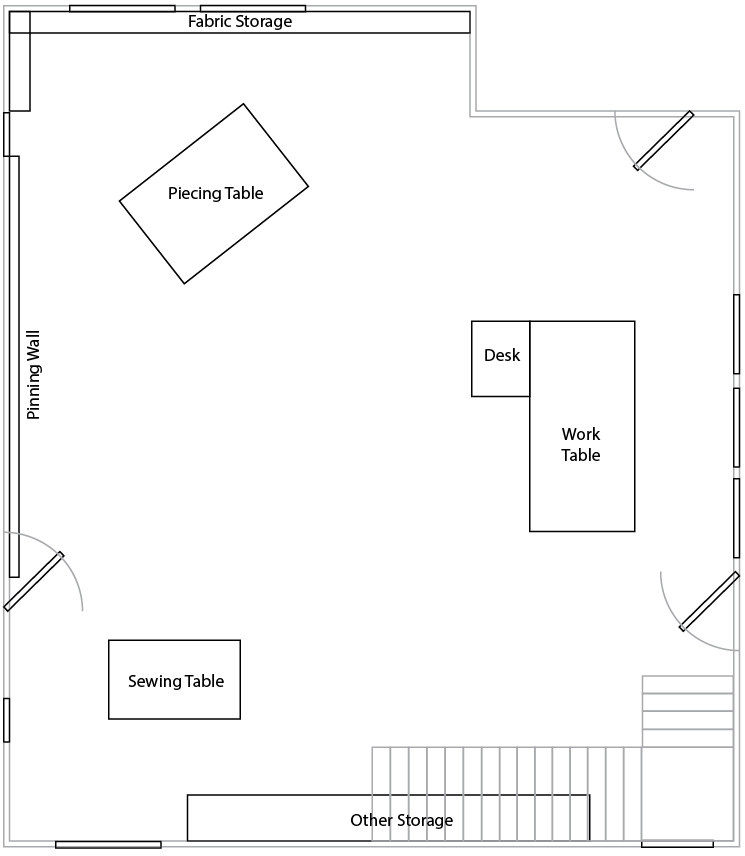
These are the most crucial items, for my way of working. It may look like there’s lots of open space, but trust me, it’s used. I’m definitely a pack rat. There are chairs, and little tables, and bookshelves, and . . .
And there are details the floor plan doesn’t show. Most of them don’t even show up at first glance. It’s the details that I think make a creative space more than just an open box with tables and shelves.
Light
Let’s start with light. It’s about as fundamental a need as there is. Light during the day and light at night. So that means windows and artificial light.
Non-artists might think, well, let’s put as many windows as possible in the south wall. That’s where the light comes from. If I was making a passive solar house, that’d be a good idea. For most artists, direct light isn’t so helpful. It’s inconsistent in its direction and intensity. It also fades fabric. Since indirect light also fades fabric eventually, my windows are low-e, which blocks at least some of the harmful UV rays.
When I’m constructing a quilt, northerly light is nice as it’s a consistent light without the strong sun and shade as the sun moves through its cycle. That’s why I have two big windows on the north wall near my piecing table.
Direct light is useful for other jobs however. Three tall east-facing windows spill light onto my work table, where I might be framing or cutting or doing paperwork. A single south-facing window floods light onto the sewing table, where seeing the stitches as I free-motion quilt is critical.
Meanwhile the western wall contains only two small windows. This allows room for a pinning wall (see below) and keeps the late afternoon light from making distracting shadows on my piecing table. However, we installed three sun-tubes from the roof to bring natural but indirect light into the area of the western wall.
At night I have two banks of daylight-bulb fluorescent spotlights running parallel to the east and west walls. I know there are other lighting solutions, and I may do more research and vary this later, but it works for now.
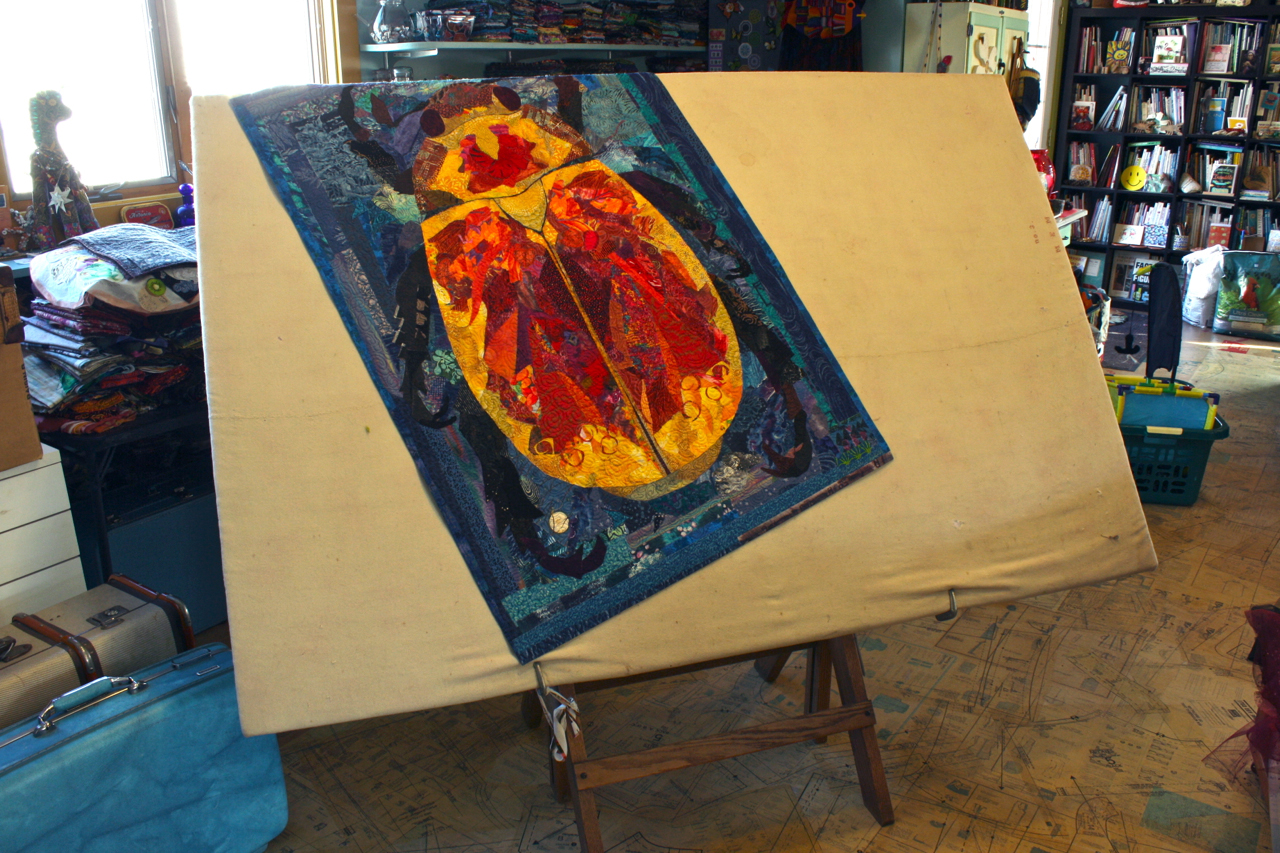
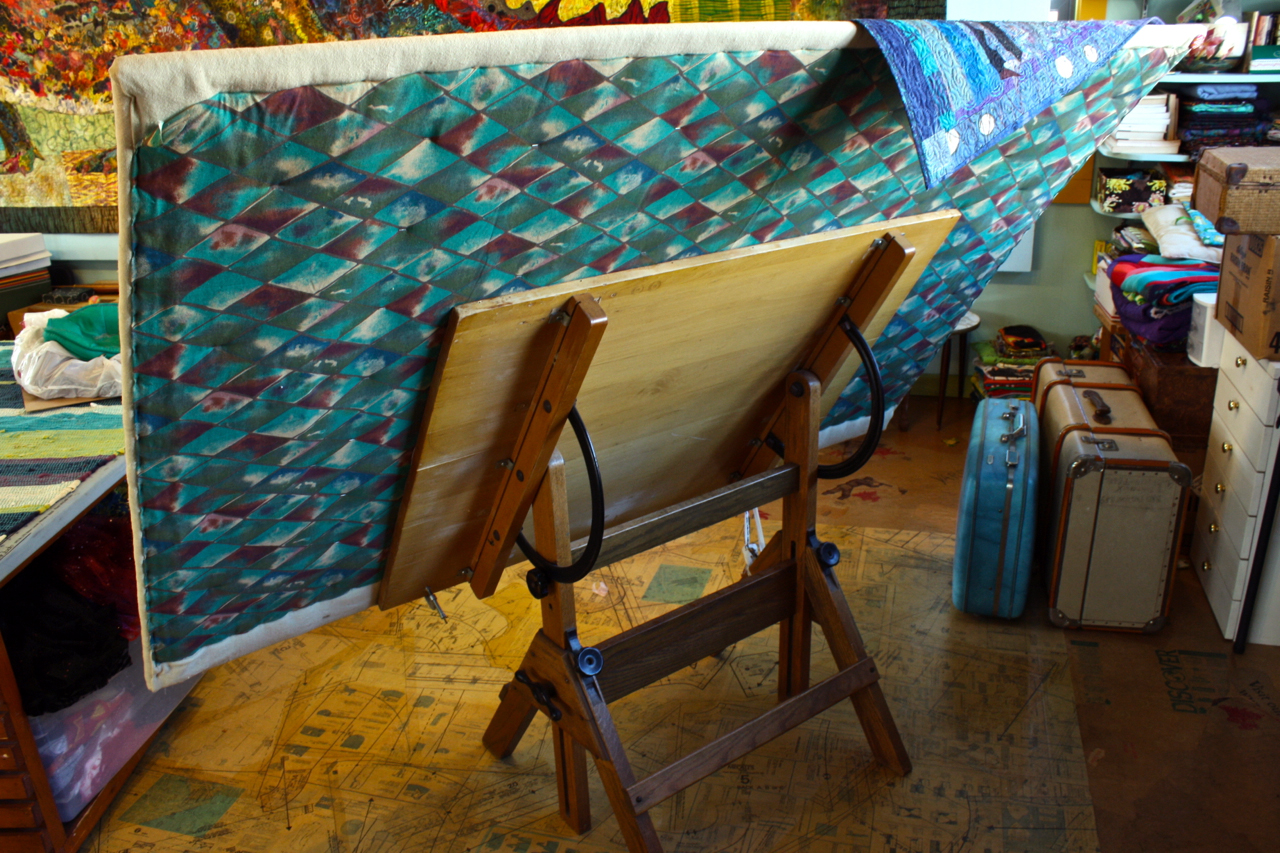
Pinning Wall
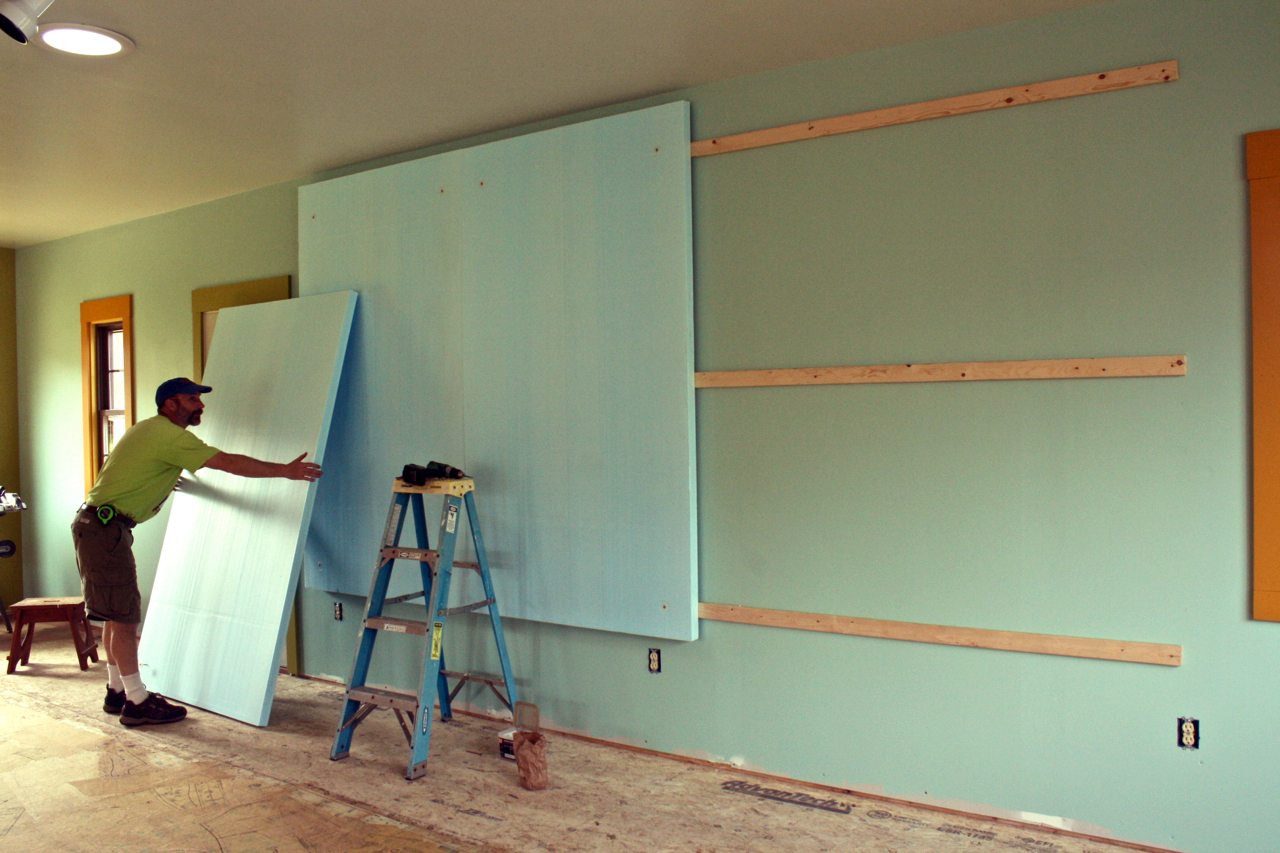
The largest pinning wall I ever had before this was a 4 x 6 sheet of plywood covered in black felt. When designing this new studio, I decided to devote most of the west wall to that purpose. As described above, that made the most sense light-wise.
I wound up having fourteen feet to devote to the pinning wall. It was designed to be replaceable when and if needed. (Like when Djinni cat sharpens her claws on it one too many times.) We used 2-inch thick sheets of 4 x 8 foot styrofoam insulation. Luckily, I found a more neutral blue instead of pink or foil covered sheets. Rather than screwing them directly to the wall, they are affixed to strapping, leaving a 3/4 inch space for air circulation. Tom was warned that styrofoam attached to the wall could actually trap moisture.
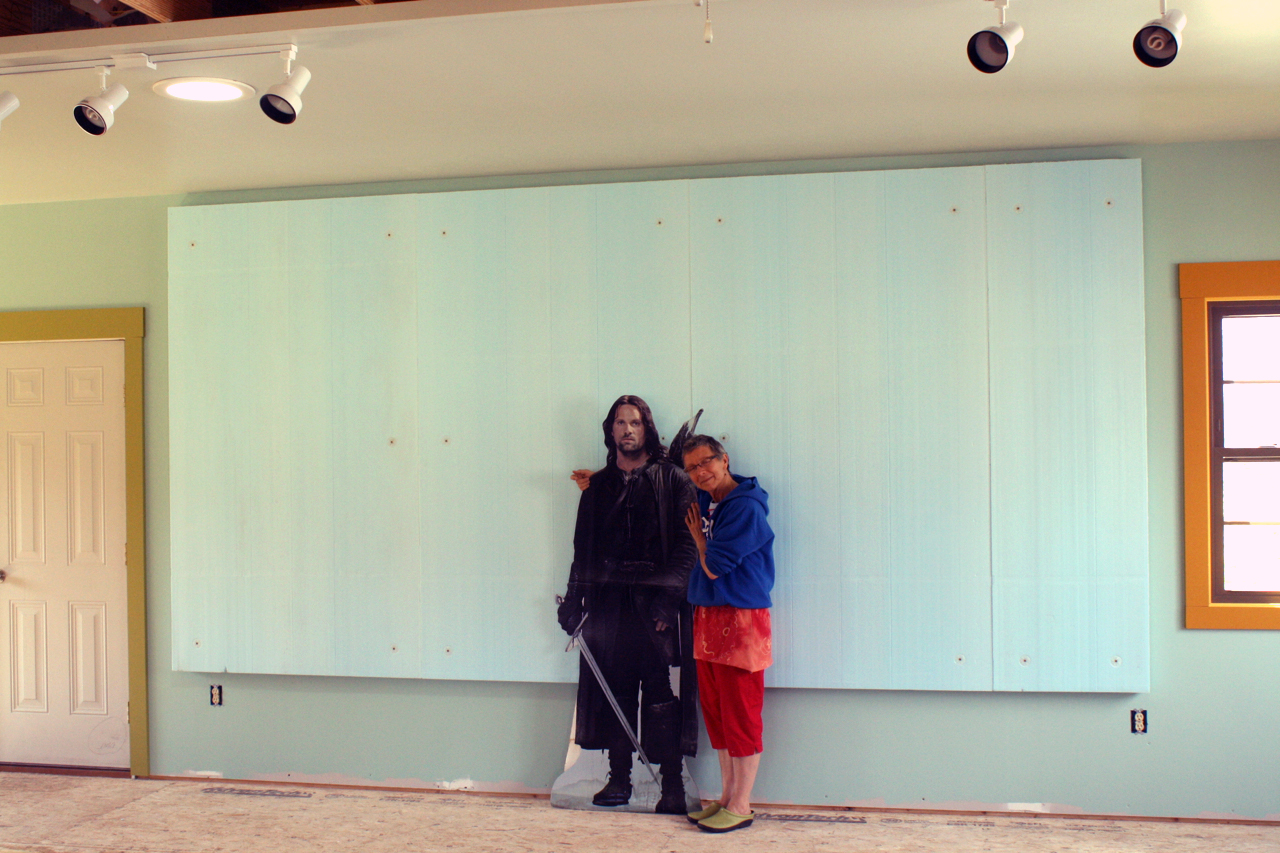
At one point, I questioned whether fourteen feet was excessive. So of course, one of the first quilts I made in this new studio was “Crocodylus Smylus,” a life-sized 20-foot salt water croc, necessitating extensions at each end of the wall.
Piecing Table
Since every other quilt I’ve made has never come close to fourteen feet, I usually start, and sometimes end, their collage construction on my piecing table. This converted drafting table allows me to angle the surface so my fabric doesn’t fall off as I audition it. Plus I have the option to sit while I work.
I adapted the drafting board by clamping a 6′ x 4′ homasote board to it. The homasote (found at a lumber yard) provides a permeable surface, which I have covered with felt, allowing me to pin into it. Clamps let me to remove the board when necessary. Today, I would probably use the same sort of styrofoam that I use on my pinning wall since it’s easier to pin into.
Sewing Machine Table
My sewing machine sits inside a rugged oak trestle table my dad converted. He cut a hole in the top of the table then constructed a box under the table to hold the machine.
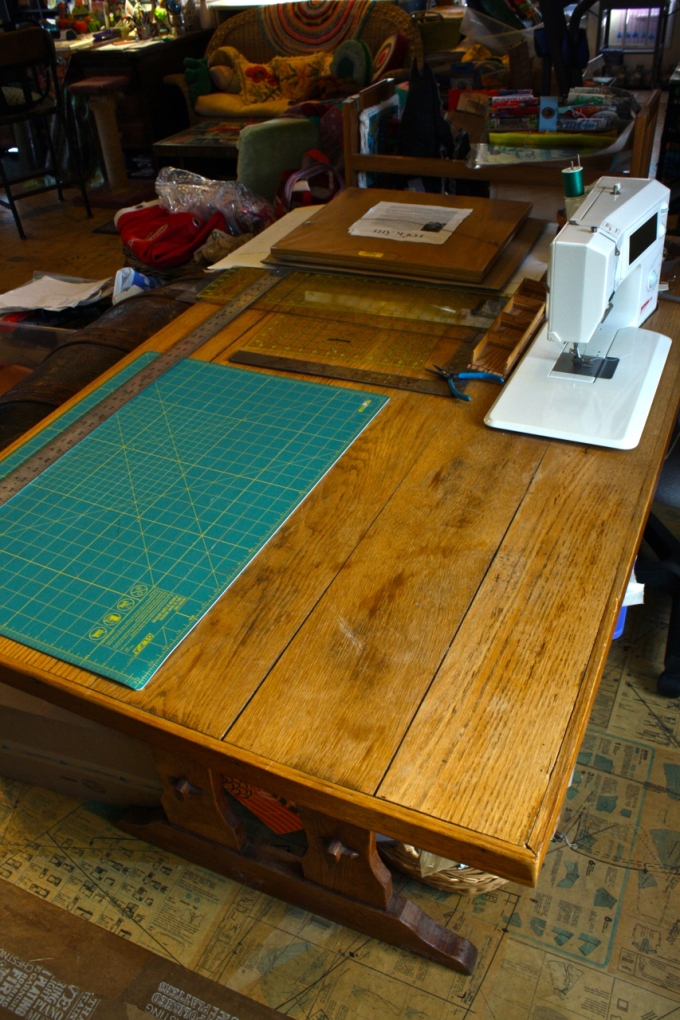
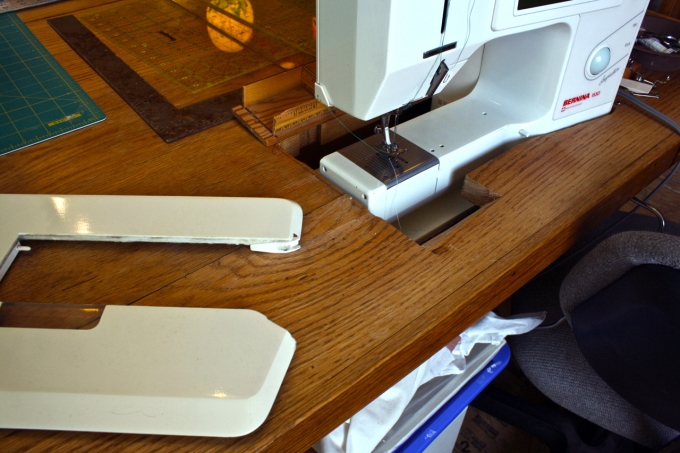
This is a DIY version that for me works pretty well. I like the look and feel of this table. It’s sturdy and simple.
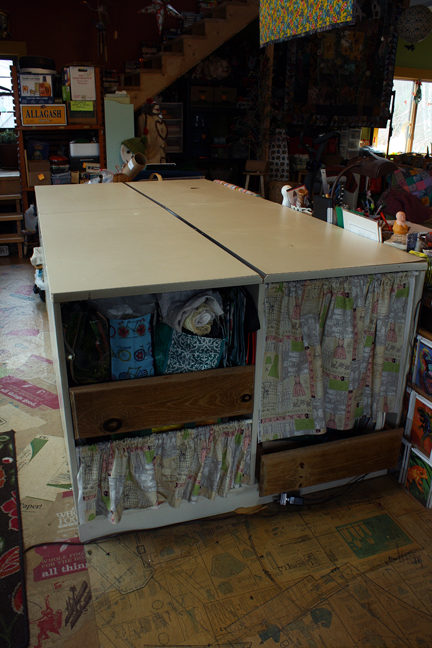
Work Table
I can never have too much storage. I’ll pack every nook and cranny full of stuff. Just ask my husband.

So I was thrilled to acquire my work table. Made in two sections, each is a 4 x 4 foot cube. I got them when a big-box fabric store was going out of business. As you can see, they are open with shelves inside providing ample storage for little-used or especially heavy items.
Desk
I don’t really need a desk, per se. I could make do with some filing cabinets and some shoeboxes if I had to. But when my parents moved and they didn’t have room for my dad’s old desk, I had to give it a home.
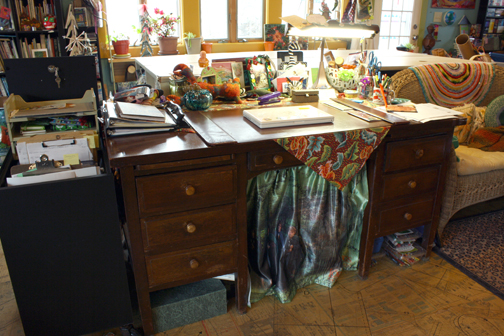
This is the desk my dad had when I was growing up. There is also a wooden swivel chair with white leather padding and big brass upholstery tacks. Not a valuable antique, probably not as useful as a modern computer desk, but special to me.
Floor
My studio was supposed to have a painted tongue and groove wood floor. Thank heavens that didn’t work out. Instead, inspiration struck and I collaged the floor with some of the hundreds of dressmaking patterns I had rescued from being taken to the dump years before at the end of a yard sale. Just knew they’d be handy sometime (see why I need extra storage?).
Using a water and white glue mixture, I (and Tom) soaked the instructions and laid them down. After the floor was covered I added the tissue-paper patterns directly on top so the instructions show through.
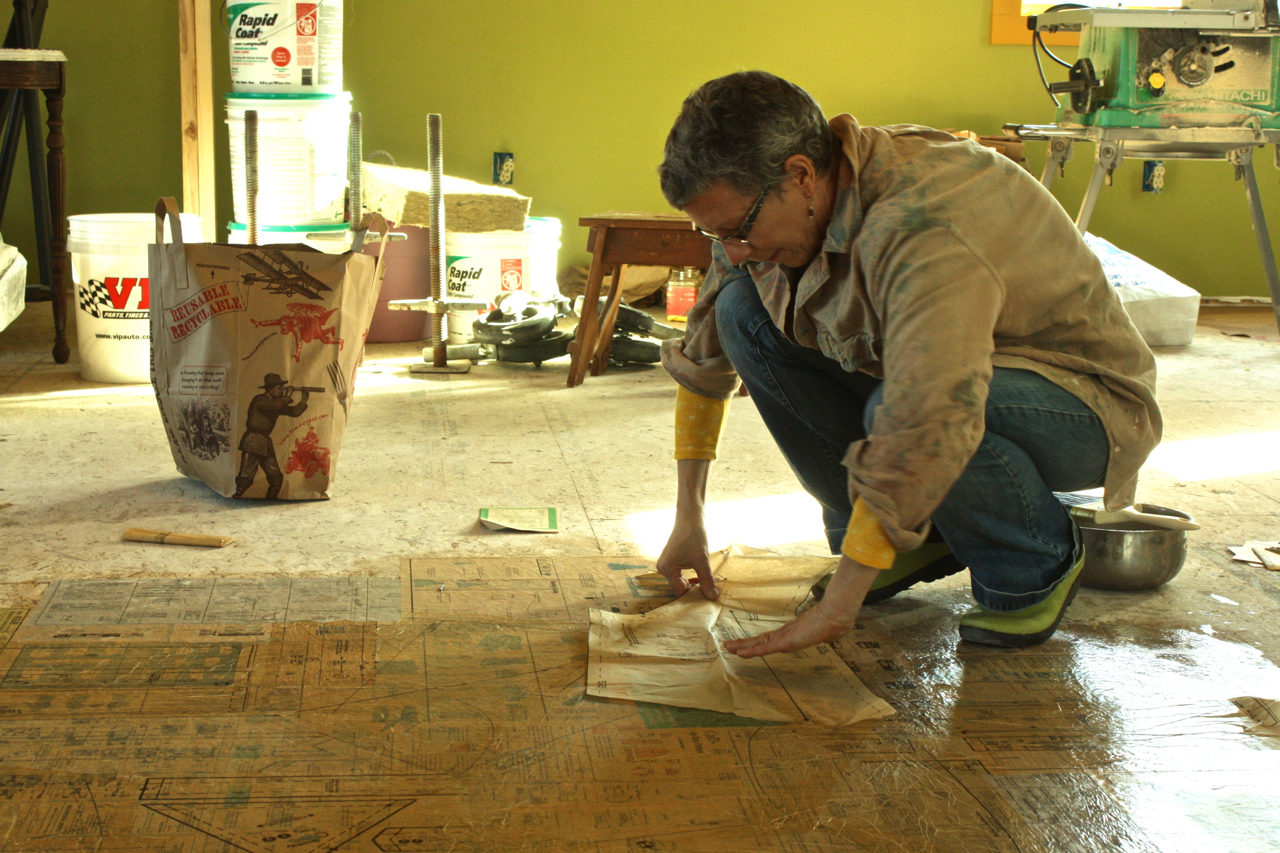
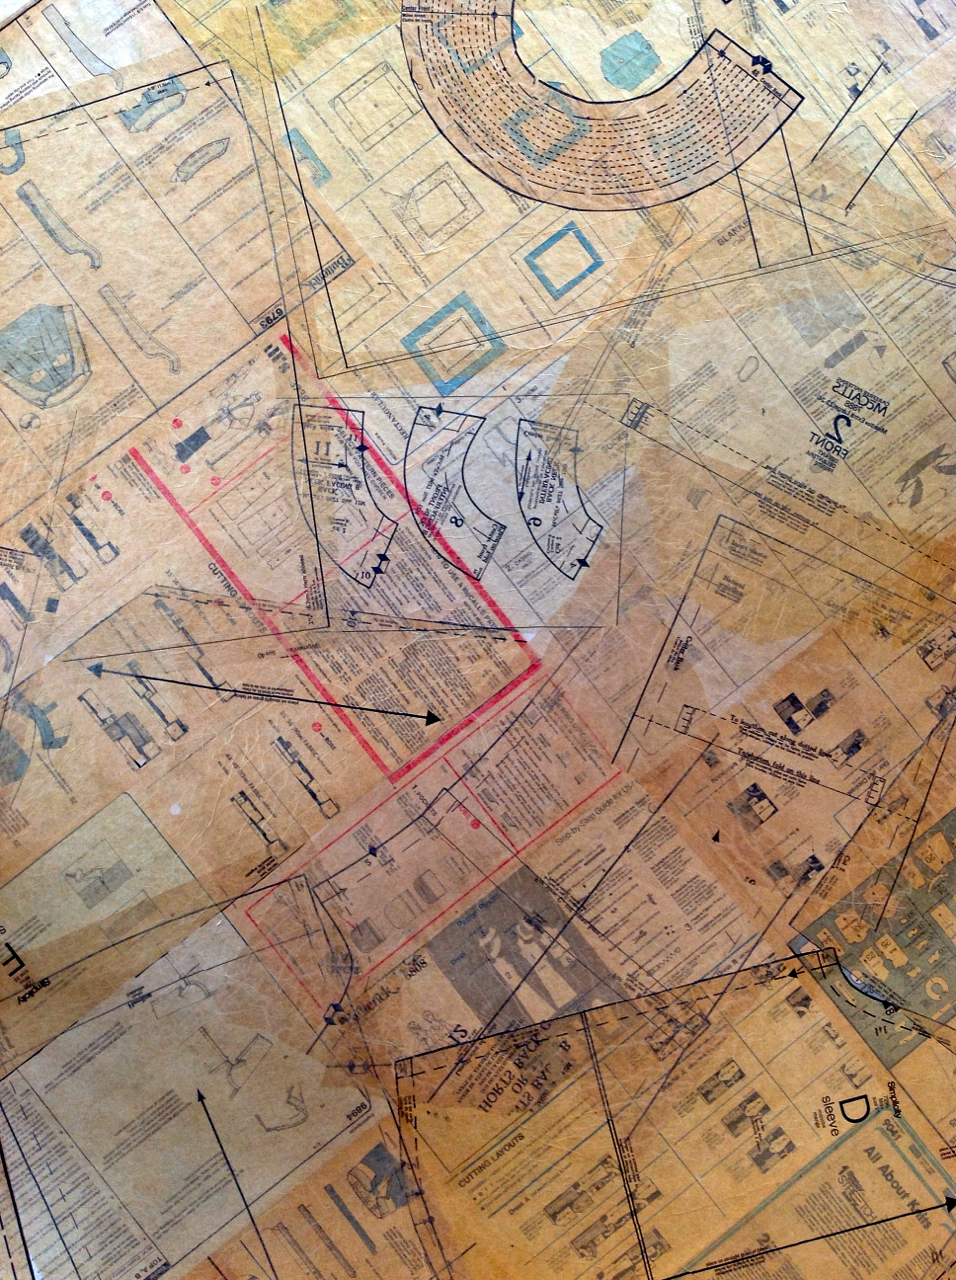
After the floor was covered, I sealed it all with a few coats of polyurethane.
It’s in the Details
So those are just some of the things that I especially appreciate about my studio. Those and the seven different colors of paint I chose to use on the walls, window frames, and ceiling. Let me tell you, Tom loved that idea.
When I’m off on my teaching adventures I meet lovely people and truly enjoy the camaraderie of the quilting world. It’s a creative vocation that I’m quite grateful for. But the time I spend being creative for others needs to be balanced by the time I spend being creative for myself in my studio.
It’s not the most extravagant or well organized space, but when I walk into it in the morning, or return to it after travels, I feel good, even nurtured. I pause, pick up my cat, and we both start to purr.
What do you like about your studio or creative space? What don’t you like? How does your space affect your creativity? Be sure to share your thoughts in the comments.
The pattern-floor! I have always been curious about the flooring. Thanks for the description of how you got that dressmaker pattern design there. As ingenious as one of the crocodile/rhinoceros/stork/beetle/fish creatures. But no surprise.
You have a great space for creating!
When you constructed the pinning wall, where did you find the large styrafoam panels and did you cover them with felt?
Great article, Susan. I’m in the midst of deconstructing and reconstructing my studio these days….so appreciated you walking through the areas and how they are used. Today I have to pack up everything in preparation for painters…ugh..but I’m ready to change things up and re organize!
Also, I just LOVED seeing your studio when I came to Harpswell for your class..it was the highlight of the trip!
Thanks for sharing!!
What a fun video!
How I loved this blog….so real. I following some sewing room posts on Facebook but some are so antiseptic and perfect that I just cannot relate. I love that you can SEE and FEEL you working in your space….it’s REAL! I live in a third floor condo that faces northwest (mainly north) so love the light from my big window, plus a lovely tree right outside that changes colour season to season and attracts birds. It’s not a big space, but it is enough space and it has nudged me into creatively using every inch of floor and wall space.
And congrats on your winning of the blog award!!! Well deserved!!
I agree with Arlene, your space is REAL. It’s got personality and of course all those wonderful quilts come out of this fun space that is a reflection of you! Thanks for sharing it with us. I dream about a dedicated studio….
Susan
Once again you ROCK IT! I have been wanting to create my own studio…getting these ideas from you and feedback before I even begin is so helpful and thoughtful of you. Thank you. Thank you. Thank you. We love you for all you do and share. Cheers from France (at the moment).
I love your studio, Susan. It’s warm and inviting, organized enough to find things but not so organized that it kills creativity. It’s perfect.
What do I love about my studio? Being in the daylight basement (with a door to the outside!), I love the light I get through 4 full sized windows. Since discovering Neodymium magnets, I love the lally column that goes from floor to ceiling and supports the first floor of the house. Initially I thought the column was cumbersome and in the way. Then I discovered the most magnificent magnets and that column, against which my ironing board is situated, holds all of my useful tools that I use at the ironing board-little snipping scissors, paper scissors, shears, a can of pens and pencils, tv and iPod dock remotes, assorted tools that I use for sewing and shipping-because it turns out that my ironing board is the perfect shipping table. John put up strips of galvanized steel in different places in the studio so I could use bull clips to hold onto patterns and linings that I need. Another big plate of steel holds already sewn items that need to stay flat but I don’t want them lying on top of each other. Magnets. They are studio life changing for me.
My space is an 8’x10’ bedroom, which I transform to meet the demand of whatever I work on.
It holds 5 bookcases (2in the closet), a 4ft hp t520 design jet printer, rubber stamp and fabric collections, light box, printer paper, teaching supplies, part of my paperweight collection, desktop printer, files, desk and chair. It is always on the edge, but I always feel peace when I enter.