
A little over two months ago I posted the first installment of a quilt I’m working on this year, a portrait of my son Sam, at age 23—as a blue crescent moon. This quilt follows two others: Sam at age 3—as a T-Rex, and Sam at age 13—as John Lennon. If you’re following the pattern, the plan is to create a new portrait of Sam in 10 years—who know what he’ll be then! A Sam quilt every decade just kinda happened. To read about that history, check out this post from June 13, 2020—In Progress Part 1: The Third Fabric Collage Portrait of My Son Sam.
In last Saturday’s post: Susan Carlson Fabric Collage: What We Did On Our 2020 Summer Vacation, there was a follow-up of the quilt in progress. However, I left a bit of a gap between the two posts—how the universe background came about! When Part 1 ended, I left you with a way-to-busy spiral overpowering the moon and earth (the cut-away spiral can be seen draped over a pinning board to the right of the photo above). When the quilt continued in the Summer Vacation post, there was a universe of stars and planets where the spiral had been.
No doubt you were quite confused and left scratching your heads.
Right. I’m sure that slip in continuity was foremost in your minds. It took a week for me to realize it myself. I think it slipped by me because we covered that major decision-making process of a background for this quilt in the Thursday Night in My Studio Live! series of four presentations that was all about backgrounds.
So this week’s Part 2 post will begin at the background.
Background
When stuck on what fabric to choose for a background, a good exercise is to cut the subject off the foundation fabric in order to better audition possibilities. That way, you can see exactly how it will look, and that’s what I did, below. In this case, you could say I have two subjects—the moon and earth.
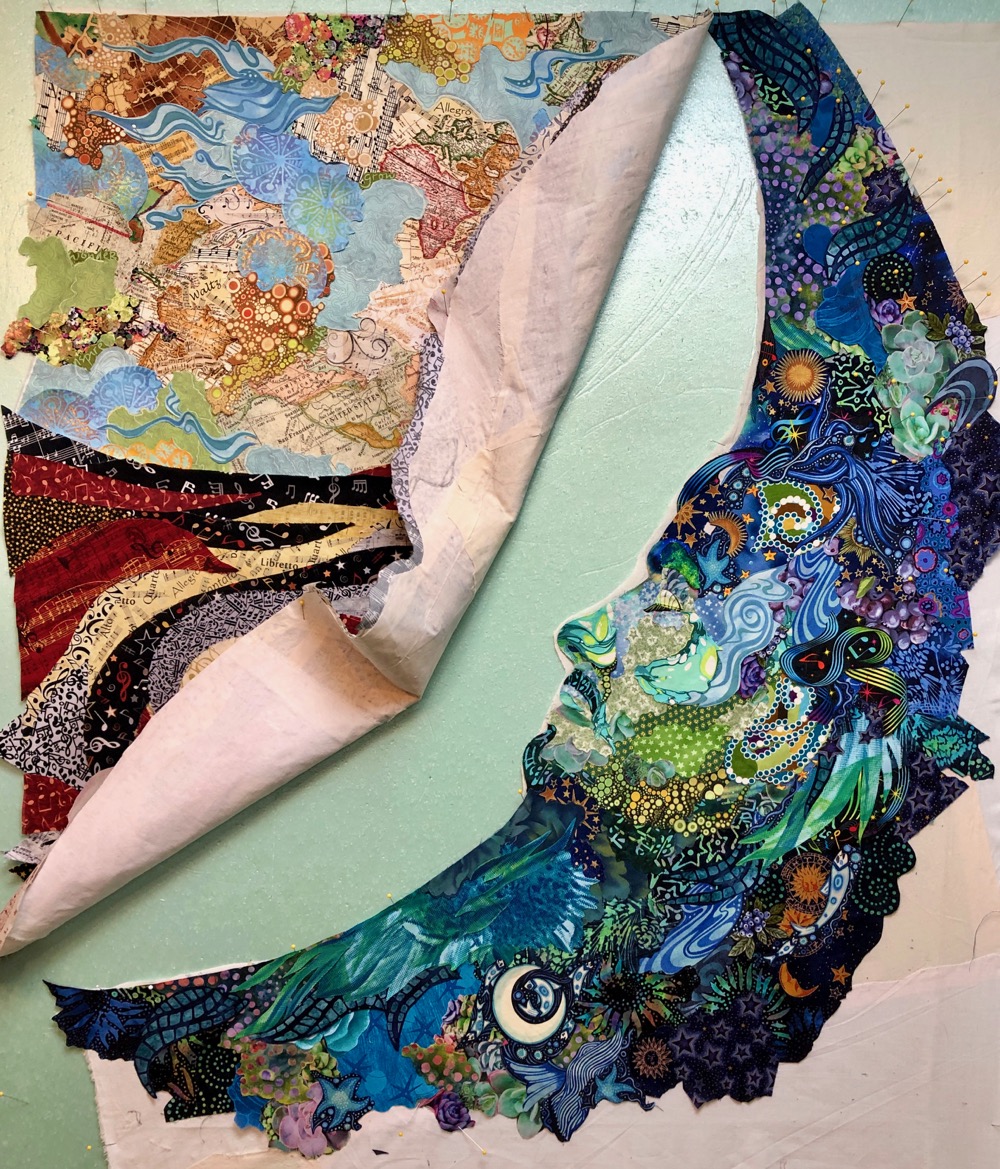
One of the uses I really appreciate my funny-looking “pelican-billed” embroidery scissors for, is cutting away foundation fabric (below). The flat blade slips nicely between my collage and the foundation fabric, “shielding” the collaged fabric pieces from the cutting blades. To see videos on the three major ways I use these scissors, check out this post: Running with Pelicans: Scissors for Fabric Collage.


Now the collaged moon and earth are free from the background foundation fabric, and from each other—a clean slate (below).


In the Thursday Night in My Studio Live! presentations, I auditioned one background after another behind the celestial images, in a different slideshow each week. Week one took the simplest approach, a solid piece of fabric. The two options above, were Sam’s favorites among those I tried. I definitely wanted his feed-back and input for this portrait quilt.
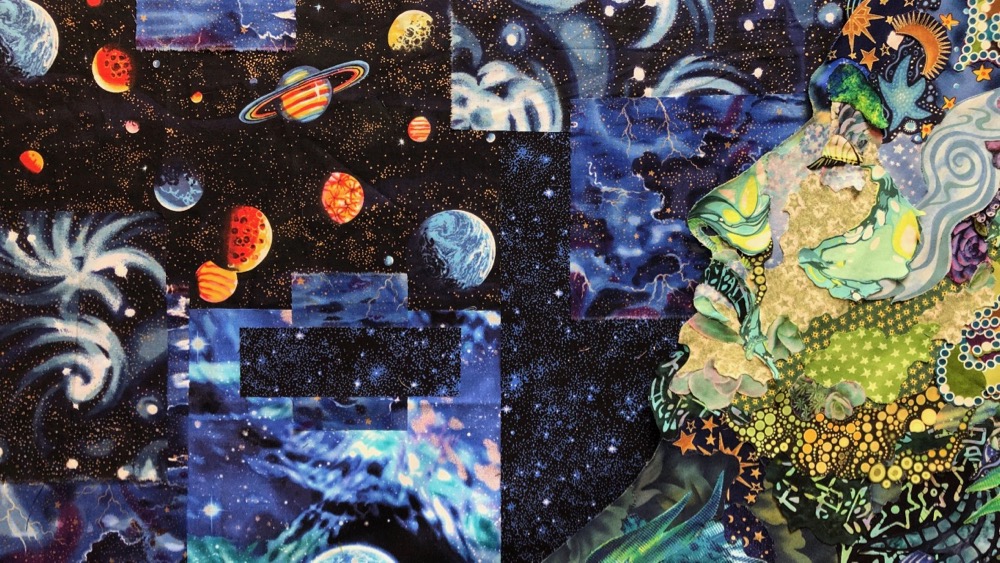
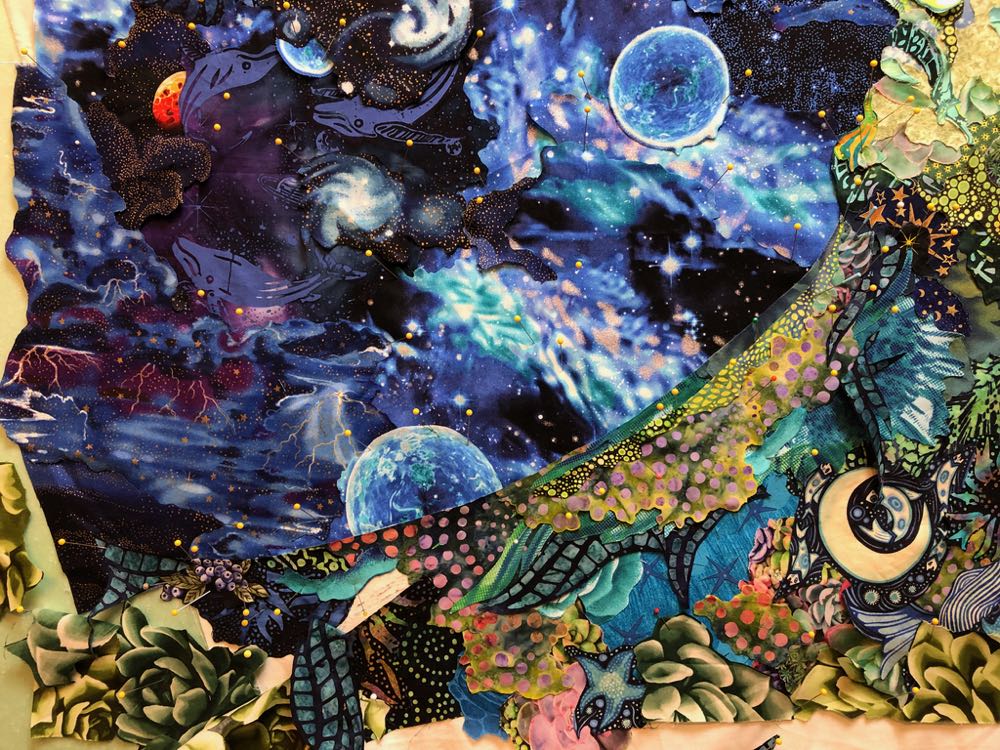
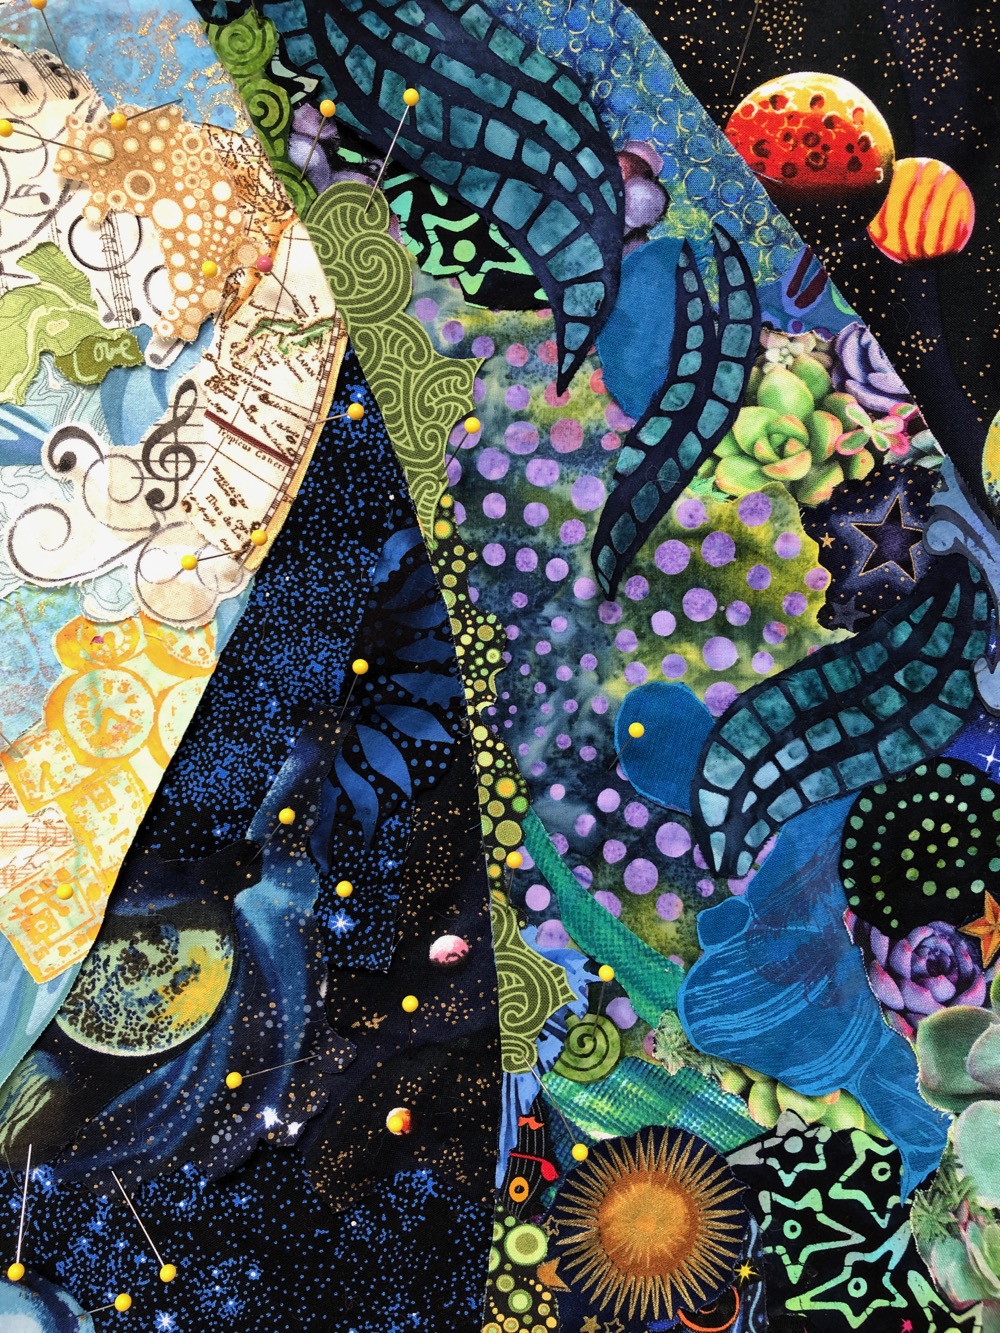
Sam really liked the idea of “universe” fabrics (I had auditioned some batiks and hand-dyes as well). For the second Thursday Night presentation, I demonstrated the assembly of a straight-edged collage background. The detail photo below, is from that slideshow. Here, I added more variety to the star and space prints—some of the fabrics I’m pretty sure have been in my stash since before Sam was even born. I cut strips, squares, and rectangles with a rotary cutter, then arranged and rearranged them as if I was creating a grid-based quilt. When I got it where I liked, the shapes and layers were pinned, then glued together (not machine pieced).
That’s the background, Sam told me.
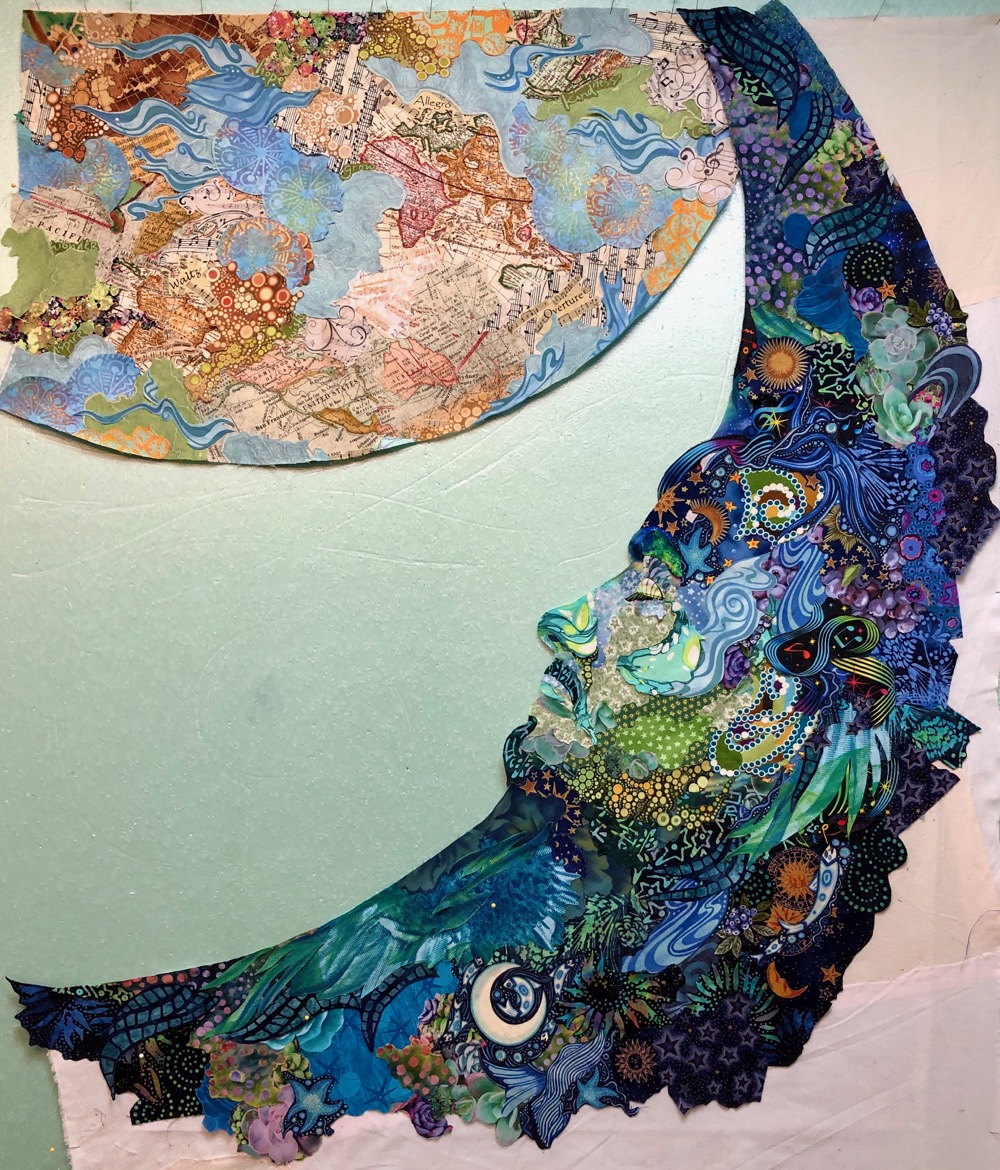
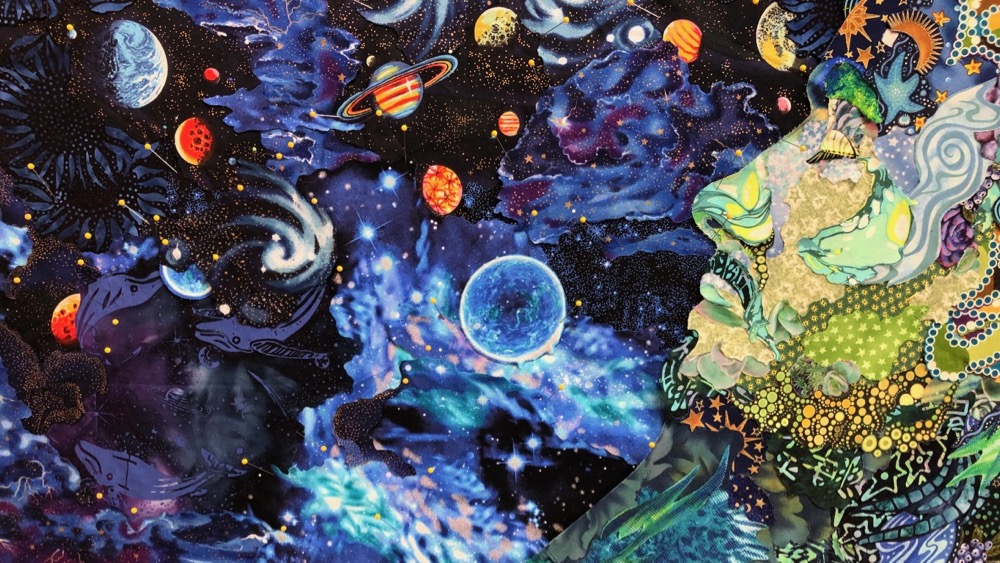
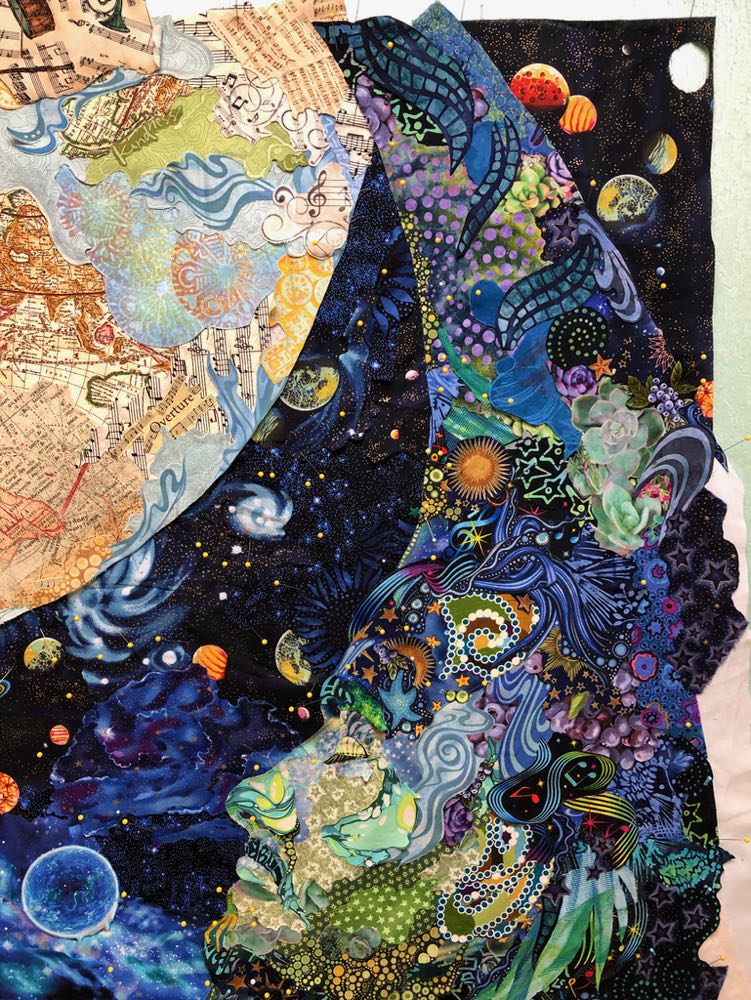
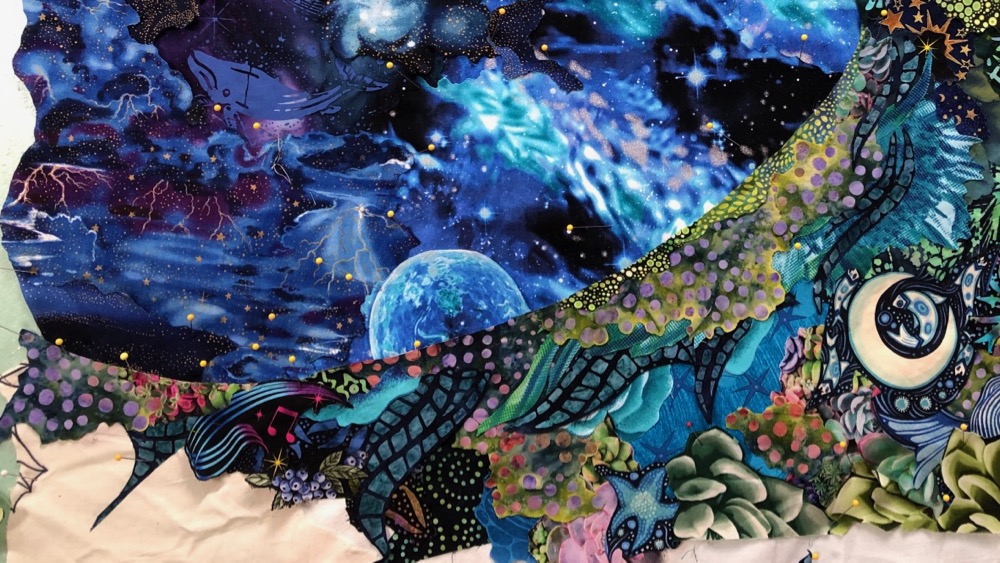
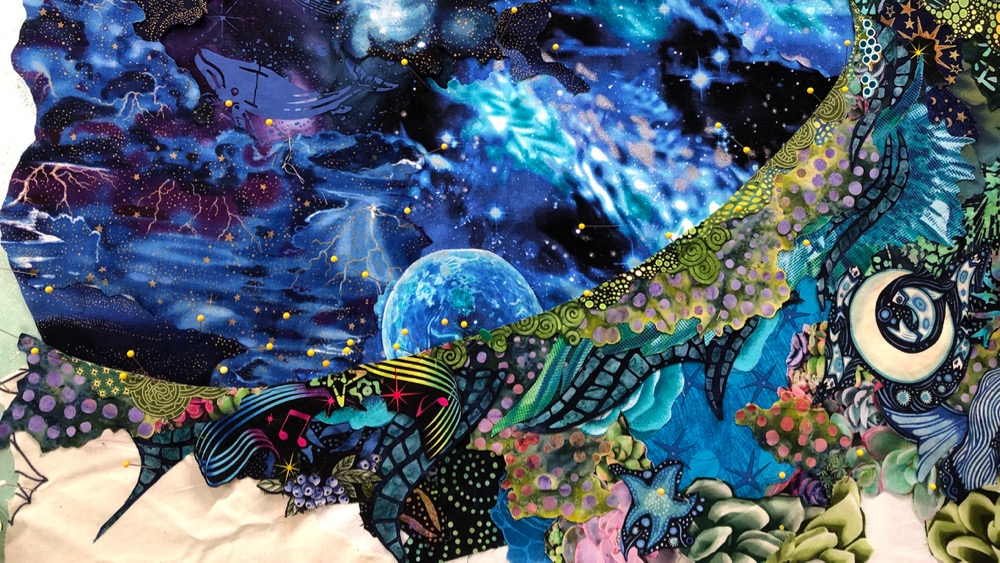
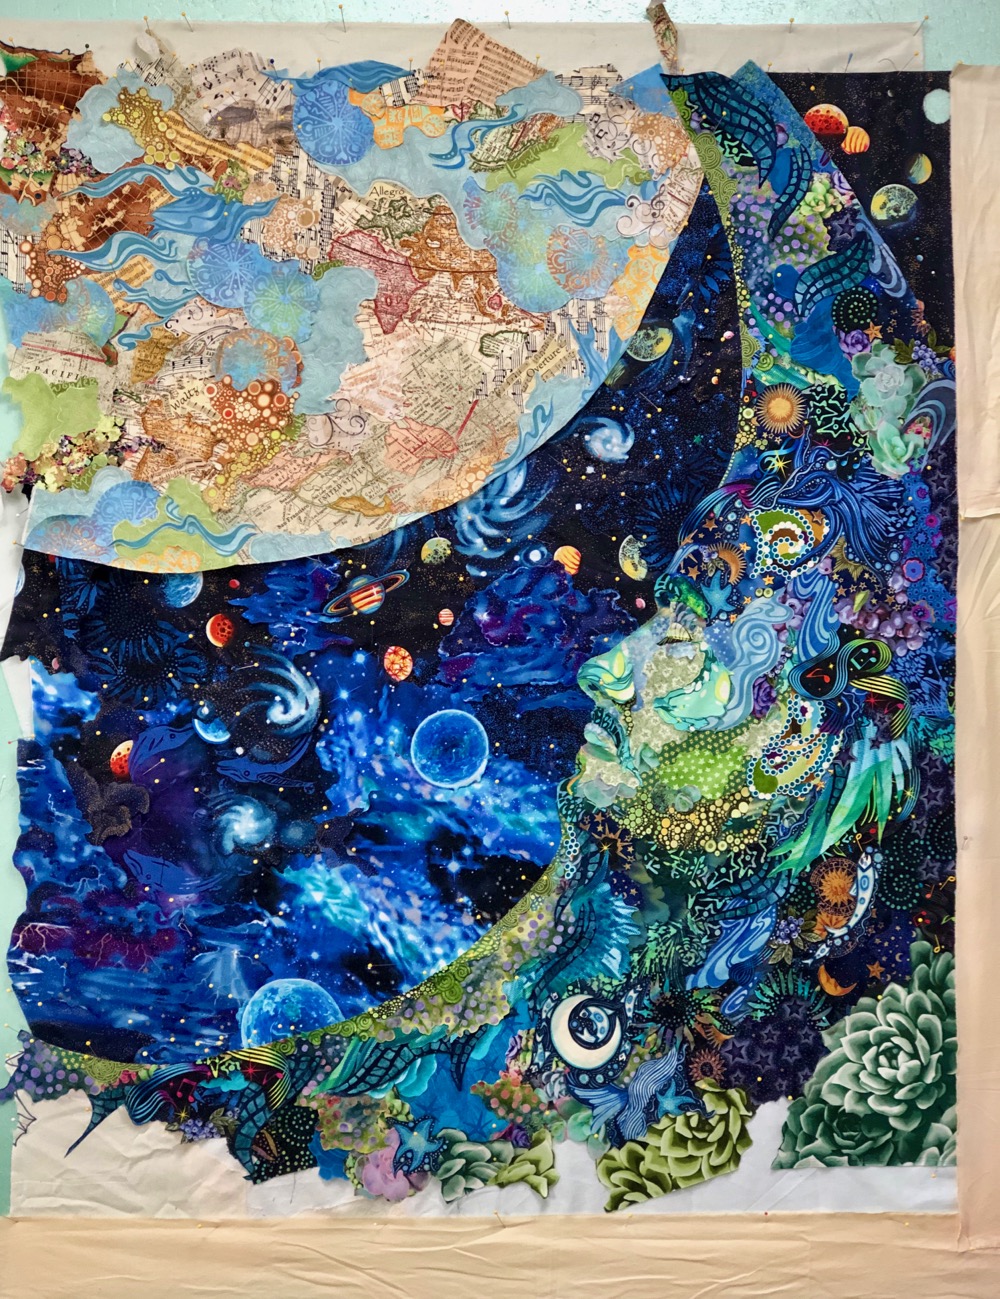
Until the next week when he saw the one below. And that’s the one that stuck as his choice for this quilt—an irregular-edged collage background.
Cutting the fabric shapes with irregular edges—using the prints in the fabrics as guides to cut against—create edges that merge and blend together in ways that straight-cut edges don’t. It’s the approach I most often take for a background, but it really depends on the subject and the story the quilt tells—I’ve used all of these three ways to construct backgrounds.
The Second Draft
Once a collage has the first layer of fabrics glued down—subject and background—I consider the first draft to be complete. I wrote about how I work in drafts; first, second, and third, and how I use that idea when teaching a class in this blog post: “Bird by Bird”: How I Use a Book on Writing to Teach Fabric Collage.
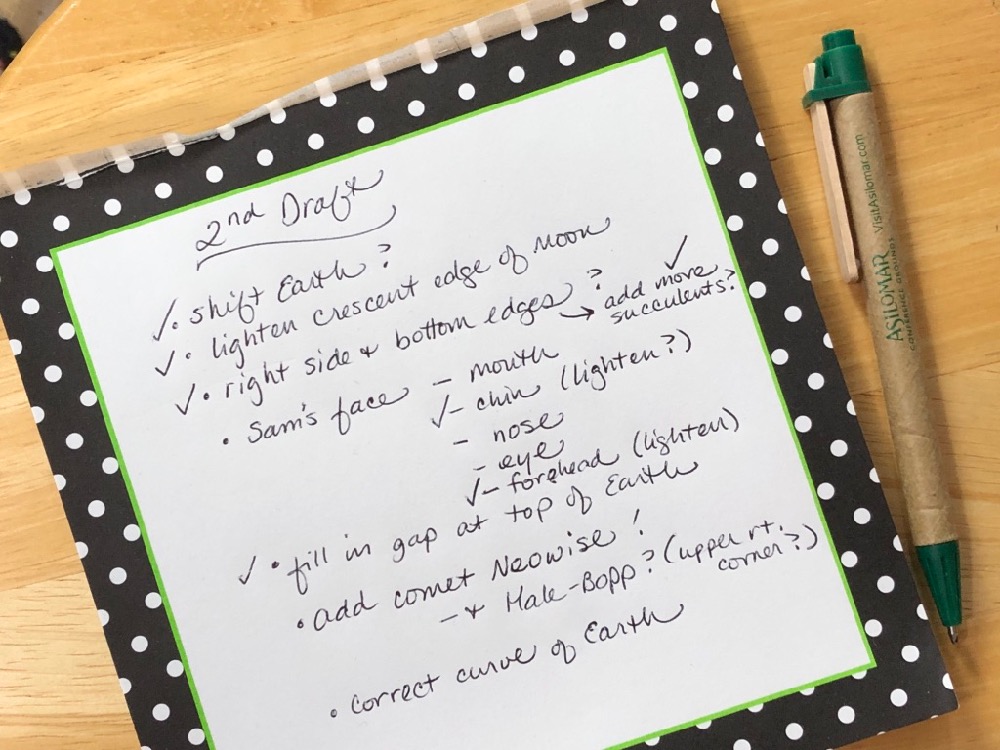
Since thoughts and ideas come and go, I find it handy to make lists. The one above is to keep me on track for the second draft of this quilt, as I also try to keep up with other projects and commitments. This way I can easily pick a short or longer task, based on the time I have available. And it’s so satisfying to check something off, isn’t it?
The rest of this particular section is lifted photo by photo and word for word from last week’s Vacation post, but it needs to be included here for sequence purposes of “Blue Moon Sam.” If you have read that blog post, you can skip ahead to the next section titled “More of the Second Draft.” If you want a refresher, here it is.


One small but important change I made recently was in the positioning of the three main elements—the moon (Sam), the earth, and the universe behind them. Specifically I tilted the earth down and to the left (photos above)—it’s not a big thing, but now I’m much happier the way the earth and moon overlap at the top. Best to get those things sorted out earlier rather than later. The new tilt of the earth created a gap on the top edge, quickly filled with fabric scraps from the making of the earth—fine-tuning can come later.
Next, I wanted to better define the moon’s edge against the universe, which became way to close in color and value as the universe came together in the first draft. That’s ok, fabric collage sometimes evolves like that, and there’s always a solution.
Since Sam’s face itself looked fine against the universe background, I just needed to bring some of those lighter and greener fabrics onto the crescent edge of the moon—as I did in the detail of the top curve of the moon, below.
Sometimes when you stare at something long enough, you figure out what you didn’t even realize bothered you—the curve of the lower part of the crescent. In the photo below, I’ve placed a line of lighter-valued moon fabric to create a new edge, to see if my hunch was correct.
When I squinted my eyes to see how that new lighter edge looked, I did like the curve better, it made just a little more of a “scoop” that matched the upper curve. So then I glued those new shapes in place and trimmed the crescent edge to match, below.

And finally, I figured it was time to think about how big this collage was going to get. The elements were in place, but how far they would extend to the edges was still a bit sketchy. I added some more moon fabric scraps to even up the edge on the right, and tidied up the succulent garden on the bottom (read this blog post for the succulent explanation).
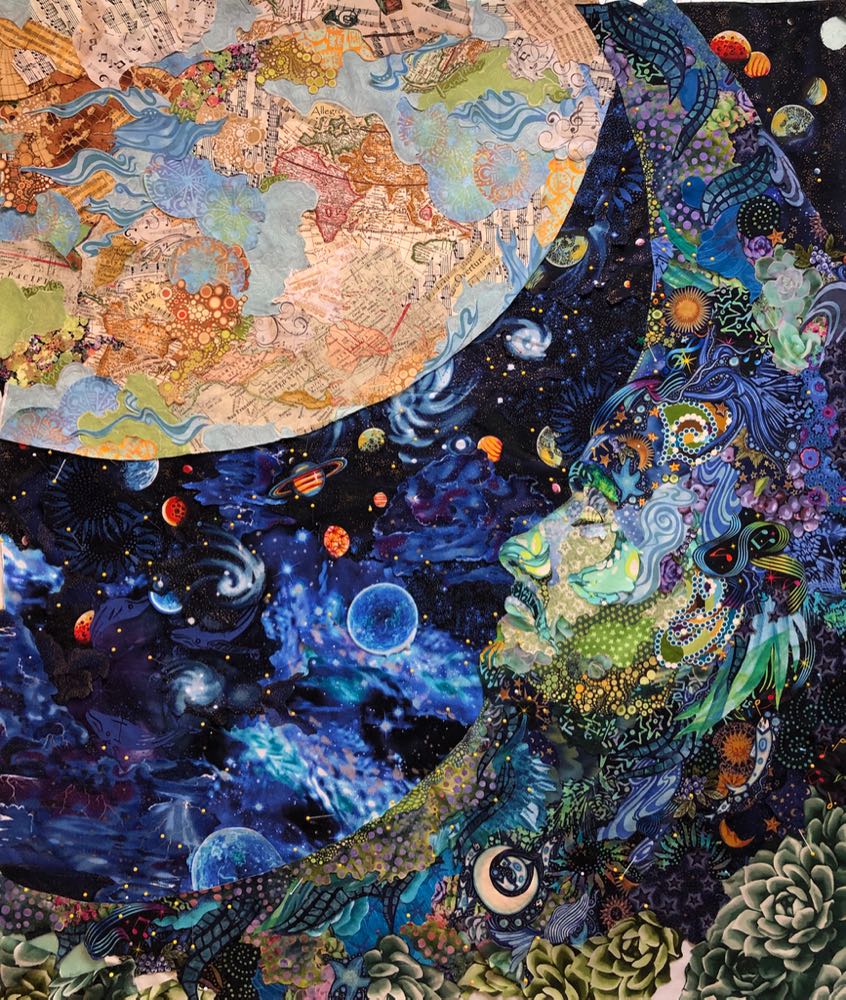
Below is the current image, cropped—not a huge difference from a few weeks ago, but I feel I figured out where I need to go now.
More of the Second Draft
I had a little time this week to get a few more second draft to-do’s checked off.
• Fill in gap at top of earth—check. In photo below left, I rearranged the fabric bits that were temporarily filling the gap created when I shifted the earth last week. In a general way, I kept the lighter valued earth fabrics along the lower edge of the sphere to create the best contrast possible against the dark universe. Darker valued earth fabrics gather toward the edges of the quilt, starting to give the earth the illusion of volume and form, with more to add in the third draft.
In draft two, I still have to smooth out the curve of the earth.


• Right sides and bottom edges?—check. In the photo upper right, the cropped photo neatens things up so I can gauge better how far (or not) I may want to extend the quilt. I like where it’s at on sides and top. However, as it is, the composition looks a bit top-heavy. I’m going to extend the collage on the bottom and see how it looks.
• Add more succulents?—check. Well, I decided that I do want to add more of the succulent printed fabric at the bottom, I just haven’t gotten there yet.
• Lighten crescent edge of moon—check and check again. After I lightened that edge last week (above), I felt it could use a little more value change this week (below). I also re-discovered a couple prints I wanted to use in this piece, but hadn’t yet—the green spirals—one is a batik, and one is a Maori print, both collected on a family trip to New Zealand in 2007. Sam was 9 years old, but he still remembers that adventure. Anyway, those prints worked great.
They worked so nicely, I added them to the upper edge of the crescent as well, in photo below.
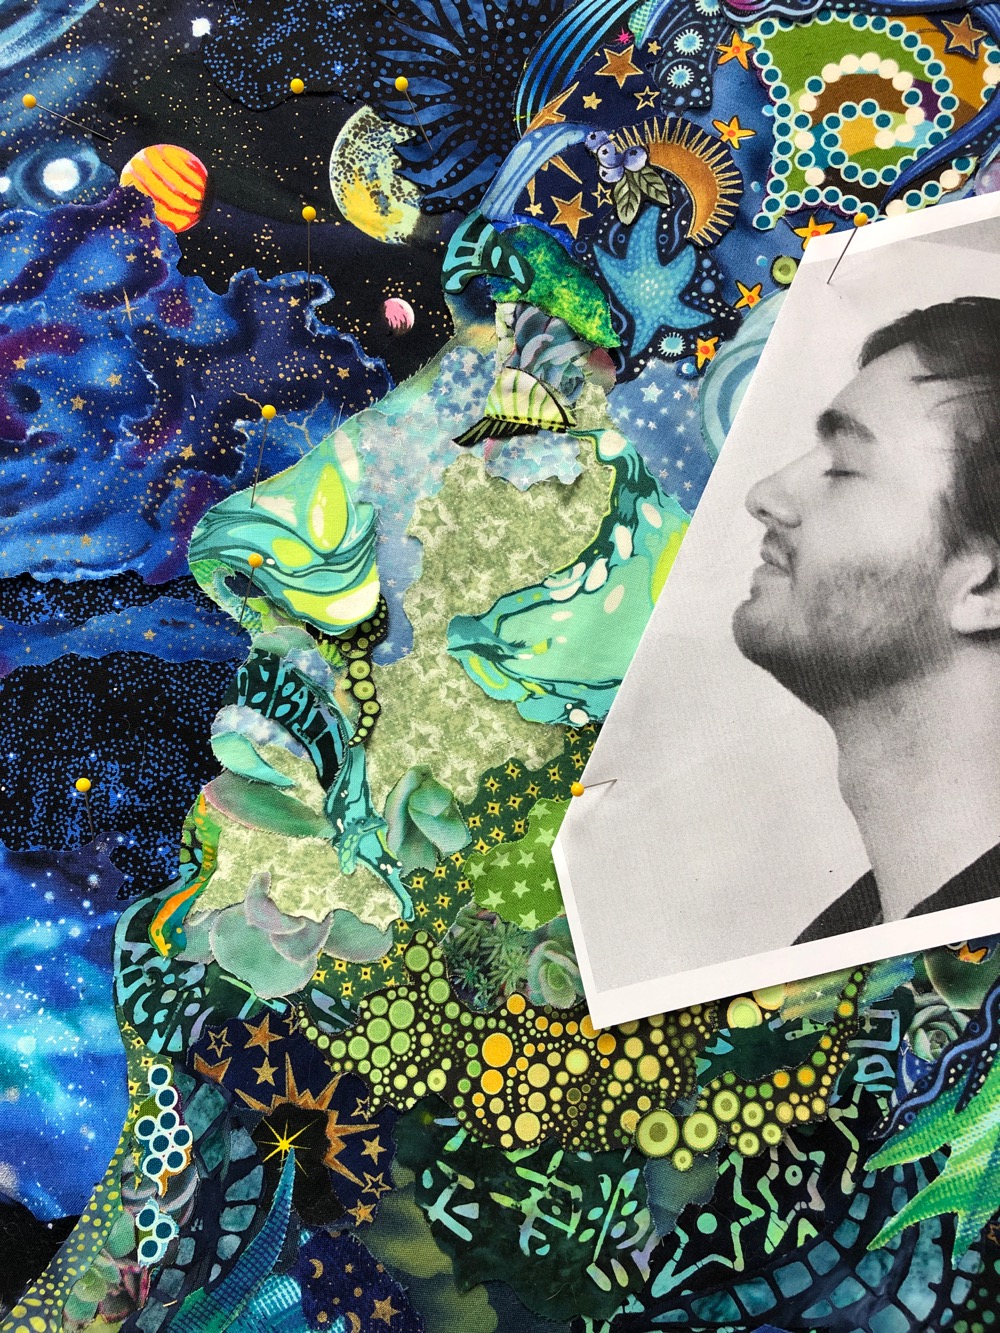
• Sam’s face—forehead (lighten)—check. This was a quick and easy one. The photo below left, shows the “before.” Note his eyebrow and forehead, both are darker blue and blend into the background. In the “after” photo below right, a couple of scraps add lighter edges to his face and give the separation needed.


For the second draft, I keep a print-out of Sam’s profile photo (above) pinned close to refer to as I work on the checklist.
•Sam’s face—chin (lighten?)—check. In both photos above, you can see how Sam’s chin also blends into the background. First I tried some lines from a sunflower batik to accent his chin (below left). I liked the curves, but the yellow “petals” were too overpowering for his darker whiskers.
I went back to the “beard batik” I had used originally and fussy-cut a small piece of fabric that had a curved line to match the outward curve of his chin. Essentially this outlines his chin, but in a way that blends with what’s already there. I also left one of the yellow petals, for now.


In above right and below photos, you can see a few more additions I made under and above the chin.
And that finishes my week, but not the second draft. More to come, of course.
Your Support Keeps Us Going—Week In, Week Out
This blog has been and always will be free. The information contained in the blog covers all aspects of fabric collage. For those who can’t afford to purchase an eWorkshop or even my book, this blog can get them a long way toward the goal of learning the fabric collage technique.
For those can afford it, we have used Patreon for the past three and a half years as a way for readers to show us their support. Each month they make a monetary contribution, which has helped offset our cost in time to produce this free resource. Support has also made it possible for us to take the time needed to create our line of eWorkshops.
In return, we like to provide incentives to our patrons to show our appreciation. We recently updated those incentives to provide better value for their contributions while making it more efficient (and fun) for us to fulfill our obligations to them. These new rewards will go into effect at the beginning of next month, September, after payments have been processed through Patreon.
The biggest change will be the incorporation of a monthly Zoom meeting with $5 and up supporters. This meeting will be recorded so that those who can’t attend live will be able to review it at their convenience.
Here’s how the new incentives break down according to level of support:
$1/month: My heartfelt thanks.
$2/month: The above, plus a free Susan Carlson quilt “wallpaper” image for your computer or electronic device.
$5/month: The above, plus an invitation to participate as an attendee for a monthly Zoom presentation. At this level participants will be able to ask questions via text.
$10/month: The above, plus a coupon for a free recording of a Thursday Night in My Studio Live! presentation of your choice.
$20/month: The above, plus an invitation to participate as a “panelist” for the monthly Zoom presentation, being able log-in to the Zoom meeting by voice, video, and sharing, with the ability to post photos and ask questions on an in-progress piece—PLUS a $20 discount on a Fabric Collage Coaching session (regular price $100).
Patreon Fabric Collage Master Class Scholarship Challenge
Each month we provide two scholarships or the equivalent value split between three or more people, for the Fabric Collage Online Master Class Manual. We have always provided one scholarship ourselves, then due to the ongoing support of our Patreon contributors we added another.
Now we would like to make a challenge to our followers.
As of today we have 117 monthly Patreon supporters. When we reach our goal of 150 supporters—at any level—we will add another monthly scholarship for the Master Class Manual.
In this way, you can help spread the knowledge and experience of fabric collage to everyone who wants to learn.
PLEASE NOTE: As a Patreon supporter, your credit card will be charged at the beginning of every month, regardless of when you sign up during the month prior. Once we have received notice of payments, usually around the 5th of every month, we will send a notice of that month’s rewards.
As always I love to see these great progress pieces. All the little details that just make the greatest differences. Every time I see these it renews my desire to keep moving forward with my collage pieces. My last piece came together so much easier than the prior collages and all because I can keep getting those tips and advice.
Thank you a Patreon Supporter and love what you and Tom have created as a learning tool.